4 Setting Up Auto Service Request
This chapter explains how to install and configure Auto Service Request for Recovery Appliance. It contains these sections:
Understanding Auto Service Request
Auto Service Request (ASR) is designed to automatically open service requests when specific Recovery Appliance hardware faults occur. ASR detects faults in the most common server components, such as disks, fans, and power supplies, and automatically opens a service request when a fault occurs. ASR monitors only server components and does not detect all possible faults.
ASR is not a replacement for other monitoring mechanisms, such as SMTP and SNMP alerts, within the customer data center. It is a complementary mechanism that expedites and simplifies the delivery of replacement hardware. ASR should not be used for downtime events in high-priority systems. For high-priority events, contact Oracle Support Services directly.
When ASR detects a hardware problem, ASR Manager submits a service request to Oracle Support Services. In many cases, Oracle Support Services can begin work on resolving the issue before the administrator is even aware the problem exists.
An email message is sent to both the My Oracle Support email account and the technical contact for Recovery Appliance to notify them of the creation of the service request.
A service request might not be filed automatically on some occasions. This can happen because of the unreliable nature of the SNMP protocol or a loss of connectivity to ASR Manager. Oracle recommends that you continue to monitor your systems for faults and call Oracle Support Services if you do not receive notice that a service request was filed automatically.
See Also:
-
Oracle Auto Service Request web page at
http://www.oracle.com/technetwork/systems/asr/overview/index.html -
Oracle Auto Service Request user documentation at
http://www.oracle.com/technetwork/systems/asr/documentation/index.html
Getting Ready to Install ASR
Before installing ASR, complete these prerequisites:
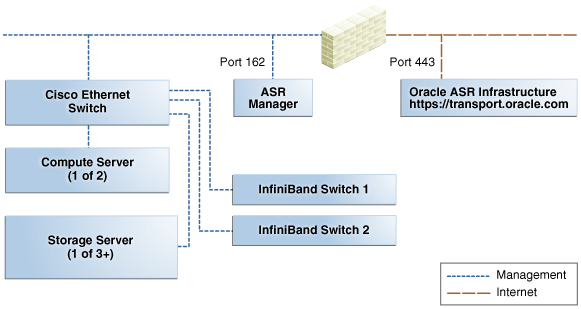
Figure 4-1 shows the network connections between ASR and Recovery Appliance.
Figure 4-1 Auto Service Request Network Connections

Description of "Figure 4-1 Auto Service Request Network Connections"
Installing ASR Manager
To install ASR Manager, download the current version from My Oracle Support Doc ID 1185493.1. Then follow the instructions in the Oracle Auto Service Request Installation and Operations Guide at
http://www.oracle.com/technetwork/systems/asr/documentation/index.html
Verifying the ASR Manager Installation
Perform these checks as root on ASR Manager to ensure that it is installed properly.
-
Ensure that the
asrcommand is in the search path of therootuser. -
Verify that ASR Manager 3.5 or later is running:
asr show_rules_version
-
Check the registration status:
asr show_reg_status
-
Test the connection by sending a test message to the transport server.
asr test_connection
-
Verify the ASR assets:
-
In ASR Manager, verify that ASR is activated:
asr list_asset -iasset_ipIn the preceding command, asset_ip is the IP address of a server or an Oracle ILOM. To list all assets, enter this command:
asr list_asset
-
If no assets are listed, then verify that ASR is configured on Recovery Appliance.
Note:
If an IP address or host name changes, then you must deactivate and reactivate the asset.
-
About the Trap Destinations on Recovery Appliance
ASR is an optional software component of Recovery Appliance. When configuring the software in Oracle Exadata Deployment Assistant, you must complete the page about ASR. Then during the software installation, Recovery Appliance configures the servers to trap the component fault indicators. See "unresolvable-reference.html".
The following are examples of Simple Network Management Protocol (SNMP) traps sent to ASR Manager for disk failures.
**INTERNAL XREF ERROR** shows the SNMP trap for an storage server disk failure. The hardware alert code (HALRT-02001) is underlined.
**INTERNAL XREF ERROR** shows the SNMP trap from a compute server disk failure. The hardware alert code (HALRT-02007)is underlined.
Example 4-1 Example of a Storage Server SNMP Trap
2011-09-07 10:59:54 server1.example.com [UDP: [192.85.884.156]:61945]:
RFC1213-MIB::sysUpTime.0 = Timeticks: (52455631) 6 days, 1:42:36.31
SNMPv2-SMI::snmpModules.1.1.4.1.0 = OID: SUN-HW-TRAP-MIB::sunHwTrapHardDriveFault
SUN-HW-TRAP-MIB::sunHwTrapSystemIdentifier = STRING: Sun Oracle Database Machine
1007AK215C
SUN-HW-TRAP-MIB::sunHwTrapChassisId = STRING: 0921XFG004
SUN-HW-TRAP-MIB::sunHwTrapProductName = STRING: SUN FIRE X4270 M2 SERVER
SUN-HW-TRAP-MIB::sunHwTrapSuspectComponentName = STRING: SEAGATE ST32000SSSUN2.0T;
Slot: 0SUN-HW-TRAP-MIB::sunHwTrapFaultClass = STRING: NULL
SUN-HW-TRAP-MIB::sunHwTrapFaultCertainty = INTEGER: 0
SUN-HW-TRAP-MIB::sunHwTrapFaultMessageID = STRING: HALRT-02001
SUN-HW-TRAP-MIB::sunHwTrapFaultUUID = STRING: acb0a175-70b8-435f-9622-38a9a55ee8d3
SUN-HW-TRAP-MIB::sunHwTrapAssocObjectId = OID: SNMPv2-SMI::zeroDotZero
SUN-HW-TRAP-MIB::sunHwTrapAdditionalInfo = STRING: Exadata Storage Server:
cellname  Disk Serial Number:   E06S8K
server1.example.com failure trap.
Example 4-2 Example of Oracle Database Server SNMP Trap
2011-09-09 10:59:54 dbserv01.example.com [UDP: [192.22.645.342]:61945]:
RFC1213-MIB::sysUpTime.0 = Timeticks: (52455631) 6 days, 1:42:36.31
SNMPv2-SMI::snmpModules.1.1.4.1.0 = OID: SUN-HW-TRAP-MIB::sunHwTrapHardDriveFault
SUN-HW-TRAP-MIB::sunHwTrapSystemIdentifier = STRING: Sun Oracle Database Machine
1007AK215C
SUN-HW-TRAP-MIB::sunHwTrapChassisId = STRING: 0921XFG004
SUN-HW-TRAP-MIB::sunHwTrapProductName = STRING: SUN FIRE X4170 M2 SERVER
SUN-HW-TRAP-MIB::sunHwTrapSuspectComponentName = STRING: HITACHI H103030SCSUN300G
Slot: 0SUN-HW-TRAP-MIB::sunHwTrapFaultClass = STRING: NULL
SUN-HW-TRAP-MIB::sunHwTrapFaultCertainty = INTEGER: 0
SUN-HW-TRAP-MIB::sunHwTrapFaultMessageID = STRING: HALRT-02007
SUN-HW-TRAP-MIB::sunHwTrapFaultUUID = STRING: acb0a175-70b8-435f-9622-38a9a55ee8d3
SUN-HW-TRAP-MIB::sunHwTrapAssocObjectId = OID: SNMPv2-SMI::zeroDotZero
SUN-HW-TRAP-MIB::sunHwTrapAdditionalInfo = STRING: Exadata Database Server: db03
Disk Serial Number: HITACHI H103030SCSUN300GA2A81019GGDE5E
dbserv01.example.com failure trap.
Troubleshooting ASR
For troubleshooting procedures for the ASR software, see Chapter 5 of the Oracle ASR Installation and Operations Guide at:
http://www.oracle.com/technetwork/systems/asr/documentation/index.html
If you continue to have issues, contact ASR support.