Install a Processor

  • Use ESD gloves (not latex or vinyl), if possible, when handling the processor.

  • Obtain a torque driver set to 12 in-lb (inch-pound) (1.35 Nm/13.5 kg-cm) force with T20 Torx bit for processor and heatsink installation.

  • Be careful not to touch the processor socket pins.

    Caution:

    The processor socket pins are very fragile. A light touch can bend the processor socket pins beyond repair.
  • If you are replacing a processor, ensure that the replacement processor is identical to the processor that was removed. For a list of supported processors, see Product Description.
  1. Attach an antistatic wrist strap to your wrist, and then to a metal area on the chassis.

    See Take Antistatic Measures.

  2. Open the new processor package.

    Ensure that the replacement processor is identical to the processor that was removed.

    The processor is preinstalled on the processor carrier.

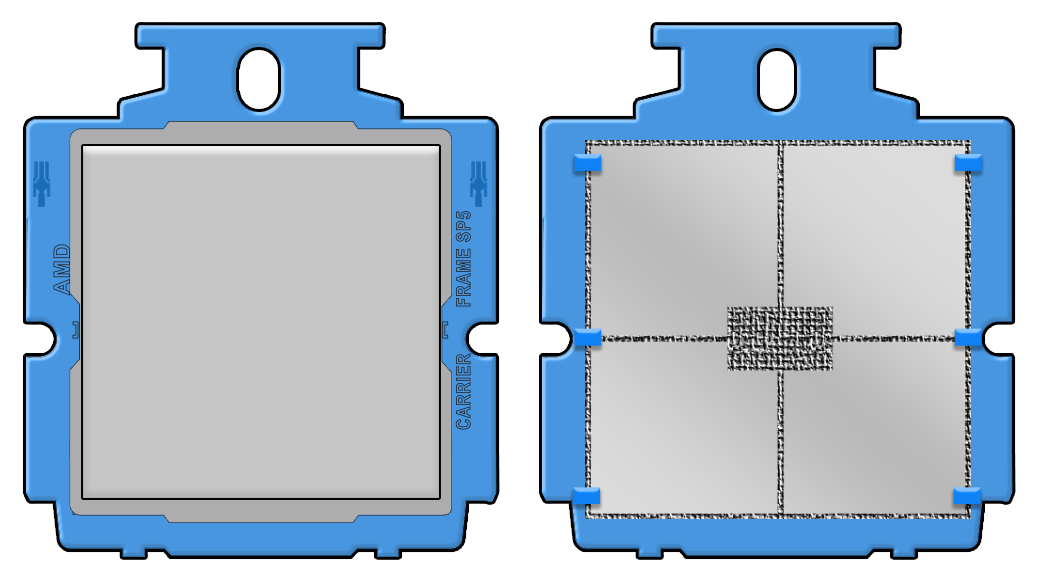
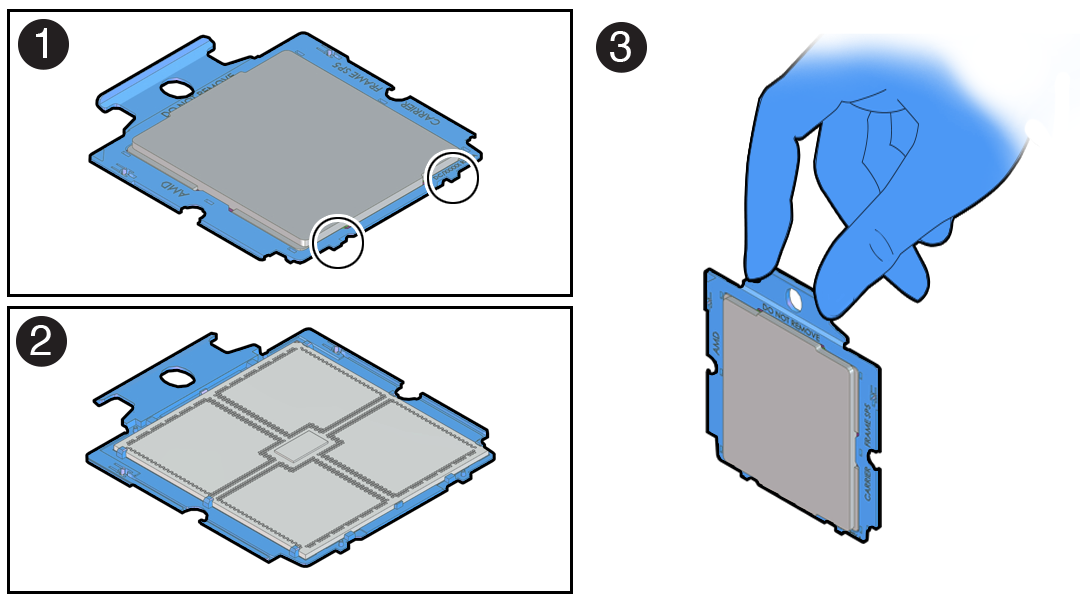
    Figure showing the processor package.

    Note the orientation and correct handling of the processor package.

    Figure showing the use of the handle of the processor package.
    Callout Description

    1

    Top of processor carrier (insertion tabs are circled)

    2

    Bottom of processor carrier (contacts the socket)

    3

    Use of the processor carrier handle

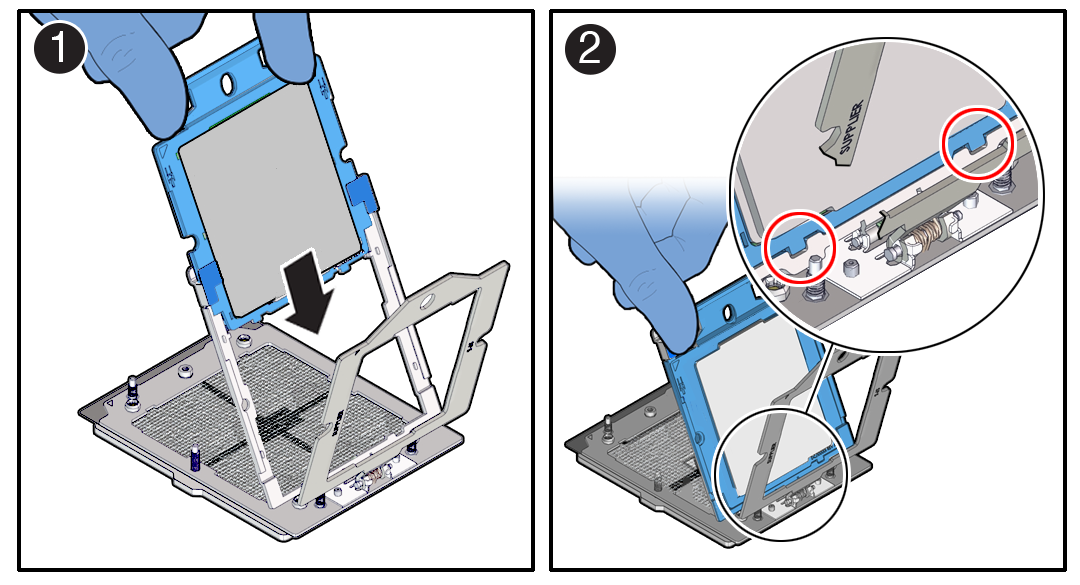
  3. Holding the processor carrier by its handle [1], slide it into the Rail Frame. Ensure the two insertion tabs at the bottom of the processor carrier are inserted into the slots in the Rail Frame [2].
    Figure showing the processor being inserted into the Rail Frame.
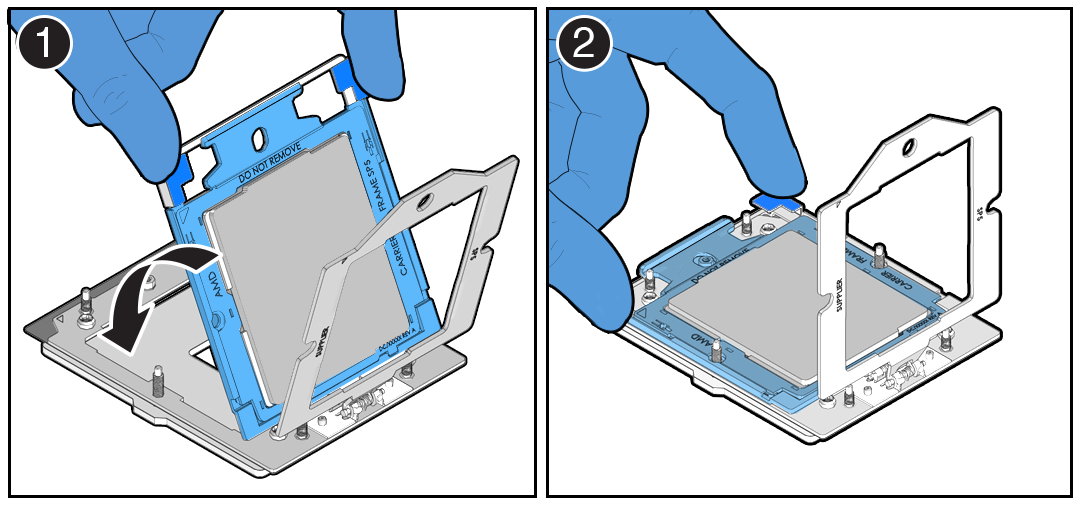
  4. Grasping the Rail Frame edge [1], rotate the Rail Frame to the closed position [2].
    Figure showing how to close the processor Rail Frame.
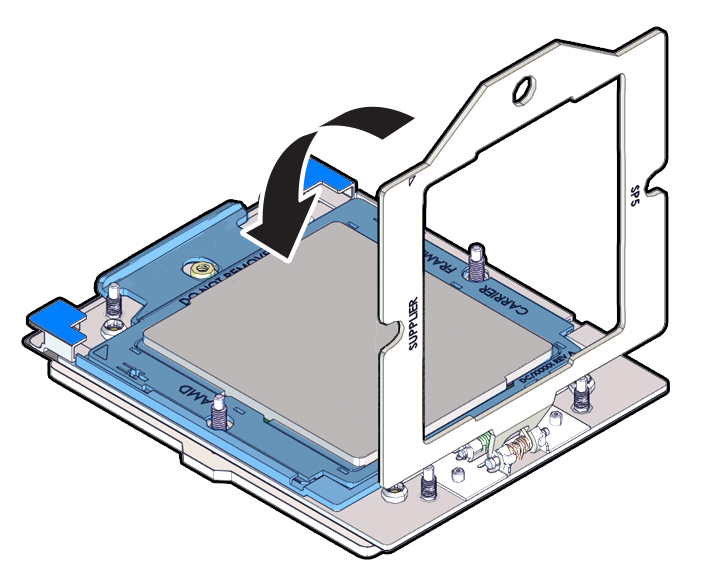
  5. Rotate the Force Frame to its closed position on the socket stiffener frame.
    Figure showing the Force Frame being lowered onto the socket stiffener frame.
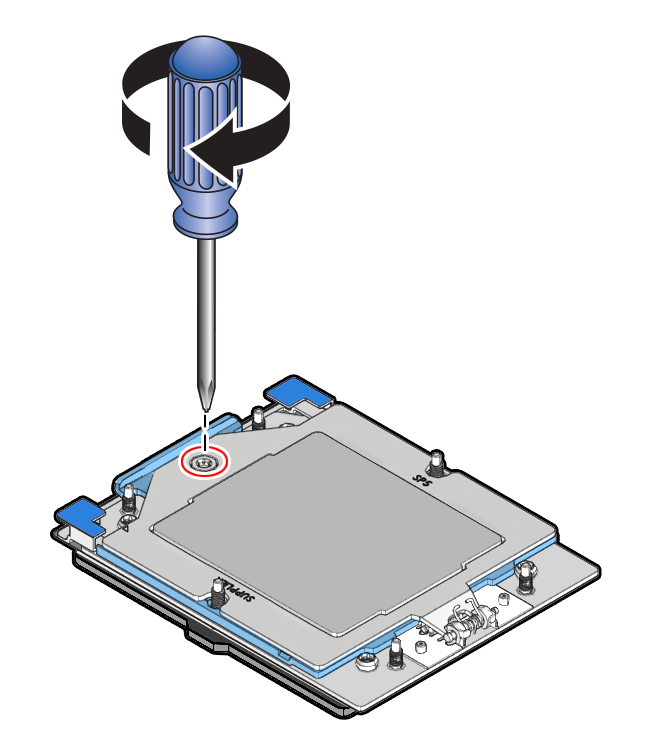
  6. Using a 12 in-lb (inch-pound) (1.35 Nm/13.5 kg-cm) driver with a Torx T20 bit, fully tighten the captive screw that secures the Force Frame to the socket stiffener frame.

    Use one hand to hold down the spring-loaded Force Frame until the screw is tightened.

    Figure showing the Force Frame being tightened.
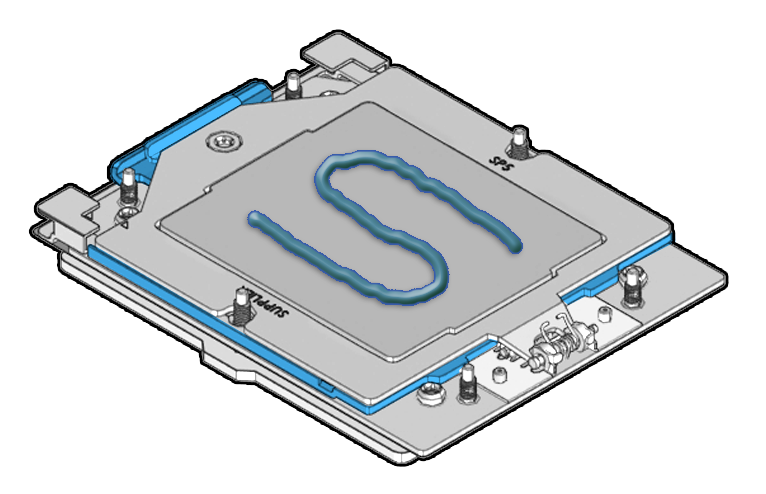
  7. Apply Thermal Grease.
    Using the supplied syringe, evenly apply all of thermal interface material (TIM) in an "S" pattern centered on the top of the processor.

    Keep the "S" pattern inside a half inch of the processor edge so the grease doesn't overflow and contaminate other parts of the processor housing.

    Note:

    Do not distribute the TIM. The pressure of the heatsink will do so for you when you install the heatsink.
    Figure showing thermal interface material applied in an S pattern.
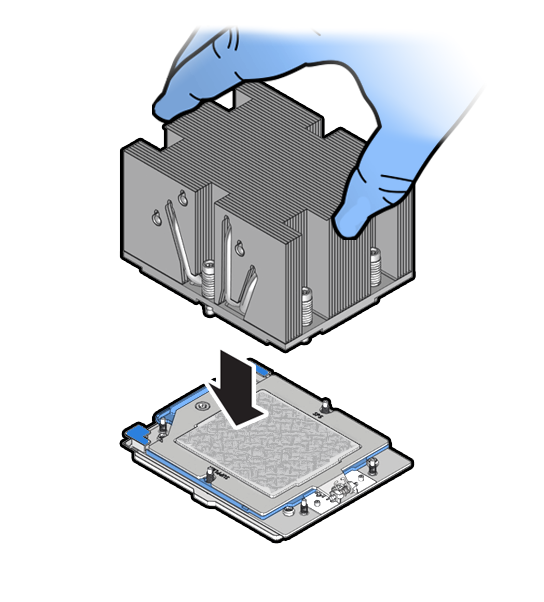
  8. Lower the heatsink (see the following note) on to the six socket heatsink attachment studs.
    Screws 1 and 2 are slightly longer than screws 3, 4, 5, and 6. Carefully lower the module.

    Note:

    The heatsink is keyed to go on only one way. The captive screws that attach to the pin 1 end of the socket stiffener frame are closer together than the captive screws that attach at the opposite end of the stiffener frame.
    Figure showing the heatsink being lowered.
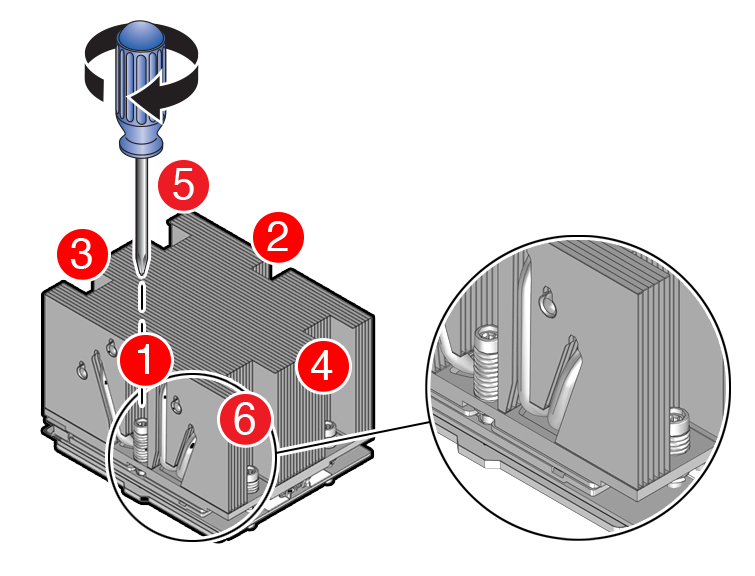
  9. Tighten captive screws 1, 2, 3, 4, 5 and 6 in the order shown.
    Using a 12 in-lbf (1.35 Nm/13.5 kg-cm) torque driver with a Torx T20 bit, tighten the heatsink module to the socket, as shown in the following illustration. Figure showing the heatsink captive screws being tightened.
    1. Engage captive screws 1, 2, 3, 4, 5 and 6 in the order shown in the illustration.

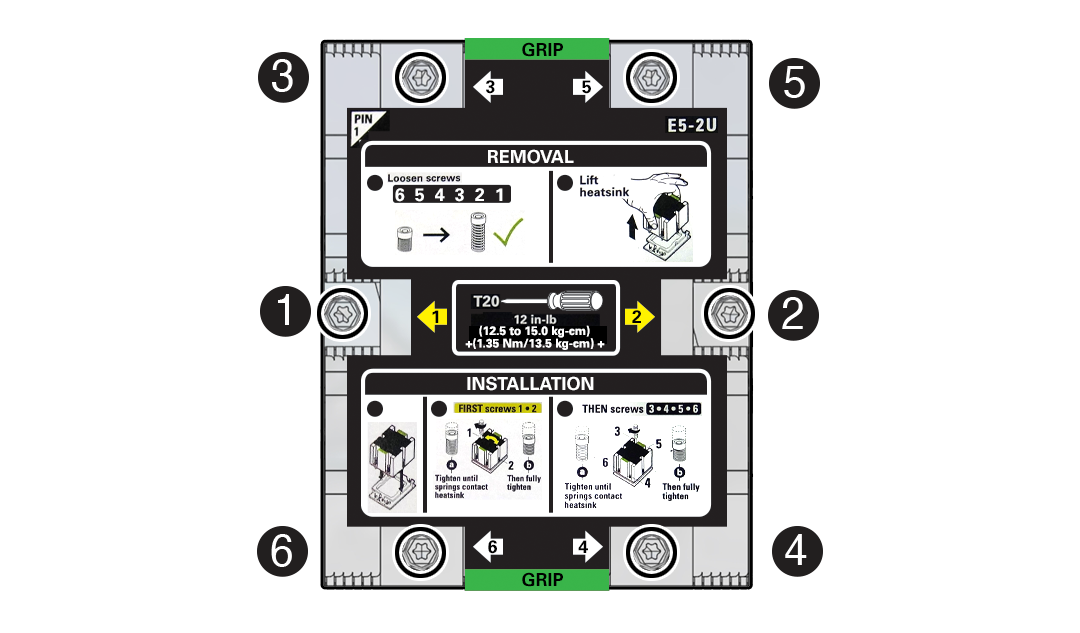
    2. Tighten captive screws 1, 2, 3, 4, 5 and 6 in the order shown in the illustration from 12 in-lbf (13.5 kg-cm) to 13.02 in-lbf (15.0 kg-cm).

    Figure showing the processor heatsink screw tightening order.
  10. Return the server to operation.
    1. Install the air baffle.
    2. Install the server top cover.
    3. Return the server to the normal rack position.
    4. Reconnect the power cords to the power supplies, and power on the server.
    5. Verify that the power supply AC OK LED is lit.
  11. Use Oracle ILOM to clear server processor faults.
    1. To show server faults: log in to the server as root using the Oracle ILOM CLI, and type the following command to list all known faults on the server:

      -> show /SP/faultmgmt

      The server lists all known faults, for example:

      -> show /SP/faultmgmt
        Targets:
            shell
            0 (/SYS/MB/P0)
        Properties:
        Commands:
            cd
            show

      Alternatively, log in to the Oracle ILOM service processor from the Oracle ILOM Fault Management Shell and issue the fmadm faulty command. For more information about how to use the Oracle ILOM Fault Management Shell and supported commands, see the Oracle ILOM User's Guide for System Monitoring and Diagnostics at Oracle ILOM Documentation.

    2. To clear the fault identified in previous step, type the following command: set command

      -> set /SYS/MB/P0 clear_fault_action=true

      For example:

      -> set /SYS/MB/P0 clear_fault_action=true
      Are you sure you want to clear /SYS/MB/P0 (y/n)? y
      Set ‘clear_fault_action’ to ‘true’

      Alternatively, to clear all known faults in the server, log in to the Oracle ILOM service processor from the Oracle ILOM Fault Management Shell and issue the fmadm repair command.

      For more information about how to use the Oracle ILOM Fault Management Shell and supported commands, see the Oracle ILOM User's Guide for System Monitoring and Diagnostics at Oracle ILOM Documentation.