3 Servicing CRUs That Do Not Require System Power Off
Perform tasks for servicing hot plug components in the Oracle Database Appliance.
Hot-pluggable components can be replaced with the system powered on.
Note:
Hot-pluggable components can also be replaced with the system powered off. If you choose this method, first power off the system as described in Preparing Oracle Database Appliance for Service.
- Oracle Database Appliance X9-2 Server Hot-Pluggable Components
Provides instructions on how to perform hot plug tasks on an Oracle Database Appliance server. - Oracle Database Appliance X9-2-HA Storage Shelf Hot Pluggable Components
Perform hot plug tasks on an Oracle Database Appliance storage shelf.
Oracle Database Appliance X9-2 Server Hot-Pluggable Components
Provides instructions on how to perform hot plug tasks on an Oracle Database Appliance server.
This section describes how to service customer-replaceable components that do not require server power off for an Oracle Database Appliance X9-2S/X9-2L server or X9-2-HA server node.
Note:
In certain storage expansion scenarios (explained in the following procedures), adding optional storage might require that the appliance be powered off.
If you are servicing storage shelf hot plug components, see Oracle Database Appliance Storage Shelf Hot-Pluggable Components.
Hot-pluggable components are those that can be removed and installed while the system is running. These are designated as Customer Replaceable Units (CRUs).
Note:
After a physical insertion or removal action of a storage component (such as a disk or SAS cable), you should wait before performing the next action to allow the system software to fully process the event. This could take up to 3 minutes to complete.
For instructions on servicing NVMe front-mounted storage devices, see Servicing NVMe Storage Drives (CRU). Note that front mounted storage drives are not supported in the Oracle Database Appliance X9-2-HA server nodes.
Caution: An NVMe drive must first be powered off before removal. If you do not power off the NVMe drive before removal you can crash the operating system. Oracle Database Appliance uses special commands to remove or add NVMe storage.
Refer to the following table for hot-plug component instructions for your appliance.
Note:
Some of the links in the following table take you to instructions outside of the Oracle Database Appliance library to the Oracle Server X9-2L documentation library. Use your browser's Back button to return to the Oracle Database Appliance library.
| Oracle Database Appliance X9-2S/X9-2L | Oracle Database Appliance X9-2-HA |
|---|---|
|
Servicing NVMe Storage Drives (CRU) Caution: An NVMe drive must first be powered off before removal. If you do not power off the NVMe drive before removal you can crash the operating system. Oracle Database Appliance uses special commands to remove or add NVMe storage. |
Front mounted storage drives are not supported in the server nodes for this product. |
- Servicing NVMe Storage Drives (CRU)
Perform tasks for servicing front-mounted NVMe drives in an Oracle Database Appliance X9-2S/X9-2L system. The Oracle Database Appliance X9-2-HA does not support front-mounted drives in server nodes.
Parent topic: Servicing CRUs That Do Not Require System Power Off
Servicing NVMe Storage Drives (CRU)
Perform tasks for servicing front-mounted NVMe drives in an Oracle Database Appliance X9-2S/X9-2L system. The Oracle Database Appliance X9-2-HA does not support front-mounted drives in server nodes.
- Replacing an NVMe Storage Drive
Replace a front-mounted NVMe drive in an Oracle Database Appliance X9-2S/X9-2L system. - Adding NVMe Expansion Storage
Add NVMe storage to an Oracle Database Appliance X9-2L. Note that the Oracle Database Appliance X9-2S does not support additional storage.
Replacing an NVMe Storage Drive
Replace a front-mounted NVMe drive in an Oracle Database Appliance X9-2S/X9-2L system.
Before removing an NVMe drive it must be powered off. After installing an NVMe drive it must be powered on. Failed drives are automatically powered off after 5 minutes.
Caution:
If you remove an NVMe drive without first powering it off, you can crash the operating system. Oracle Database Appliance uses special commands to add or remove NVMe storage.
The instructions describe how to replace an NVMe drive using the odaadmcli power on/off commands for an Oracle Database Appliance server.
The odaadmcli commands listed here must be run as the root user.
Parent topic: Servicing NVMe Storage Drives (CRU)
Adding NVMe Expansion Storage
Add NVMe storage to an Oracle Database Appliance X9-2L. Note that the Oracle Database Appliance X9-2S does not support additional storage.
-
The Oracle Database Appliance X9-2L supports ten expansion slots for NVMe drives. These are slots labeled 2 through 11 as seen from the front of the system (callouts 2 through 11 in the following illustration). Storage drives can be added in sets of two. For information about supported optional storage drives, refer to the Owner's Guide.
-
When expanding storage, populate slots starting with the lowest numbered available slot (for example, slot 2 as seen on the front panel).
-
The drive power-up and storage expansion
odaadmclicommands listed here should only be run after all new disk drives have been physically installed. Once you expand storage, you cannot revert to a previous storage configuration (for example, the default installation with only two NVMe drives).
Parent topic: Servicing NVMe Storage Drives (CRU)
Oracle Database Appliance X9-2-HA Storage Shelf Hot Pluggable Components
Perform hot plug tasks on an Oracle Database Appliance storage shelf.
Under most circumstances, Oracle Database Appliance X9-2-HA storage shelf components can all be replaced while the storage shelf is powered-on and running. Any exceptions will be described in the following procedures.
- Adding Optional Storage Shelf Drives (CRU)
Add disk storage in an Oracle Database Appliance X9-2-HA storage shelf. - Replace a Storage Shelf HDD or SSD (CRU)
Replace a storage disk in an Oracle Database Appliance storage shelf. - Replace a Storage Shelf Power Supply (CRU)
Replace a power supply in an Oracle Database Appliance storage shelf. - Replace a Storage Shelf I/O Module (CRU)
Replace an IO module in an Oracle Database Appliance storage shelf.
Parent topic: Servicing CRUs That Do Not Require System Power Off
Adding Optional Storage Shelf Drives (CRU)
Add disk storage in an Oracle Database Appliance X9-2-HA storage shelf.
The Oracle Database Appliance X9-2-HA storage shelf partially-populated base configuration supports storage expansion with either 7.68 TB SSDs (available in six-packs) or 18 TB HDDs (available in an eighteen-pack). Depending on your initial base storage shelf configuration, there can be up to eighteen expansion slots. These slots are labeled 6-23 as seen from the front of the system (callouts 6 through 23 in the following illustration).
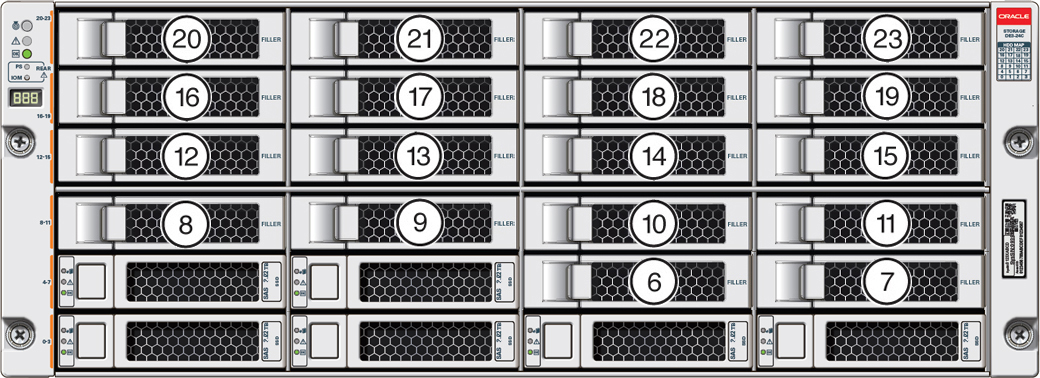
Description of the illustration gxxxx-x8-2ha_optional_shelf_drives_top.jpg
-
Upgrade options:
-
For a high performance shelf, you can add up to eighteen 7.68 TB SSDs (available in six-packs). You can add storage with the system running and use the appliance CLI software commands to expand the storage configuration.
-
For a high capacity shelf, you can add eighteen 18 TB HDDs (available in an eighteen-pack). You must power off the appliance, add storage, then re-image and redeploy the appliance software. This is required to reconfigure the appliance from the default high performance mode to high capacity mode.
-
-
Expanding the base configuration storage shelf with 7.68 TB SSDs for high performance. The base configuration has slots 0-5 with 7.68 TB drives for DATA/RECO. Expansion SSDs are available in six-packs and are populated in shelf storage slots from the bottom up to also be used for DATA/RECO, as follows:
- The first six expansion drives go into slots 6-11.
- The second six expansion drives go into slots 12-17.
- The third six expansion drives go into slots 18-23.
The following illustration shows the expanded drive configuration for 7.68 TB SSDs.
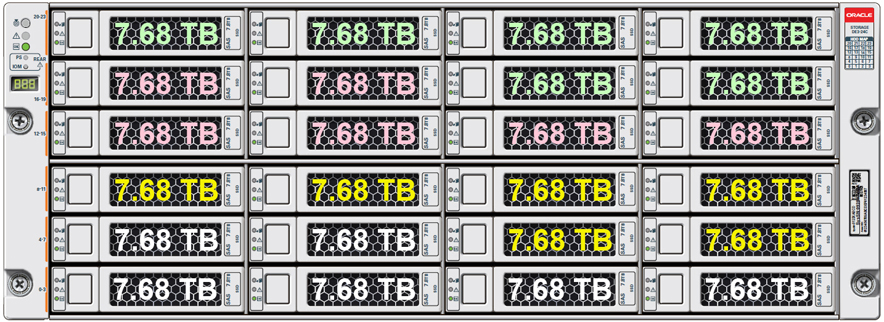
Description of the illustration oda_x8-2-ha_shelf_ssds.jpg
-
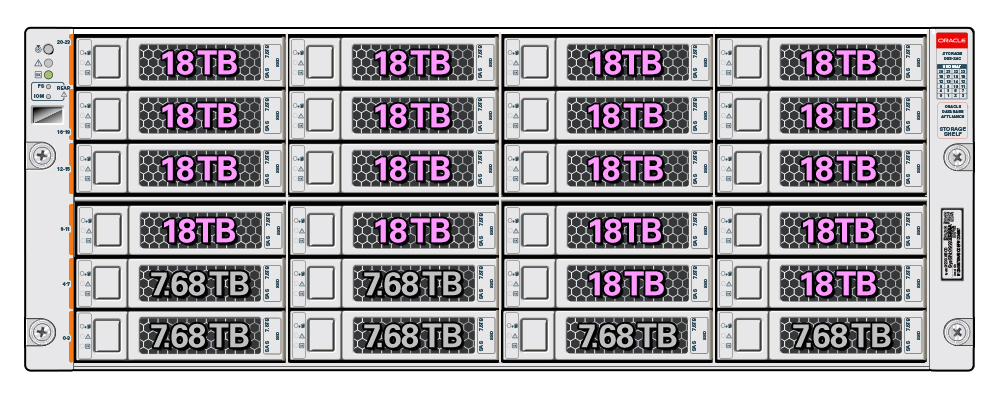
Expanding the base configuration storage shelf with 18 TB HDDs for high capacity. When expanding the storage shelf with HDDs, the base configurations SSDs will be used for FLASH and the HDDs will be used for DATA/RECO. Expansion HDDs are available in an eighteen-pack and populate the empty shelf storage slots (slots 6-23).
The following illustration shows the expanded drive configuration for 18 TB HDDs.
-
Once you expand storage to support additional disks, you cannot revert to the base configuration (no drives in slots 6-23).
-
If you plan on adding another storage shelf, it must be populated identically to your first storage shelf.
-
The
odaadmclicommands listed here must be run as the root user.
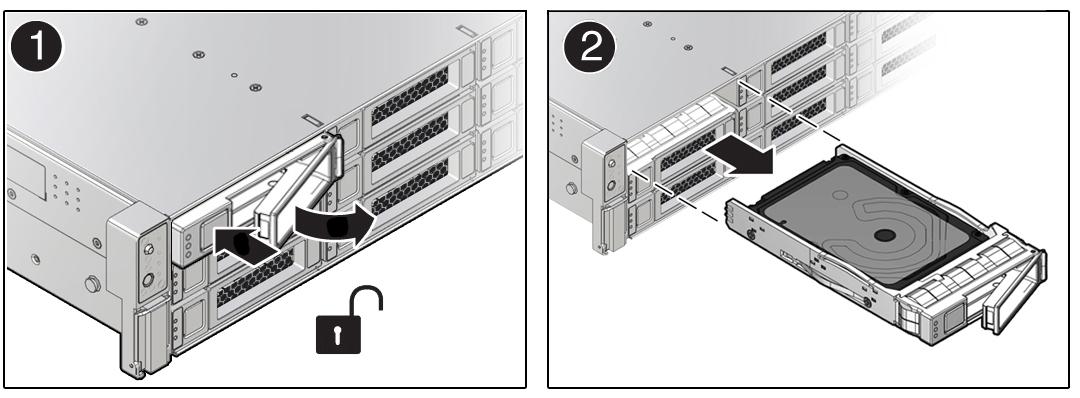
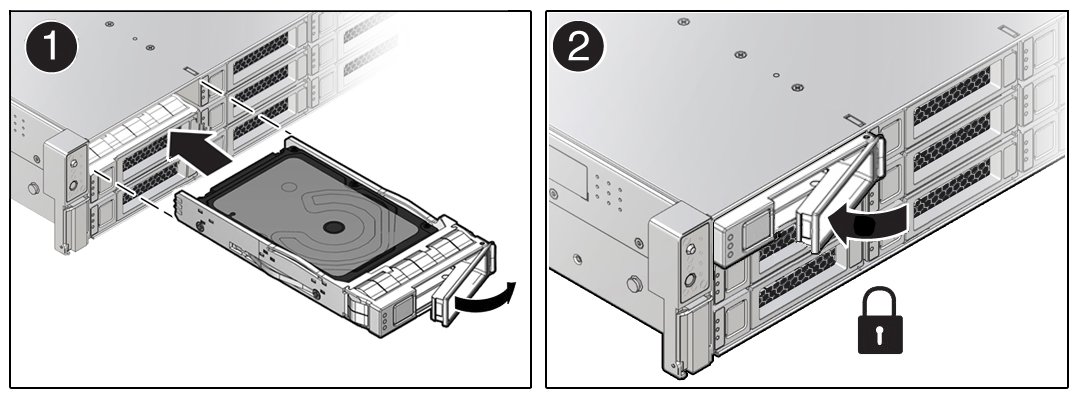
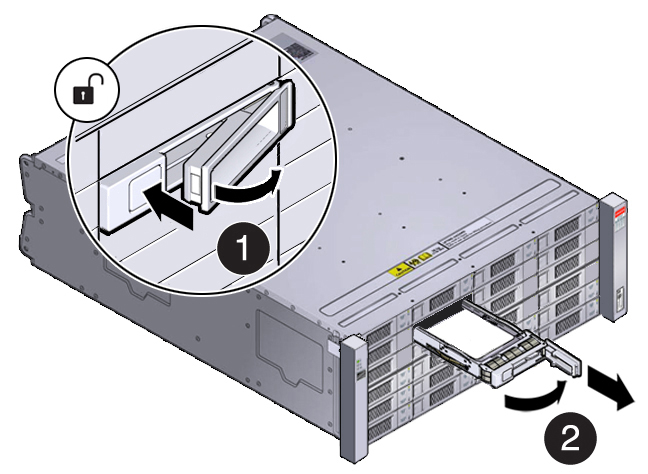
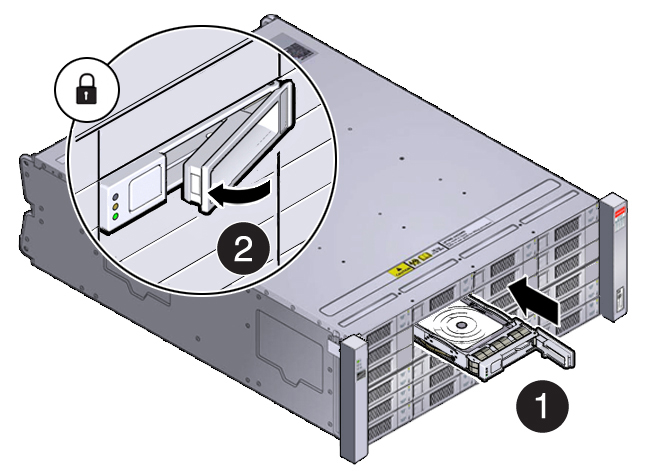
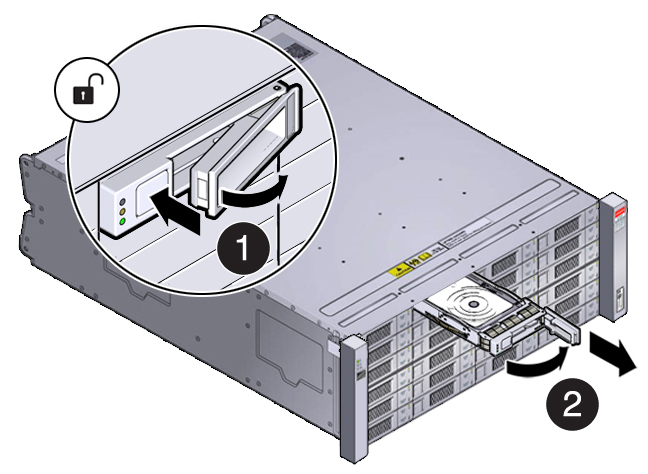
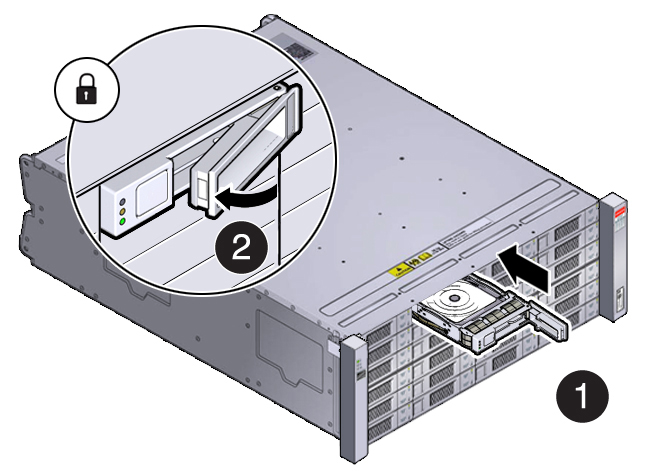
Replace a Storage Shelf HDD or SSD (CRU)
Replace a storage disk in an Oracle Database Appliance storage shelf.
Note:
After a physical insertion or removal action of a storage component (such as a disk or SAS cable), you should wait before performing the next action to allow the system software to fully process the event. This could take several minutes to complete.
Replace a Storage Shelf Power Supply (CRU)
Replace a power supply in an Oracle Database Appliance storage shelf.
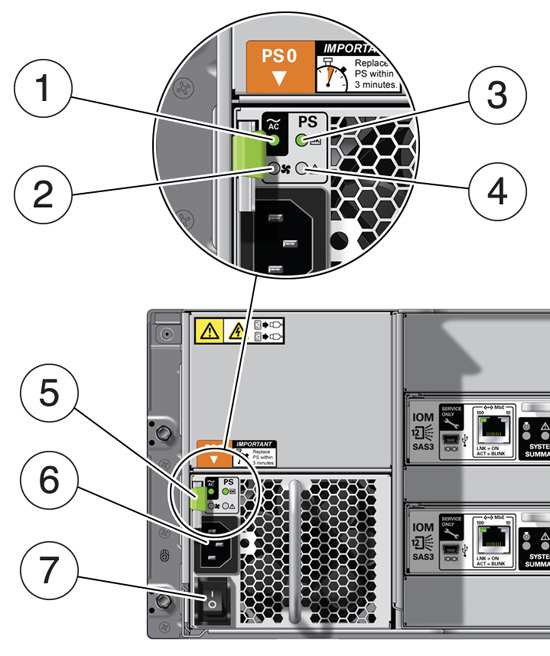
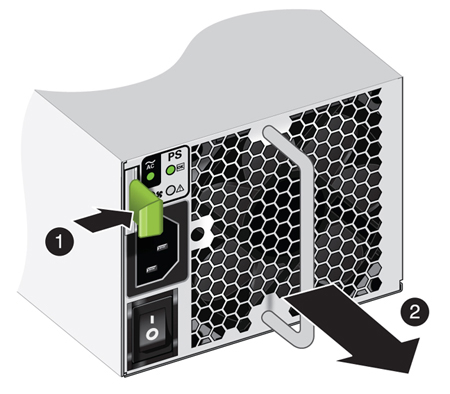
The storage shelf and the storage expansion shelf each have two power supplies. Indicators (LEDs) on the power supplies indicate their operation state.
The power supplies are redundant and one can be replaced while the appliance is running.
Example figure showing a DE3-24C power supply:
| Callout | Description |
|---|---|
|
1 |
AC power fail indicator |
|
2 |
Fan fail indicator |
|
3 |
Power supply status indicator |
|
4 |
DC power fail indicator |
|
5 |
Release lever |
|
6 |
AC connector |
|
7 |
On/Off switch |
If any of the indicators are amber, or if the power supply status indicator does not light, replace the power supply.
Replace a Storage Shelf I/O Module (CRU)
Replace an IO module in an Oracle Database Appliance storage shelf.
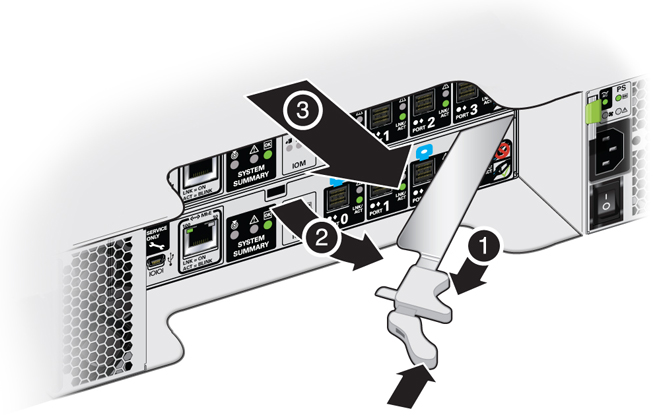
Storage Shelf SAS I/O modules are fully redundant and can be replaced while the appliance is running.
Note:
After a physical insertion or removal action of a storage component (such as a disk or SAS cable), you should wait before performing the next action to allow the system software to fully process the event. This could take up to 3 minutes to complete.
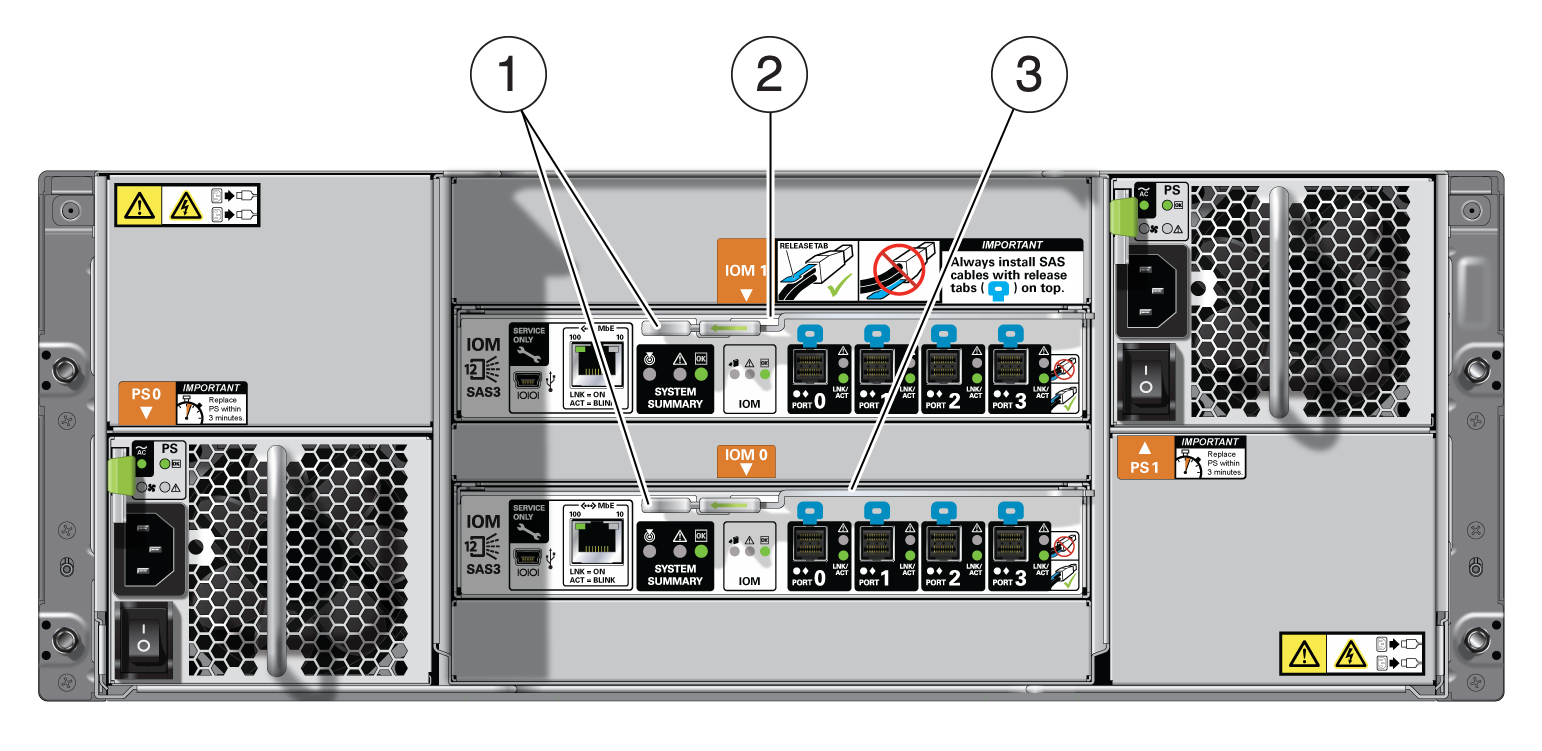
Example figure showing the DE3-24C:
| Callout | Description |
|---|---|
|
1 |
I/O module locking levers |
|
2 |
I/O module 1 (top) |
|
3 |
I/O module 0 (bottom) |
