4 Working with TimesTen Objects
This chapter focuses on working with TimesTen objects in SQL Developer.
Topics include:
Working with users
You can create, edit, or drop database users from a TimesTen database with SQL Developer.
Topics include:
Create a user
You can create a database user for a TimesTen database.
To create a user, ensure that you are on the main SQL Developer page and that your TimesTen connection is expanded.
Note:
You can only create users under a direct connection, and the connected user needs ADMIN system privileges. See Connecting to a TimesTen Database.
You can now select the system privileges to grant to the user.
Edit a user
You can alter a database user already created. When you alter an existing user, you can perform these actions:
-
Change the password.
-
Change the profile.
-
Lock or unlock the user.
-
Expire the current password.
-
Update the list of granted system privileges.
Note:
All actions above, except for updating the list of granted system privileges, need to be performed under a direct or encrypted client/server connection, the connected user needs
ADMINsystem privileges. See "Transport Layer Security for TimesTen Client/Server" in the Oracle TimesTen In-Memory Database Security Guide for more information on encrypted client/server connections.
Once you are done editing the options in the User and System Privileges tabs, you can review the SQL statements before they are applied.
Drop a user
You can drop a database user from a TimesTen database from SQL Developer.
To drop a user, ensure that you are on the main SQL Developer page and that your TimesTen connection is expanded.
Note:
The connected user needs ADMIN system privileges to drop a user.
You have successfully dropped a user.
Reset password of connected user
You can reset the password of the database user used for the TimesTen connection.
To reset the password of the connected user, ensure that you are on the main SQL Developer page.
Note:
-
You cannot reset the password of the instance administrator or external users. See "Overview of TimesTen users" in the Oracle TimesTen In-Memory Database Security Guide,
-
You can only reset the password of the connected user under a direct or encrypted client/server connection. See "Transport Layer Security for TimesTen Client/Server" in the Oracle TimesTen In-Memory Database Security Guide for more information on encrypted client/server connections.
You have successfully reset the password of the connected user.
Working with profiles
You can create, edit, or drop password management profiles from a TimesTen database with SQL Developer.
Topics include:
Create a profile
You can create a password management profile for database users in a TimesTen database.
To create a profile, ensure that you are on the main SQL Developer page and that your TimesTen connection is expanded.
Note:
The connected user needs ADMIN system privileges to create a profile.
You have successfully created a profile.
Edit a profile
You can edit a password management profile for database users in a TimesTen database.
To edit a profile, ensure that you are on the main SQL Developer page and that your TimesTen connection is expanded.
Note:
The connected user needs ADMIN system privileges to edit a profile.
You have successfully edited a profile.
Drop a profile
You can drop a password management profile for database users from a TimesTen database.
To drop a profile, ensure that you are on the main SQL Developer page and that your TimesTen connection is expanded.
Note:
The connected user needs ADMIN system privileges to edit a profile.
You have successfully dropped a profile.
Working with tables
You can work with tables for the TimesTen databases. This section includes these topics:
Create a table
You can create a table for the TimesTen database or TimesTen Scaleout database.
Ensure that you are on the main SQL Developer page and that your TimesTen or TimesTen Scaleout connection is expanded.
Define the columns of your table
To define the columns of your table, locate the Columns table. For each of the columns that you want to define:
- In the PK column, click in the column if you want to define this column as a primary key. You need to have a primary key if you want to create an index on your table.
- In the Name column, type a column name. For more information on supported column names, see "Basic names" in the Oracle TimesTen In-Memory Database SQL Reference.
- In the Data Type column, select a data type for your column. For more information on data types, see "Data Types" in the Oracle TimesTen In-Memory Database SQL Reference.
- In the Size column, select a size for your column based on your the data type that you selected.
- If you want this column to be
NOT NULL, select the Not Null check box. - If you want this column to have a default value, type a value in the Default column.
- If you want to define this column as
INLINE, select the Inline check box. By default, variable-length columns whose declared column length is > 128 bytes are stored out of line. Variable-length columns whose declared column length is <= 128 bytes are stored inline.
You have successfully defined a column for your table.
To add another column, click the + button that is located in the top right corner of the Columns table. Then, repeat steps 1-7 to define each column.
To remove a column, select the column that you want to remove and click the - sign that is located in the top right corner of the Columns table.
To copy a column, select the column that you want to copy and click the Copy Column button that is located in the top right corner of the Columns table.
Once you have defined all of the columns for your table:
-
If you defined a primary key for your table, create an index for your table. See Create an index for your table for more information.
-
If you did not define a primary key on your table, set constraints for your table. See Set constraints for your table for more information.
Create an index for your table
To define an index for your table, you need to have defined a primary key for your table. To define an index on your table:
- Select an index type from the Index Type options. For more information on index types, see "CREATE TABLE" in the Oracle TimesTen In-Memory Database SQL Reference.
- If you selected a hash index, type a
RowPagesparameter in the Page size(Rows) text field. - Compute this value by dividing the number of expected rows in your table by 256. For example, if your table has 256,000 rows, specify 1000 for the value of
RowPages(256000/256=1000).
You have successfully defined an index on your table. You are now ready to define constraints for your table.
Set constraints for your table
Select the Constraints tab to work with constraints for your table.
If you have defined a primary key or compound primary key in the columns tab, you see this primary key constraint in the Constraints tab.
You can set these types of constraints:
-
Primary key constraint: If you have not defined a primary key for your table in the Columns tab, click the + button located in the top right corner of the Constraints region and then select New Primary Key Constraint.
If you have already defined a primary key, the New Primary Key Constraint option is not available. However, you are able to edit the definition of your primary key in the constraints region.
In the Constraints table you can:
-
Edit the name of your primary key by editing the name column of the Primary Key row.
-
Select columns to be part of your primary key definition by double clicking the column name in the Available Columns list.
-
Remove columns from your primary key definition by double clicking the column name in the Selected Columns list.
-
Remove a primary key constraint by selecting the primary key constraint that you want to remove, and then clicking the x sign that is located in the top right corner of the Constraints region.
-
-
Foreign key constraint: To define a foreign key for your table:
-
Click the + button located in the top right corner of the Constraints region and then select New Foreign Key Constraint.
-
In the Constraints table, specify the name of your foreign key. You can edit the name of a foreign key by editing the name column of the Foreign Key row in the Constraints table.
Locate the Referenced Constraint region.
-
From the Schema drop-down list, select the schema name of the table that you want to reference. Alternatively, you can type the schema name instead of selecting it from the drop-down list.
-
From the Table drop-down list, select the table name that you want to reference. Alternatively, you can type the table name instead of selecting it from the drop-down list.
-
From the Constraint drop-down list, select a primary key constraint name that you want to reference. Alternatively, you can type the primary key constraint name instead of selecting it from the drop-down list.
-
From the On Delete drop-down list, select an on delete option.
You have successfully defined a foreign key constraint.
-
To add another foreign key constraint, the + button located in the top right corner of the Constraints region and then select New Foreign Key Constraint. Then, repeat steps 1-6 to define each foreign key constraint.
-
To remove a foreign key constraint, select the foreign key constraint that you want to remove and click the x sign that is located in the top right corner of the Constraints region.
-
Set the distribution method for your table
This tab is only available when working with a TimesTen Scaleout table.
To define the distribution method for your table:
Edit a table
You can alter a table that is already created. When you alter an existing table, you cannot perform these actions:
-
Change the schema name.
-
Change the table name.
-
Change the index.
-
Change the distribution scheme of a table that contains data. This only applies to TimesTen Scaleout tables.
To edit a table, ensure that you are on the main SQL Developer page and that your connection is expanded:
Expand the Tables option, right-click the table name, and then select Edit.
The Edit Table dialog displays. The Edit Table dialog is the same as the Create Table dialog, except that not all options can be edited. You can edit all of the options except for those that are mentioned above. See Create a table for more information on how to use the Create Table dialog.
Review the distribution of data for a TimesTen Scaleout table
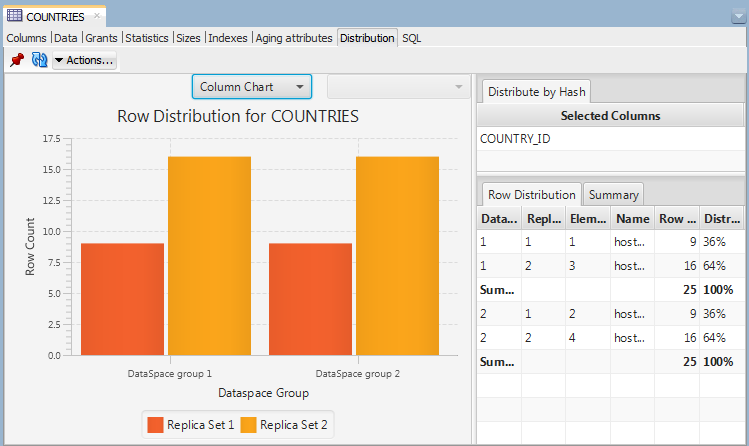
You can view distribution statistics for your table. This feature is only available for TimesTen Scaleout tables. Distribution statistics enable you to see how your data is distributed between the data instances of your grid.
To view the distribution statics for a table, ensure that you are on the main SQL Developer page and that your connection is expanded:
The Distribution tab contains these regions:
Note:
The contents of each region can vary depending on the distribution scheme of the table.
-
Row distribution chart
This chart can show either a column or pie chart of the row count of your table on each of your elements. Use the drop-down list in this region to switch between the column and pie chart for your table.
The pie chart enables you to view a pie chart for the row count of each element of your data space groups. Use the drop-down list in this region to switch between data space groups. The pie chart is not available when your table uses a duplicate distribution scheme.
If one of your elements is down or unavailable, the corresponding column chart for that element becomes unavailable. Also, the pie chart for the data space group of the element becomes unavailable.
-
Distribution scheme table
This table shows you information about the distribution scheme that your table uses.
-
Distribute by hash distribution scheme - This table shows the columns that TimesTen Scaleout uses to create a hash in order to distribute the rows of your table.
-
Distribute by reference distribution scheme - This table shows the foreign key relationship that TimesTen Scaleout uses to distribute the rows of your table.
-
Duplicate distribution scheme - This table doesn't show any information because this distribution scheme has the same information on every element.
-
-
Row distribution table
This table shows the row count of your table on each of your elements. You can also see information about the data space group, replica set, element ID, instance name, and distribution percentage for each of the elements. If you use the duplicate distribution scheme, the distribution percentage column is not available.
If one of your elements is down or unavailable, the row count and distribution percentage columns for that element are marked as unavailable.
If the table is distributed by hash or reference, the distribution tab will display a summary row including totals for row count and distribution. This summary is only accessible when the table is sorted by data space group and will be hidden if sorted on a different column. If needed, this information is always available in the "Summary" tab next to "Row Distribution".
If the table is distributed by hash or reference, this table displays summary rows with total row count and distribution percentage for each data space group. However, this is only available if the row distribution table is sorted by data space groups. If you use a different sort order, you can click the Summary tab to see these summary rows.
-
Summary table
This table shows the row count and distribution percentage for each data space group.
Create a primary key constraint
You can create a primary key constraint on a table that does not have a primary key defined. Follow these steps:
To view the SQL statement used to create the primary key constraint, choose the SQL tab of the Add primary key dialog box.
For information about creating a primary key constraint, see "CREATE TABLE" in the Oracle TimesTen In-Memory Database SQL Reference or "ALTER TABLE" in the Oracle TimesTen In-Memory Database SQL Reference.
Change the attributes of primary key
You can change the attributes of a primary key constraint after you have defined a primary key on a table. Follow these steps:
To view the SQL statement used to change the attributes of the primary key constraint, choose the SQL tab of the Change parameters of a primary key dialog.
For information about changing the attributes of a primary key constraint, see "ALTER TABLE" in the Oracle TimesTen In-Memory Database SQL Reference.
Create an index on a table
You can create a range index or a hash index on a regular table or on a cache table.
To create an index, click the + to the left of the Tables node to view the list of tables. Then right-click the name of the table to create an index on and select Index, then select Create Index.
You can also right-click the Indexes node and select New Index.
In the Properties tab of the Create Index dialog, locate the Table drop-down menu. From this menu, select the table for the index.
For Index Type:
-
To create a range index, choose Range.
-
To create a hash index, choose Hash. Then, select a Pages value:
-
Page size(Rows): Specify the number of pages to use. To determine the value, divide the number of expected rows in your table by 256. For example, if your table has 256,000 rows, specify 1000 (256000/256=1000).
-
Current: The current number of rows in the table is used to calculate the page count value. Do not use this option if there are no rows in your table. This is because when rows are added to the table, the hash index performs poorly.
-
For Uniqueness:
-
To have a single occurrence of index key column values in your table, choose Unique.
-
If not, select Non-unique.
For information about the different types of indexes supported in TimesTen, see "CREATE INDEX" in the Oracle TimesTen In-Memory Database SQL Reference.
In the Index section, specify the columns for the index. You can select the columns from the Column Name and then click > to add these columns to your index. For each indexed column, from the Order select list, you can specify whether the column is to be sorted in ascending or descending order. The default sort order is ascending.
To create a composite index:
- Select additional columns and then click >. Select a column and then the < to remove columns from the index definition.
- In the DDL tab of the Create Index dialog, you can view the
CREATE INDEXstatement used to create the index. - Click OK to create the index.
Create a foreign key constraint
You can create a foreign key constraint on a table. Ensure that you are on the main SQL Developer page and that your TimesTen connection is expanded.
For information about creating a foreign key constraint, see "CREATE TABLE" and "ALTER TABLE" in the Oracle TimesTen In-Memory Database SQL Reference.
Specify and display LOB data types
If you are using TimesTen release 11.2.2 or higher, then you can specify and display LOB data types in your table definitions. If you are using TimesTen Scaleout, ensure that this feature is supported in your version of TimesTen Scaleout. See "Comparison between TimesTen Scaleout and TimesTen Classic" in the Oracle TimesTen In-Memory Database Scaleout User's Guide.
If you want to create a column with a LOB data type, then in the Create Table dialog, expand the drop-down list for the Data Type column header. You see CLOB, NCLOB, and BLOB as valid data types.
To view the data type for your columns, select the table and then choose the Columns tab. You see the LOB data type for your column.
If you want to add a column and specify a LOB data type, use the Add Column option. Right-click on the table, select Column, then select Add. The Add Column dialog appears. In the Add Column dialog, expand Data Type. You see CLOB, NCLOB, and BLOB among the possible choices.
For PL/SQL objects, you can specify LOB data types as IN, OUT, and IN OUT parameters. In the PL/SQL edit dialogs, for parameter types, choose CLOB, NCLOB, or BLOB.
Specify the INLINE attribute for columns
You can specify the INLINE attribute for columns of type VARCHAR2, NVARCHAR2, and VARBINARY.
In the Create Table dialog, locate the column header named Inline. Click in the check box to define the column with the INLINE attribute.
You can also specify the INLINE attribute when adding a column to a table. Right-click on the table, select Column, then select Add. The Add Column dialog appears. For columns of type VARCHAR2, NVARCHAR2, and VARBINARY, click in the Inline check box to add the column with the INLINE attribute.
Alter the aging properties of a table
You can add an aging policy to or drop an aging policy from a regular table or a cache table. You can also change the aging state for a table's existing aging policy, or change the lifetime and cycle for a table's existing time-based aging policy. An aging policy is only supported on TimesTen tables.
The following sections describes these aging policy operations:
Adding an aging policy to a table
To add an aging policy to a regular table or a cache table, under the Tables node, right-click the name of the table to add an aging policy to and select Aging, then select Add Usage-based to add an LRU aging policy. To add a time-based aging policy select Aging, then select Add Time-based. An aging policy can be added to a cache table only if it is the root table of a cache group.
If you are unable to find the table that you are looking for, see Locating a TimesTen database object.
To add an LRU aging policy to the table, in the Prompts tab of the Add Usage-based dialog box, specify an aging state by choosing either On or Off in the Usage-based aging field. The default aging state is on. Click Apply to add the LRU aging policy to the table.
The TimesTen database memory usage thresholds determine when data starts and stops being deleted from the table. The default memory usage threshold that determines when data starts being deleted from the table is 90%. The default memory usage threshold that determines when data stops being deleted from the table is 80%. The default LRU aging cycle is 1 minute. For information about how to change these thresholds and the LRU aging cycle, see Specifying an aging policy.
An LRU aging policy can be added to any regular table, and only to cache tables in an AWT, SWT or user managed cache group that does not have automatic refresh defined.
To add a time-based aging policy to the table, in the Prompts tab of the Add time-based dialog box, select the column name from Column to store the timestamp value indicating when each row was added or most recently updated.
In the Life-time field, indicate the length of time in which data that has not been updated is to be kept in the table by specifying a numeric value followed by a unit of minutes, hours or days in the drop-down menu.
In the Cycle field, indicate the frequency at which data is to be aged out of the table by specifying a numeric value followed by a unit of minutes, hours or days. The default time-based aging cycle is 5 minutes.
Specify an aging state by choosing either On or Off in the Time-based aging field. The default aging state is on. Then click Apply to add the time-based aging policy to the table.
A time-based aging policy can only be added to a table that contains a non-nullable DATE or TIMESTAMP column.
Dropping an aging policy from a table
To drop an existing aging policy from a regular table or a cache table, under the Tables node, right-click the name of the table to drop an aging policy from and select Aging, then select Drop.
If you are unable to find the table that you are looking for, see Locating a TimesTen database object.
Click Apply to drop the aging policy from the table.
Changing the aging state of a table's aging policy
To change the aging state of a regular table's or cache table's existing aging policy, under the Tables node, right-click the name of the table to change the aging state of and select Aging, then select Change State On/Off.
If you are unable to find the table that you are looking for, see Locating a TimesTen database object.
In the Prompts tab of the Change state on/off dialog, change the aging state by selecting either On or Off in the Change aging state field. Click Apply to change the aging state of the table.
Changing the memory usage thresholds and LRU aging cycle
To change the memory usage thresholds and the LRU aging cycle, right-click the node of the connection name for the TimesTen database and choose Change Usage-based Aging Attributes.
In the Prompts tab of the Changing the usage-based thresholds dialog box, specify the threshold that determines when data starts being deleted from the tables in the High usage threshold field. Specify the threshold that determines when data stops being deleted from the tables in the Low usage threshold field. Specify the LRU aging cycle in the Update Frequency field. Then click Apply to change the memory usage thresholds and the LRU aging cycle.
The new settings apply to all tables that have an LRU aging policy defined.
Changing the lifetime and cycle of a table's time-based aging policy
To change the lifetime and cycle of a regular table's or cache table's existing time-based aging policy, under the Tables node, right-click the name of the table to change the lifetime and cycle of and select Aging, then select Change Lifetime and Cycle.
If you are unable to find the table that you are looking for, see Locating a TimesTen database object for information.
In the Life-time field within the Prompts tab of the Change Lifetime and Cycle dialog box, change the length of time in which data that has not been updated is to be kept in the table by specifying a numeric value followed by a unit of minutes, hours or days.
In the Cycle field, change the frequency at which data is to be aged out of the table by specifying a numeric value followed by a unit of minutes, hours or days.
Then click Apply to change the lifetime and cycle for the table.
Load data into tables
You can load data into your table using Import Data. Before you can load your data, you must export the data into a file. To export the data, right-click on the name of the table and choose Export. After successfully exporting your data, you can import the data into a TimesTen table. The TimesTen export feature does not support exporting data from a TimesTen table for the purpose of importing that data into an Oracle database.
Compute table size information
If you are using TimesTen Release 11.2.2 or higher, you can compute table size information.
To view table size information, you must first compute the table size:
-
Choose + to the left of the Tables node to view the list of tables.
-
Right-click the name of the table to compute table size information.
-
Select Table, then select Compute Size.
The Compute Size dialog appears. The owner and name of the table are displayed.
-
Click in the Also count out-of-line sizes check box if you want to compute out-of-line sizes.
-
Choose Apply.
A Confirmation dialog appears.
-
Choose OK.
The table size statistics for the table are computed.
To view the SQL for computing the table size, choose the SQL tab in the Compute Size dialog. You see that a TimesTen built-in procedure called ttComputeTabSizes is executed. After this built-in is executed, you can review the table size information for your table. Note that this table size information is on a per table basis.
To compute table sizes for all tables in your database including materialized views, system tables, and tables that are part of cache groups, use the SQL Worksheet and execute the command: Call ttComputeTabSizes (NULL,0); or to include out-of-line data: Call ttComputeTabSizes (NULL,1);.
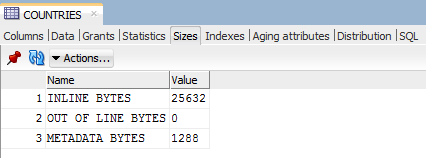
After you compute the table size for one or more tables, you can view the table size information:
Figure 4-2 Displaying table size information
Description of "Figure 4-2 Displaying table size information"
You can choose the Actions menu to generate or regenerate the table size. If you select the Actions menu, then Table, then select Compute Size. The Compute Size dialog appears allowing you to compute the table size information.
Choose Refresh to refresh the displayed table size data.
You can view table size information for all tables that you have computed table sizes. To view such information, select TimesTen Reports, then Table, then select Table Sizes. For more information on TimesTen reports, see Generating TimesTen Reports.
For more information on the ttComputeTabSizes built-in procedure, see "ttComputeTabSizes" in Oracle TimesTen In-Memory Database
Reference.
View the characteristics of a table
After you have created a regular table, a global temporary table or a cache table, you can view the characteristics of the table itself such as its columns, indexes and aging policy.
Click the + to the left of the Tables node to view the list of tables. Click the name of the table to view.
If you are unable to find the table that you are looking for, see Locating a TimesTen database object.
Viewing the columns
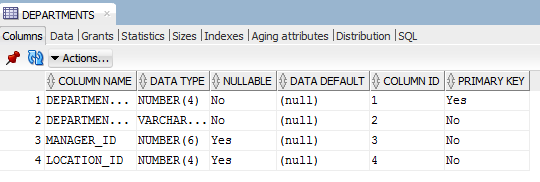
The Columns tab, located within the table's tab, shows information about the columns of a table. The name of the column, data type, nullability property and default value is displayed.
To view the list of columns in a table, locate the Tables node. Click the + to the left of the node that contains the name of the table.
Viewing the indexes
The Indexes tab, located within the table tab, shows information about the index for a table. The name of the index, type, uniqueness property, and the number and name of the columns are displayed.
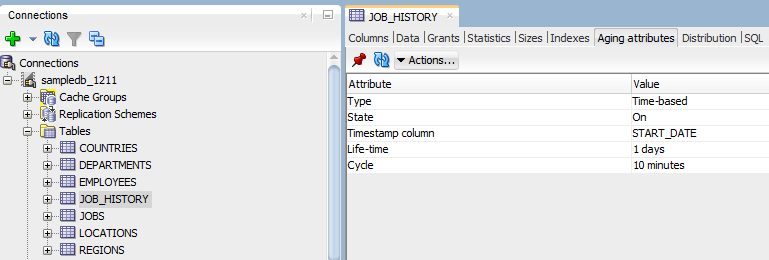
Viewing the aging attributes
The Aging attributes tab, located within the table tab, shows information about the aging attributes for a table. The aging policy type, aging cycle, and aging state are displayed.
For tables that have an LRU aging policy defined, the TimesTen database memory usage thresholds are displayed. For information about how to change these thresholds and the LRU aging cycle, see Specifying an aging policy.
For tables that have a time-based aging policy defined, the name of the non-nullable DATE or TIMESTAMP column used to store the timestamp value (indicating when each row was added or most recently updated) and the length of time non-updated data is not deleted from the table is displayed.
Figure 4-4 Viewing the aging attributes for a table
Description of "Figure 4-4 Viewing the aging attributes for a table"
Viewing the table definition
The SQL tab, located within the table tab, shows the CREATE TABLE statement that was used to create the table for a regular table or a global temporary table.
Since a cache table is created when its accompanying cache group is created, you can view a cache table's definition by viewing its cache group definition. See Viewing the cache group definition.
Figure 4-5 Viewing the SQL for the table definition

Description of "Figure 4-5 Viewing the SQL for the table definition"
Working with PL/SQL
In SQL Developer you can work with PL/SQL. This section includes these topics:
Create a PL/SQL package
You can create a PL/SQL package for the TimesTen database.
To create a PL/SQL package, ensure that you are on the main SQL Developer page and that your TimesTen connection is expanded.
You have successfully compiled and saved a PL/SQL package. You are now ready to specify a PL/SQL package body.
Define the body of a PL/SQL package
Before you define the body of a PL/SQL package, ensure that you have defined a PL/SQL package.
To define the body of a PL/SQL package, ensure that you are on the main SQL Developer page and that your TimesTen connection is expanded.
You have successfully compiled and saved the body of a PL/SQL package. You are now ready to run your PL/SQL package.
Run a PL/SQL package
To run a PL/SQL package, ensure that you are on the main SQL Developer page and that your TimesTen connection is expanded.
You successfully ran a PL/SQL package.
Compile PL/SQL packages
Before you compile a PL/SQL package, ensure that you have created a PL/SQL package and defined the body of that PL/SQL package. You should compile a PL/SQL package after you edit any part of your PL/SQL package or package body.
You can either compile a specific PL/SQL package or compile all of your saved PL/SQL packages.
Compile a specific PL/SQL package
To compile a specific PL/SQL package, ensure that you are on the main SQL Developer page and that your TimesTen connection is expanded.
You have successfully compiled a PL/SQL package.
Compile all of your PL/SQL packages
To compile all of your saved PL/SQL packages, ensure that you are on the main SQL Developer page and that your TimesTen connection is expanded.
You have successfully compiled all of your saved PL/SQL packages.
Drop a PL/SQL package
To drop a PL/SQL package, ensure that you are on the main SQL Developer page and that your TimesTen connection is expanded.
You have successfully dropped a PL/SQL package.
Use a REF CURSOR as an OUT parameter
You can test a PL/SQL function, procedure, or package by defining a REF CURSOR as an OUT parameter in your PL/SQL function, procedure, or package. After you define a REF CURSOR, compile and run your PL/SQL function, procedure, or package. The Run dialog appears and when you choose OK, the details of the run are displayed and the output from the execution of the function, procedure, or package is displayed in the Output Variables tab.
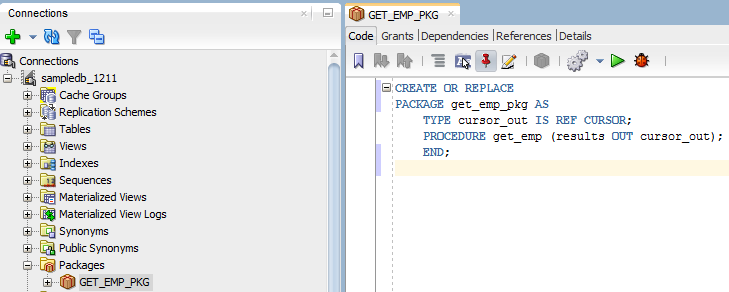
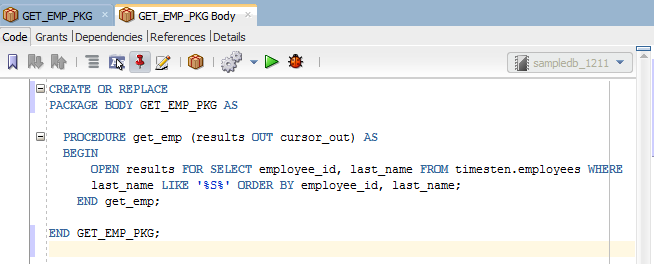
The following example creates a package called get_emp_pkg. The get_emp_pkg package defines a REF CURSOR as an OUT parameter and defines a procedure that uses the REF CURSOR as an OUT parameter.
Next create a package body that defines the procedure get_emp. The procedure get_emp opens the REF CURSOR variable and performs a query on the employees table.
Figure 4-7 get_emp_pkg package body definition
Description of "Figure 4-7 get_emp_pkg package body definition"
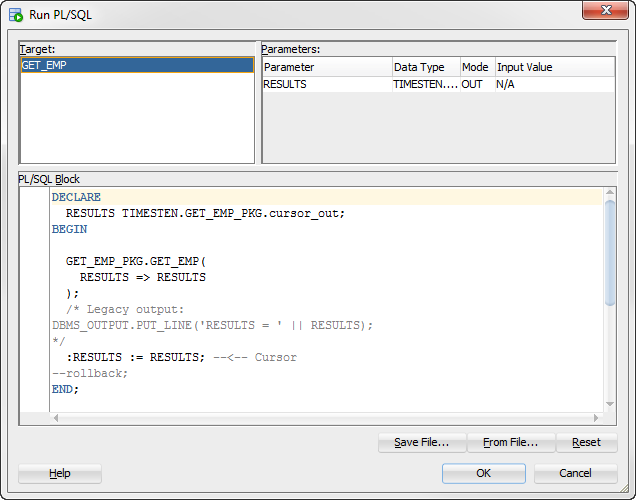
Compile the package and package body. Right-click on the get_emp_pkg and choose Run. The Run PL/SQL dialog displays allowing you to run the test wrapper. Choose OK to run the test wrapper.
At the bottom of SQL Developer, you see the following tabs:
-
Messages: Displays the status of all of your compilations and if any errors occurred.
-
Logging Page: Displays all errors that have occurred.
-
IdeConnections: Displays the status of your run including any errors encountered.
-
Output Variables: Shows the output from the execution of the function, procedure, or package.
Working with sequences
You can work with sequences for TimesTen and TimesTen Scaleout databases. For more information on sequences, see "CREATE SEQUENCE" in the Oracle TimesTen In-Memory Database SQL Reference.
This section includes these topics:
Create a sequence
You can create a sequence for the TimesTen database or TimesTen Scaleout database.
To create a sequence, ensure that you are on the main SQL Developer page and that your TimesTen or TimesTen Scaleout connection is expanded.
You have successfully created a sequence.
Alter a sequence
You can alter the batch value of an existing sequence of a TimesTen Scaleout database.
To alter a sequence, ensure that you are on the main SQL Developer page and that your TimesTen or TimesTen Scaleout connection is expanded.
You have successfully edited the batch value of an existing sequence.
Working with views
You can work with views for the TimesTen and TimesTen Scaleout databases. For more information on views, see "Understanding views" in the Oracle TimesTen In-Memory Database Operations Guide.
This section includes these topics:
Create a view
You can create a view for the TimesTen database or TimesTen Scaleout database.
To create a view, ensure that you are on the main SQL Developer page and that your TimesTen or TimesTen Scaleout connection is expanded.
You have successfully created a view.
Working with materialized views
You can work with materialized views for the TimesTen and TimesTen Scaleout databases. For more information on views, see "Understanding materialized views" in the Oracle TimesTen In-Memory Database Operations Guide.
This section includes these topics:
Create a materialized view
You can create a materialized view for the TimesTen database or TimesTen Scaleout database.
To create a materialized view, ensure that you are on the main SQL Developer page and that your TimesTen or TimesTen Scaleout connection is expanded.
You have successfully created a materialized view.
Drop a materialized view
You can drop a materialized view of the TimesTen database or TimesTen Scaleout database.
To drop a view, ensure that you are on the main SQL Developer page and that your TimesTen or TimesTen Scaleout connection is expanded.
You have successfully dropped a materialized view from your database.
Locating a TimesTen database object
If you are unable to find a database object, right-click the node corresponding to the object type and select Refresh to refresh the list of objects of that type.
For example, to find a cache group, right-click the Cache Groups node and select Refresh to refresh the list of cache groups.
You can also check if the object appears under the Other Users node. Click the + to the left of the Other Users node to expand the node. Then click the + to the left of any of the users' nodes to expand that user's node.
Click the + to the left of the node corresponding to the object type to view the list of objects of that type owned by the user.
For example, to find a table, click the + to the left of the user's Tables node to view the list of tables owned by that user.
Granting and revoking object privileges
You can grant privileges to and revoke privileges from the following database objects:
-
Regular and cache tables
-
Regular and materialized views
-
Sequences
-
PL/SQL packages, procedures and functions
To grant privileges on an object, right-click the name of the object and select Privileges, then select Grant.
In the Users drop-down menu of the Grant dialog box, select the user to grant object privileges to the object. In the Privileges section, select the All check box or click >> to grant all available object privileges on the object to the selected user. Otherwise, select the individual privileges from the Available Privileges list for the privileges to grant to the selected user and then click > to move those privileges into the Selected Privileges list. To select multiple privileges, press and hold the CTRL key, and click the desired privileges. Click Apply to grant the selected object privileges on the object to the selected user.
For a particular object type, only the available object privileges are shown. For example, DELETE, INDEX, INSERT, REFERENCES, SELECT and UPDATE privileges can be granted on a table. However, only INDEX, REFERENCES and SELECT privileges can be granted on a materialized view.
Only users with the ADMIN system privilege or the owner of an object can grant object privileges on the object.
For more information about the set of privileges available to each type of object, see "Object privileges" in the Oracle TimesTen In-Memory Database SQL Reference.
To revoke privileges from an object, right-click the name of the object and select Privileges, then select Revoke.
In the Users drop-down menu of the Revoke dialog box, select the user to revoke object privileges from the object. In the Privileges section, select the All check box or click >> to revoke all granted object privileges on the object from the selected user. Otherwise, select the individual privileges from the Available Privileges list for the privileges to revoke from the selected user and then click > to move those privileges into the Selected Privileges list. To select multiple privileges, press and hold the CTRL key, and click the desired privileges. Click Apply to revoke the selected object privileges on the object from the selected user.
The Users drop-down menu shows only users that have object privileges on the object. For a particular user, only the object privileges that they have been granted are shown.
Only users with the ADMIN system privilege or the owner of an object can revoke object privileges from the object.
Viewing the privileges granted on a database object
You can view the object privileges granted to all users on a particular object such as a regular table or a cache table, a regular view or a materialized view, a sequence, or a PL/SQL package, procedure or function.
For example, to view the privileges granted on a regular table, click the + to the left of the user's Tables node to view the list of tables owned by that user and then click the name of the desired table.
The Grants tab, located within the table tab, shows the users who have privileges on the table, what privileges they have been granted, and the user who granted the privileges.
ttIsql commands in SQL worksheet
The following ttIsql commands are supported in the SQL Worksheet:
-
autocommit
-
desc
-
dssize
-
version
For more information, see "ttIsql" in the Oracle TimesTen In-Memory Database Reference.
