Access Multiple Essbase Servers Using a Centralized Smart View URL
For independently deployed Essbase instances not registered with EPM Shared Services, you can use Provider Services to configure all the Essbase Servers to be accessible as nodes under one centralized Smart View URL.
After you do so, Smart View users will be able to access all the Essbase Servers using just one URL in their connection panel.
To set up the centralized URL access,
-
On your current Essbase Server machine, navigate to the location of the clone scripts.
-
Linux
<Essbase Product Home>/modules/oracle.essbase.sysman/scripts/copyclusterkey -
Windows
<Essbase Product Home>\modules\oracle.essbase.sysman\scripts\copyclusterkey
If you do not know where <Essbase Product Home> is in your environment, refer to Environment Locations in the Essbase Platform for an explanation.
-
-
Copy the cloneTokenManagerKeys (
.shor.cmd) script and the updatedClusterId.py file into thebindirectory of <Domain Home> on your current Essbase Server machine. If you do not know where <Domain Home> is in your environment, refer to Environment Locations in the Essbase Platform for an explanation.For Linux,
-
Copy
cloneTokenManagerKeys.shandupdatedClusterId.pyinto$DOMAIN_HOME/bin. For example:/scratch/<home dir>/Oracle/Middleware/Oracle_Home/user_projects/domains/essbase_domain/bin -
Open a command prompt in the
$DOMAIN_HOME/bindirectory, and grant execute permission tocloneTokenManagerKeys.sh. For example,chmod +x cloneTokenManagerKeys.sh -
Run the script, providing a secondary Admin Server URL to synchronize it (for single sign-on using Provider Services) with the current server.
The syntax is:
./cloneTokenManagerKeys.sh t3://<ADMIN-SERVER-NAME>:<ADMIN-PORT>For example:
./cloneTokenManagerKeys.sh t3://AdminServer2:7001If there are multiple environments to synchronize, enter the Admin Server URLs for each environment, delimited by spaces. For example:
./cloneTokenManagerKeys.sh t3://AdminServer2:7001 t3://AdminServer3:7001If TLS (SSL) is enabled, use the
t3sprotocol to specify the URL. For example:./cloneTokenManagerKeys.sh t3s://AdminServer2:7002
For Windows,
-
Copy
cloneTokenManagerKeys.cmdandupdatedClusterId.pyinto%DOMAIN_HOME%\bin. For example:C:\Oracle\Middleware\Oracle_Home\user_projects\domains\essbase_domain\bin -
Open a command prompt in the
%DOMAIN_HOME%\bindirectory. -
Run the script, providing a secondary Admin Server URL to synchronize it (for single sign-on) with the current server using Provider Services.
The syntax is:
.\cloneTokenManagerKeys.cmd t3://<ADMIN-SERVER-NAME>:<ADMIN-PORT>For example:
.\cloneTokenManagerKeys.cmd t3://AdminServer2:7001If there are multiple environments to synchronize, enter the Admin Server URLs for each environment, delimited by spaces. For example:
.\cloneTokenManagerKeys.cmd t3://AdminServer2:7001 t3://AdminServer3:7001If TLS (SSL) is enabled, use the
t3sprotocol to specify the URL. For example:.\cloneTokenManagerKeys.cmd t3s://AdminServer2:7002
-
-
After you are finished with the synchronizing process, restart all Essbase Servers that you synchronized with the current Essbase Server. Refer to Start, Stop, and Check Servers.
-
Configure your Essbase Servers by adding them to Provider Services management using the Essbase web interface.
-
In the Essbase web interface, navigate to the Console and click Configuration.
-
Go to the Centralized URL tab and click Add.
-
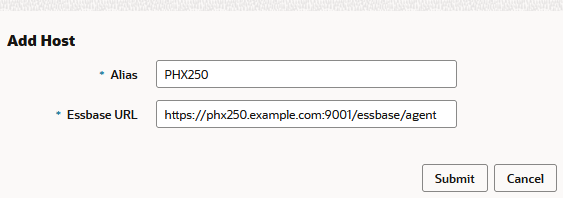
In the Add Host dialog, enter information about one of the Essbase Servers. Provide an Alias and an Agent URL.

-
Click Submit, and click Add again to add more Essbase Servers that you want to make accessible from a single Smart View URL.

-
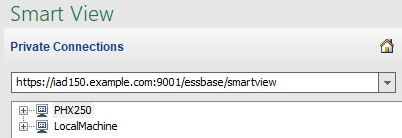
From Smart View, log in to the Essbase Server you just configured. You should be able to connect to all instances that you configured for centralized URL.

-
If you additionally want to set up high availability (failover) access to an application hosted on one or more of the Essbase Servers you configured using a centralized URL, proceed to Configure and Manage Active-Active (Read-Only) Essbase Clusters.
-