3.6.6 Enabling Spatiotemporal for a Dataset
In order to visualize and animate spatiotemporal data, you must enable Spatiotemporal for the dataset on the Datasets page.

Spatial Studio supports visualization and animation of spatiotemporal map layers using a Cesium Timeline widget (see Overview of the Cesium Timeline Widget). These map layers can listen to the timeline only if you enable Spatiotemporal on the underlying datasets.

Characteristics of a Spatiotemporal Dataset

Spatial Studio considers a dataset to contain spatiotemporal data if it belongs to any one of the following types.
  • Live Spatiotemporal Dataset: A dataset which meets the following characteristics is known as a Live dataset:
    • The dataset is based on a geometry table or view with a geometry column or pair of latitude/longitude columns.
    • The dataset has one or more entities (that represent an object in the dataset) which are uniquely identified by one of the columns.
    • The dataset's underlying table or view contains a column of the type TIMESTAMP or DATE (or a qualifying field in the GeoJSON response), that stores the UTC datetime of the entities as they are being observed and recorded.
    • The dataset's underlying table or view must have ongoing inserts with recently obtained location data of entities being observed or monitored.

    Spatial Studio considers all the different dataset rows of the same entity id as entries representing the entity with different TIMESTAMP values. However, they may or may not have varying location coordinates or geometries. Hence, these live spatiotemporal datasets can again be classified as shown:

    • Moving Objects: For each entity, if the location or geometry change with changing TIMESTAMP values, then these datasets are called moving objects datasets. In this case, a trail layer (if it is a qualifying geometry) gets added, which shows the trajectory of the moving object as a line string by fetching data for last N seconds (or higher time unit).
    • Non-Moving Objects: For each entity, if only certain properties change (and not the location or geometry) with changing TIMESTAMP, then these are called non-moving objects datasets. In this case, no trail layer gets added as only the properties change with time.
  • Non-Live Spatiotemporal Dataset: A dataset with the following characteristics is known as a Non-Live dataset:
    • The dataset is based on a geometry table or view with a geometry column or pair of latitude/longitude columns.
    • The dataset's underlying table or view contains a TIMESTAMP or DATE type column that contains historic time values.
    These datasets can again be classified as shown:
    • Moving Objects: Similar to a Live dataset, if this dataset contains entities (that uniquely represent an object in the dataset) with varying TIMESTAMP values, then a trail layer gets added. The trail layer shows the trajectory of the moving object as a line string by fetching data for last N seconds (or higher time unit).
    • Non-Moving Objects: In this configuration, the dataset is just treated to have various rows with different TIMESTAMP values (not grouped by any entity id).
  • Time-enabled WMS Dataset: If a WMS Service offers a time dimension for an image layer selected in a WMS dataset, then that WMS Dataset can be configured as spatiotemporal.
  • GeoJSON URL (external) Dataset: These types of datasets can be configured to refresh periodically based on an interval value.

3.6.6.1 Configuring Spatiotemporal for Live Moving Objects Dataset

Perform the following steps to configure spatiotemporal for a live dataset with moving objects. The instructions assume that such a dataset is already existing in your database schema.
  1. Navigate to the Datasets page.
  2. Right-click on the required spatiotemporal dataset and click Properties.
    The Dataset Properties dialog opens.
  3. Click the Spatiotemporal tab.

    The following dialog is displayed:

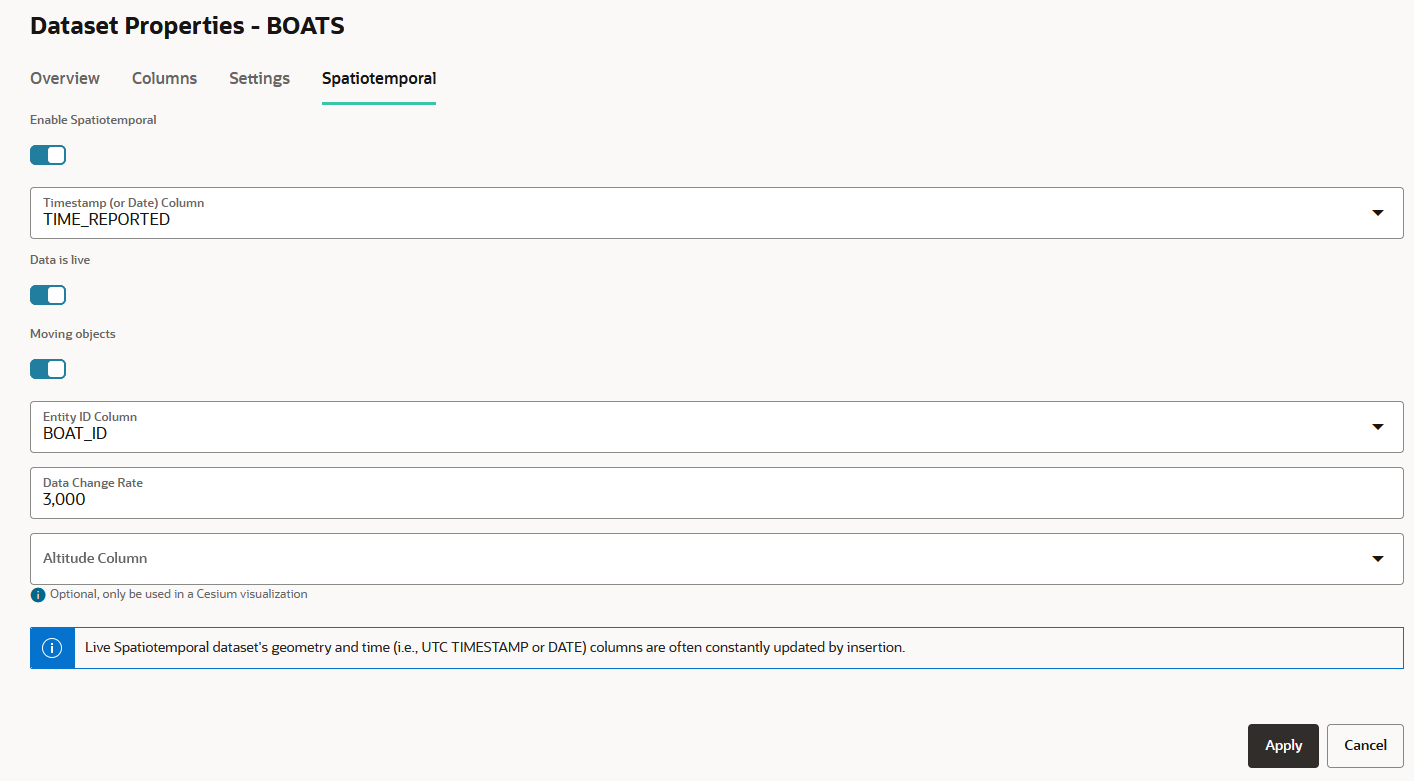
    Figure 3-36 Enabling Spatiotemporal for a Dataset
    Description of Figure 3-36 follows
    Description of "Figure 3-36 Enabling Spatiotemporal for a Dataset"
  4. Switch ON Enable Spatiotemporal.
  5. Select the Timestamp (or Date) Column.
    • Both date-type and timestamp-type columns are supported.
    • If using a timestamp-type column, then note that Spatial Studio supports only UTC (Coordinated Universal Time) or GMT (Greenwich Mean Time) time zone for visualizing moving objects.
  6. Switch ON Data is live.
  7. Switch ON Moving objects.
  8. Select the Entity ID Column that identifies a set of unique entities.
    The Entity ID Column is not a unique column as each entity can have many recordings of its locations in the same table.
  9. Specify Data Change Rate to indicate the approximate frequency of the live feed updates in the table.
  10. Optionally, select the Altitude Column for Cesium Map Visualization only.
  11. Click Apply.
Your dataset is now enabled for spatiotemporal data visualization.

3.6.6.2 Configuring Spatiotemporal for Live and Non-Moving Objects Dataset

Perform the following steps to configure spatiotemporal for a dataset containing live real-time data on non-moving objects. Although the data attributes of the different entities can vary with time, the entity locations do not change. The instructions assume that such a dataset is already existing in your database schema.
  1. Navigate to the Datasets page.
  2. Right-click on the required spatiotemporal dataset and click Properties.
    The Dataset Properties dialog opens.
  3. Click the Spatiotemporal tab.
  4. Switch ON Enable Spatiotemporal.
  5. Select the Timestamp (or Date) Column.
    • Both date-type and timestamp-type columns are supported.
    • If using a timestamp-type column, then note that Spatial Studio supports only UTC (Coordinated Universal Time) or GMT (Greenwich Mean Time) time zone for visualizing moving objects.
  6. Switch ON Data is live.
  7. Switch OFF Moving objects.
  8. Select the Entity ID Column that identifies a set of unique entities.
    The Entity ID Column is not a unique column as each entity can have many recordings of its locations in the same table.
  9. Specify Data Change Rate to indicate the approximate frequency of the live feed updates in the table.
  10. Optionally, select the Altitude Column for Cesium Map Visualization only.
  11. Click Apply.
Your dataset is now enabled for spatiotemporal data visualization.

3.6.6.3 Configuring Spatiotemporal for Non-Live Moving Objects Dataset

Perform the following steps to configure spatiotemporal for a dataset containing non-live data on moving objects. The instructions assume that such a dataset is already existing in your database schema.
  1. Navigate to the Datasets page.
  2. Right-click on the required spatiotemporal dataset and click Properties.
    The Dataset Properties dialog opens.
  3. Click the Spatiotemporal tab.

    The following dialog is displayed:

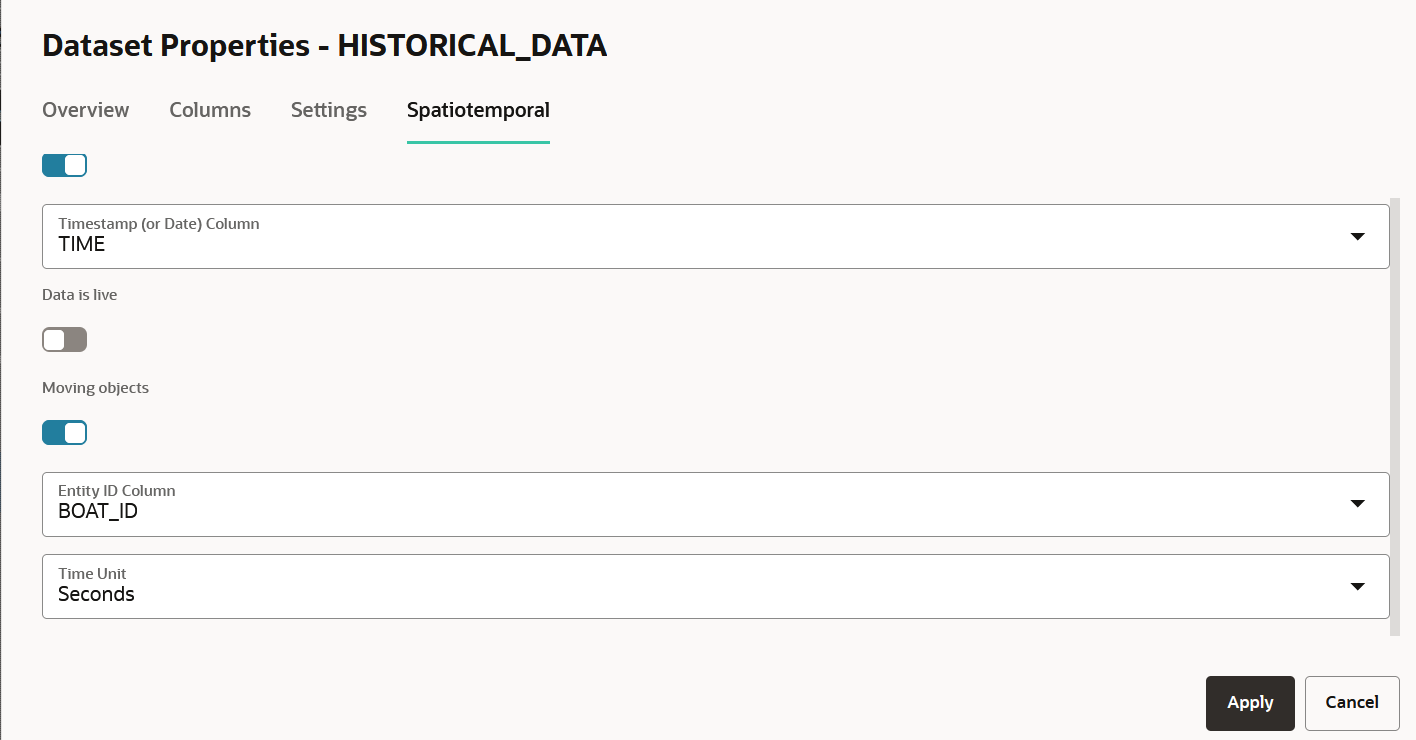
    Figure 3-37 Enabling Spatiotemporal for Historical Data

    Description of Figure 3-37 follows
    Description of "Figure 3-37 Enabling Spatiotemporal for Historical Data"
  4. Switch ON Enable Spatiotemporal.
  5. Select the Timestamp (or Date) Column.
    • Both date-type and timestamp-type columns are supported.
    • If using a timestamp-type column, then note that Spatial Studio supports only UTC (Coordinated Universal Time) or GMT (Greenwich Mean Time) time zone for visualizing moving objects.
  6. Switch OFF Data is live.
  7. Switch ON Moving objects.
  8. Select the Entity ID Column that identifies a set of unique entities.
    The Entity ID Column is not a unique column as each entity can have many recordings of its locations in the same table.
  9. Select the Time Unit.
  10. Click Apply.
Your dataset is now enabled for spatiotemporal data visualization.

3.6.6.4 Configuring Spatiotemporal for Non-Live and Non-Moving Objects Dataset

Perform the following steps to configure spatiotemporal for a dataset containing non-moving objects with different timestamp values. The instructions assume that such a dataset is already existing in your database schema.
  1. Navigate to the Datasets page.
  2. Right-click on the required spatiotemporal dataset and click Properties.
    The Dataset Properties dialog opens.
  3. Click the Spatiotemporal tab.

    The following dialog is displayed:

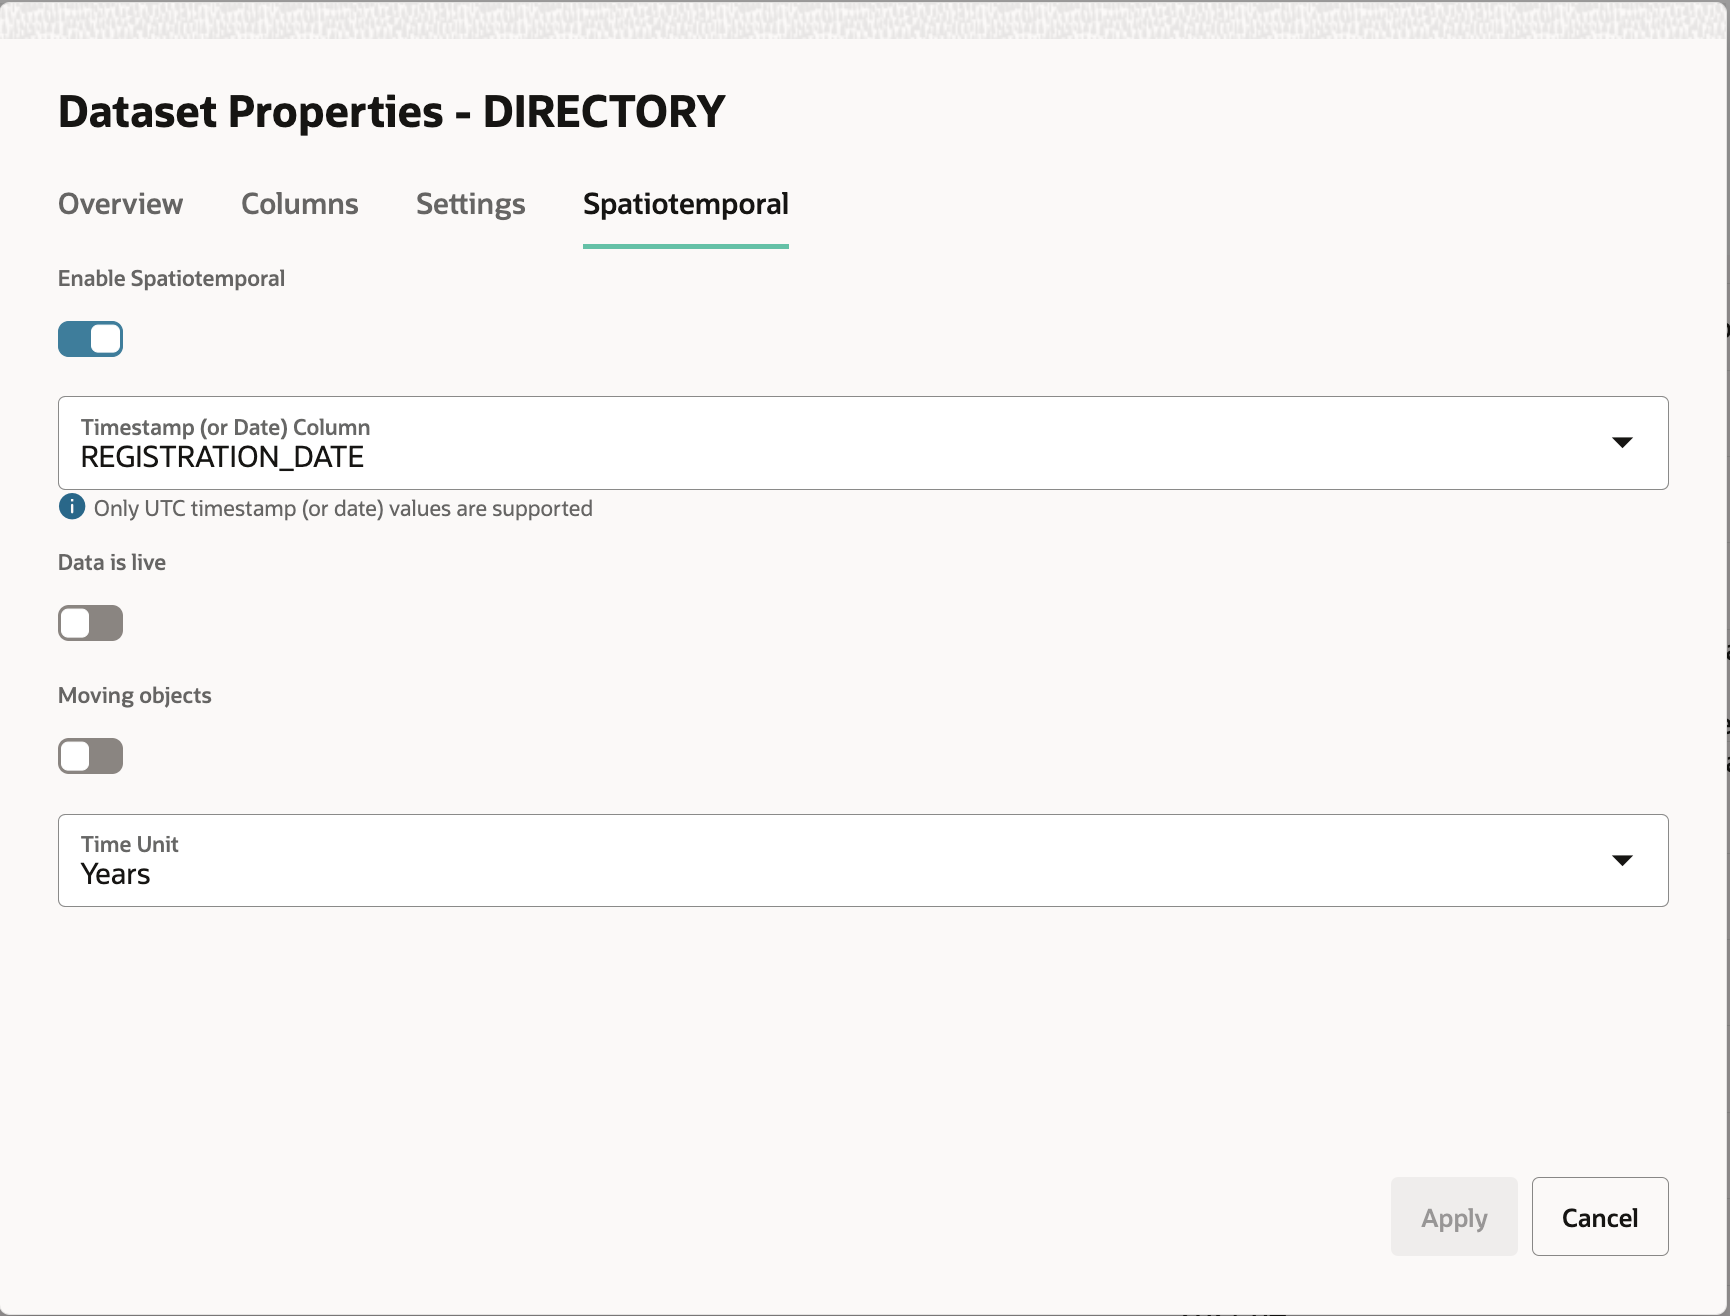
    Figure 3-38 Enabling Spatiotemporal for Standard Filtering Datasets

    Description of Figure 3-38 follows
    Description of "Figure 3-38 Enabling Spatiotemporal for Standard Filtering Datasets"
  4. Switch ON Enable Spatiotemporal.
  5. Select the Timestamp (or Date) Column.
    • Both date-type and timestamp-type columns are supported.
    • If using a timestamp-type column, then note that Spatial Studio supports only UTC (Coordinated Universal Time) or GMT (Greenwich Mean Time) time zone for visualizing moving objects.
  6. Switch OFF Data is live.
  7. Switch OFF Moving objects.
  8. Select the Time Unit.
    The data will be filtered as per the selected time unit.

    Also, note that the filtering is applied at the dataset level. This implies that all the layers created out of this dataset will have the same filtering when added to the timeline.

  9. Click Apply.
Your dataset is now enabled for spatiotemporal data visualization.

3.6.6.5 Configuring Spatiotemporal for OGC WMS Datasets

Perform the following steps to configure spatiotemporal for an OGC WMS dataset.
  1. Navigate to the Datasets page.
  2. Right-click on the required OGC WMS dataset and click Properties.
    The Dataset Properties dialog opens.
  3. Click the Spatiotemporal tab.

    The following dialog is displayed:

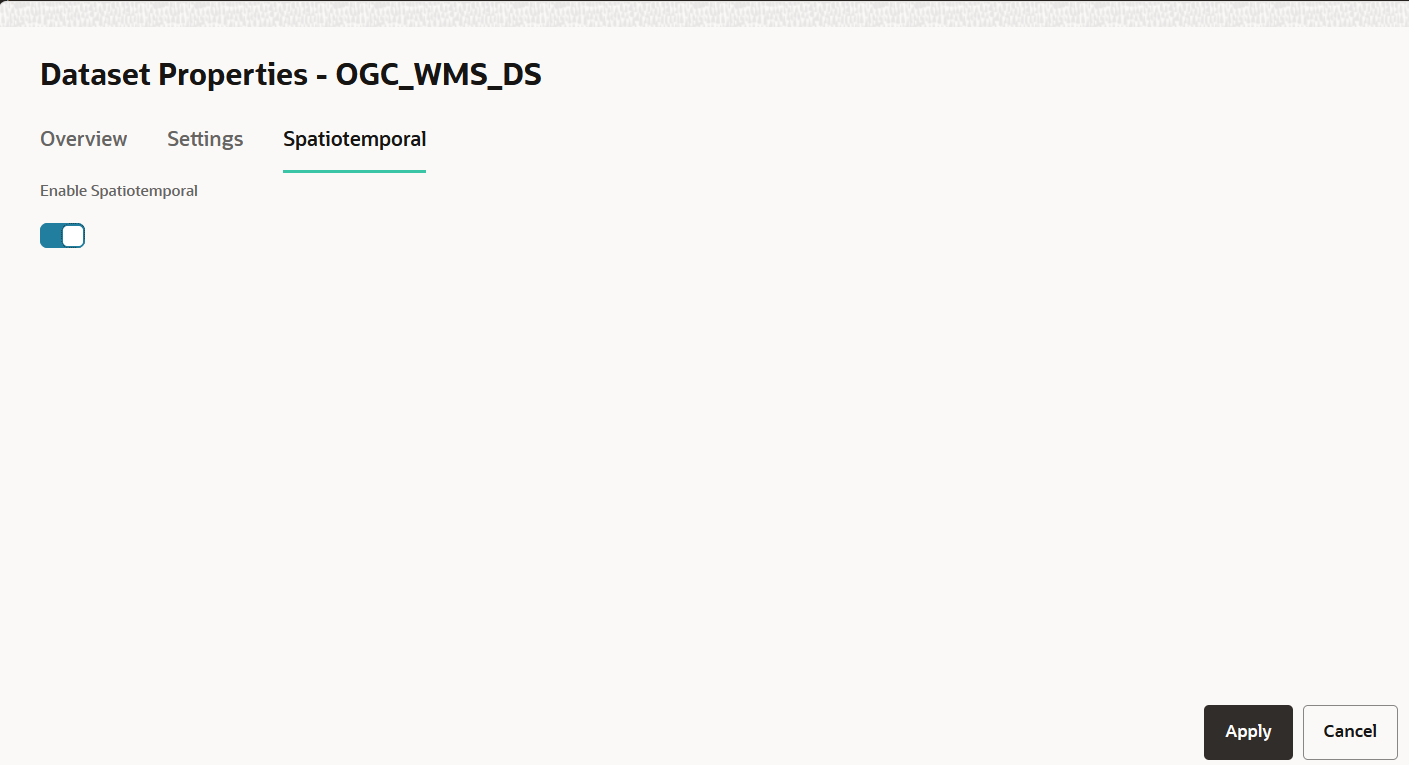
    Figure 3-39 Enabling Spatiotemporal for OGC WMS Dataset

    Description of Figure 3-39 follows
    Description of "Figure 3-39 Enabling Spatiotemporal for OGC WMS Dataset"
  4. Switch ON Enable Spatiotemporal.
  5. Click Apply.
Your dataset is now enabled for spatiotemporal data visualization.

3.6.6.6 Configuring Spatiotemporal for GeoJSON URL Datasets

Perform the following steps to configure spatiotemporal for a GeoJSON URL based dataset.
  1. Navigate to the Datasets page.
  2. Right-click on the required GeoJSON URL dataset and click Properties.
    The Dataset Properties dialog opens.
  3. Click the Spatiotemporal tab.
  4. Switch ON Enable Spatiotemporal.
  5. Click Apply.
Your dataset is now enabled for spatiotemporal data visualization. Also, note that the dataset will be considered Live by default.