- Guide
- Using Oracle Spatial Studio
- Visualization in Oracle Spatial Studio
- Styling a Map Layer
- Using the Redline Map Tool
3.10.4.14 Using the Redline Map Tool
Spatial Studio provides the Redline map tool for drawing and annotating different geometry shapes on your map.
In addition, you can edit, delete, or share these redline drawing sets by exporting it to a GeoJSON file.
Perform the following steps to get started with the Redline map tool.
The instructions assume that you have a project opened on your Active Project page and
the map layer is displayed for visualization.
- Click the Actions icon on the map tool bar.
- Select Redline from the drop-down menu.The Redline map tool bar appears as shown:
The tool bar provides the following options for defining or managing Redline objects on the map:
- Select Feature (default): To select a Redline object for update or delete.
- Draw Line: To define a Redline line.
- Draw Point: To define a Redline point.
- Draw Rectangle: To define a Redline rectangle.
- Draw Circle: To define a Redline circle.
- Draw Polygon: To define a Redline polygon.
- Draw Freehand: To draw a Redline freehand.
- Click to choose a color: To choose the default color for the Redline objects.
- Export Features: To export the Redline objects to a GeoJSON file. You can later upload the file to create a Dataset which can be used in Map Visualizations. See Creating a Dataset by Uploading a File to upload a GeoJSON file.
- Toggle Visibility: To hide or unhide the marked Redline objects.
- Click the desired drawing option and draw the corresponding shape on the
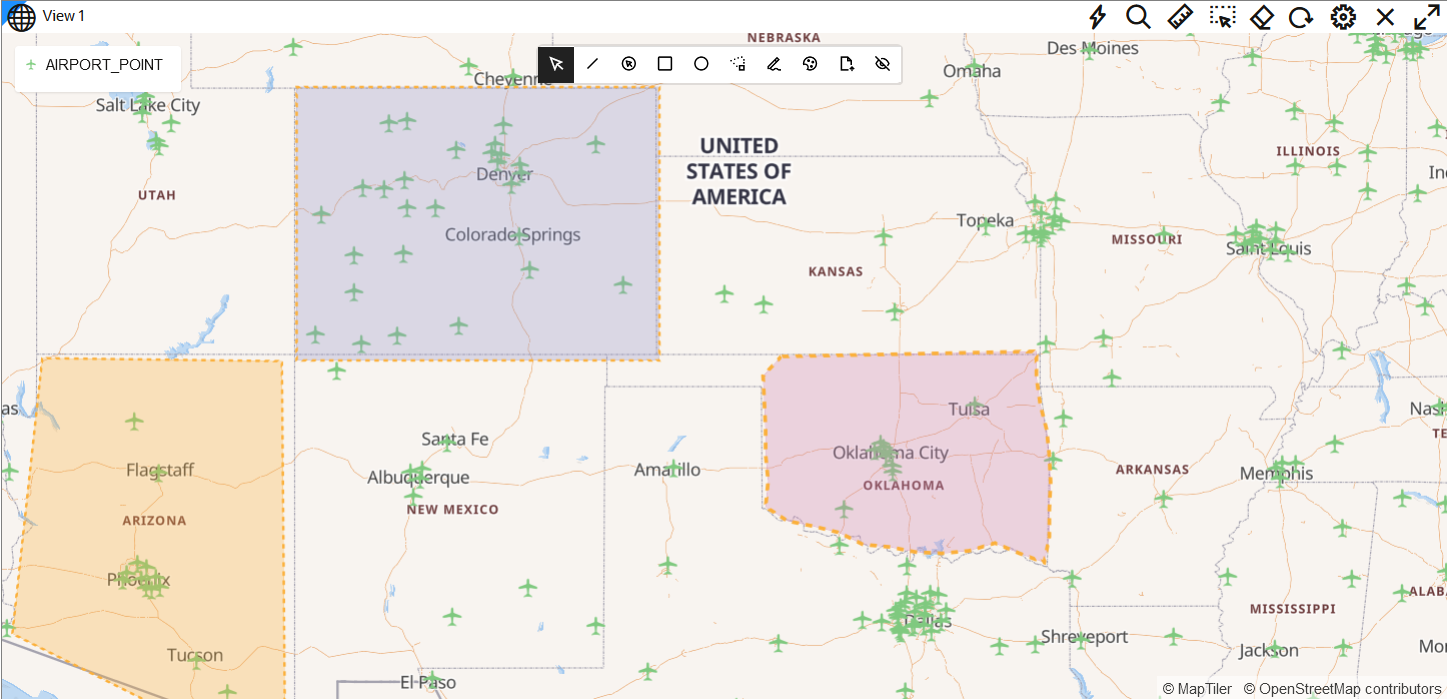
map.For example, the following figure shows three Redline objects added to a map layer:
Figure 3-87 Redlining Areas in Map Visualization

Description of "Figure 3-87 Redlining Areas in Map Visualization"Repeat this step to add as many Redline objects as required.Tip:
You can duplicate and move a Redline object on the map. - Optionally, perform any of the following actions on a defined Redline
object.
- Modify the Shape of the Redline Object
- Click Select Feature on the Redline map toolbar.
- Click the required Redline object.
The existing vertices of the object are shown highlighted in red.
- Click along the object boundary to add new vertices (points) and adjust its shape as required.
- Optionally, move the entire object to the desired location on the map.
- Edit Feature Properties
- Click Select Feature on the Redline map toolbar.
- Right-click and select Edit Feature Properties on the required Redline object.
- Add a Description to annotate the
object.
This description will be displayed as a tooltip when you mouse over a Redline object.
- Optionally, modify the Fill and Outline width.
- Duplicate Feature
- Click Select Feature on the Redline map toolbar.
- Right-click and select Duplicate Feature on the required Redline object.
- Move the duplicated object to the desired area on the map.
- Delete Feature
- Click Select Feature on the Redline map toolbar.
- Right-click and select Delete Feature on the required Redline object to be deleted.
- Modify the Shape of the Redline Object
- Optionally, export all the marked Redline objects to a GeoJSON file.
- Click Export Features on the Redline map toolbar.
- Click Download as GeoJson and save the
.geojsonfile to your system.Also, note the following details regarding the exported GeoJSON file:- Each Redline object is automatically assigned a unique ID (UUID), which will be a exported.
- Any description entered for a Redline object is exported.
- Any styling information, such as custom colors and outline width are NOT exported.
- Click Save to save your project with the Redline
drawings.The drawings will be persisted as a part of the project. Note that when you reopen an existing project with Redline drawings, the shapes are initially not editable. You must select the Redline tool again to "rehydrate" the tool with the drawings.
Parent topic: Styling a Map Layer