Data Sovereignty Use Case

A large but imaginary financial institute, Shard Bank, wants to offer credit services to users in multiple counties. Each country where credit service will be provided has its own data privacy regulations and the Personally Identifiable Information (PII) data have to be stored in this country.

The access to the data has to be limited and data administrators in one country cannot see data in others. The solution for this use case is user-defined Sharding with shards configured in different countries and Real Application Security (RAS) or Virtual Private Database (VPD) for data access control.

Overview of the Data Sovereignty Solution

This data sovereignty solution provides you with in-country data storage, and still supports a global view of all the data.

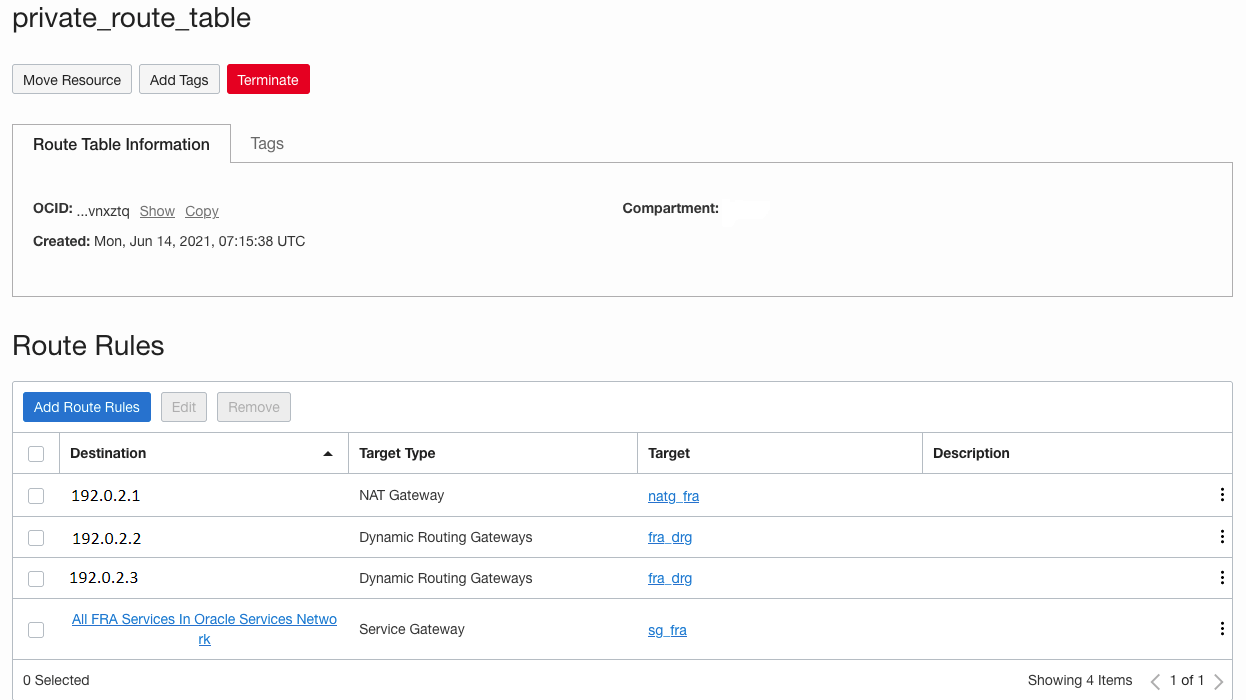
The example below demonstrates a hybrid Oracle Globally Distributed Database user-defined deployment between OCI data centers and on-premises across multiple regions. In this configuration, you can store and process all data locally. Each database (in each sovereign region) is made into a shard and the shards belong to a single distributed database. Oracle Globally Distributed Database allows you to query data in one shard (within one country), and Oracle Globally Distributed Database supports multi-shard queries (that can query data from all the countries).

Figure 16-2 Distributed Database


The global distributed database is partitioned by a key indicating the country in which it must reside. In-country applications connect to the local database as usual, and all data is stored and processed locally.

Any multi-shard queries are directed to the shard coordinator. The coordinator rewrites the query and sends it to each shard (country) that has the required data. The coordinator processes and aggregates the results from all of the countries and returns result.

Oracle Globally Distributed Database makes this use case possible with the following capabilities:

  • Direct-to-shard routing for in-country queries.
  • The user-defined sharding method allows you to use a range or list of countries to partition data among the shards.
  • Automatic configuration of replication using Oracle Active Data Guard, and constrain the replicas to be in-country.
  • Data federation support (starting with Oracle Database 21c) for converting and adding existing databases into a distributed database. For more information, see Creating a Federated Distributed Database.
  • Automatic derivation of sharding key (starting with Oracle Database 21c).

The benefits of this approach are:

  • Each shard can be in a cloud or on-premises within the country.
  • Shards can use different cloud providers (multi-cloud strategy) and replicas of a shard can be in a different cloud or on-premises.
  • Online resharding allows you to move data between clouds, or to and from the cloud and on-premises.
  • Strict enforcement of data sovereignty providing protection from inadvertent cross region data leak.
  • Single Multimodel Big Data store with reduced volume of data duplication.
  • Better fault isolation as planned/unplanned down time within one region/LOB does not impact other regions/LOBs.
  • Ability to split busy partitions and shards as needed.
  • Support for full ACID properties is critical for transactional applications.

Deployment Topology for Data Sovereignty

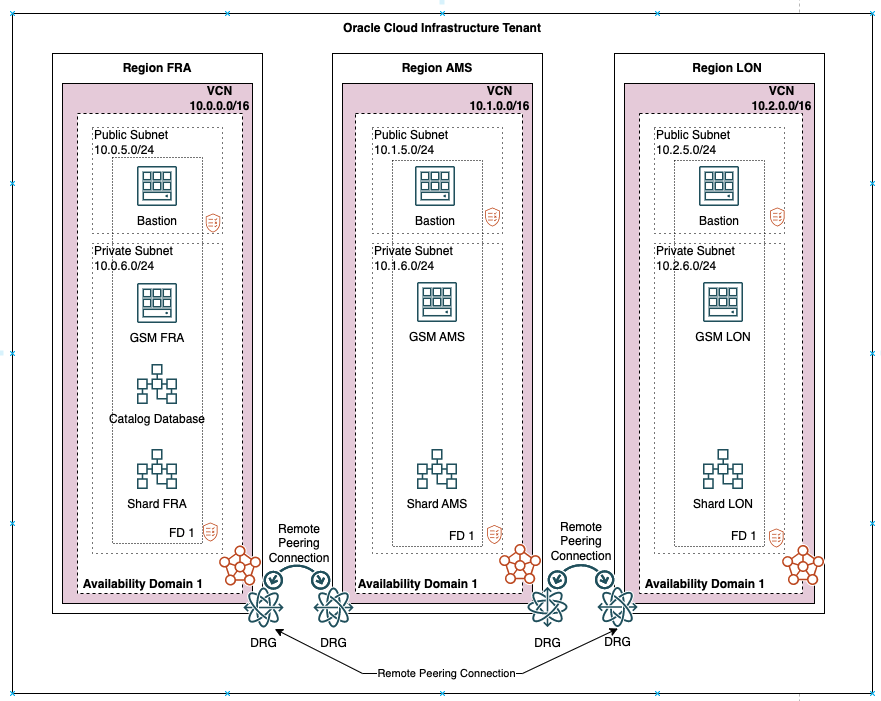
In this example use case, we create a distributed database on Oracle Cloud Infrastructure that spans three regions, Frankfurt (Region1 FRA), Amsterdam (Region 2 AMS), and London (Region 3 LON).

Each region hosts a shard director (Virtual Machine global service manager (GSM)) and one shard (System Database Shard 1, 2, and 3 respectively), and Region 1 (FRA) hosts the shard catalog (System Database GSM Catalog Database).

Figure 16-3 Deployment Topology of Data Sovereignty


Configuring the Data Sovereignty Use Case

Configure the Oracle Globally Distributed Database Data Sovereignty use case by performing the steps given in the following topics.

Configuring VCN Networks in All Three OCI Regions

In Oracle Cloud Infrastructure (OCI), a virtual cloud network is a virtual version of a traditional network on which your instances run. Deploy and configure a virtual cloud network (VCN) in each of our regions (FRA, AMS, and LON).

In each region, create a VCN with two subnets: public and private.
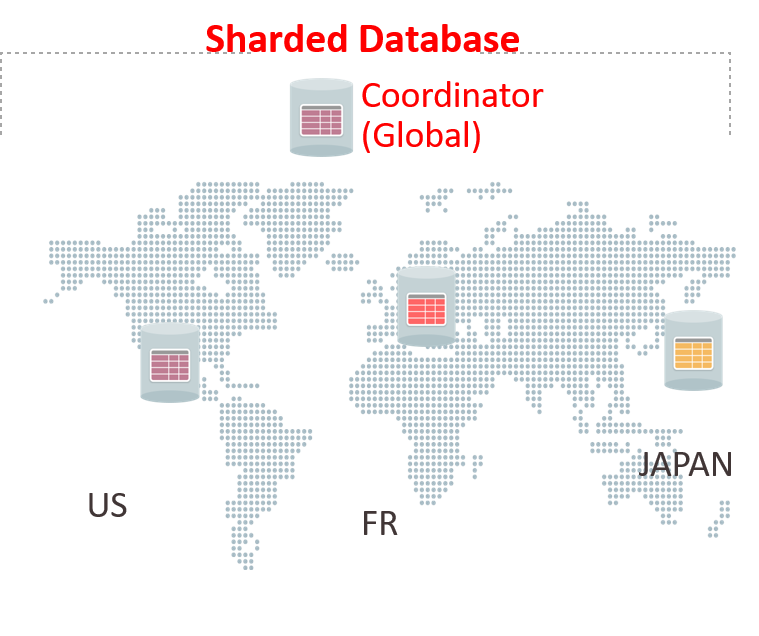
  1. Create new route table for private subnet and associate it with private subnet. The default route table should only be used for the public subnet and the private subnet should have a dedicated private route table.
  2. Create an internet gateway and associate it with default route table.
  3. Create a Network Address Translation (NAT) gateway, Service Gateway, and associate it with route table for private subnet.
Example for FRA:
  • VCN Name/CIDER: Sharding VCN FRA 10.0.0.0/16
  • Public Subnet name/CIDER: public_fra 10.0.5.0/24
  • Private Subnet name/CIDER: private_fra 10.0.6.0/24

Note:

Repeat the steps in all regions used in the sharding deployment. The subnet CIDER must be different in each region and you must provide region prefix in the VCN/subnet name.

Configuring Remote VCN Peering Between All Three Regions

Remote VCN peering is the process of connecting two VCNs in different regions, which allows the VCNs' resources to communicate using private IP addresses without routing the traffic over the internet.

Configure two remote peering connections (RPCs) in each region to connect with the other two regions in the topology.
  1. See Remote VCN Peering using an RPC for the steps to configure an RPC.
  2. Configure routing rules for the public subnet/VCN.
  3. Configure routing rules for the private subnet/VCN.
  4. Configure security rules.

Configuring Private DNS for Naming Resolution Between the Regions

You create private views for the public and private subnet for each domain in each region, resulting in a total of 6 private zones within 1 zone. Then all entries are added to each private zone configuration.

  1. See Private DNS to create and manage private DNS zones.
  2. Verify that all names are resolved correctly before you proceed with the next task.

Note:

These steps must be done in each region on all VCNs/VMs so that names can be correctly resolved.

Installing a Global Service Manager in Each Region

Oracle Global Data Services global service manager (GSM) is used by Oracle Globally Distributed Database to route queries from the application to the correct shard in a distributed database.
Download the software and perform the following tasks:
  • Download the global service manager (Oracle Database 19c) software into the bastion VM.
  • Apply the latest version of OPatch.
  • Apply the latest available Oracle Database Bundle Patch on the newly installed global service manager (Oracle Database 19c).
To install a GSM in each region:
  1. Create a 200 GB block storage using iSCSI. Configure iSCSI on the OCI Compute for GSM. Mount block storage under/u01 .
    See Connecting to Volumes With Consistent Device Paths for the mounting block storage process.
  2. As the root user, install all the required packages.
    # yum install -y oracle-database-preinstall-19c
  3. As the root user, ensure that /u01 is owned by oracle:oinstall.
    # chown oracle:oinstall /u01
  4. Download the GSM software to the designated shard director VM and install it in silent mode.
  5. Add gsm home to /etc/oratab.
    gsm:/u01/app/oracle/product/19.0.0.0/dbhome_1:N
  6. Apply the latest OPatch version.
  7. Apply the latest available bundle patch version for Oracle Database 19c.
  8. Open GSM port on Firewall:
    $ systemctl start firewalld.service
    $ systemctl enable firewalld.service
    $ firewall-cmd --permanent --zone=public --add-port=1522/tcp # firewall-cmd --reload
    $ firewall-cmd --permanent --zone=public --list-ports
    1522/tcp 22/tcp 
    
  9. Ensure that the required port is open on security lists assigned to GSM VMs to allow applications to connect to GSM.

Collecting TNS Entries for the Shard Catalog and Shards

The collection of TNS entries is required to prepare GSM server for configuration of the shard catalog database and shard databases.

The shard catalog database requires access only to PDB that stores the shard catalog database objects. However for the shard databases, prepare the entries for each shard CDB and PDB that stores the application schemas.

  1. Prepare the tnsnames entries to access the shard catalog database and all shards (Shard Catalog and Shards).
  2. Add these entries to $ORACLE_HOME/network/admin/tnsnames.ora on the GSM VMs.

    Note:

    Use FQDN for hostnames in connection strings.
    db_unique_name =
      (DESCRIPTION =
        (ADDRESS = (PROTOCOL = TCP)(HOST = host_name_fqdn)(PORT = 1521))
        (CONNECT_DATA =
          (SERVER = DEDICATED)
          (SERVICE_NAME = cdb_service_name)
        )
      )
    
    pdb_name =
      (DESCRIPTION =
        (ADDRESS = (PROTOCOL = TCP)(HOST = host_name_fqdn)(PORT = 1521))
        (CONNECT_DATA =
          (SERVER = DEDICATED)
          (SERVICE_NAME = pdb_service_name)
        )
      )
    

Configuring the Shard Catalog

The shard catalog manages the metadata for Oracle Globally Distributed Database. Configure a database on Region 1 (FRA) which will be the shard catalog database.

  1. Connect to all DBCS instances and update sqlnet encryption algorithms configured in sqlnet.ora file and add the RC4_256 encryption method as a supported algorithm for client and server.

    Note:

    The patch is required to enable the AES encryption as the AES encryption is not supported by default by GSM: Enh 29496977 - GDS ONLY USES RC4_256 TYPE ENCRYPTION. To enable the AES encryption, apply the patch in Oracle Database 19c. However, this patch is not required in Oracle Database 21c.

    Note:

    The RC4_256 algorithm is required only for Oracle Database 19c.
  2. Configure the shard catalog database with requirements for Oracle Globally Distributed Database.
    SQL> alter system set open_links=16 scope=spfile;
    SQL> alter system set open_links_per_instance=16 scope=spfile;
    SQL> shu immediate
    SQL> startup
    
  3. Configure users on the shard catalog database.
    SQL> alter user gsmcatuser account unlock.
    SQL> alter user gsmcatuser identified by password;
    # Switch to PDB dedicated for catalog database
    SQL> alter session set container=catalog_db_pdb;
    SQL> create user mysdbadmin identified by password;
    SQL> grant connect, create session, gsmadmin_role to mysdbadmin; 
    SQL> grant inherit privileges on user SYS to GSMADMIN_INTERNAL;
    

Configuring the Shard Databases

Configure a database in each region which will be a shard in the distributed database configuration.

  1. Connect to all DBCS instances and update sqlnet encryption algorithms configured in sqlnet.ora file and add the RC4_256 encryption method as a supported algorithm for client and server.

    Note:

    The patch is required to enable the AES encryption as the AES encryption is not supported by default by GSM: Enh 29496977 - GDS ONLY USES RC4_256 TYPE ENCRYPTION. To enable the AES encryption, apply the patch in Oracle Database 19c. However, this patch is not required in Oracle Database 21c.

    Note:

    The RC4_256 algorithm is required only for Oracle Database 19c.
  2. Run the following commands:
    SQL> alter database flashback on;
    SQL> alter system set dg_broker_start=true;
    SQL> alter user GSMROOTUSER account unlock;
    SQL> alter user GSMUSER account unlock;
    SQL> alter user GSMADMIN_INTERNAL account unlock;
    SQL> alter user GSMROOTUSER identified by password;
    SQL> alter user GSMUSER identified by password;
    SQL> alter user GSMADMIN_INTERNAL identified by password;
    SQL> grant sysdg to gsmuser;
    SQL> grant SYSBACKUP to gsmuser;
    SQL> grant sysdg to GSMROOTUSER;
    SQL> grant SYSBACKUP to GSMROOTUSER;
    SQL> alter system set global_names=false;
    SQL> shu immediate
    SQL> startup
    # Switch to PDB used as shared database
    SQL> alter session set container= pdb_name;
    SQL> grant read,write on directory DATA_PUMP_DIR to GSMADMIN_INTERNAL;
    SQL> grant sysdg to gsmuser;
    SQL> grant SYSBACKUP to gsmuser;
    

Creating the Oracle Globally Distributed Database

Configure the global service manager listener, create a shard catalog database, and add all of the shards to the configuration. The deployment step configures all shards as a single global database.

  1. Configure the shard catalog.

    Note:

    By default system-managed data distribution is configured. If you require any other data distribution method, specify it during shard catalog creation.
    GDSCTL> create shardcatalog -database catalog_pdb_tns_entry -sharding user -user
          mysdbadmin/password -region region1
  2. Add the GSM listener and start it. Run the listener from GDSCTL.
    GDSCTL> add gsm -gsm sharddirector1 -listener 1522 -pwd password -catalog pdb_tns_entry
          -region region1
  3. Use the following template to add shards to the configuration. Repeat for each shard database.

    Add shard in FRA:

    GDSCTL> add invitednode shard_hostname
    GDSCTL> add cdb -connect cdb_conn_tns_entry -pwd gsmrootuser_pwd
    GDSCTL> add shardspace -shardspace primary_shardspace_fra
    GDSCTL> add shard -cdb cdb_conn_string -connect pdb_conn_string
     -shardspace primary_shardspace_fra -pwd gsmuser_pwd -deploy_as PRIMARY

    Add shard in AMS:

    GDSCTL> add invitednode shard_hostname
    GDSCTL> add cdb -connect cdb_conn_tns_entry -pwd gsmrootuser_pwd
    GDSCTL> add shardspace -shardspace primary_shardspace_ams
    GDSCTL> add shard -cdb cdb_conn_string -connect pdb_conn_string
     -shardspace primary_shardspace_ams -pwd gsmuser_pwd -deploy_as PRIMARY

    Add shard in LON:

    GDSCTL> add invitednode shard_hostname
    GDSCTL> add cdb -connect cdb_conn_tns_entry -pwd gsmrootuser_pwd
    GDSCTL> add shardspace -shardspace primary_shardspace_lon
    GDSCTL> add shard -cdb cdb_conn_string -connect pdb_conn_string
     -shardspace primary_shardspace_lon -pwd gsmuser_pwd -deploy_as PRIMARY
  4. Deploy the distributed database configuration.
    Run the GDSCTL DEPLOY command, to get the following output:
    GDSCTL> deploy
    deploy: examining configuration...
    deploy: requesting Data Guard configuration on shards via GSM
    deploy: shards configured successfully
    The operation completed successfully
    
  5. Create global database services on the shards to service incoming connection requests from your application. The global service is an extension to the traditional database service. All the properties of traditional services are supported for global services. For distributed databases, additional properties are set for global services. See Create and Start Global Database Services.
    For example, database role, replication lag tolerance, region affinity between clients and shards, and so on. For a read-write transactional workload, create a single global service to access data from any primary shard in a distributed database. For highly available shards using Active Data Guard, create a separate read-only global service.
    GDSCTL> add service -service oltp_rw_srvc -role primary
Load the data into the shards using the methods described in Migrating to a Sharded Database

Implementing a Session-Based Application Context Policy

Add row-level data access control on the distributed database in conjunction with the Oracle Database virtual private database (VPD) feature for both single shard queries and multi-shard queries. Oracle Global Data Services global service manager (GSM) is used in Oracle Globally Distributed Database to route queries from the application to the correct shard in a distributed database.

  1. Create user accounts and sample tables on the shard catalog.
    connect / as sysdba
    alter session enable shard ddl;
    create user bt identified by bt;
    grant dba, all privileges to bt;
    
    --CREATE USER sysadmin_vpd IDENTIFIED BY password CONTAINER = CURRENT;
    CREATE USER sysadmin_vpd IDENTIFIED BY password ; --CONTAINER = CURRENT;
    
    GRANT CREATE SESSION, CREATE ANY CONTEXT, CREATE PROCEDURE, CREATE TRIGGER, ADMINISTER DATABASE TRIGGER, ALTER SESSION TO sysadmin_vpd;
    GRANT EXECUTE ON DBMS_SESSION TO sysadmin_vpd;
    GRANT EXECUTE ON DBMS_RLS TO sysadmin_vpd;
    
    CREATE USER CT identified by ct;
    CREATE USER DT identified by dt;
    GRANT CREATE SESSION TO CT, DT;
    
    GRANT EXECUTE ON sys.exec_shard_plsql to bt, ct, dt, sysadmin_vpd;
    
    connect bt/bt
    create tablespace set ts1 in shardspace shd1;
    CREATE SHARDED TABLE customers (custid number, name varchar2(20), constraint pk1 primary key(custid)) PARTITION BY CONSISTENT HASH(custid) PARTITIONS AUTO TABLESPACE SET ts1;
    -- user-defined:
    -- CREATE SHARDED TABLE customers (custid number primary key, name varchar2(20)) PARTITION BY RANGE (custid) (PARTITION p1 values less than (100) TABLESPACE  ts1, PARTITION p2 values less than(200) TABLESPACE  ts2, PARTITION p3 values less than(300) TABLESPACE  ts11, PARTITION p4 values less than(400) TABLESPACE  ts12);
    
    insert into customers(custid, name) values(1,'CT');
    insert into customers(custid, name) values(2,'DT');
    insert into customers(custid, name) values(4,'ET');
    insert into customers(custid, name) values(5,'FT');
    commit;
    
    GRANT READ ON customers TO sysadmin_vpd;
    
    create sharded table orders(oid number not null, custid number not null, constraint ordfk foreign key(custid) references customers(custid)) partition by reference(ordfk);
    -- user-defined:
    -- CREATE SHARDED TABLE orders(oid number not null, custid number not null, constraint orders_fk1 foreign key(custid) references customers(custid)) partition by reference(orders_fk1);
    
    insert into orders values(9876, 1);
    insert into orders values(8888, 2);
    insert into orders values(7777, 2);
    insert into orders values(7771, 4);
    insert into orders values(7772, 4);
    insert into orders values(7773, 5);
    commit;
    
    GRANT READ ON orders TO CT, DT;
    
  2. Create a database session-based application context.
    CONNECT sysadmin_vpd/password
    CREATE OR REPLACE CONTEXT orders_ctx USING orders_ctx_pkg;
  3. Create a PL/SQL package to set the application context.
    CONNECT sysadmin_vpd/password
    CREATE OR REPLACE PACKAGE orders_ctx_pkg IS 
    --  PROCEDURE set_custnum SHARD_ENABLE;
      PROCEDURE set_custnum;
     END;
    /
    CREATE OR REPLACE PACKAGE BODY orders_ctx_pkg IS
      --PROCEDURE set_custnum SHARD_ENABLE
      PROCEDURE set_custnum
      AS
        custnum NUMBER;
        cnt number;
        cname varchar2(256);
      BEGIN
        -- workaround for bug 33131789: run a CSQ before SET_CONTEXT
        SELECT count(*) INTO cnt FROM BT.CUSTOMERS;
        SELECT SYS_CONTEXT('USERENV', 'SESSION_USER') INTO cname FROM dual;
        SELECT custid INTO custnum FROM BT.CUSTOMERS WHERE name = cname;
        DBMS_SESSION.SET_CONTEXT('orders_ctx', 'cust_no', custnum);
      EXCEPTION
       WHEN NO_DATA_FOUND THEN NULL;
      END set_custnum;
    END;
    /
    
  4. Create a logon trigger to run the application context PL/SQL package.
    /* create trigger fails to propagate from catalog.
        CREATE TRIGGER set_custno_ctx_...
        DDL Error: ORA-06550: line 1, column 7:
        PLS-00352: Unable to access another database \'GDS$CATALOG.SYSLOCLINK\'
        ORA-06512: at "GSMADMIN_INTERNAL.EXECUTECOMMAND", line 166
        ORA-06550: line 1, column 7:
        PLS-00201: identifier \'SYS@GDS$CATALOG.SYSLOCLINK\' must be declared
        ORA-06550: line 1, column 7:
        PL/SQL: Statement ignored
        ORA-06512: at "SYS.DBMS_GSM_FIXED", line 3764
        ORA-06512: at "SYS.DBMS_GSM_FIXED", line 3866
        ORA-06512: at "GSMADMIN_INTERNAL.EXECUTECOMMAND", line 118
        ORA-06512: at "GSMADMIN_INTERNAL.EXECUTEDDL", line
      So we create it on shards as well manually. => Use alter session enable  shard operations before creating the trigger.
    */
    /* execute sys.exec_shard_plsql('CREATE OR REPLACE TRIGGER set_custno_ctx_trig AFTER LOGON ON DATABASE  BEGIN  sysadmin_vpd.orders_ctx_pkg.set_custnum; END;');
    ORA-03753: The procedure cannot be propagated.
    */
    -- run on catalog and all shards
    CONNECT sysadmin_vpd/password
    CREATE OR REPLACE TRIGGER set_custno_ctx_trig AFTER LOGON ON DATABASE  BEGIN  sysadmin_vpd.orders_ctx_pkg.set_custnum; END;
    /
    
  5. Test the logon trigger.
    connect dt/dt
    SELECT SYS_CONTEXT('orders_ctx', 'cust_no') custnum FROM DUAL;
    connect ct/ct
    SELECT SYS_CONTEXT('orders_ctx', 'cust_no') custnum FROM DUAL;
    /* Example output:
    SQL> SELECT SYS_CONTEXT('orders_ctx', 'cust_no') custnum FROM DUAL;
    CUSTNUM
    --------------------------------------------------------------------------------
    2
    */
    
  6. On the shard catalog and shards, create a PL/SQL policy function to limit user access to their orders only.
    /* IF you see following error while propagation of DDL to shards, create the function on catalog and each shards manually.
        PLS-00352: Unable to access another database \'GDS$CATALOG.SYSLOCLINK\'
    */
    connect sysadmin_vpd/password
    CREATE OR REPLACE FUNCTION get_user_orders(
      schema_p   IN VARCHAR2,
      table_p    IN VARCHAR2)
     RETURN VARCHAR2
     AS
      orders_pred VARCHAR2 (400);
      cnum NUMBER;
     BEGIN
      SELECT NVL(SYS_CONTEXT('orders_ctx', 'cust_no'), 0) INTO cnum FROM dual;
      --orders_pred := 'custid = '||cnum;
      orders_pred := 'custid = SYS_CONTEXT(''orders_ctx'', ''cust_no'')'; 
     RETURN orders_pred;
    END;
    /
    
  7. Create the new security policy.
    execute sys.exec_shard_plsql(' SYS.DBMS_RLS.ADD_POLICY (object_schema => ''BT'',   object_name => ''orders'', policy_name => ''orders_policy'',  function_schema => ''sysadmin_vpd'', policy_function  => ''get_user_orders'', statement_types  => ''select'',  policy_type => DBMS_RLS.CONTEXT_SENSITIVE,  namespace => ''orders_ctx'',  attribute => ''cust_no'')');
    
    -- exec sys.exec_shard_plsql('sys.DBMS_RLS.DROP_POLICY(''BT'', ''orders'', ''orders_policy'')');
    -- exec sys.exec_shard_plsql('sys.DBMS_RLS.REFRESH_POLICY(''BT'', ''orders'', ''orders_policy'')');
    
  8. Test the new policy.
    connect ct/ct
    select * from bt.orders;
    connect dt/dt
    select * from bt.orders;
    /*
    connect dt/dt
    SQL> select * from bt.orders;
           OID     CUSTID
    ---------- ----------
          8888        2
          7777        2
          
    connect ct/ct
    SQL> select * from bt.orders;
           OID     CUSTID
    ---------- ----------
          9876        1
    */