17.7.4 Including Generative AI in Applications
Include Generative AI in your application by creating a Generative AI Service, configuring application attributes on the AI page, and creating a dynamic action to open the AI Assistant.

17.7.4.1 About Including Generative AI in Applications
Learn about including Generative AI (such as an AI Assistant) in your applications.

You can include AI in your applications by creating a dynamic action which opens the AI Assistant. The actual steps involved can be as simple as hooking a button to the dynamic action.

In general, the steps are as follows:

  1. Create a Generative AI Service. See Creating a Generative AI Service Object.
  2. Create an application. See Creating Applications.
  3. Edit the application definition and configure the attributes on the AI tab. See Configuring AI Attributes for an Application.
  4. Create a dynamic action with a True Action of Open AI Assistant. See Creating a Dynamic Action to Open AI Assistant.

About the Open AI Assistant True Action

Configuring a Open AI Assistant True Action, is the real power behind this feature. By editing the Action attributes in Page Designer, you can define all kinds of behavior. Consider the following examples:

  • Generative AI, System Prompt - Specify a system prompt to give the AI context to request user input. Supports application and page items and system variables.
  • Generative AI, Welcome Message - Specify a welcome message the AI Assistant will display. Supports substitutions: Application and page items and system variables.
  • Appearance, Display As - Select if AI Assistant should display as a dialog or inline.
  • Initial Prompt, Type - Specify the initial prompt (or message) that displays to the user to make it appear it's coming from an actual person. The message can be stored as an item or a value from a JavaScript expression.
  • Use Response, Type - Select how the AI Assistant should return responses. The term response refers to the message content of an individual chat message. You have the option to capture this response directly in a page item value or to process it based on more complex logic using JavaScript Code.
  • Quick Actions, Type - Enter a message to serve as a chat-wide quick action. A quick action is a pre-defined phrase that, once clicked, will be sent as a user message. Supports template directives, application and page items. and system variables.

Utilizing AI Infrastructure Programmatically

You also access the AI infrastructure programmatically using the APEX_AI package. Note that the APEX_AI APIs require an APEX session, must linked to an APEX app that has a Generative AI Service properly configured. Consider the following SQL Developer example:

set serveroutput on;

declare
    l_result clob;
begin
    apex_session.create_session (
        p_app_id   => 102,
        p_page_id  => 1,
        p_username => 'ADMIN' );

    l_result := apex_ai.generate( 'what''s 1+1?' );

    sys.dbms_output.put_line( l_result );

    apex_session.delete_session;
exception
    when others then
        apex_session.delete_session;
        raise;
end;
/

See Also:

APEX_AI in Oracle APEX API Reference

17.7.4.2 Configuring AI Attributes for an Application

Edit attributes on the AI page to select a Generative AI Service and define Consent message for a application.

Tip:

Before you can configure attributes on the AI page, you must define a Generative AI Service in Workspace Utilities. See Managing Generative AI Services.

To configure AI attributes for an application:

  1. Define a Generative AI Service as described in Managing Generative AI Services.
  2. Navigate to the AI page:
    1. On the Workspace home page, click the App Builder icon.
    2. Select an application.
    3. On the Application home page, click Edit Application Definition to the right of the application name.
    4. Click the AI tab.

    The AI page appears.

  3. Configure the attributes on the AI page:
    1. Generative AI, Service - Select the default AI Service for this application.
    2. Generative AI, Consent Message - Enter a consent message for the use of the selected AI Service.

      The Consent Message you define displays to the user the first time they access the AI Service. The user must agree with the message before they interact with the AI. The user's choice (Accept or Deny) is stored as a preference so they are only prompted once.

      Note:

      You can also use the APEX_AI package to programmatically set or clear user consent. See APEX_AI in Oracle APEX API Reference.

      Use the APEX_AI package to programmatically set or clear user consent.

  4. Click Apply Changes to save your changes.

17.7.4.3 Creating a Dynamic Action to Open AI Assistant

Create a dynamic action to open AI Assistant.

Note:

Before you can add a dynamic action to open AI Assistant, you must complete the steps described in About Including Generative AI in Applications. Failure to create a Generative AI Service or edit the application, AI attributes results in an error.

The following simple example creates a dynamic action hooked to a button that displays the AI Assistant in a dialog. Note this example only describes the limited number of attributes. This example assumes you have already created an application and page.

To add a dynamic action to open AI Assistant:

  1. Navigate to the application page.
    1. On the Workspace home page, click the App Builder icon.
    2. Select an application.
    3. Select a page.
    Page Designer appears.
  2. Create a region to contain the button. For example, create a region named Open an AI Dialog.
    1. Right Body and select Create Region from the context menu.
      In Page Designer, edit the Region attributes.
    2. Identification, Name - Enter a region name. The region name is used as the runtime region title, if the title attribute is empty. For example: Open AI Assistant Dialog
  3. Create a button:
    1. Right-click the region you just created and select Create Button from the context menu.
      In Page Designer, edit the Button attributes.
    2. Identification, Button Name - Enter the name used to reference the button being clicked. This name is used to reference the button. For example: OPEN_AI_ASSISTANT
  4. Create a dynamic action that fires when the user clicks a button:
    1. Click the Dynamic Actions tab in the left pane.
    2. Under Events, right-click Click and select Create Dynamic Action.

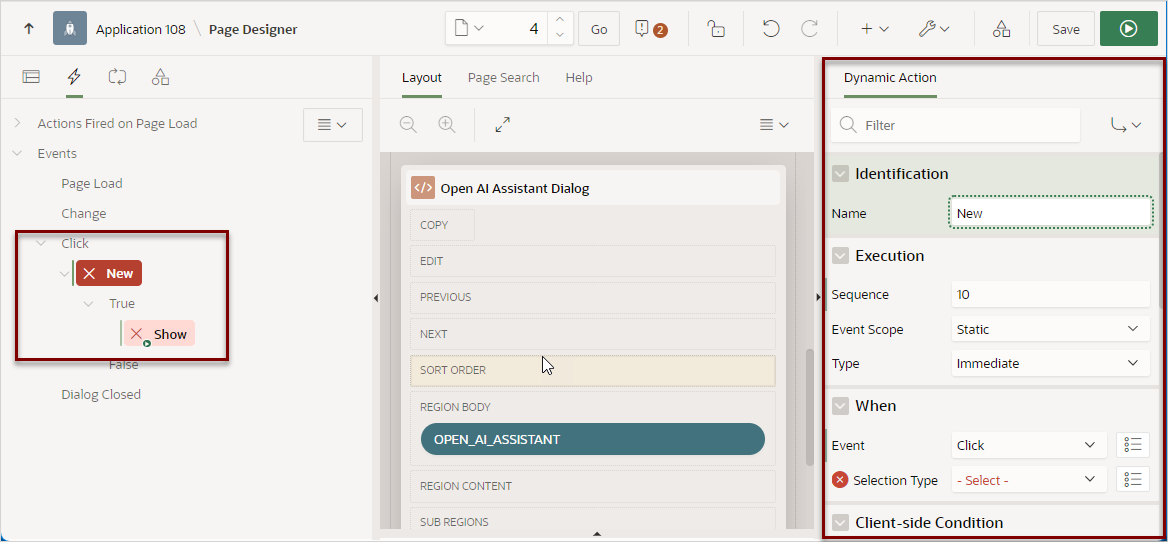
      A dynamic action named New appears in the left pane. The Property Editor displays Dynamic Action attributes.


  5. In the Property Editor, edit the Dynamic Action attributes:
    1. Identification, Name - Enter the name of the dynamic action. For example: Open AI Assistant Click
    2. When, Event - Specify the event that causes the dynamic action to fire. For this example, accept the default, Click
    3. When, Selection Type - Select the type of page element or construct to be used to trigger the event. For this example, select Button.
    4. When, Button - Select the type of page element or construct to trigger the event. For this example, select the button you previously created, OPEN_AI_ASSISTANT.
  6. Edit the True action, Show. In the Dynamic Action tab, click the Show action.

    Action attributes displays in the Property Editor.

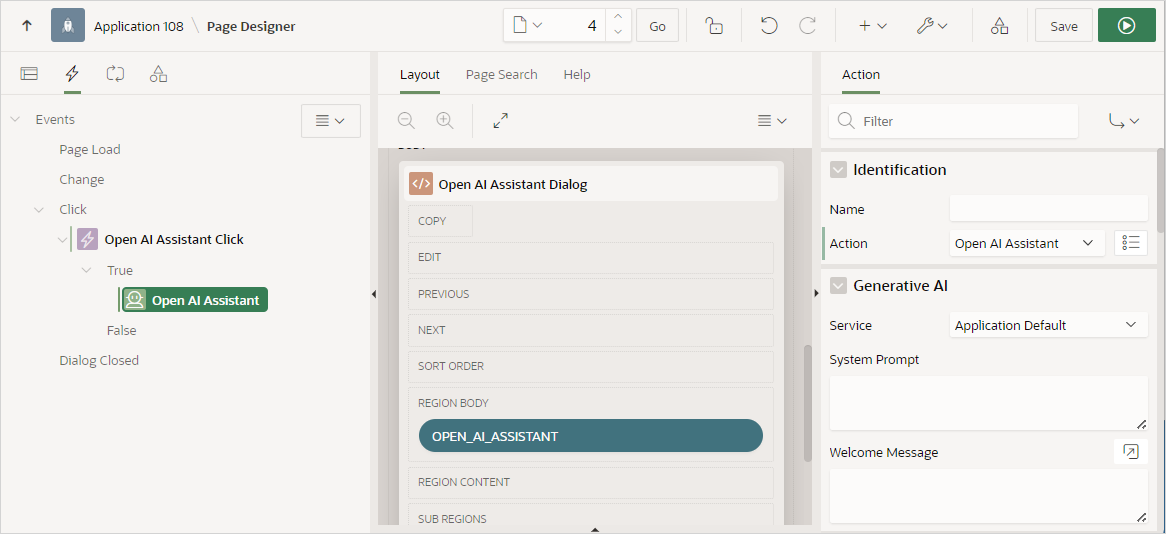
  7. Identification, Action - Select action you want to perform.

    For this example, select Open AI Assistant.


  8. Generative AI attributes:
    1. Generative AI, Service - Select the Generative AI Service to be used by the AI Assistant. Application Default uses the Generative AI Service specified on the AI page in the application attributes. See Configuring AI Attributes for an Application.
    2. Generative AI, System Prompt - Specify the system prompt to be used by the AI Assistant. The System Prompt gives the AI a context. This message does not display on front end, but is sent to all AI service requests on the back end.

      You can enter text or use this attribute in conjunction with Initial Prompt to utilize substitutions using application items, page items, or system variables.

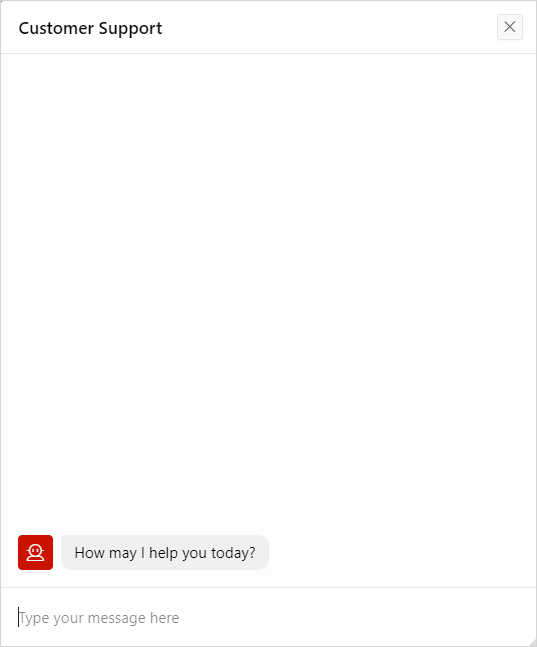
    3. Generative AI, Welcome Message - Specify an optional welcome message shown by the AI Assistant. For example: How may I help you today?

      Note this attribute also supports substitutions using application items, page items, or system variables

  9. Appearance attributes:
    1. Appearance, Display As - Select how the AI Assistant should appear on your page. Options include: Dialog or Inline.

      For this example, select Dialog.

      Note that the UI changed depending upon your selection.

    2. Appearance, Title - Only displays if Display As is Dialog. Enter the title that displays on the dialog. For example: Customer Support
  10. Quick Actions, Message - Enter a message to serve as a chat-wide quick action. A quick action is a predefined phrase that, once clicked, will be sent as a user message. For example: I need help with an order?
  11. View the page. Click Save and Run Page..
    The page appears.
  12. Click the Open AI Assistant button.

17.7.4.4 Creating an AI Assistant to Suggest Salary

Create an AI Assistant to suggest salary recommendations.

The example in this topic describes how to create an AI Assistant that provides salary recommendations for employees. This example assumes you have completed the following tasks:

  • Have access the EMP table available in EMP / DEPT sample dataset. To learn more, see Using Sample Datasets in Oracle APEX SQL Workshop Guide
  • Create an interactive report, named Employees, and form page, named Edit Employee, on the EMP table. See Managing Interactive Reports.

To create an AI Assistant to suggest salary recommendations:

  1. View the form page in Page Designer:
    1. On the Workspace home page, click the App Builder icon.
    2. Select the application.
    3. Select the form page,Edit Employee.
      The form page displays in Page Designer.
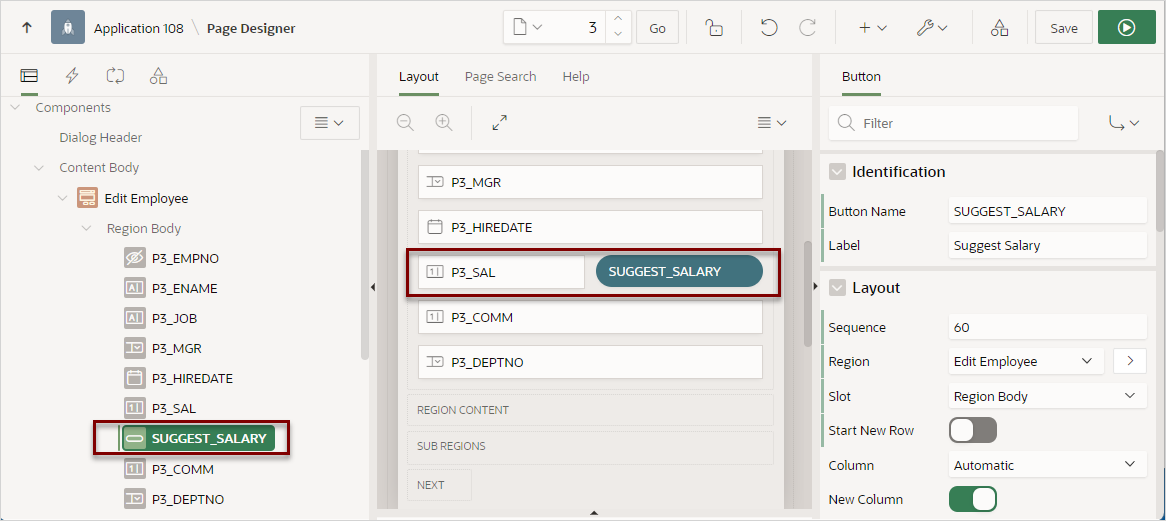
  2. On the form page, add a button named SUGGEST_SALARY:
    1. Right-click the Edit Employee region and select Create Button.

      In the Property Editor, edit the Button attributes.

    2. Identification, Button Name - Enter the name used to reference the button. For example, enter:
      SUGGEST_SALARY
    3. Change the button position so it displays to the right of Salary (P3_SAL).

      Tip:

      You can edit the button attributes or drag and drop the button to the appropriate location in the Layout pane.
      • Layout, Sequence - Enter the display sequence for this item. Enter 60

      • Layout, Start New Row - Disable Start New Row.

        Note New Column is now enabled.


    4. Appearance, Button Template - Select Text with Icon.
    5. Appearance, Hot - Enable Hot.
    6. Appearance, Template Options - Click Use Template Defaults. In Template Options dialog, configure the following:
      • Common, Size - Select Large.
      • Common, Width - Select Stretch.
      • Advanced, Spacing Top - Select Large.
      • Click OK.
    7. Appearance, Icon - Select fa-robot.
    8. Behavior, Action - Select Defined by Dynamic Action.
    9. Behavior, Execute Validations - Disable Execute Validations.
    10. Click Save.
  3. Add a hidden item named P3_DEPARTMENT:
    1. Right-click the Edit Employee region and select Create Page Item

      In the Property Editor, edit the Page Item attributes.

    2. Identification, Name - Enter the item name. For example, enter:
      P3_DEPARTMENT
    3. Identification, Type - Select Hidden.
    4. Click Save.
  4. Create a computation to retrieve the department name:
    1. Right-click P3_DEPARTMENT and select Create Computation.

      In the Property Editor, edit the Computation attributes.

    2. Computation, Type - Select SQL Query (return single value).
    3. Computation, SQL Query - Enter the following:
      select dname
        from dept
       where deptno = :P3_DEPTNO
    4. Click Save.
  5. Add a hidden item named P3_INIT_PROMPT:
    1. Right-click the Edit Employee region and select Create Page Item

      In the Property Editor, edit the Page Item attributes.

    2. Identification, Name - Enter the item name. For example, enter:
      P3_INIT_PROMPT
    3. Identification, Type - Select Hidden.
  6. For P3_INIT_PROMPT, create a computation:
    1. Right-click P3_INIT_PROMPT and select Create Computation.

      In the Property Editor, edit the Computation attributes.

    2. Computation, Type - Select Static Value.
    3. Computation, Static Value - Enter the following:
      Department: &P3_DEPARTMENT. Current salary: &P3_SAL.
    4. Click Save.
  7. Create a dynamic action that fires when the user clicks the SUGGEST_SALARY button:
    1. Click the Dynamic Actions tab in the left pane.
    2. Right-click Click and select Create Dynamic Action.
      A dynamic action named New appears in the left pane. The Property Editor displays Dynamic Action attributes.
  8. In the Property Editor, edit the Dynamic Action attributes:
    1. Identification, Name - Enter the name of the dynamic action. For example, enter:
      AI: Suggest Salary
    2. When, Event - Specifies the event that causes the dynamic action to fire. Accept the default, Click.
    3. When, Selection Type - Specifies the page element or construct that triggers the event. For example, select Button.
    4. When, Button - Specify the button that triggers the dynamic action. Select SUGGEST_SALARY.
  9. Edit the True action, Show. In the Dynamic Action tab, click the Show action.

    Edit the Action attributes in the Property Editor.

  10. Identification, Action - Select Open AI Assistant.
  11. Configure Generative AI attributes:
    1. Generative AI, Service - Select the Generative AI Service to be used by the AI Assistant. Application Default uses the Generative AI Service specified on the AI page in the application attributes. See Configuring AI Attributes for an Application.
    2. Generative AI, System Prompt - The System Prompt gives the AI a context. This message does not display on front end, but is sent to all AI service requests on the back end.

      You will use this attribute in conjunction with Initial Prompt.

      Enter:

      You are an HR manager who provides suggestions for salary raises of employees.
      Based on the department the percentage of the increase differs.
      
      Here is the list of departments and the increase percentage values:
      - ACCOUNTING 5%
      - OPERATIONS 7%
      - RESEARCH 10%
      - SALES 3%
      
      You will get the department information and the current salary of an employee.
      Based on these information you will calculate a new salary.
      
      The calculated salary should be displayed without special characters and currency symbols. Also round decimal numbers to the next highest integer. Answer in complete but short sentences containing the calculated salary.
      
      Only answer questions to salary suggestions and nothing else.
      If needed parameters like the department name or current base salary are missing, reply that you need more information to proceed.
    3. Generative AI, Welcome Message - Specify an optional welcome message shown by the AI Assistant. For example, enter:
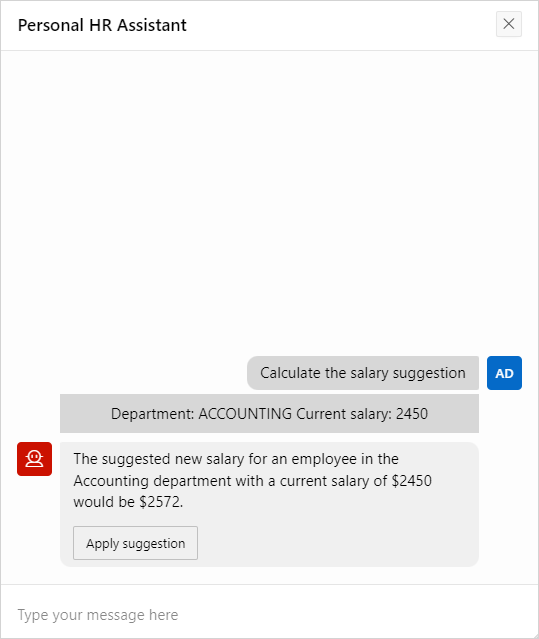
      Hi. I'm your personal HR assistant. I can assist you in calculating salary raises.
  12. Configure Appearance attributes:
    1. Appearance, Display As - Select how the AI Assistant should appear on your page. Select Dialog.
    2. Appearance, Title - Enter the title that displays on the dialog.

      Enter:

      Personal HR Assistant
  13. Initial Prompt attributes - The Initial Prompt is the first message/context from a user's perspective:
    1. Initial Prompt, Type - Select Item.

      This attribute determines how the AI Assistant should return responses. Select the type of initial prompt to be delivered to the AI Assistant. The initial prompt represents a message as if it were coming from the user. This can be either a specific item value or a value derived from a JavaScript expression.

    2. Initial Prompt, Item - Enter a page item used to set the initial prompt.

      Select P3_INIT_PROMPT.

    3. Initial Prompt, Immediate Action Prompt - Enter a prompt that is used in conjunction with the Initial Prompt to display an immediate AI-generated response for the end user.

      Enter:

      Calculate the salary suggestion
  14. Use Response - Returns the content of an answer (or AI message). For this example, you specify a page item.
    1. Use Response, Type - Determines how the AI Assistant should return responses. Select Item.
    2. Use Response, Item - Select P3_SAL.
    3. Use Response, Button Label - Specify the label for the message action button, which is used to send the response to a designated target. Enter:
      Apply suggestion
    4. Use Response, JavaScript Detection Expression - Enter a JavaScript Expression to search for certain criteria within the message. This expression should return the text to be used in the response. Enter the code:
      // search for numbers with a length of 3-5 and just return the number if one is found
      this.fullContent.match( /\b\d{3,5}\b/g ) ? this.fullContent.match( /\b\d{3,5}\b/g )[0] : ""
  15. Click Save.
  16. Test your changes:
    1. Return the Employees page and run the page.
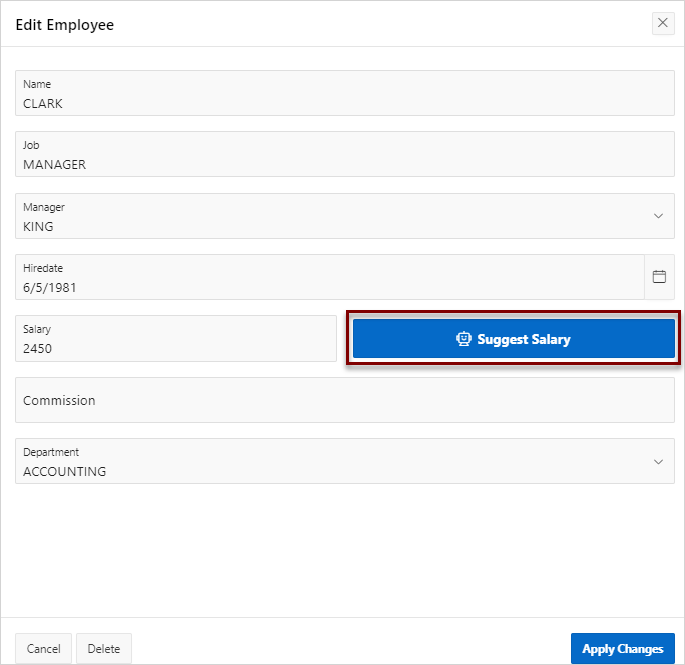
    2. Find an employee and click the Edit icon to view the Edit Employee form.

      The Edit Employee form appears.


      Note that Clark's Salary is 2450.

      The Edit Employee form appears.
    3. Click Suggest Salary.
    4. Click Apply Suggestion.

      Note that the employee's Salary is no 2573.

    5. Click Apply Changes to accept the change and exit the form.