Multiple Quoting Layouts
In a complex CPQ environment, different users interact with quotes at various stages, each requiring distinct information and actions. A static, one-size-fits-all UI creates inefficiencies, leading to longer processing times, increased user frustration, and a higher risk of errors. To address these challenges, Oracle CPQ 26B introduces support for multiple quoting layouts to allow administrators to create, customize, and assign layouts tailored to various business requirements.
By investing in this feature, we ensure that users interact with a streamlined, role-specific interface that surfaces only the most relevant information and actions at the right time. This results in faster deal cycles, improved data accuracy, enhanced compliance, and greater user efficiency. For the administrators, this feature enables a scalable and configurable UI framework, reducing customization efforts, improving system maintainability, and supporting future innovations. For customers, it enhances the overall user experience, drives adoption, and ultimately contributes to increased revenue by accelerating sales processes and reducing operational bottlenecks.
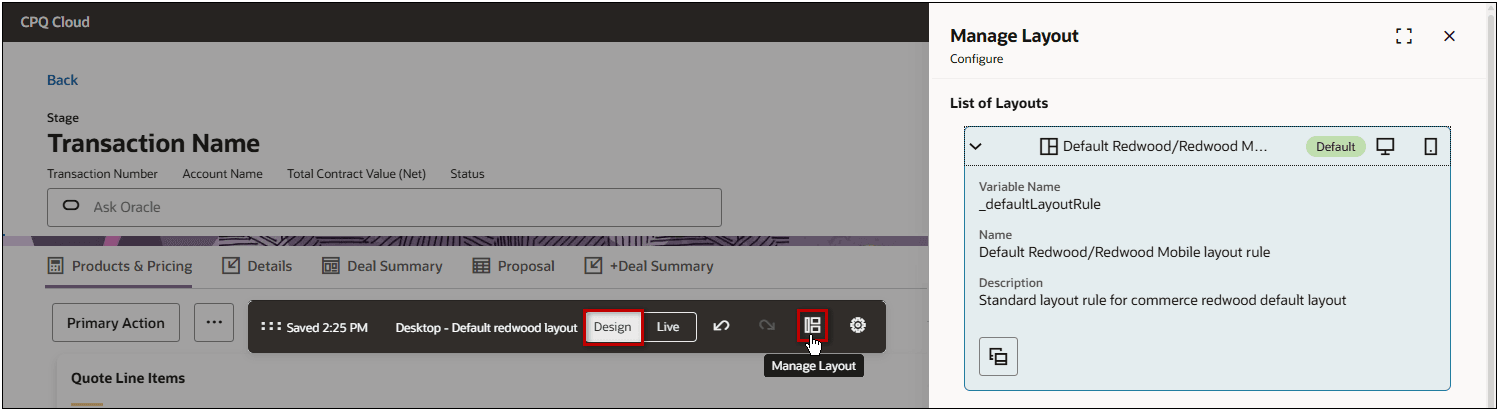
To manage layouts, administrators open a quote, click Design, then click the Manage Layout icon.
Redwood Quote UIs have a default layout. Administrators can clone the default layout to create new layouts.
- The default layout is automatically generated when a new standard process is created.
- Upon upgrade to Oracle CPQ 26B, the existing layout will become the default layout.
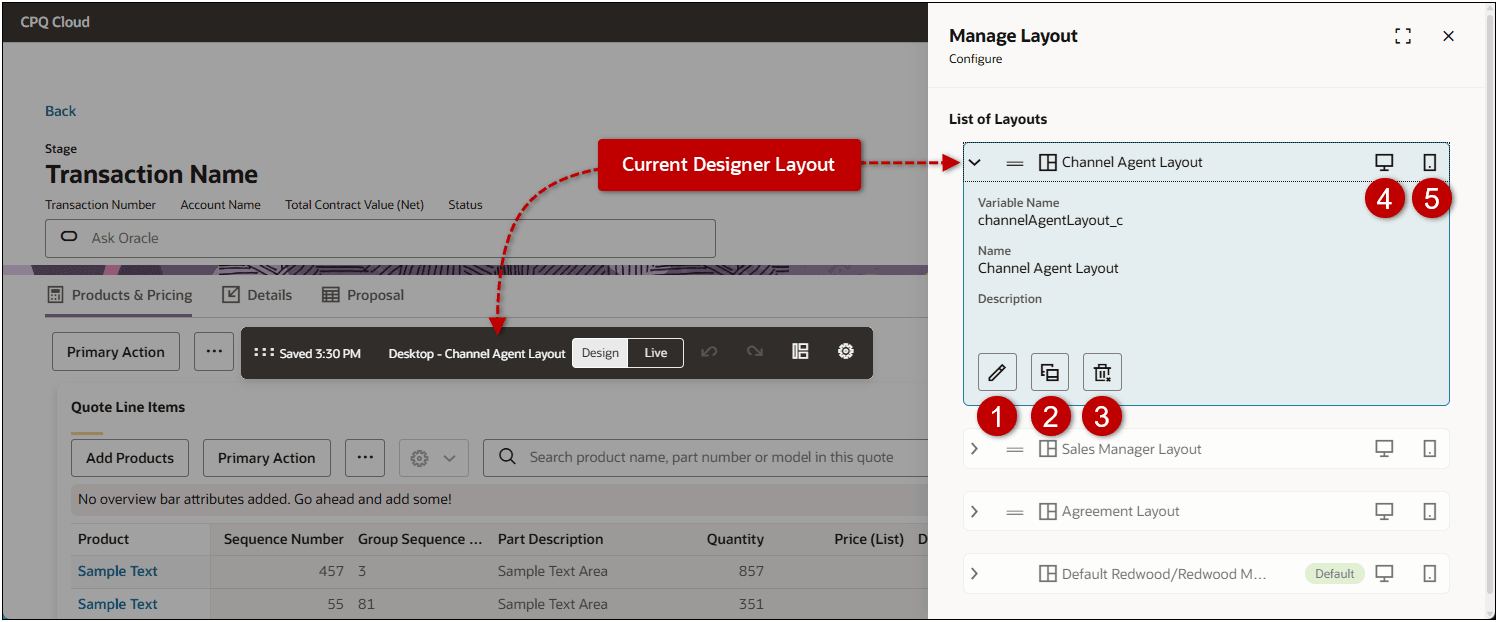
The name of the current Designer layout is displayed in the toolbar and is also highlighted in the List of Layouts. Administrators can apply unique settings for Desktop and Mobile layouts. The Designer toolbar will also indicate if the current Designer layout is for the Desktop or Mobile layout.
| Item | Description |
|---|---|
| 1 | Edit basic details and conditions for a layout. |
| 2 | Clone the layout. |
| 3 | Delete the layout. You can only delete custom layouts; you cannot delete the default layout. |
| 4 | Indicates that the Desktop layout view is enabled, click to customize the desktop specific layout. |
| 5 | Indicates that the Mobile layout view is enabled, click to customize the mobile specific layout. |
When layout rule conditions are met, the layouts are applied in sequential order. Administrators can drag and drop the layouts to change the order of layouts.
- If conditions from multiple layouts are applicable, the highest listed layout is applied.
- If none of the custom layout conditions are applicable, the default layout is applied.
Layout rule conditions can be used to provide customized layouts, some examples include:
- Role-based layouts based on the user's type or group (e.g., Channel Agent, Sales Representative, Sales Manager, Legal, Finance, Partner)
- Stage-specific layouts that dynamically adjust based on the quote lifecycle stage (Agreement, Order, Quote).
- Status-specific layouts based (Draft, Approval, Order, Renewal, Quote for Orders, and Quote for Agreement)
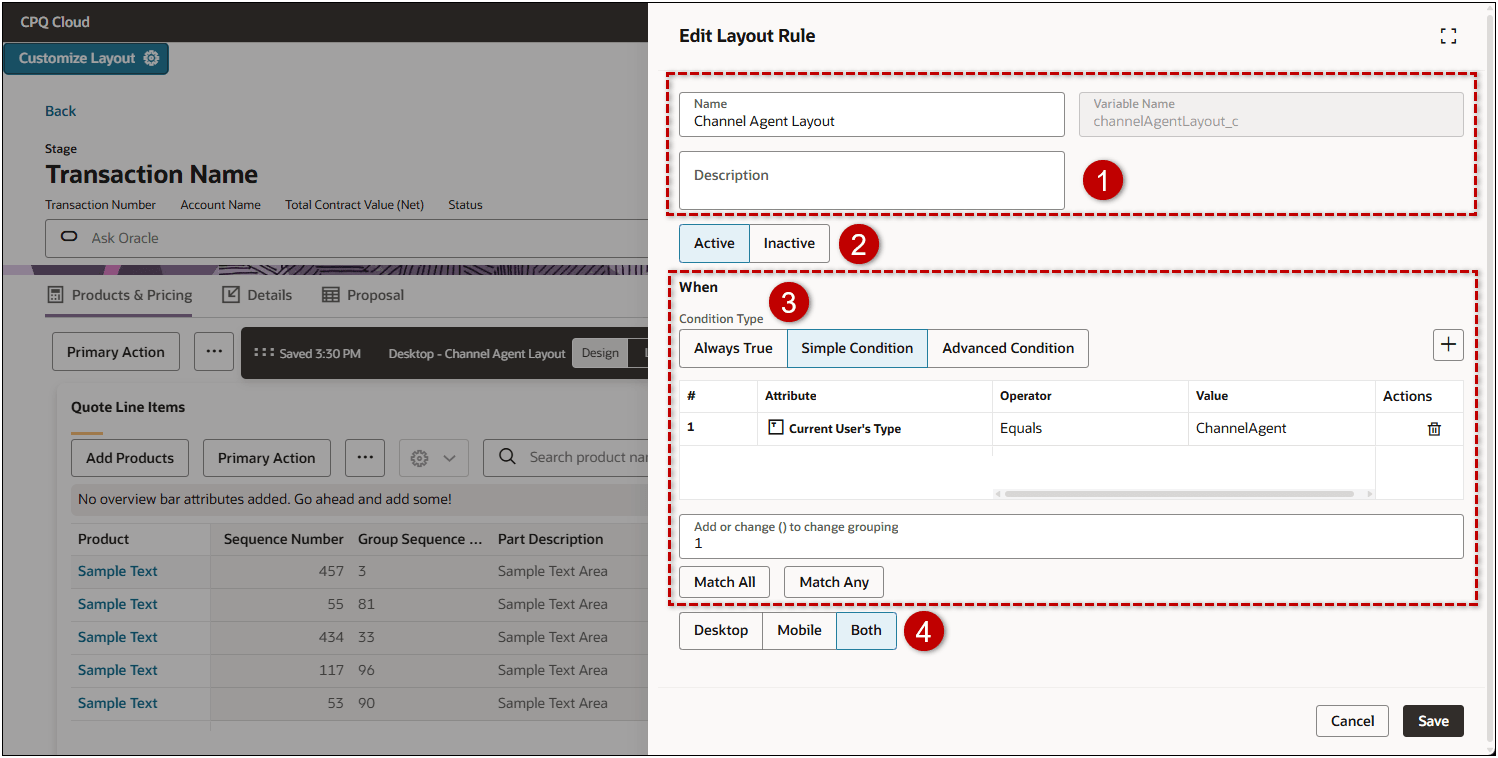
The following example shows a role-based layout with a simple condition that will automatically display this layout when the Current User's Type is "ChannelAgent".
| Item | Description |
|---|---|
| 1 | Edit the layout Name or Description. |
| 2 | Activate or Inactivate a layout |
| 3 | Set conditions for the layout. Administrators can use conditions to determine when each layout is shown. |
| 4 | Enable Desktop, Mobile, or Both layout views |
Unlike most Redwood Quote Designer settings, the applicable commerce process must be deployed before quote layout settings are available to sales users on the Redwood Quote UI. This allows administrators to preview and test layouts before making them available, ensuring consistency and accuracy.
This feature provides the following business benefits:
- Enables a personalized quoting experience for different roles and workflows.
- Boosts user productivity by matching layouts to user needs.
- Ensures consistent, accurate presentation of quotes across devices and browsers.
- Reduces errors and rework through thorough pre-deployment validation.
- Gives administrators more control and flexibility without the need for custom coding.
Steps to enable and configure
Create a Quote Layout
Complete the following steps to create a new Redwood quote layout.
- Open or create a Redwood quote, click Design, then click the Manage Layouts icon.
- Open an existing layout section, then click the Clone icon.
- Enter the Name and Variable Name, then click Clone.
- Open the new layout section, then click the Edit icon.
- (optional) Enter a Description for the layout.
- Set the status: Active or Inactive
- Select the Condition Type and add conditions.
- Always True The rule fires automatically.
- Simple Condition Select this option select attributes and define simple conditions.
- Add a condition.
- Click the Add icon to select an attribute.
- Enter the Operator and Value.
- Select the match criteria
- Match All if all of the conditions must be met.
- Match Any if any condition needs to be met.
- Click in the Add or change () to grouping field to define custom grouping.
For example, (1 OR 2) AND 3
- Click the Delete icon to remove a condition.
- Advanced Condition Use the function editor to select attributes and define advanced conditions.
- Click Define BML Function.
- Enter the Function Script.
- Click Save.
- Select the layout type: Desktop, Mobile, or Both.
- Click Save.
- Customize the layout
- Click the Desktop icon to customize the desktop specific layout.
- Click the Mobile icon to customize the mobile specific layout.
- Refer to Oracle CPQ Administration Online Help > Quotes > Redwood Admin > Quote Designer for information about customizing the Redwood Quote UI.
Note: Unlike most Redwood Quote Designer settings, the applicable Commerce process must be deployed before quote layout settings are available to sales users on the Redwood Quote UI.
