Area and Scope
You define areas by adding div tags to the template. Site Management Tools (SMT) uses the area div tag to find each area's location on the page and set the scope. The scope of an area determines which website pages show the assigned content. For example, if the scope of an area on the product detail page is set to this page, then any content added to that area displays only for that product. When you add content, each area is labeled with its scope so you know how and when the content appears. The three scope types are:
Category pages support content in areas with page type and all pages scope. Areas with this page scope are not supported on category pages.
Each div tag has the two following attributes that name the area and set its scope:
-
data-cms-area - The value of the
data-cms-areaattribute is a user-defined name given to the area. If you want to add an area to the main part of the page, set the value of thedata-cms-areaattribute tomain,main-header, ormain-footer. For a sidebar area, set the value of thedata-cms-areatosidebar,sidebar-right, orsidebar-left, and so on. Remember, this is a user-defined value that names the area, so use the naming convention that works best for you. For example, you can name the area by its purpose or where it appears on the page.Note:The
data-cms-areaname only defines the area in template files and doesn't display on your website. -
data-cms-area-filters - This attribute sets the area's scope, meaning on which pages display content in that area. Scope types are defined as follows:
Area Scope
data-cms-area-filters
Description
All Pages
global
The All Pages area displays content on any page, provided the page has an area with the same
data-cms-area.Page Type
page_type
The Page Type area displays content on any page of the designated type, for example, product list or product detail.
This Page
path
The This Page area is the most specific area with regard to when content displays. Content displays only on the page specified by the path in the page URL. This is the type of area to use if you want to display content for a specific product, facet, or home page.
Each page template can have multiple areas. For example, you may want to add one or more This Page areas and a All Pages area to your home page. You may want to include the same All Pages area on the Item Detail and Facet Browse pages. You may also want to include one or more This Page and Page Type areas on the Facet Browse and Item Detail pages. Pages can have multiple areas.
Areas display visually in Edit mode when you add content to the page. The label for each area indicates the scope of that area.
All Pages Areas
You create an All Pages area by setting the data-cms-area-filters attribute in the area div to global. All Pages areas display on any page that has a global area with the same data-cms-area name. For example, if you set data-cms-area to main in the, home.tpl, facets_facet_browse.tpl, and item_details.tpl template files, any content you add to that area appears on the following pages:
-
The Home Page
-
All Facet Browse Pages
-
All Item Detail Pages
The content is displayed on those pages because each one has a global area named "main". The following code sample illustrates this area:
<div data-cms-area="main" data-cms-area-filters="global"></div>
By adding this area div to one or more templates, you create a new All Pages area on the template. In the following screenshot, you see two All Pages areas.
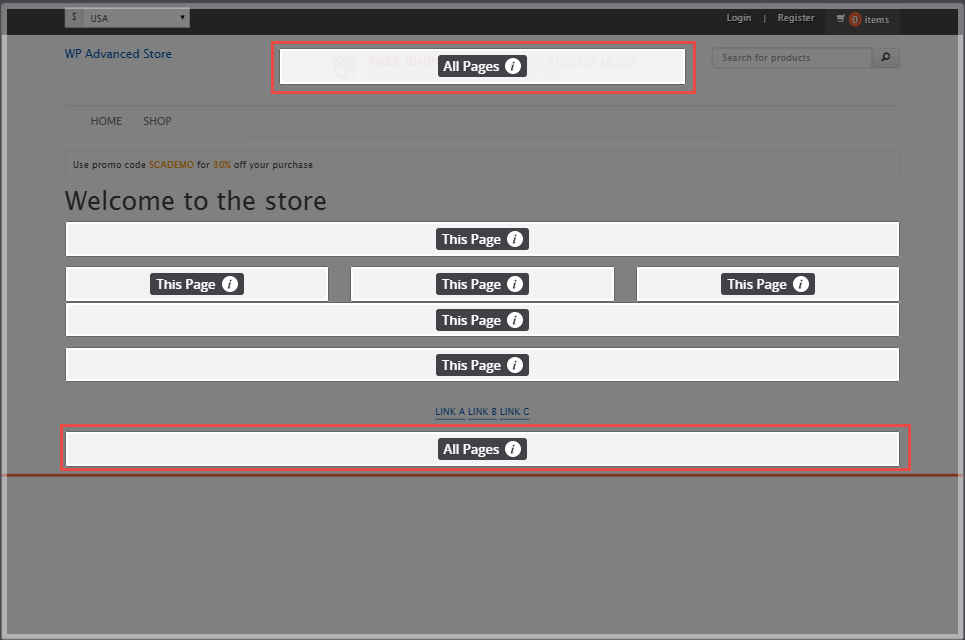
These two area divs are defined as follows:
          <div data-cms-area="header_banner" data-cms-area-filters="global"></div>
<div data-cms-area="global_banner_footer" data-cms-area-filters="global"></div>
In this example, the divs are added to the header and footer template files. This way, the areas are available on all shopping pages without adding them to every template file.
Page Type Areas
Areas with page type scope are identified by the type of page, for example Product Detail pages or Facet Browse pages. You create an area with page type scope by setting data-cms-area-filters attribute to page_type. The page type can be the home page, Product Detail page, or Facet Browse page. To do this, modify the product details template file to add an area. Set the value of data-cms-area to item_info_bottom, and set the value of data-cms-area-filters to page_type. The div code for this area is as follows:
<div data-cms-area="item_info_bottom" data-cms-area-filters="page_type"></div>
After you add this area div to the product detail page template, it's available on every product detail page. Any content you add in this area displays for every product. The area on the page looks like this:
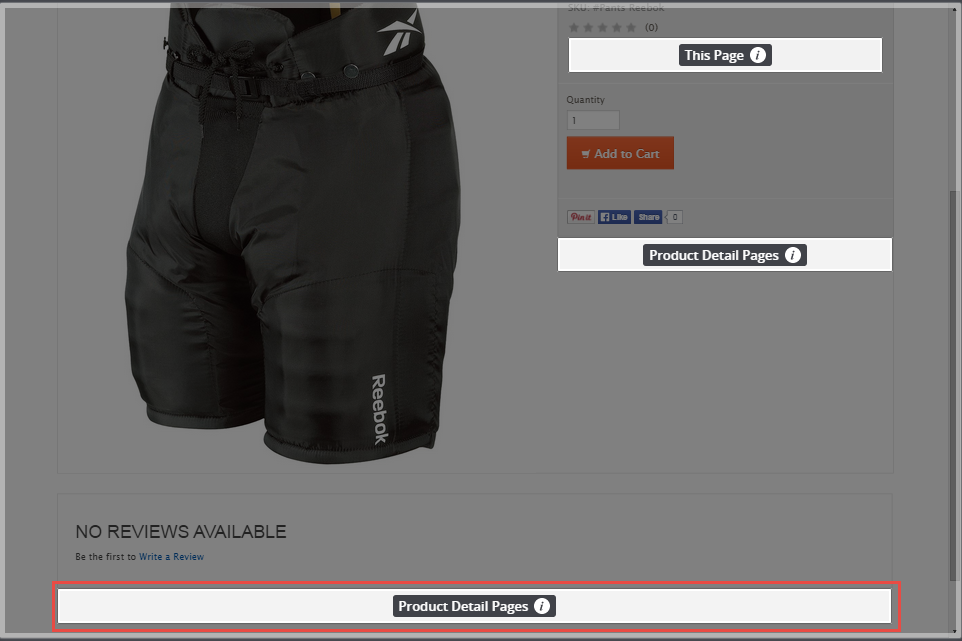
Notice that in this example, the area is labeled with the page type: Product Detail Pages. This lets you know that any content you add to that area displays on every product detail page.
This Page Areas
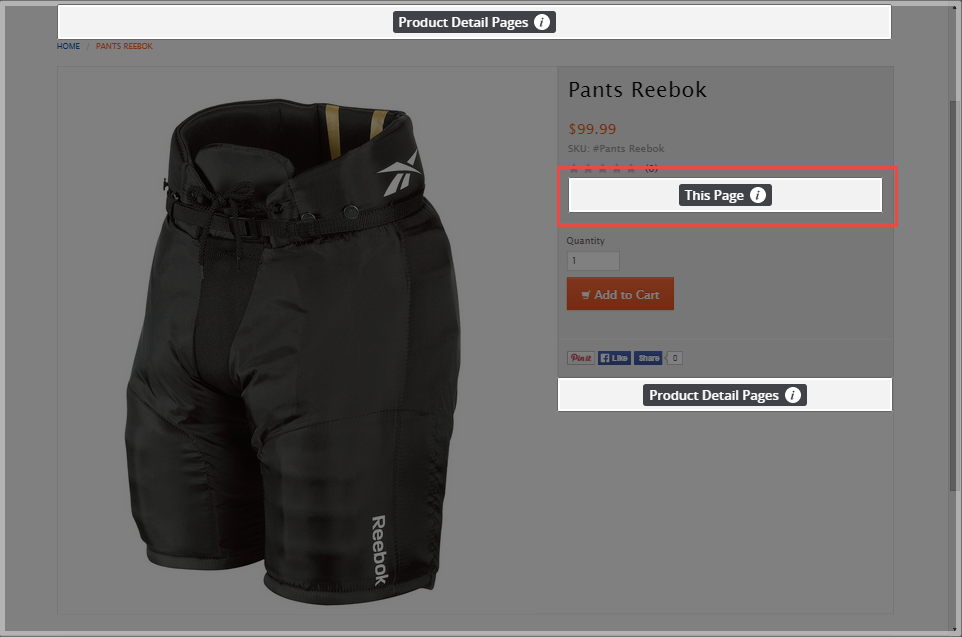
You create This Page areas by setting the value of the data-cms-area-filters to path. The This Page area is the most specific of the three areas because it only displays for a particular page path. The path is the URL without the host or any query string parameters. For example, you update the product detail template and add an area wit data-cms-area set to item_info and data-cms-area-filters set to path.
When you add content to the area, it's tied to that path. For example, the URL to Reebok Pants is http://website.name.com/pantsreebok. The path to this product is /pantsreebok. Even though the page is a product detail page, content in that area only displays when customers visit /pantsreebok. The content won't display any other product. The div segment for this area can be defined as follows:
<div data-cms-area="item_info" data-cms-area-filters="path">
A more sophisticated use of a This Page area is to apply it to a facet search page. This way, you can display content that's specific to the facet a customer is viewing. For example, the path to a facet search of black items is /color/black. When you place content in a This Page area, it only displays when a customer views items with the black facet filter.
To go a step further, the path for black pants is /category/pants/color/black. After you add content to a This Page area, the content only displays when a customer views the pants page with the black facet filter.
Facet Order in URLs
When you use facet filters on a search page, the URL always lists the facets in the same order, no matter which order a customer selects them. For example if one customer filters by pants first and then black, and another customer filters by black first and then by pants, the URL for both customers is identical. This means that the path for black pants is always /category/pants/color/black, no matter which order customers select the filters.