Push Notifications in NetSuite for iOS
Push notifications are like instant messages sent to your device, reminding you about important information from your NetSuite account. When they're enabled, you don't need to have the app open or even be logged in. You can easily customize them, and lots of record types are supported.
For a video guide on setting up push notifications in NetSuite for iOS, see How to Set Up Push Notifications on NetSuite for iOS.
Prerequisites for using Push Notifications with iOS
Administrators:
-
Enable the Mobile Push Notification feature in NetSuite. See Setup > Company > Enable Features > Mobile > Mobile Push Notification
-
Notifications based on a saved search (shown with a magnifying glass icon) need a matching saved search in NetSuite.
Enabling Push Notifications in NetSuite for iOS
Follow this procedure to enable push notifications in your app.
To enable push notifications:
-
Tap the Account Menu icon
 .
. -
Tap Push Notifications.
-
Slide the Allow Push Notifications slider to on.
-
The first time you log in, a pop-up window prompting you to confirm the action displays.
Tap OK to confirm.
-
Tap OK again to approve the iOS-generated dialog.
The Badge Count switch controls whether to display the number of unread notifications (all roles), next to the app icon on the iOS home screen. By default the badge count is switched on when push notifications are enabled.
Setting a push notification for an event in NetSuite
Follow this example to set a notification for an event. You can set similar notifications for other activities and records.
To set a notification for an event
-
Create a new event in your NetSuite desktop account by going to Activities > Scheduling > Events > New.
-
On the Attendees subtab, check the Notify Attendees by Email box.
-
Click Save.
Attendees who have push notifications enabled receive a push notification for the event invite.
Default notification set for iOS push notifications
These notifications are switched on by default when you enable push notifications in your app.
|
Activities |
Calendar Event |
Canceled, Updated, Invited |
|
Phone Call* |
Created, Updated |
|
|
Task* |
Created, Updated |
|
|
Approvals |
Expense Report |
Approval required |
|
|
Purchase Order |
Approval required |
|
Support |
Support Case* |
Created, Updated |
|
* These notification types are based on saved searches (shown with a magnifying glass icon in the app). You might need to set them up first. |
||
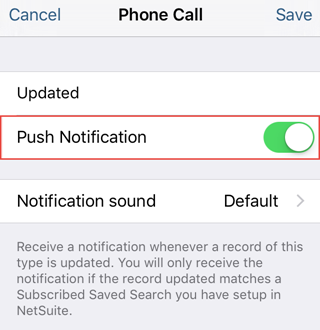
To switch individual push notifications on and off :
-
Tap the Account Menu icon
. -
Tap Push Notifications.
-
Tap the push notification you want to manage, for example Phone Call Updated.
-
Slide the Push Notification slider to off.
The NetSuite for iOS Notification Center
The Notification Center is like your inbox for all NetSuite notifications. Unlike push notifications, which are one-time alerts, the Notification Center saves your notifications so you can check them later. Tap any notification to open the Actions menu. The badge count shows how many notifications you haven't read.
The iOS Notification Center Options Screen
The Notification Center has an options screen where you can set how you view items. Tap the slider icon in the top left to open it:
|
What do the Options do? |
|
|---|---|
|
Date |
Orders notifications from newest to oldest |
|
Type |
Orders notification type alphabetically (A-Z) |
|
Show done* |
Displays items which have been marked done as well as items requiring action |
|
Show unsupported* |
Shows all notification types from NetSuite, even ones that aren't available as push notifications. |
|
Mark All as Read |
Bulk select option - marks all notifications in the center as read. |
|
Mark All as Done |
Bulk select option - marks all notifications in the center as done. |
|
* These options are session-based. They'll go back to off when you log out of the app. |
|
Related Topics:
- Configuring NetSuite for Mobile
- System Requirements
- Mobile Security
- Mobile Device Access Permission
- Setting Date and Number Formatting in NetSuite for Mobile
- Setting the Time Zone in NetSuite for iOS
- Setting the Language in NetSuite for Mobile
- Configuring Maximum Entries in Dropdown Lists in NetSuite for Mobile
- Configuring Phone Call Logging in NetSuite for iOS
- Configuring the Tab Bar in NetSuite for iOS
- Changing App Settings