Creating Price Books and Price Plans for Subscription Plans
After you save a subscription plan, you can create a price book by setting up a price plan for each item. For information about how to create subscription plans, see Creating Subscription Plans with Subscription Billing Enhanced UI.
The following procedure describes how to create price books and price plans using the enhanced time-based pricing UI provided by the Subscription Billing Enhanced UI SuiteApp.
To create price books and price plans using the Subscription Billing Enhanced UI SuiteApp:
-
Open a saved subscription plan record in view mode.
-
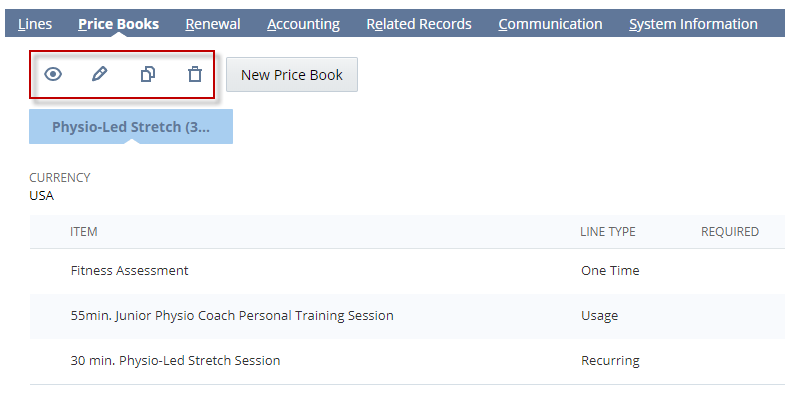
Click the Price Books subtab.
-
To create a new price book, click New Price Book.
-
In the Name field, enter a name for the new price book.
-
In the Currency field, select the appropriate currency for the price book.
-
Set up the price plan for each item in the price book.
-
To edit a pricing interval, click anywhere on the pricing interval box or click the ellipsis icon on the top right corner of the box and select Edit.
-
Select a start interval from the list and enter the number for when you want the interval to start. For example, Month 1 or Month 6.
Note:You can set the start interval to Week, Month, or Year only for the first interval. You cannot change this value on succeeding pricing intervals. Also, the first pricing interval for each item always begins with an interval start of 1 and cannot be edited. For example, the first pricing interval is always Week 1, Month 1, or Year 1.
-
In the Pricing Model field, select one of the following:
-
Tiered - This pricing model is based on the incremental quantity sold. It is commonly used for recurring items. Tiered pricing charges a specified rate for all items sold in the tier (for example, the first 10 items). When the quantity sold exceeds the upper limit for the tier, NetSuite charges the price specified for the next tier for the additional items.
-
Volume - This pricing model is based on the aggregate quantity sold. It is commonly used for usage pricing. For volume pricing, the total quantity sold defines the charge rate for all items in the order.
-
-
In the Discount field, enter a discount, if applicable. Both percentage and flat rate discounts are supported. To enter a percentage discount, include the percentage sign (%) after the positive number you enter in the Discount field. To enter a flat rate discount, enter the numeric value only.
-
For usage lines, enter a value in the Included Quantity field, if applicable.
-
For recurring or usage lines, set how often you want the charge to occur by selecting a Charge Frequency and entering a number in the Repeat Every field.
In the Repeat Every field, you can enter any positive integer from 1 up to the maximum value, depending on the Charge Frequency:
-
If Charge Frequency is set to Annually, the maximum value for the Repeat Every field is 10.
-
If Charge Frequency is set to Monthly or Weekly, the maximum value for the Repeat Every field is 120.
-
-
For recurring lines, select a proration option in the Prorate By field. You can set the value for this field only on the first pricing interval of a recurring line. The default setting is Prorate by Day. If the charge frequency is more than one month, you have the option to select Prorate by Day or Month.
-
Set the values for the price tiers. For each tier, enter values for the following:
-
Above Quantity (required) - Default value is zero for the first tier. For succeeding tiers, the value you specify in this field indicates the upper limit for the previous tier.
-
Pricing Option (optional) - Select one of the following options:
-
Rate (default) - Calculates the item amount as quantity multiplied by rate.
-
Fixed Amount - The defined charge amount for the item is not affected by its quantity.
-
-
Value (required) - Enter an amount to charge for the item.
-
Min Amount (optional) - Enter the minimum amount limit for the tier.
-
Max Amount (optional) - Enter the maximum amount limit for the tier.
Click the plus (+) icon on the right side of the tier to create a new pricing tier for additional quantities.
-
-
When you are finished entering information in the pricing interval, click the check icon on the top right corner of the box to save your changes.
Note:When you save a price plan for the first time, a popup window appears indicating that after the price plan is saved, the price book currency cannot be changed. Verify if the currency is correct, then click OK to save the price plan. Click Cancel if you want to change the currency before saving the price plan..
-
-
To create additional pricing intervals for recurring and usage lines, do any of the following:
-
To create a new interval, click the plus (+) icon on the right side of the last interval.
-
To create a copy of an existing pricing interval, click the ellipsis icon on the pricing interval and select Make Copy. The pricing interval for one-time lines cannot be copied.
-
To create a new interval for all recurring and usage lines in the price book, click the Add Interval To All button at the top of the price book. For more information, see Adding a Price Interval to All Items at Once.
Edit the pricing information for additional or copied pricing intervals as needed.
Note:Pricing intervals that are located next to each other must be unique. If you have two identical adjacent pricing intervals, NetSuite combines them into one interval.
-
-
Repeat step 6 (and step 7 as needed) for each item in the price book. Every item in a subscription plan must have an associated price plan.
-
To save the price book, click Save on the price book window.
You can view the price books that you created on the Price Books subtab of the subscription plan. Click the name of the price book to view the price book details. It may take a few seconds for all of the information to appear. For each price book, you can do the following actions by clicking the appropriate icon on the top left corner of the Price Books subtab:
-
Quick View - Click this icon to show the price book summary in graphical form.
-
Edit - Click this icon to open an existing price book for editing.
-
Make Copy - Click this icon to create a copy of the price book. For example, a new price book may be needed for a different currency.
-
Delete - Click this icon to delete a price book.