NSPOS 2024.1.10 Minor Release Notes
This document lists the updates provided in NetSuite Point of Sale (NSPOS) version 2024.1.10. The enhancements/fixes listed here are not available to NSPOS customers until they have upgraded to this version. NetSuite will modify these notes when needed to provide our customers with additional information.
Minor Release Components
This minor release is applied as an update to your NSPOS server. It is deployed automatically to customers currently on NSPOS version 2024.1.0 or later, and affects the following areas:
|
Release Type |
NSPOS Component |
Updated? |
|---|---|---|
|
Minor Release |
Bundle |
Yes |
|
Replication Server |
Yes |
|
|
NSPOS Application |
Yes |
Notes and Suggested Actions
Updating your NSPOS components to 2024.1.10 is optional, but should be done to ensure your environment is using the most recent version of NSPOS. Use the descriptions in this topic to decide what actions to take after the minor release is deployed to your server.
You can verify server deployment by viewing any active RA-Workstation record in NetSuite ERP. See Appendix: NSPOS Release Types and Verification.
Verify Security GUID is Configured
Configuring the GUID applies to new customers installing a new bundle. You should verify that you have the security GUID set up prior to installing NSPOS 2024.1.10. See Configuring the Security GUID For New Accounts.
If you are currently running NSPOS 2020.1 or 2024.1, you have already configured the security GUID and can skip this procedure.
Bundle Update
You must update your bundle to get the benefits included in the minor release. You can wait until time is available to do the update, but you should not delay if a fix will resolve an ongoing issue.
Replication Server Update
No user actions are available for the replication server portion of the update.
NSPOS Application Update
Some fixes in this release require restaging your registers/workstations. The sooner you perform restaging, the sooner your registers can benefit from the minor release.
Note that NSPOS registers can run in backward compatibility mode (one release prior to the server version) until time for restaging is available. You do not need to restage all registers immediately after the minor release is deployed.
For Upgrade Steps
To upgrade your installation to this release, see Perform the Upgrade to NSPOS 2024.1.X.
Product Enhancements NSPOS 2024.1.10
This NSPOS minor release includes the following feature improvements.
NSPOS Kiosk Enhancements
We made the following improvements to kiosk functionality.
Shopper Key In Code Supports All Characters
If an item's bar code will not scan, the shopper can tap Key In Code to enter bar code numbers manually. In this NSPOS release, the on-screen keyboard supports all common alphanumeric and symbol characters.


If a matching bar code is not found, the kiosk displays that information which the shopper can confirm by tapping OK. Previously, an error appeared that required the attendant to log in and clear the message.
Journal Shows Matrix Item Dimensions
Transaction line items in the kiosk journal now include dimensions for matrix items. Matrix item dimensions are also available for items found using a search.

Discount Amounts in Different Color
Discount amounts are now displayed in a different color than the dark, default font. This color difference can help shoppers and attendants easily identify discount lines.
Line item and coupon discounts appear in a different color on the left. Transaction discounts also use this different color, but are shown in the payment summary on the right.

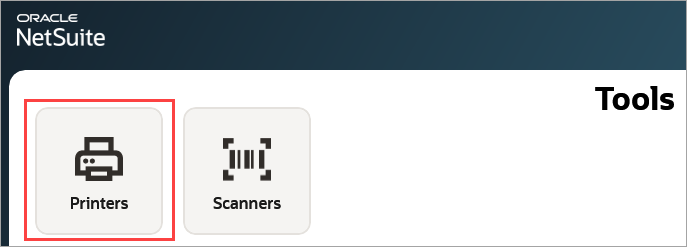
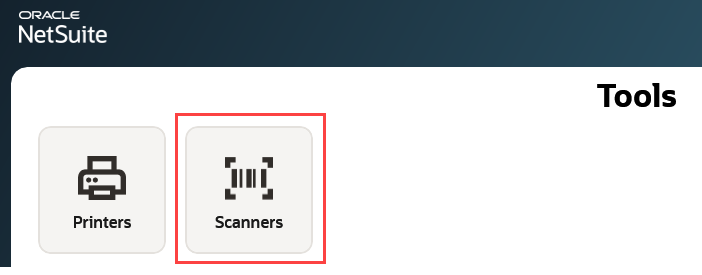
System Tools Enhanced Hardware Configuration
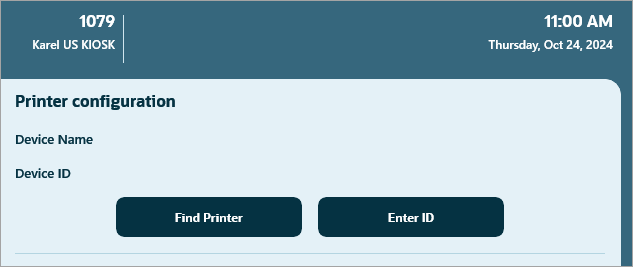
An attendant in Assistance Mode can use System Tools to configure printers and bar code scanners. The kiosk will automatically find a connected device or you can enter the device ID manually.
When using Assistance Mode > System Tools to search for a printer or scanner, you may experience issues with kiosk user-interface. For example, the UI might freeze or buttons become locked/disabled. These issues are related to Windows functionality.
To restore the interface, tap Go Back to exit System Tools. Then try configuring the device again.
To configure a kiosk printer:
-
Connect the printer to the kiosk and power on the printer.
-
Log into the NPSOS kiosk.
-
Go to Assistant Mode > System Tools.
-
Select Printers.
-
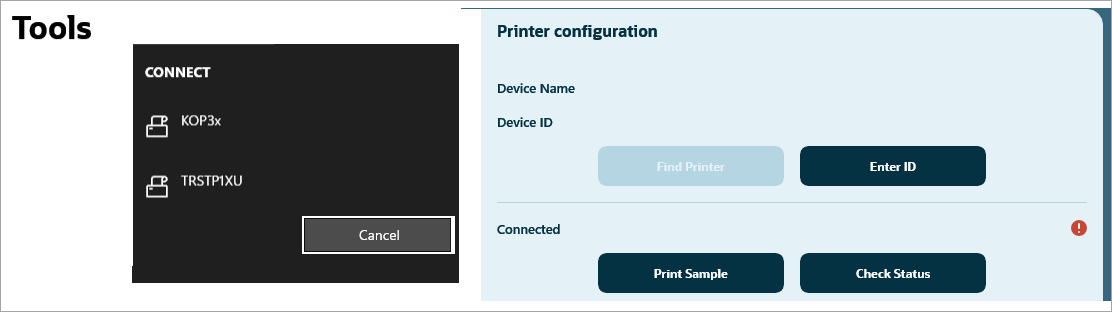
Choose how to identify the printer:
-
Find Printer - Automatically tries to find printers available in the kiosk workstation Windows operating system (OS).
Important:Find Printer may not work correctly if the OS is running in Windows Kiosk mode. If the Find Printer dialog does not open after tapping its button, you can either:
-
Temporarily switch Windows to a non-kiosk mode, or
-
Use Enter ID to enter the printer ID manually
-
-
Enter ID - Manually enter the printer ID.
This ID was set up when the device was configured for OPOS (OLE for Retail Point of Sale). Typically, the ID is the device name.
-
-
Tap OK to confirm your printer choice. NSPOS begins configuring the printer for use with the kiosk.
Tip:The Connected section shows a red icon while the printer is being configured. The icon turns green when the setup is complete.

-
When the icon turns green, you can tap Check Status to verify the printer is configured and connected.
-
If your printer requires special formatting, select it from the ESC/POS command formatting list. These formats are mainly used for printing bar codes.
-
None
-
Epson
-
TGP
-
-
Tap Print Sample to inspect the printer output.
The sample shows how various bar code types are formatted using the selected ESC/POS command formatting.
-
If you want to test your receipt setup, check the Debug Printer box.
Debug mode displays the receipt in a window instead of printing to paper. Use this mode to verify what information will appear on a printed receipt or to test for other changes.
-
Tap Save & Quit to keep your changes and exit the printer configuration page.
To configure a kiosk scanner:
-
Connect the scanner to the kiosk and power on the scanner.
-
Log into the NPSOS kiosk.
-
Go to Assistant Mode > System Tools.
-
Select Scanners.
-
Tap Enter ID and enter the scanner ID.
This ID was set up when the device was configured for OPOS (OLE for Retail Point of Sale). Typically, the ID is the device name.
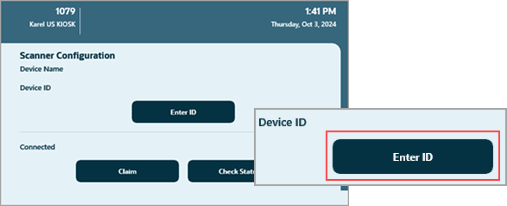
-
Tap OK to confirm the scanner ID.
-
Tap Claim. NSPOS begins configuring the scanner for use with the kiosk.
 Tip:
Tip:The Connected section shows a red icon while the kiosk is setting up the scanner connection. The icon turns green when the connection is complete.
-
When the icon turns green, you can tap Check Status to verify the scanner is configured and connected.
-
Tap Save & Quit to keep your changes and exit the scanner configuration page.
Troubleshooting Documentation
We added topics to the administrator guide to help you resolve issues you may experience with a kiosk setup. See Troubleshooting a Kiosk.
Kiosk Workstation Type Validation Improved in NetSuite ERP
This enhancement ensures that when setting up an RA-Workstation record for a kiosk, the administrator can only choose from payment gateways that are supported for the kiosk workstation type. Currently only FreedomPay is supported for use with a kiosk.
Help Available at the Kiosk
We added Help to the kiosk user interface. This help provides quick tips that may resolve a shopper's question or issue. Help is available in all shopper modes, but not available in Assistance mode.


Close Button Added to System Tools
The Assistance Mode > System Tools page now includes a button to Close the NSPOS kiosk application. NSPOS prompts the attendant for confirmation before shutting down the kiosk.

Calls For Assistance Prompt in Red
If a shopper needs attention from an attendant, they can tap Call for Assistance. The kiosk attendant on duty should watch for these requests and arrive to assist. To make the request visible to the attendant from a distance, the message icons and background now appear in red.

Use Web Store Item Images at the Kiosk
You can use item images set up for your web store for journal line items on the kiosk. The Use Web Store Image for NSPOS option overrides any NSPOS item image already set up on the item record.
To set an item to use a web store image at the kiosk:
-
Log into NetSuite ERP as an administrator.
-
Go to Lists > Accounting > Items.
-
Locate the item and click Edit.
-
Open the Custom subtab.
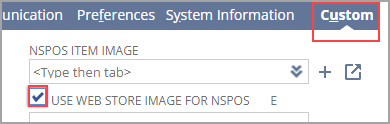
-
Check the Use Web Store Image For NSPOS option.
-
Open the Web Store subtab.
-
Verify the image to use in the Item Display Image field.

-
Click Save.
The web store item image will be used for the item at the kiosk. If a web store Item Display Image is not selected, no item image will be used at the kiosk.
Due to image caching requirements, an item-image update in NetSuite ERP may take up to two hours before the change is visible at the kiosk.
Configure Windows Kiosk Mode
You can configure the Windows operating system (OS) to run in Windows Kiosk mode. Kiosk mode is a Windows lock-down feature in which only designated applications - such as NSPOS Kiosk - can run for most users. All other Windows functionality is locked and unavailable to users who are not Windows administrators.
Support for kiosk mode is limited to these operating systems:
-
Windows Enterprise editions, including LTSC and loT
Minimum requirements are Windows 10 Enterprise 2019 LTSC.
To configure a workstation to run in Windows Kiosk mode:
-
Log into Windows as administrator on the computer used as an NSPOS kiosk workstation.
-
Enter Computer management in the Windows Start search field.
-
Expand the Local Users and Groups list.
-
Right-click the Users folder and select New User.
-
Create a new user with the User Name: KIOSK_USER.
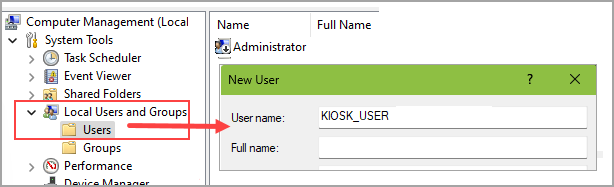
-
Log out as administrator and log in as KIOSK_USER. Wait for the new user profile to be set up.
-
Log out, then log in as an administrator user.
-
Download and unzip the PsExec tool from the Microsoft Store.
-
Run PsExec in an elevated command prompt.
-
Go to the PSExec folder and run the following commands:
powershell.exe -Command "Set-ExecutionPolicy RemoteSigned"powershell.exe -Command "Unblock-File 'C:\Program Files (x86)\NetSuite\Kiosk Agent\Kiosk Mode\KioskModeSetUp.ps1'"psexec.exe -i -s powershell.exe -File "C:\Program Files (x86)\NetSuite\Kiosk Agent\Kiosk Mode\KioskModeSetUp.ps1" -
Restart the computer.
-
Log in as KIOSK_USER. Windows will now function as a kiosk when this user is logged in.
To return a workstation to standard Windows mode
-
Log into Windows as administrator on the computer used as an NSPOS kiosk workstation.
-
Go to Computer management.
-
Expand the Local Users and Groups list.
-
Expand the Users list.
-
Delete the Windows user KIOSK_USER.
Oracle and NSPOS Logos Updated
We updated these logos and icons to follow new Oracle layout requirements.
-
Upper company logo
-
Main company logo
-
Tray icon
-
'About' window (CTRL+F1)
-
Staging logo
-
Installation file icon
-
Welcome "splash" screen
-
Application installation file & icons (visible in Windows tools)
Additional Statistics for NS ERP Workstation and NSPOS Normal State Monitoring
We added statics and values for monitoring workstation health in NetSuite ERP and at the NSPOS register.
|
Name |
NetSuite ERP (only) NSPOS (only) or Both |
Property |
Value |
|
Database |
Both |
Version |
Version of installed MySQL database |
|
Database |
NetSuite ERP |
Uploaded / Count |
If issues occur in the MySQL database, NSPOS automatically creates a backup and uploads it to the server. This statistic shows the number of database backups held on the server for the workstation. |
|
Database |
NetSuite ERP |
Not Uploaded / Count |
If issues occur in the MySQL database, NSPOS automatically creates a backup and uploads it to the server. This statistic shows the number of database backups held on the register waiting for upload to the server. |
Manager Permission for Refund to Different Credit Card
We added a flag to require store manager permission before refunding a return to a credit card that is different from the card used in the original transaction.
Flag: Returns: Not original CC refund requires manager
-
Disabled (default) - No change to current behavior
-
Enabled - Manager must approve refund if shopper wants it applied to a different credit card

Credit Card Transactions Overview Report
Use this NSPOS report to review credit card transactions and identify possible issues such as charges that appear to be duplicated.
Till Management: Receive Till
As an alternate to running End of Day (EOD), you can run the Receive Till function. This function shows all tills ready to be received (without active user sessions), and makes the till available for Count and Settle Till.
To run Receive Till:
-
In Sales Mode, complete all sales and return transactions.
-
Tap Register Functions.
If you do not see Register Functions, press Ctrl+F12, then search for and tap
Count and Settle Till. -
Tap Receive Till.
-
In the Receive Till ID window:
-
Locate the Till ID by browsing folders or entering search criteria.
-
Tap the Till ID and then tap Done.
-
-
Tap Yes to confirm you want to receive the cashier's (operator's) till.
-
Choose whether to Print a Till Count Worksheet.
This worksheet provides a convenient form on which to enter your count. It prints as a receipt on the receipt printer.
End of Day: Entire Location from One Register
Previously, performing End of Day (EOD) for a store/location meant having to physically log in on each register. Now you can use the new Store End of Day function to run EOD for all registers from a single register. The function prompts you to select from available tills within the location.
All other steps match your current EOD configuration, including the effects of flags and settings.
Function: Store End of Day
Role Restrictions: Store Manager or Administrator roles only
Available Tills:
-
Only tills within the same location as the register used to run Store End of Day
-
Only tills where the user/cashier is logged out. When using operator accountability, the till must be taken, not locked.
-
Tills assigned to the user running Store End of Day are automatically designated as available
You can assign the Store End of Day function to a button for quick access.
When you run staging on the register used to run Store End of Day, the process removes all information about other tills at that location from the register.
Restricted Access to Security GUID Setup
Configuring a Security GUID in NetSuite ERP is required for the initial staging process. To ensure only qualified personnel have access to this setup, the feature is now restricted to administrators only.
Fixes NSPOS 2024.1.10
The update includes these fixes.
Settings Overridden on Backward Compatible Workstations
NSPOS settings could be overwritten when updated on a backward compatible workstation. Now NSPOS settings are safe to be changed or viewed anytime and anywhere - even on old registers.
Percent Discount with Decimal Point
Percent-based discounts that included a decimal point, such as 9.5%, were shown incorrectly in the journal and on receipts. Values for these discounts now appear as intended.
Sales Orders with 'Do not download' Item
You can configure an item with Do not download to POS set to prevent the item from downloading to NSPOS registers. Now sales orders created or updated in NetSuite ERP are blocked from downloading to NSPOS if the sales order includes a "Do not download" item.
RA-Barcode Deletion in NetSuite ERP Not Propagated to NSPOS
Deleting an RA-Barcode record in NetSuite ERP did not inactivate or remove the bar code from the NSPOS register databases. Now when a bar code is deleted in ERP, the deletion is synchronized to your registers.
Miss-configured RA-Promotion Record Unusable on NSPOS
If a transaction included a promotion that was not configured correctly, the transaction was not synchronizing between NetSuite ERP and NSPOS. With the 24.1.10 NSPOS release, promotions with incorrect configurations are not available at the register.
Transaction Promotion Calculation Incorrect for Exchanges
Calculations for transaction-level discounts were incorrect when the transaction involved an exchange of items that were also discounted using an item-level promotion. NSPOS now calculates the correct discount amounts for this scenario.
Employee Middle Name Update in NSPOS Not Synchronizing to Employee Record in NetSuite ERP
When entered from an NSPOS workstation, changes to an employee's (operator's) middle name were not synchronizing to the employee record in NetSuite ERP.
Register Incorrectly Shown as Being Offline
A synchronization issue involving monitoring data caused some registers to be shown as offline when they were online and functioning correctly.
Customer Category Updates Not Synchronizing to NSPOS
Changes made to the Category field on the customer record in NetSuite ERP were not synchronizing to the customer record in NSPOS.
Changing Time Format in Preferences Could Impact Provisioning
Changing the Time Format for an account in NetSuite ERP was causing some instances of RA-Workstation provisioning to stop working.
Disabled Tax Option Affecting Validated Returns From Sales Orders
If an account was not using the "per line" tax feature for transactions, tax codes were removed from transactions with validated returns from sales orders. The scenario could cause synchronization issues to occur. With this fix, having the "per line" tax feature enabled or disabled does affect synchronization.
Gift Receipt Printing Issue When Digital Receipts Enabled
An issue with printing gift receipts occurred when digital transaction receipts were enabled. With this fix, you can use digital receipts with other receipt types.
Verifying an Minor Release Was Deployed
You can verify that the minor release was deployed to your server by viewing any active RA-Workstation record in NetSuite ERP. See Appendix: NSPOS Release Types and Verification.