Prerequisites for the SuiteProcurement SuiteApp
The following table lists the steps you need to perform in the order specified before you install and start using the SuiteProcurement SuiteApp. You must perform the steps using the role mentioned in the table.
The SuiteProcurement SuiteApp supports both curated (Amazon US, Amazon Canada, and Staples) and non-curated trading partners.
If you want to procure items from a non-curated trading partner, ensure that your trading partners have completed the setup steps mentioned in SuiteProcurement Support for Non-curated Trading Partners.
If you want to procure items from Amazon United States, you must follow the instructions in the Procuring Items from Amazon Using the SuiteProcurement SuiteApp guide.
For all other trading partners, refer the table. The following table lists the steps you need to perform before you install and use the SuiteProcurement SuiteApp. You must use the role mentioned to perform the steps in the order specified.
Steps to Perform in NetSuite
|
Step |
Role |
Related Help Topic |
|---|---|---|
|
1. Log in to NetSuite |
Administrator |
- |
|
2. Enable the required features |
Administrator |
Enabling Required Features for the SuiteProcurement SuiteApp |
|
3. Activate the Employee Center role |
Administrator |
|
|
4. Install the NetSuite Electronic Business (NSEB) SuiteApp |
Administrator |
|
|
5. Connect your NetSuite account with Oracle Business Network (OBN) |
OBN Manager |
|
|
6. Register your parent company and subsidiaries with OBN. |
OBN Manager |
Registering NetSuite Parent Company and Subsidiaries with Oracle Business Network |
After the registration is complete, a successful completion message with the OBN registration ID displays on the OBN registration page. An email with user login credentials and the next steps to activate the OBN account is sent to your registered email ID.
The following table lists the steps you need to perform in the order specified after you log in to OBN.
Steps to Perform on Oracle Business Network (OBN)
|
Step |
Related Help Topic |
|---|---|
|
1. Log in to OBN |
- |
|
2. Activate transactions for SuiteProcurement purchases |
|
|
3. Add trading partner punch-outs |
After performing all the steps, you can proceed to Installing the SuiteProcurement SuiteApp, Setting Up SuiteProcurement Preferences, and Working with SuiteProcurement.
Enabling Required Features for the SuiteProcurement SuiteApp
Before you install the SuiteApp, ensure to enable the following features in your NetSuite account. To enable the features, go to Setup > Company > Enable Features.
|
Subtab |
Section |
Feature |
|---|---|---|
|
Accounting |
Basic Features |
Accounting |
|
Employees |
Time and Expenses |
Purchase Requests |
|
CRM |
Marketing |
Online Forms |
|
SuiteCloud |
SuiteBuilder |
Custom Records |
|
SuiteCloud |
SuiteScript |
Server SuiteScript |
Activating the Employee Center Role
You must verify that the employee center is active in your NetSuite account to successfully install the NSEB and SuiteProcurement SuiteApps. All active roles appear in the Manage Roles list. If you can't find the employee center role in the list, use the following steps.
To activate the employee center role:
-
Go to Setup > Users/Roles > Manage Roles.
-
Check the Show Inactives box.
-
Clear the box beside Employee Center role.
-
Click Submit.
Installing the NetSuite Electronic Business SuiteApp
You must install the NetSuite Electronic Business (NSEB) SuiteApp using the Administrator role before you install the SuiteProcurement SuiteApp.
The NSEB SuiteApp provides the foundation for NetSuite users to configure and participate in global business networks like Oracle Business Network (OBN) and PEPPOL. It enables NetSuite users to connect with a potential customer or trading partner.
For information about installing the SuiteApp, see Installing from the SuiteApp Marketplace.
Installing the NSEB SuiteApp enables you to connect NetSuite with OBN to register your parent company and subsidiaries on OBN, and connect with trading partners.
Connecting NetSuite with Oracle Business Network
To use Oracle Business Network (OBN), you must authorize the connection between your NetSuite account and OBN.
To authorize connection between NetSuite and OBN:
-
Go to Set Up > Electronic Business > OBN Registration.
-
Click Authorize as shown in the following image.

-
On the Consent page, click Allow. You will be redirected to the OBN portal in a new tab.
-
You must accept the terms and conditions to allow OBN to access the following NetSuite data:
-
Access your personal information.
-
Access data and perform actions as OBN Manager
Note:The OBN Manager must be authorized to accept the terms and conditions on behalf of the organization.
-
-
Accept the Oracle Business Network policy and terms of use.
After the authorization is completed, the OBN Registration page opens with the parent company information and a successful authorization message.
To register a parent company or subsidiary in OBN, see Registering NetSuite Parent Company and Subsidiaries with Oracle Business Network.
Registering NetSuite Parent Company and Subsidiaries with Oracle Business Network
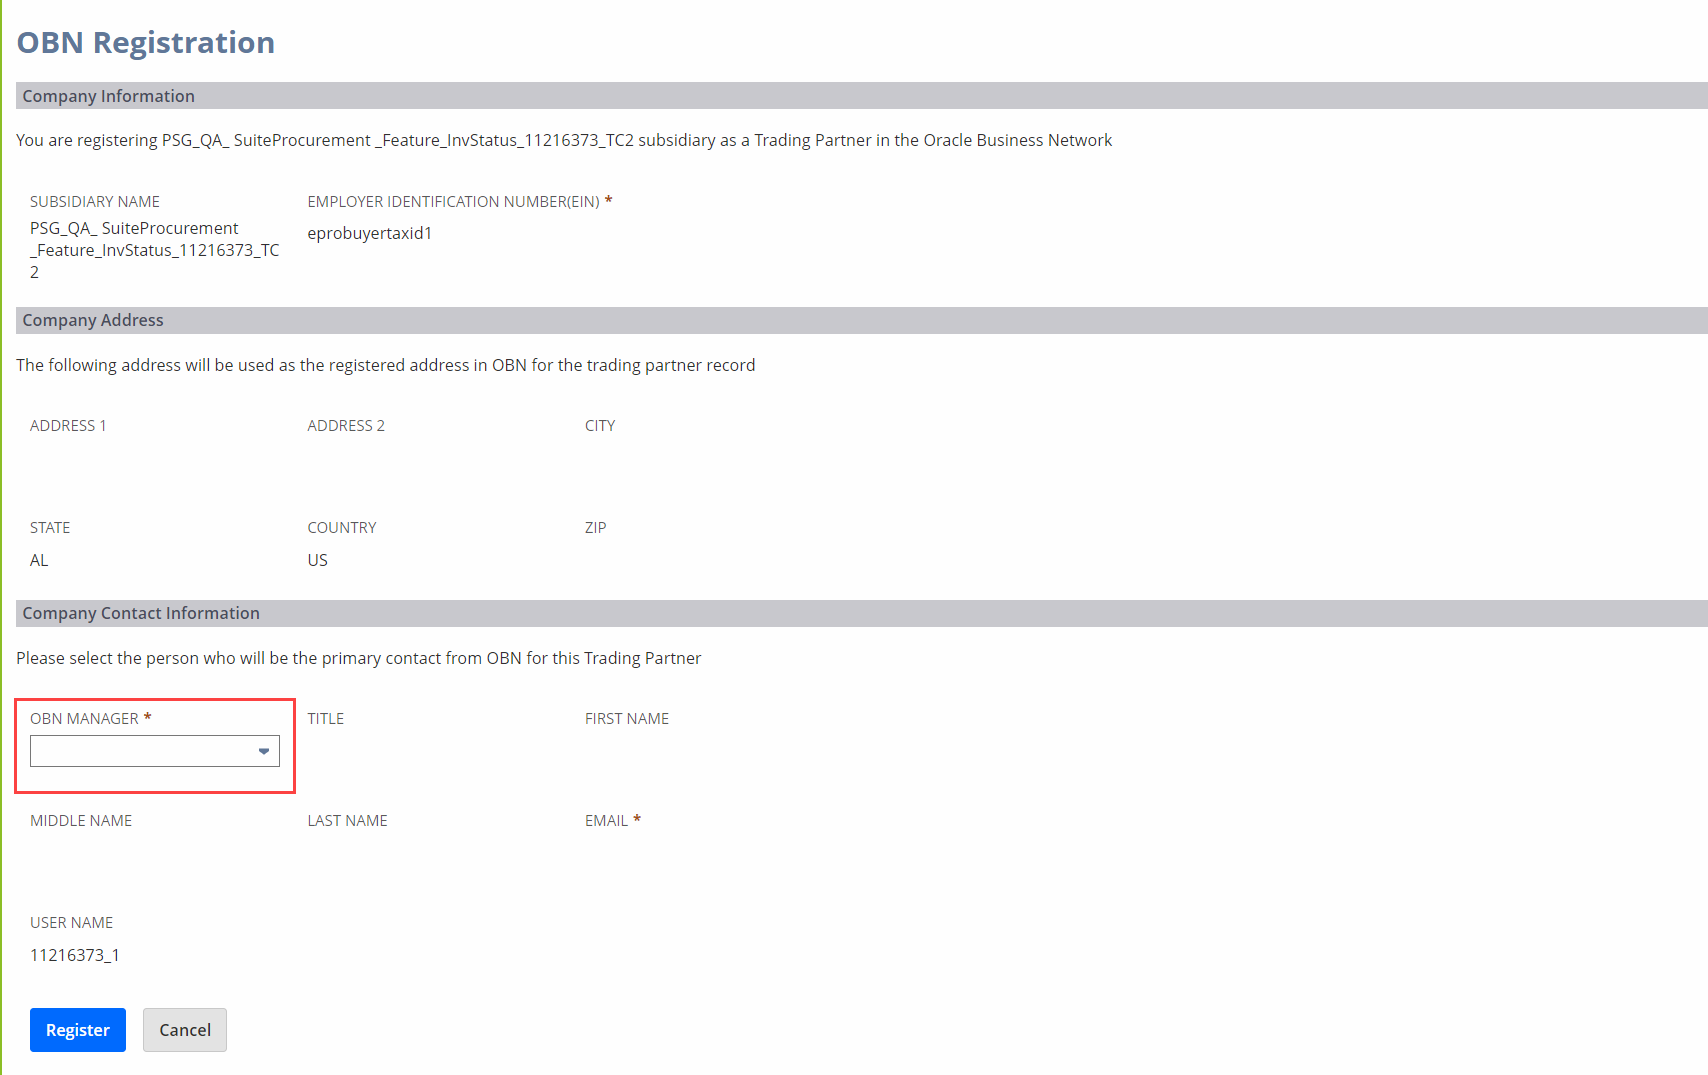
You must register a parent company as a trading partner on the Oracle Business Network (OBN). After registering the parent company, you can also register the subsidiaries associated with the parent company.
The OBN registration is a one-time setup for a parent company or a subsidiary. The OBN manager can select a subsidiary for registration on the OBN Registration page. If the subsidiary is already registered, then the OBN manager can view the respective OBN registration ID on the OBN Registration page.
A OBN unique identifier is automatically assigned to each parent and its associated child subsidiaries. You must separately register each parent and child companies.
To register a parent company with OBN:
-
On the OBN Registration page, from the OBN Manager list, select the name of the person as primary contact for the trading partner.
-
Click Register.
 Note:
Note:After the registration is completed, a successful completion message displays on the OBN Registration page with the OBN registration ID. An email with user credentials and next steps to activate the new OBN account is sent to your registered email ID.
To register a subsidiary with OBN:
-
On the OBN Registration page, from the Subsidiary list, select a subsidiary.
Tip:You can use the Subsidiary Name filter to filter the required subsidiary from the Registered Subsidiaries table.
-
Click Continue.
-
In the Company Contact Information section, from the OBN Manager list, select the name of the person as primary contact for the trading partner.
-
Click Register.
Note:After the registration is completed, a successful completion message displays on the OBN Registration page with the OBN registration ID. An email with user credentials and next steps to activate the new OBN account is sent to your registered email ID.
Adding Trading Partner Punch-outs
To procure items from a trading partner's store, you must first request for punch-out access from them.
The SuiteProcurement SuiteApp supports both curated and non-curated trading partners.
Following are the curated trading partners that the SuiteApp supports:
-
Amazon.com
-
Amazon.ca
-
Staples Contract & Commercial, Inc.
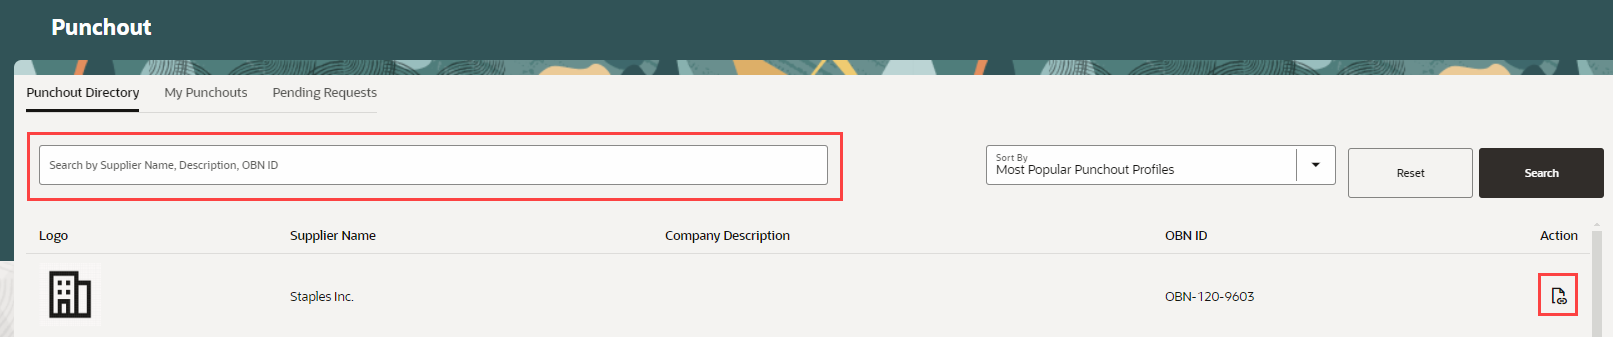
To add a trading partner punch-out:
-
Log in to your OBN account.
-
At the bottom of the page, go to the Punchout tab.
-
Click the Punchout Directory tab.
-
In the Search field, enter trading partner's OBN ID. Following are the OBN IDs for the supported trading partners.
-
Amazon Business - NetSuite- OBN-100-8634
-
Amazon Business CA - NetSuite- OBN-105-6322
-
Staples Advantage- OBN-100-0021
-
-
Click Search.
-
Under the Action column, click the Request icon.
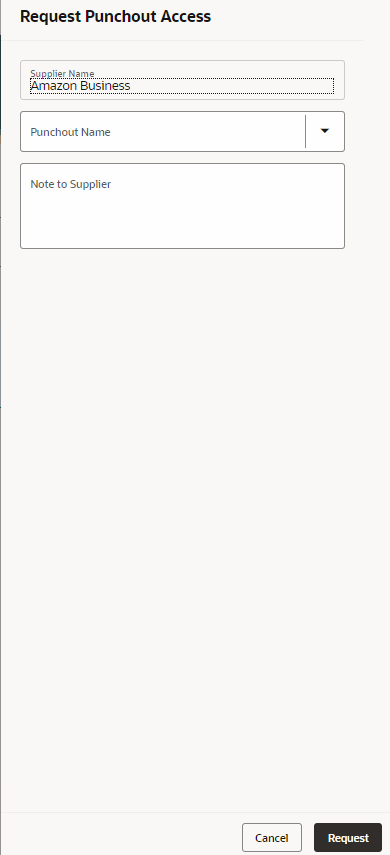
-
In the Request Punchout Access panel, in the Punchout Name field, select the trading partner's punch-out name.
-
In the Note to Supplier field, enter the identifier that you want to use for the trading partner.
-
Click Request.
You can view the status of your punch-out request on the Pending Requests tab. Following are the punch-out request statuses:
-
Pending Acknowledgment - Request is under review. After a request is acknowledged, a trading partner is added to the Your Trading Partners tab on OBN.
-
Pending Activation - Request is acknowledged but activation is still pending. After punch-out is activated, you can view a trading partner on the My Punchouts tab and can start purchasing items from the trading partner.
The OBN manager receives an email after the punch-out access is granted and another when the punch-out access is ready for activation.
Activating Transactions for SuiteProcurement Purchases
You must activate the following transactions before procuring items using the SuiteProcurement SuiteApp. This action allows you to manage the documents you want to send and receive with your trading partner through OBN.
-
Advance Shipment Notice
-
Invoice
-
Purchase Order
-
Purchase Order (PO) Acknowledgment
To activate the transactions on OBN:
-
Log in to your OBN account.
-
At the bottom of the page, click the Messaging tab.
-
At the top of the page, click the Transaction Setup tab.
-
Under Send, edit Purchase Order.
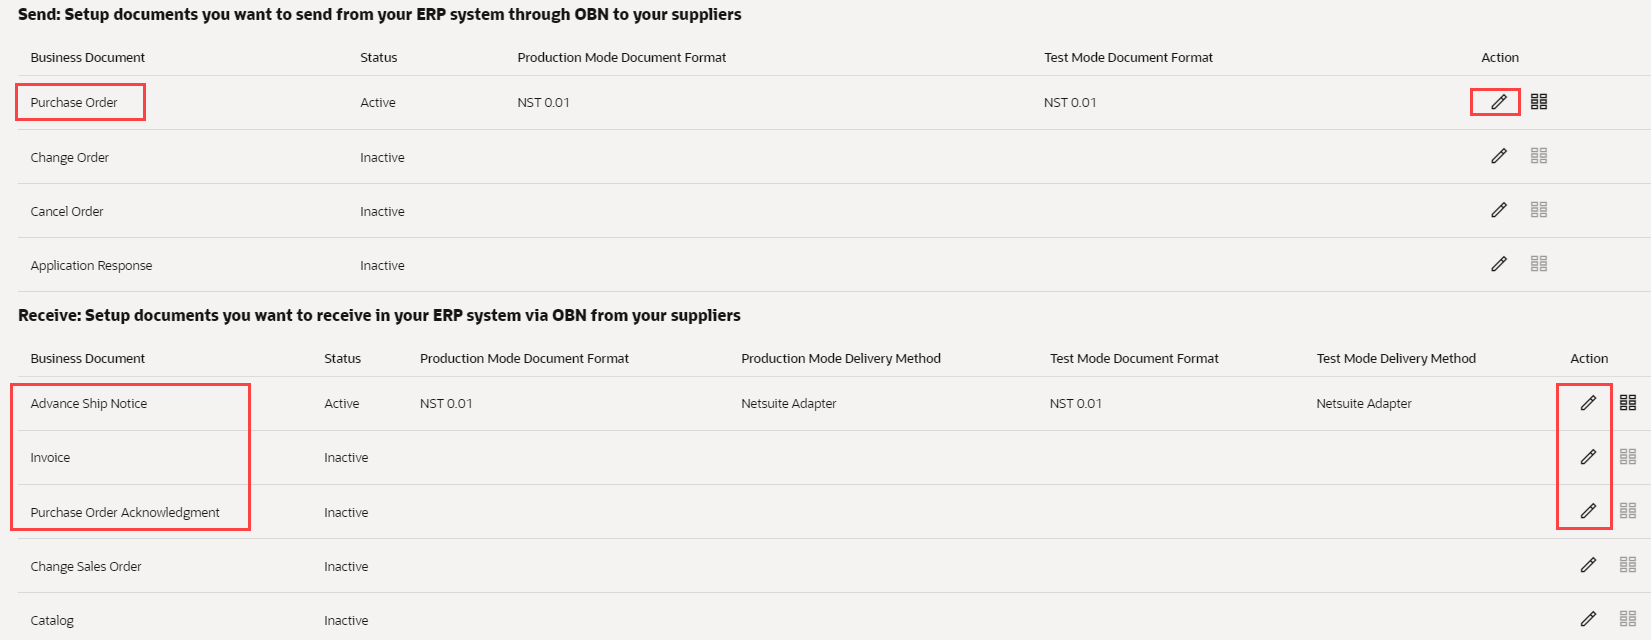
-
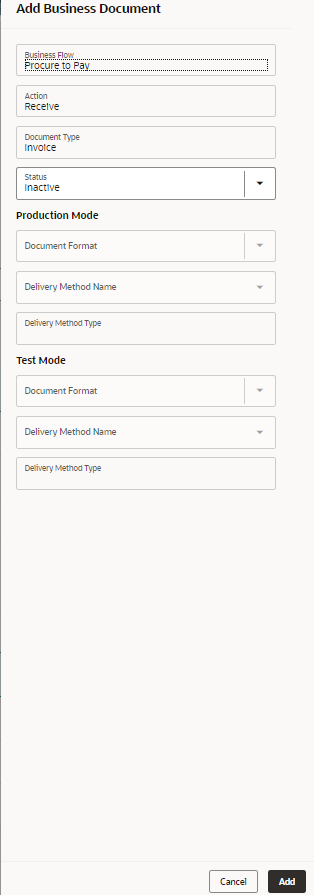
In the Add Business Document popup window, complete the following:
-
In the Status field, select Active.
-
Under Document Format, in the Production Mode and Test Mode fields, select NST.
-
Click Add.
-
-
Under Receive, edit Invoice.
-
In the Add Business Document popup window, complete the following:
-
In the Status field, select Active.
-
Under Production Mode, in the Document Format field select NST.
-
In the Delivery Method Name field, select NetSuite Adapter.
Note:The value of the Delivery Method Type field must be NetSuite Adapter for both production and test modes. Do not change the value.
-
Under Test Mode, in the Document Format field select NST.
-
In the Delivery Method Name field, select NetSuite Adapter.
-
Click Add.
-
-
Repeat Step 6 and Step 7 for advance ship notice and PO acknowledgment.
Now, you can proceed to Installing the SuiteProcurement SuiteApp and Setting Up SuiteProcurement Preferences.