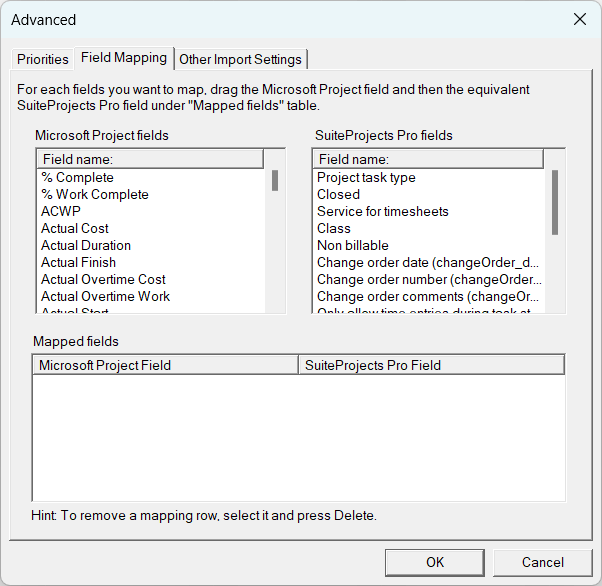
Field Mapping
When you export a project plan from Microsoft Project to SuiteProjects Pro, or import a project plan from SuiteProjects Pro into Microsoft Project, you can map standard or custom fields for tasks in Microsoft Project with the equivalent standard or custom fields for tasks in SuiteProjects Pro. Field mapping lets you configure the task information that you want to transfer between SuiteProjects Pro and Microsoft Project.
You only need to map Microsoft Project and SuiteProjects Pro fields one time. Project Connector remembers the field mapping.
The following custom fields may be useful when using Project Connector:
-
In SuiteProjects Pro, create a custom field for tasks to hold the built-in Microsoft WBS code and map it to the Microsoft Project standard field WBS. For more information about creating custom fields in SuiteProjects Pro, see Creating and Modifying Custom Fields.
-
In Microsoft Project, create the following custom fields for tasks and populate them in your project plan. You can then map them to the equivalent standard field in SuiteProjects Pro when setting up your import or export. For more information about creating custom fields in Microsoft Project, see Creating Custom Fields in Microsoft Project.
-
Closed task - Values in SuiteProjects Pro are either
0(open task) or1(closed task). -
Task type - Values are defined in Administration > Application Settings > Projects > Task types in SuiteProjects Pro. Values in the custom field value list must match exactly the Name of the task type as defined in SuiteProjects Pro.
-
Service - Values are defined in Administration > Application Settings > Timesheets > Services in SuiteProjects Pro. Values in the custom field value list must match exactly the Name of the service as defined in SuiteProjects Pro.
-
To map Microsoft Project and SuiteProjects Pro fields:
-
In the export or import setup window, click Advanced then click the Field Mapping tab.
-
To add a field mapping:
-
Drag a Microsoft Project field containing the information you want to export into the Mapped fields table under the Microsoft Project column.
-
Drag the SuiteProjects Pro field you want to export this information to into the Mapped fields table under the SuiteProjects Pro column.
-
-
To delete a field mapping:
-
Click the row you want to delete in the Mapped fields table.
-
Press Delete.
-
-
Click OK to save the field mapping and return to the export or import setting window.

Creating Custom Fields in Microsoft Project
Use the following steps to create custom fields in Microsoft Project. These steps are provided for illustration purposes only. For more information about custom fields in Microsoft Project, refer to the vendor documentation.
To create custom fields in Microsoft Project and map them to SuiteProjects Pro Fields:
-
In Microsoft Project, click Tools and select Customize, then Fields.
The Customize Fields window appears.
-
In the Custom Fields tab:
-
Under Field, choose
Task. -
Under Type, select
Text.A list of Text<#> custom fields appears.
-
-
Repeat the following for each custom field you want to add:
-
Select an available custom field.
-
Click Rename, enter the new name for the custom field, then click OK.
The new name appears in the custom field list with the default custom field name in parenthesis.
-
Click Value List
The Value List for "<custom field name>" window appears.
-
Enter values and descriptions to match the possible values in SuiteProjects Pro under the Value and Description fields. For example, for the Closed task custom field enter the following rows:
Row
Value
Description
1
1Closed
2
blank
Open
Note:Leave the value blank for Open tasks, which corresponds to zero in SuiteProjects Pro.
A message appears to inform you that data entry is limited to the values defined in the value list, and that continuing with this set up will delete any existing values for the custom field that are not in the value list.
-
If values for the corresponding SuiteProjects Pro field are defined as record names (if you are setting up a custom field to hold task type or service information, for example), verify that all the values in the custom field value list match exactly the names defined in SuiteProjects Pro.
-
Click OK.
Note:When you select the custom field in the Field Mapping tab of the advanced export or import settings window, a message appear to remind you that you need to make sure the values defined in Microsoft Project match the names defined in SuiteProjects Pro.
-
-
Click OK.
To populate custom field values for tasks in Microsoft Project, open the Task Information window and click the Custom Fields tab, then select the value for each custom field as applicable.