Creating Solutions

Platform solutions are accessed from the Solutions tab of the Scripting Center. Solutions can be created for form, scheduled, and library scripts. Solutions can also be used to create custom fields, script libraries, and script parameters. Solutions are automatically available when form and / or scheduled scripts are enabled, see Scripting Switches.
Solutions are stored in XML files so you can read, transfer, archive, and compare them. Solutions contain a version tag to allow SuiteProjects Pro to check that the solution file is compatible before applying.
A log is created when a solution is applied to show exactly what the solution created and to record any errors.
Add the 'Solutions' column on the 'Form' or 'Scheduled' lists to see which scripts are contained in a solution.
Solution Status
A solution can be in one of three states:
-
Not applied - The solution has been uploaded.
-
Applied - The solution has been successfully applied.
-
Failed - The solution was applied but encountered errors.
Solutions create a log when they are applied to an account. For 'Applied' solutions you can view the log to see which objects (scripts or parameters) the solution created. For 'Failed' solutions you can also see the errors that occurred when the solution was applied.
Solution Actions

A solution can have the following actions:
-
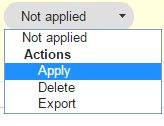
Apply - Creates all objects specified in the solution and creates a log file. If successful the solution status changes to 'Applied'. If unsuccessful an error message is displayed and the solution status changes to 'Failed'. See To apply a platform solution:.
Note:This action is only available for solutions with the 'Not applied' status.
-
Delete - Deletes the solution with all its history and logs.
Important:This does not delete any objects created by the solution.
-
Download - Downloads the solution XML file that was uploaded.
To create a solution:
-
Go to Administration > Scripting Center > Solutions.
-
Click the global Create button and select Create solution.
-
Name the solution and give it a title and description. Select the scripts to include in the solution and select any additional parameters or custom fields. Solutions are built from existing active scripts.
-
Click the > Create link under Documentation URL if you want to link to documentation describing the solution. After the link is created, click the link in the Documentation URL column in the Solutions tab to open the document.
-
Select which scripts (including Library scripts) the solution will run from the Scripts selection list.
-
Select which custom fields the solution will create from the Custom fields selection list.
-
Select which script parameters the solution will create from the Script parameters selection list.
-
Click Save.
You only need to select additional custom fields and parameters. When you select a script, the solution will automatically pull in the script's required libraries and parameters. SuiteProjects Pro ignores duplicate selections.
To create a platform solution from a single script:
-
Sign in as an Administrator and go to the Scripting Center.
Note:Make sure you have the necessary switches enabled, see Scripting Switches.
-
Go to the Form, Scheduled, or Library script you want to create the solution for.
-
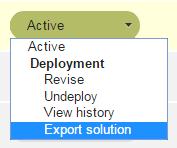
Select the Export solution option from the script status menu.
 Note:
Note:You can create a solution for any script that is not 'Inactive'. See Scripting Workflow.
-
Enter the name, title, and description for the solution file and SAVE.
The solution will contain all library scripts and parameters referenced by the script. To create a solution without a certain reference, first remove the reference from the script and then create the solution.
To apply a platform solution:
-
Go to Administration > Scripting Center > Solutions.
The solution list appears.
-
Select Upload solution from the Create menu.
Note:You are not allowed to upload an invalid solution file.
-
Select the Apply option from the status menu.
