Creating a Support Case
If you are experiencing difficulties with SuiteProjects Pro or would like to enable an optional feature, go to SuiteAnswers through the Support page in SuiteProjects Pro and create a support case.
Our support staff and engineers will work with you to find a solution to your problem.
Be sure to review the Support Usage Best Practice Guidelines, Case Severity Definitions and Case Resolution Overview before you submit a support case or call the Support team.
As a part of the support case creation process you will be presented with existing answers that may solve your problem. Take a moment to view the available answers before proceeding to create a support case.
To create a support case:
-
Sign in to your company's SuiteProjects Pro account.
-
Go to the user menu in the SuiteProjects Pro application. To access the user menu, click your profile pictures or initials in the upper-right corner.
-
Select Support.
-
Click Explore SuiteAnswers
-
In SuiteAnswers, click Contact Support in the top bar.
-
Click Create Support Case under Online Support.
Note:Depending on your support services subscription level, you may be able to access Support by phone. In this case, the page lets you select your country and shows a phone number that you can use to access Support by phone. The page also shows your SuiteProjects Pro account ID and your support services subscription level.
The page also includes a link to the SuiteProjects Pro user group. Click Ask an Expert from the SuiteProjects Pro Support Community to go to the SuiteProjects Pro user group.
The Create a Support Case page appears.
-
Follow the onscreen instructions to create a Support case:
-
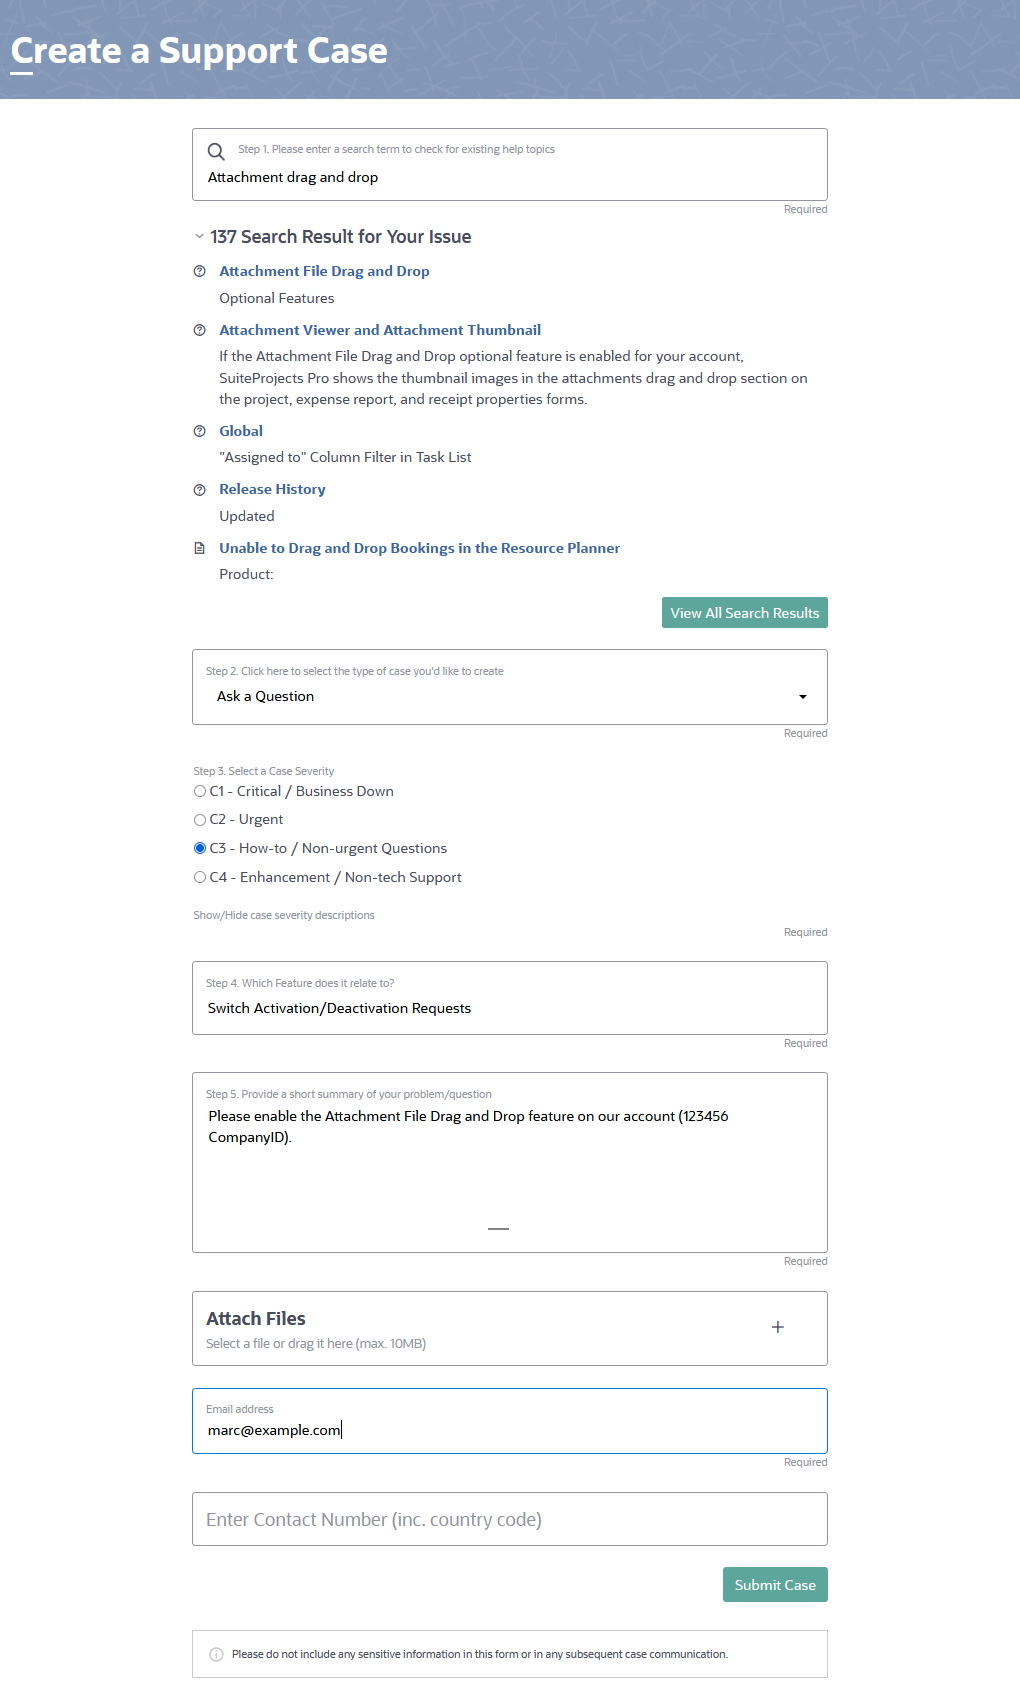
Step 1 - Enter a search term to check for existing answers to your query.
The first 5 search results appear. The list shows the number of articles matching your search. Oftentimes, an answer to your query already exists in SuiteAnswers. Review the search results and click View all search results to view other search results.
-
Step 2 - Click and select the type of case you want to create.
-
Step 3 - Choose a case severity. For more information about case severity levels, see Case Severity Definitions.
Important:Always use the appropriate case severity when submitting a case. Using the appropriate case severity helps SuiteProjects Pro Support prioritize between cases. Otherwise, SuiteProjects Pro Support need to evaluate the true urgency of each case, which slows down the response time to all cases.
-
Step 4 - Click and select the feature that your query relates to. Click the caret to expand options under each categories in the list. If you want to change the option selected, you need to delete the text first before you can select a different option.
-
Step 5 - Enter your question or a description of the problem you encountered.
-
(Optional) Attach files. Either click and select the files you want to attach or drag the files to the form.
-
Enter or verify your email address.
-
(Optional) Enter or verify your telephone number, including the country code and without any spaces, if you prefer to be contacted by telephone.
-
Do not enter anything into the 'Attach Document' field.
-
In the 'Email' field, type your email.
Note:Requests to enable or disable account-wide features in SuiteProjects Pro can only be processed when an administrator's email address is entered in this field.
-
In the 'Phone (Optional)' field, type a phone number where you can be contacted if you would prefer contacts you by telephone. Please include your country code and enter the number without any spaces.
Note:If you are creating a support case to enable an optional feature controlled by SuiteProjects Pro Support, enter the following details:
-
In Step 2. Click here to select the type of case you'd like to create, select 'Ask a question'.
-
In Step 3. Select a case severity, select 'C3 - How To / Non Urgent questions'.
-
In Step 4. Which Feature does it relate to?, select "Switch Activation/Deactivation Requests' under the category "SuiteProjects Pro Web Application".
-
In Step 5. Provide a short summary of your problem/question, enter the name of the optional feature you want to enable or disable, the type of account (production or sandbox) and the Company ID for the account you want to enable or disable it for.
-
-
Click Submit case.
An email confirmation with your support case reference (SuiteProjects Pro Customer Care #) is sent to your email address.
SuiteProjects Pro Support will contact you to request additional information if necessary or guide you through any steps required to resolve the support case.