Editing Exchange User Mailbox Information
Support for Exchange Integration Manager (EIM) will end on January 13, 2026. After this date, you will not receive any updates, issue fixes, or customer support for EIM.
Effective October 1, 2026, you may not be able to use EIM to integrate SuiteProjects Pro with Exchange Online. The EIM installer and all access to SuiteProjects Pro from EIM may be removed in future.
If your organization uses the EIM desktop application to integrate SuiteProjects Pro with Exchange Online or Exchange Server, switch to an alternative solution before October 1, 2026. For more information, see End of Support for Exchange Integration Manager.
You can enter and modify the list of Exchange user mailboxes manually, including information about the Exchange organization each mailbox is stored in, or you can import the list from a CSV file.
To edit Exchange user mailbox information:
-
In SuiteProjects Pro Exchange Integration Setup, go to Options > Edit Exchange User Mailboxes.
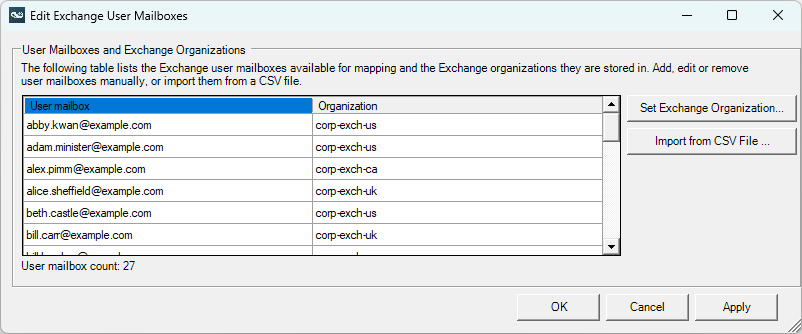
The Edit Exchange User Mailboxes window appears. The table lists the Exchange user mailboxes available for mapping in Exchange Integration Setup and the Exchange organization each user mailbox is stored in.

-
To add new user mailboxes, do the following for each user mailbox you want to add:
-
Scroll down to the bottom of the table.
-
On an empty row, enter the email address associated with the user mailbox under Exchange user and the Exchange organization under Organization.
-
Press Enter or click a cell in the next empty row.
-
-
To remove user mailboxes, do the following for each user mailbox you want to remove:
-
Select the user mailbox.
-
Press Delete.
Tip:Press Shift and Ctrl keys to select multiple users.
-
-
To change the Exchange organization a user mailbox is stored in:
-
Select the user mailbox.
-
Click Set Exchange Organization....
A dialog appears.
-
Enter the new Exchange organization name.
-
Click OK.
Tip:Select multiple rows and click Set Exchange Organization to change the Exchange organization for several user mailboxes at the same time.
-
-
To import users from a CSV file:
-
Click Import from CSV File.
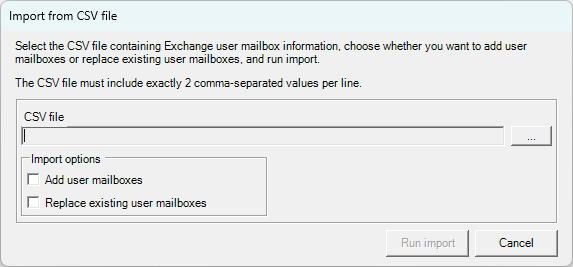
The Import from file window appears.

-
Click the Select button (...).
A file selection dialog appears.
-
Select the CSV file containing the information to import. The CSV file must contain 2 columns separated by commas (
,), and include plain data only without column headers. The following example shows the correct CSV format:kathryn.glass@example.com,corp-exch-us larry.nelson@example.com,corp-exch-us abby.kwan@example.com,corp-exch-us ed.ellis@example.com,corp-exch-ca bill.carr@example.com,corp-exch-uk alex.pimm@example.com,corp-exch-ca -
Do one of the following:
-
Check the Add user mailboxes box to import Exchange user mailboxes from the CSV file only if the email addresses corresponding to these user mailboxes are not already listed in Exchange Integration Setup.
-
Check the Replace existing user mailboxes box to replace already listed Exchange user mailboxes with information from the CSV file.
-
Check both boxes to add new user mailboxes and replace existing user mailboxes.
-
-
Click Run import.
-
-
Click OK to validate the changes and return to the main Exchange Integration Setup window.
-
Click File > Save.