Scheduling the Integration to Run Automatically
SuiteProjects Pro lets you schedule the integration to run automatically for selected workflow groups on specific days and times.
To schedule integration runs, in SuiteProjects Pro, go to Administration > NetSuite Connector > Automate.
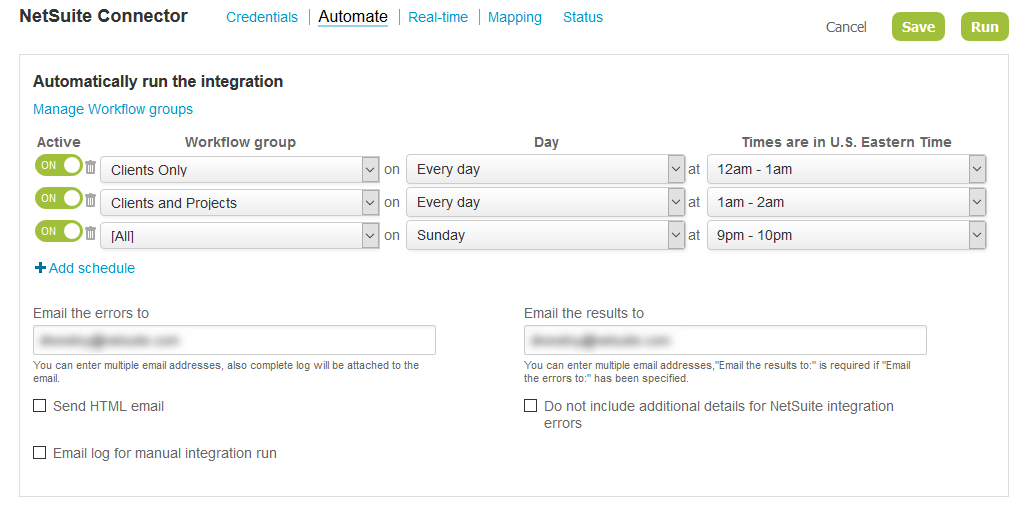
The form shows a list of scheduled integration runs in a tabular form with information about the workflow group, the day and time for the integration run.
-
You can add scheduled integration runs. See Adding a Scheduled Integration Run.
-
You can create workflow groups to include only the integration workflows you need in each scheduled integration run. See Creating and Managing Workflow Groups.
Tip:Define and use workflow groups to gain more control when setting up or maintaining your integration. If you do not select a workflow group, the scheduled integration run includes all integration workflows active at the time of the run. For more information about activating integration workflows, see Adding and Managing Integration Workflows.
-
You can activate, deactivate or delete a scheduled integration run at any time:
-
To activate or deactivate a scheduled integration run, click the Active switch then click Save.
-
To delete a scheduled run, click the delete icon
 then click Save.
-
If a workflow is part of a group selected for an active scheduled integration run, it is protected - you cannot modify the field mappings or the settings for the workflow, and you cannot deactivate the workflow. See Protected workflows.
You should define and use workflow groups in your integration schedules. However, a legacy compatibility administration setting lets you disable the Workflow Group feature. See Hide workflow groups.
You can also configure SuiteProjects Pro to send result and error notification email for each scheduled and manual integration run.

Adding a Scheduled Integration Run
You can schedule the integration to run for a specific workflow group on a specific day and at a specific time. See also Creating and Managing Workflow Groups.
To add a scheduled integration run:
-
In SuiteProjects Pro, go to Administration > NetSuite Connector > Automate.
-
Click Add schedule.
-
Select a Workflow group. This will restrict the scheduled integration run to the workflows included in that group. The options include:
-
Workflow groups defined for your account.
-
The metavalue [All] - all the workflows enabled on the NetSuite Connector Mapping tab.
Tip:Workflow group defaults to [All] when you add a new schedule. Define and use workflow groups instead of [All] in your integration schedules to gain more control when setting up or maintaining your integration.
-
-
Select the Day and Time frame for the run. Scheduling options include:
-
Days of the week, every day, specific days of the month including the 1st - 31st, last day of the month, 1st and 15th of the month, and 15th and last day of the month.
-
Hourly time ranges - SuiteProjects Pro will determine the optimum time the run occurs within that hourly time range.
Note:Scheduled runs begin during the time frame specified but may end after that time frame.
You can schedule up to 24 integration runs per day. However, scheduled runs cannot overlap. An error message will appear if there are any potential problems with scheduled runs.
If you use scheduled integration runs for Project Tasks or Customers, you can improve the performance of these integration runs by enabling monitored fields. See Enabling Monitored Fields for Import Workflows.
-
-
Click Save.
Creating and Managing Workflow Groups
You can create workflow groups to include only the integration workflows you need in each scheduled integration run. You can include any active workflows in your workflow groups.
After you create workflow groups, you can use them in your integration schedules instead of including all the workflows that are active at the time of the integration run. This lets you gain more control when setting up or maintaining your integration. See also Adding a Scheduled Integration Run.
To create or modify workflow groups:
-
In SuiteProjects Pro, go to Administration > NetSuite Connector > Automate.
-
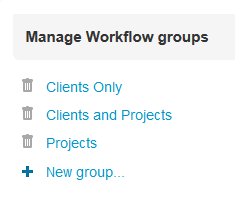
Click Manage workflow groups. The manage workflow groups dialog appears.

-
Do one of the following:
-
Click New group ... to create a new workflow group.
-
Click a workflow group name to view or modify it.
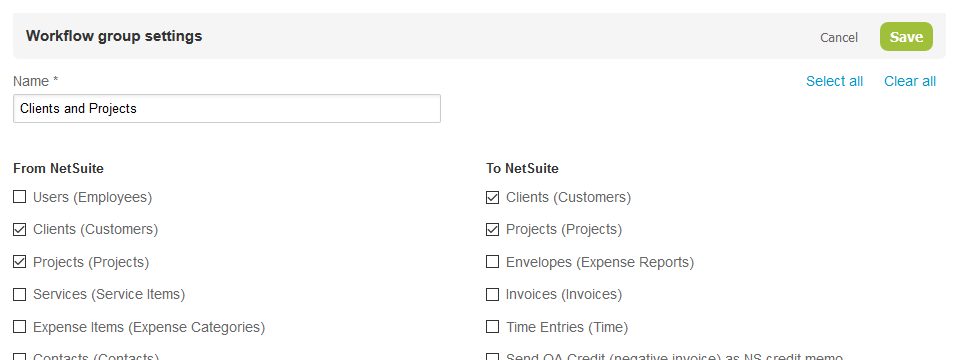
The workflow group settings dialog appears.
-
-
Enter a Name for the workflow group, if creating a new group.
-
Check the boxes for the workflows you want to include. You can only select workflows that are currently active. For more information about activating integration workflows, see Adding and Managing Integration Workflows.
Tip:Click Select all to check all boxes and clear the box for each workflow you want to exclude, or click Clear all to clear all boxes and check the box for each workflow you want to include.

-
Click Save.
SuiteProjects Pro validates any workflow dependencies before saving the workflow group settings. A validation error message appears if a workflow is required but not included in the workflow group. For example, if you create a workflow group to import projects from NetSuite, customers must also be imported.

-
Click Cancel or outside the dialog to close it and return to the Automate tab.
To delete a workflow group:
-
In SuiteProjects Pro, go to Administration > NetSuite Connector > Automate.
-
Click Manage workflow groups. The manage workflow groups dialog appears.

-
To delete a workflow group, click the delete icon
 next to the workflow group name.
 -
Click Cancel or outside the dialog to close it and return to the Automate tab.