Testing the REST API Using Postman
This section provides some tips and guidelines you can use to get started with testing the REST API using the GUI REST client Postman.
You can download Postman from https://www.getpostman.com/ and install it on your computer. After you have installed Postman, you will be able to:
-
Define and save a set of environment variables, which you can then used in your requests, export and import. See Defining and Saving Environment Variables in Postman.
-
Create collections, you can use to save your requests for later use, export, and import. See Creating a Request Collection in Postman.
-
Create and send HTTP requests with the help of a user interface. See Creating and Sending API Requests Using Postman.
-
Use the OAuth 2.0 authorization code flow to get a user's permission and obtain an access token. See Creating and Sending API Requests Using Postman.
-
Refresh access tokens manually or programmatically. Refreshing Access Tokens Using Postman.
The following steps refer to Postman v11.4.7 and are provided for illustration purposes only. You can use any GUI REST client and version of your choosing. You can also use the curl command-line utility to make HTTP requests. Refer to the relevant product documentation for detailed information about its setup and usage.
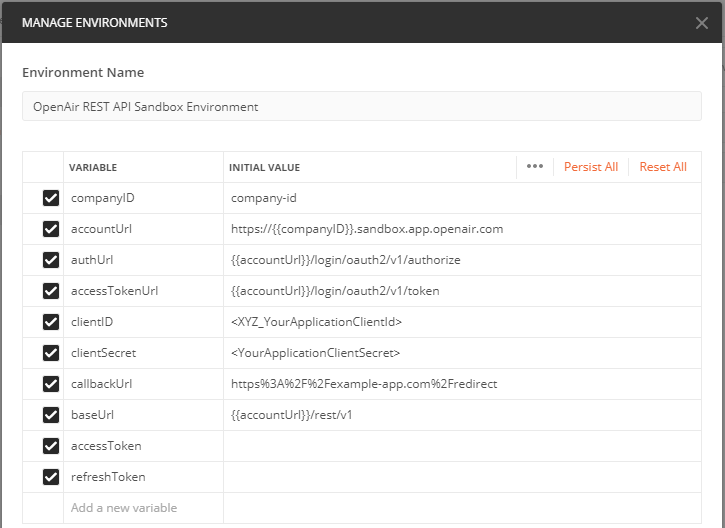
Defining and Saving Environment Variables in Postman
A Postman environment is a set of key-value pairs. The key represents the name of the variable, which you can then use in place of the value in your requests. You can set up multiple environments and switch between them. For example, you can have, the same set of environment variables with different values to use the same requests with your company's sandbox or production SuiteProjects Pro accounts, or with different access tokens obtained for different users with different permissions and access rights. You can create copies of your environments, export them as JSON, or share them with other Postman users.
To define and save environment variables in Postman:
-
In Postman, click the Environments tab in the left sidebar.
-
Click the create icon +. The New environment page appears.

-
Click New Environment (the environment name) in the upper-left corner of the form and enter a name for your environment.
-
Enter a variable name and initial value for each environment variables you want to add. You can use the following example as a model.
Variable
Initial value
Notes
account_urlhttps://<company-id>.app.sandbox.netsuitesuiteprojectspro.com Your account URL. This example shows the account URL for your sandbox account. Replace
<company-id>with your unique account identifier which is typically assigned based on the Company ID for your account.For more information about your account URLs, see Your Account URLs.
auth_url{{account_url}}/login/oauth2/v1/authorize The authorization endpoint URL. Uses the
account_urlvariable within the value.access_token_url {{account_url}}/login/oauth2/v1/token The token endpoint URL. Uses the
account_urlvariable within the value.client_id<your-application-client-ID>The client ID for your application. Replace with the client ID for the application you registered in SuiteProjects Pro.
client_secret<your-application-client-secret>The client secret for your application. Replace with the client secret for the application you registered in SuiteProjects Pro.
callback_urlhttps%3A%2F%2Fexample-app.com%2Fredirect The callback URL for your application. Replace with the redirect URI for the application you registered in SuiteProjects Pro.
base_url{{account_url}}/webapi/v2The base URL for REST API requests. Uses the
account_urlvariable within the value.access_token -
The access token for your application. You can leave the value empty and use Postman to obtain the token. See Creating and Sending API Requests Using Postman and Refreshing Access Tokens Using Postman.
refresh_token -
The refresh token for your application. You can leave the value empty and use Postman to obtain the token. See Creating and Sending API Requests Using Postman and Refreshing Access Tokens Using Postman.
-
Click Save.
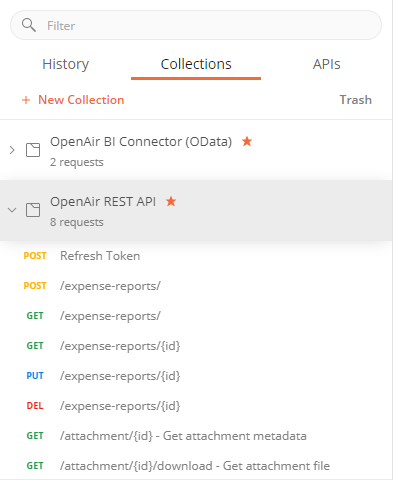
Creating a Request Collection in Postman
A Postman collection is a set of HTTP requests. You can use collections to save your requests for later use, copy an entire set of requests, export them as JSON, or share them with other users.
To create a collection in Postman:
-
In Postman, click the Collections tab in the left sidebar.
-
Click the create icon +. The New collection page appears.
-
Select Blank collection
-
Select New Collection (the collection name) in the upper-left corner of the form and enter a name for your collection.
-
(Optional) Add a description. You can also define a default authorization method for your requests and define collection variables, if required. These settings are not set at the collection level in this example.
-
Click Save.
Creating and Sending API Requests Using Postman
Postman makes it simpler to create and send request and read responses. It spares you the need to get your curl syntax right and analyze requests and responses from the command line. Postman lets you obtain and access token using the OAuth 2.0 Authorization code flow. You can use this to simulate the OAuth 2.0 Authorization process and obtain an access token to authenticate your requests.
To create and send an API request using Postman:
-
In Postman, click the + at the top of the main pane to add a new tab.
A new untitled request tab appears. New requests use the GET method by default. You can select any other supported method from the dropdown on the left.
-
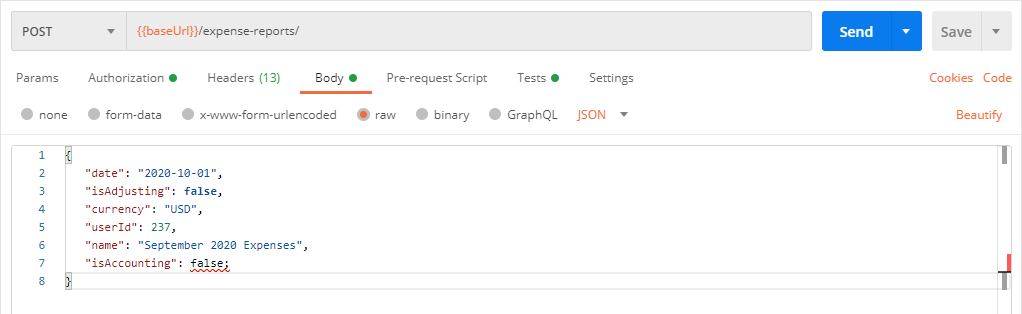
Enter the request URL. You can use the environment variable for the base URL and add the relevant resource endpoint path. For example, enter
{{base_url}}/expense-reports/
-
Click the Params tab and enter any query parameters as key-value pairs. Notice the query parameters are added to the request URL as you type.
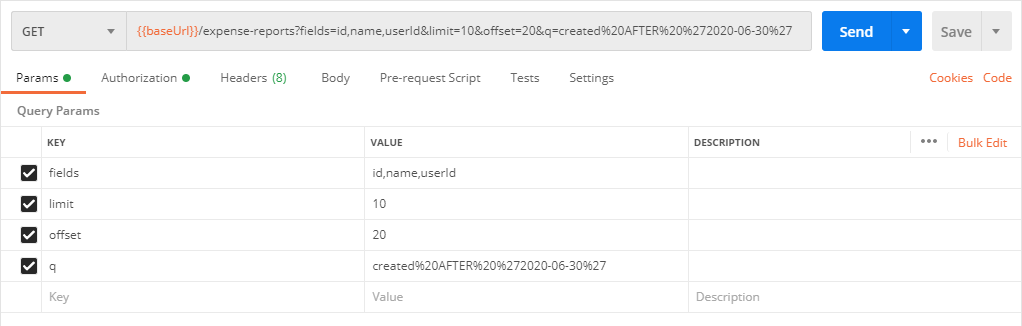 Note:
Note:Postman URL-encodes query parameter values. The example above shows a URL-encoded value for the
qparameter but it is not necessary to URL-encode the value in the Params tab. -
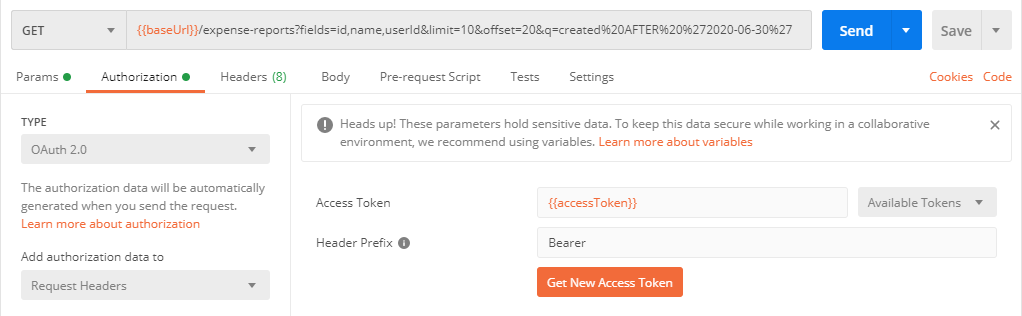
Click the Authorization tab and select or enter the following information:
-
Auth Type - Select
OAuth 2.0. -
Add authorization data to - Select
Request Headers -
Current Token:
-
Token - Enter the access token for your application. You should use the relevant environment variable for the access token -
{{access_token}}. The first time you send a request or if your access token is no longer valid, you need to use the OAuth 2.0 authorization flow to get a new access token using the information under the Configure New Token section. -
Header Prefix - Enter
Bearer.
-
-
Configure New Token - Postman lets you obtain and access token using the OAuth 2.0 Authorization code flow. You can use this to simulate the OAuth 2.0 Authorization process and obtain an access token to authenticate your requests. To do so, enter the following details under this section:
-
Grant Type - Select
Authorization Code. -
Callback URL - Enter the redirect URI for the application you registered with SuiteProjects Pro. You should use the relevant environment variable for the callback URL -
{{callback_url}}. -
Auth URL - Enter the authorization endpoint URL for your account
https://<account-domain>/login/oauth2/v1/authorize. You should use the relevant environment variable for the authorization endpoint URL -{{auth_url}}. -
Access Token URL - Enter the token endpoint URL for your account
https://<account-domain>/login/oauth2/v1/token. You should use the relevant environment variable for the token endpoint URL -{{access_token_url}}. -
Client ID - Enter the client ID for the application you registered with SuiteProjects Pro. You should use the relevant environment variable for the client ID -
{{client_id}}. -
Client Secret - Enter the client secret for the application you registered with SuiteProjects Pro. You should use the relevant environment variable for the client secret -
{{client_secret}}. -
Scope - Enter
rest. -
Client Authentication - Select
Send as Basic Auth header.
-
-
-
The first time you send a request or if your access token is no longer valid, you need to use the OAuth 2.0 authorization flow to get a new access token using the information under the Configure New Token section. Click Get New Access Token.
The SuiteProjects Pro or SSO sign-in page appears in a new window.
-
Enter your sign-in details and click Sign in.
Note:If this is the first time you authorize the application, the Authorization page will appear. Click Allow.
The Get new access token window appears, showing the progress of the authentication request. If the authentication completes successfully, the Manage Access Tokens window appears and shows the tokens obtained.
-
Save the access token and refresh token as environment variables.
-
Select and right-click the Access token value. Point to Set:<Environment Name>, and select
access_token -
Select and right-click the Refresh Token value. Point to Set:<Environment Name>, and select
refresh_token.
You can now use the
access_tokenandrefresh_tokenenvironment variables in your requests.Important:Make sure you do not select the line break at the end of the token value. If you double click to select the entire string, the access token you save in your environment variables includes a line end character and isn't valid.
-
-
Close the Manage Access Tokens window.
-
If you are creating a POST or PUT request, click the Body tab. Select the raw option and select JSON from the type dropdown on the right of the radio buttons. Enter the JSON object for the resource you want to insert. The Postman editor indicates possible syntax errors with a red line on the right.
-
Click Save, enter or edit the request name, select the collection you want to save this request under, and click Save.
-
Click Send to send the request.
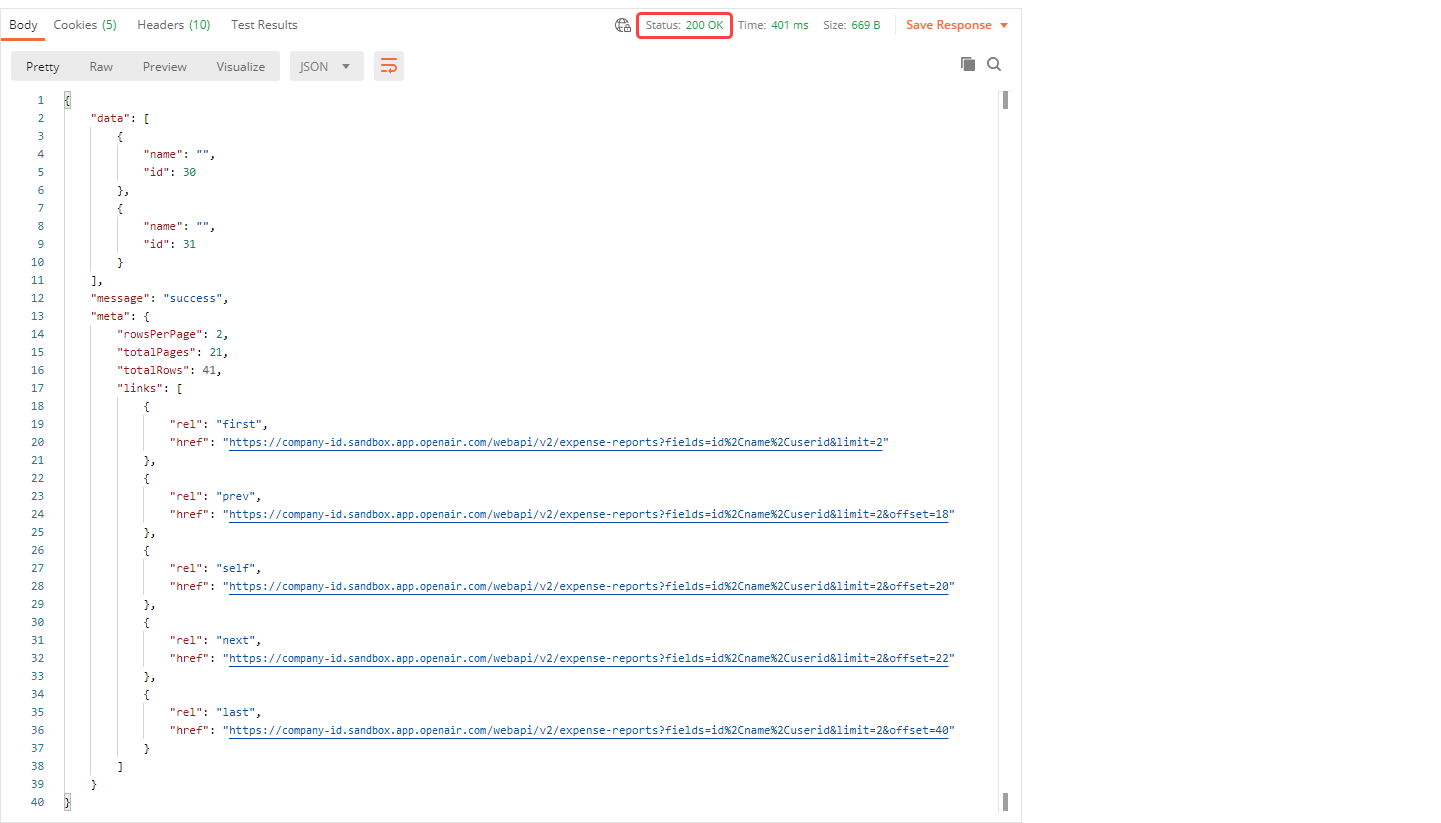
You can then analyze the response in the bottom pane, which includes the Body and the HTTP Status code.
Refreshing Access Tokens Using Postman
Access token have a short validity period, you can refresh access tokens using a separate request or you can add a pre-request script to your API requests to refresh your access token if it has expired before you send a request.
Creating a Token Refresh Request Using Postman
You can create a request to refresh your access token. For more information about the request used to refresh tokens, see Refreshing an Access Token.
To create a token refresh request in Postman:
-
Create a new request and use the following:
-
Method -
POST -
Request URL -
{{access_token_url}} -
Authorization - Select or enter the following information:
-
Auth Type -
Basic Auth -
Username - Enter the client ID for the application you registered with SuiteProjects Pro. You should use the relevant environment variable for the client ID -
{{client_id}}. -
Password - Enter the client secret for the application you registered with SuiteProjects Pro. You should use the relevant environment variable for the client secret -
{{client_secret}}.
-
-
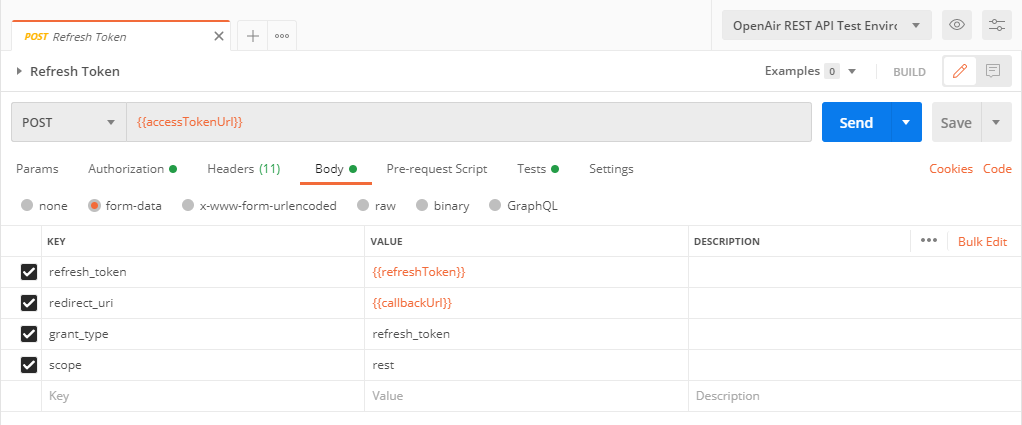
Body - Choose
form-dataand enter the following key-value pairs:-
refresh_token-{{refreshToken}} -
access_token-{{accessToken}} -
grant_type-refresh_token -
scope-rest
-
-
-
Click the Scripts tab and Post-response subtab, and paste the following script. This script will save the new access token and refresh token automatically to your environment variables.
pm.test("Status test", function (){pm.response.to.have.status(200)}); if (pm.response.to.have.status(200)) { var data = pm.response.json(); pm.environment.set("access_token", data.access_token); pm.environment.set("refresh_token", data.refresh_token); } -
Click Save and save the request to your collection for later use. You can use this request to refresh your access token when it expires.
Refreshing Tokens Automatically Before Each API Request
You can add a pre-request script to your API requests to refresh your access token if it has expired before you send a request and save the new access token and refresh token automatically to your environment variables.
Open one your API requests, click the Pre-request Script tab, paste the following script, and click Save.
The first time the script runs, it will create the environment variable access_token_expires. The variable will be used to save the time the new access token is due to expire. The script compares the current time with the time the current access token is due to expire and only requests a new access token if the current access token has expired.
              var now = new Date().getTime();
var accessTokenExpires = pm.environment.get("access_token_expires");

if (!accessTokenExpires) {
    accessTokenExpires = now;
}

var accountUrl = pm.environment.get("account_url");
var tokenUrl = accountUrl + "/login/oauth2/v1/token";

if (accessTokenExpires && now >= accessTokenExpires) {
    var options = {
        method: 'POST',
        url: tokenUrl,
        header: {
            "content-type": "application/json"
        },
        auth: {
            "type": "basic",
            "basic": [{
                "key": "username",
                "value": pm.environment.get("client_id")
            }, {
                "key": "password",
                "value": pm.environment.get("client_secret")
            }]
        },
        body: {
            mode: 'formdata',
            formdata: [{
                key: "refresh_token",
                value: pm.environment.get("refresh_token"),
                disabled: false,
                description: {
                    content: "",
                    type: "text/plain"
                }
            }, {
                key: "redirect_uri",
                value: pm.environment.get("callback_url"),
                disabled: false,
                description: {
                    content: "",
                    type: "text/plain"
                }
            }, {
                key: "grant_type",
                value: "refresh_token",
                disabled: false,
                description: {
                    content: "",
                    type: "text/plain"
                }
            }, {
                key: "scope",
                value: "rest",
                disabled: false,
                description: {
                    content: "",
                    type: "text/plain"
                }
            }, ]
        }
    };
    console.log(options);
    pm.sendRequest(options, function(refreshError, refreshResponse) {
        if (refreshError) console.log(refreshError);
        var jsonRefreshResponse = refreshResponse.json();
        if (jsonRefreshResponse.access_token) {
            pm.test("Token refreshed and saved", () => {
                pm.expect(refreshResponse).to.have.property('code', 200)
            });
            pm.environment.set("access_token", jsonRefreshResponse.access_token);
            pm.environment.set("refresh_token", jsonRefreshResponse.refresh_token);
            var t = new Date();
            t.setSeconds(t.getSeconds() + jsonRefreshResponse.expires_in);
            pm.environment.set("access_token_expires", t.getTime());

        } else {
            pm.test("Refresh token request failed - Get new access and refresh tokens by clicking \"Get New Access Token\" in the Authorization tab, save the values in the relevant environment variables, and try sending the request again", () => {
                pm.expect(refreshResponse).to.have.property('code', 200)
            });
        };
    });
}