Timesheet Record
A timesheet allows you to record your time and submit it for approval, and track approval. If you're a manager, you can review and approve or reject a timesheet submitted by one of your reports or by a consultant working on your projects.
The timesheet record page may include the following tabs, depending on your account configuration:
-
Edit - Use the Edit tab to enter time against a project or a task. See Time Entry Grid.
-
Hours remaining - The Hours remaining tab shows the number of hours that remain to be worked in each task against which you entered time. The System estimate (hrs) field shows how many hours are left based on the initial number of hours set for the task. You can enter your own estimate under Hours remaining if you think that more or less time will be needed to complete the task.
Note:This tab may not be available depending on your company's account configuration.
-
Report - The Report tab shows a tabular view of the timesheet which you can print, save as PDF, or download as a CSV or HTML file. If you're a manager or project manager, you can use the Report tab to approve or reject time entries in the timesheet selectively.
-
Properties - The Properties tab holds general information for the timesheet, such as accounting date, default values to use for every new row in the time entry grid. You can set the default project for new rows in the time entry grid, for example. You can also add notes and attachments.
-
Submit/Approve - Use the Submit/Approve tab to submit your timesheet for approval, view the approval history of a timesheet, along with any notes for each approval stage, or to approve or reject the entire timesheet.
Time Entry Grid
The time entry grid in the Edit tab is where you record time against a project or a task. It includes the following elements:
-
Information columns and time grid rows - Use the information columns on the left to select the projects or tasks against which you're recording time, and any additional information that your company may require.
-
You can change the width of information columns. To do so, drag the right edge of the column. SuiteProjects Pro will remember the column width, next time you go to a timesheet.
-
You can use different rows in the time entry grid to record time against different tasks.
-
You can add as many rows as you need. An empty row is always available at the bottom of the grid. When you start entering information in the empty row, a new empty row appears.
-
To duplicate a row, click the copy icon
 . This adds a duplicate of the row immediately below with the same values in the information columns and the same time entries.
 -
To delete a row, click the delete icon
 and select Delete.
-
-
You can control the vertical density of the timesheet grid in your personal settings - See Control the data density displayed in timesheet grid with selected mode.
-
-
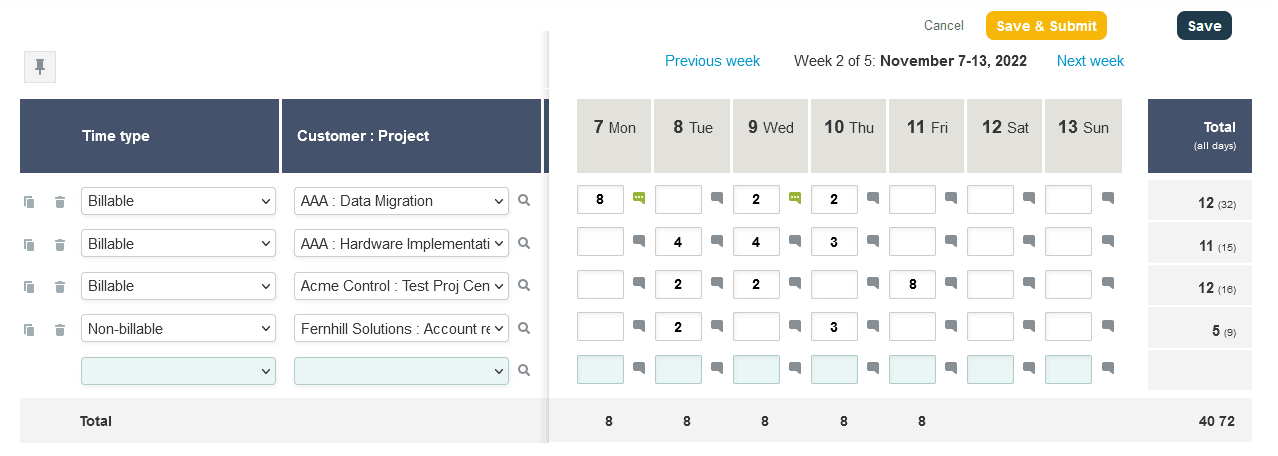
Calendar and time entries - The calendar on the right shows a column for each day in the timesheet period.
-
Use the time entry cells under each day to enter the number of hours worked on the project and task selected under the information columns for each row.
Note:Fractions of an hour must be recorded as a decimal and not as minutes, For example to record 5 hours and 45 minutes, enter
5.75.Your company may require you to record additional information for time entries. Click the notes icon
 next to the time entry cell to enter additional information. A green color icon
  indicates that there is additional information for the time entry.
 -
Depending on the configuration of your company's SuiteProjects Pro account, you may need to submit time for more than one week at a time. If your timesheet period spans several weeks, the calendar shows either one week at a time or all days in the timesheet period, depending on your personal settings - see Display all weeks for timesheets containing multiple weeks. When showing one week at a time, click Previous week or Next week to move through the different weeks in the timesheet period.
-
The calendar shows the total time entered for each day and for each row. If the timesheet period spans several weeks and the calendar shows one week at a time, the row totals include the total number of hours for the week shown and, in brackets, the total across the all timesheet period.
-
You can pin the calendar so that the whole week is always visible. You can then scroll vertically to see any hidden information columns on the left if the full grid does not fit in the width of the canvas. When the calendar is unpinned, the information columns on the left and the calendar are shown as one continuous grid and you need to scroll vertically to see any part of the grid that is not visible. To pin or unpin the calendar, click the pin icon
 .
.
-
Depending on your company's SuiteProjects Pro account configuration and on your access profile, other information may be required or other functionality may be available on the time entry grid. These include:
-
Time entry start time and end time - When available or required by your company, click the notes icon
next to the time entry cell to enter a start time and end time for the time entry. The duration in the time entry cell is updated automatically when you close the additional information pop up form. This is a separate functionality from the time cards. Note that updating the duration does not update the start time or end time automatically and the time entry cell shows an error if the duration doesn't match the period between the start time and end time. -
Time cards - If your company requires you to enter a start time and end time for each working day, as well as a start time and end time for a break during the working day, the time entry grid shows a clock icon
 for each day in the calendar. Click this icon to enter the required information. This is a separate functionality from the time entry start time and end time.
 -
Timer - When available, the time entry grid also shows a clock icon
for each day in the calendar. You can use the Timer feature to time multiple activities in the course of the current day and use the time recorded to populate the time grid.