Invoke a Web Service with a JWT Assertion

You can invoke the web service of a service provider using a JWT user or client assertion security policy with the SOAP Adapter. JWT assertions let you authenticate a client application without using a client secret.

The SOAP Adapter provides the following security policies for JWT assertion:
  • OAuth using JWT User Assertion
  • OAuth Client Credentials using JWT Client Assertion

This use case provides a high level overview of how to invoke a web service of a service provider using the OAuth Client Credentials using JWT Client Assertion security policy.

  1. Manually create a signing key outside of Oracle Integration.
  2. In the navigation pane, click Settings, then Certificates.
    1. Click Upload.
    2. In the Alias name field, enter the alias name. You also specify this alias on the Connections page when configuring the JWT assertion security policy. For this example, the idcs alias is specified.
    3. From the Type list, select Signing key.
    4. Click Private.
    5. Click Select key file to select the signing key you created previously.
    6. If the private signing key is encrypted, enter the private signing key password.
  3. In the navigation pane, click Design, then Connections.
    1. Select and configure a SOAP Adapter trigger connection.
    2. Select and configure a SOAP Adapter invoke connection to use a JWT assertion.
    3. In the WSDL URL field, upload the WSDL URL of the service provider to which to connect.
    4. From the Security Policy list, select OAuth Client Credentials using JWT Client Assertion. This selection is typically used for application-driven web services.
    5. In the Access token URI field, specify the access token URI for the service provider.
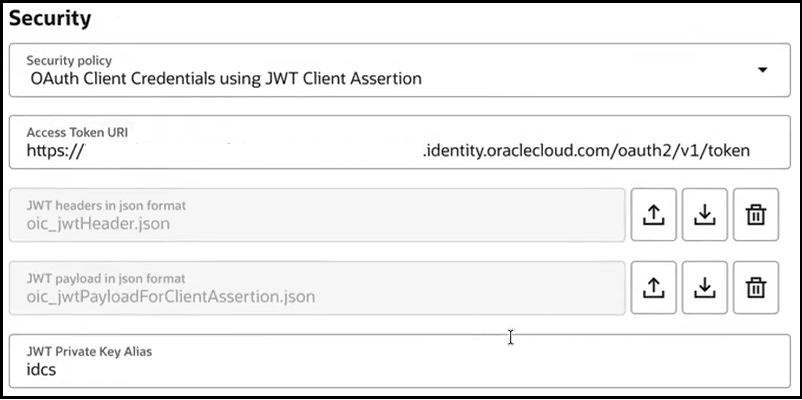
      Security configuration form set to “OAuth Client Credentials using JWT Client Assertion,” with an Oracle Identity Cloud access-token URL, JSON files for JWT headers and payload, upload/download/delete controls for each file, and JWT private key alias set to “idcs.”

    6. Upload the JWT headers file and JWT payload file. These files are used instead of specifying a client secret.
      You create the content in JSON files. The content of both files is specific to the service provider you want to invoke.
      • JWT header file: This file requires an algorithm (alg) and a key identifier (kid) that is uniquely-generated and associated with the uploaded private signing key.
        : {
          "alg": "RS256",
          "kid": "oicIdcs",
          }
      • JWT payload file: At a minimum, this file requires the iss (issuer of the claim), sub (client ID value), aud (audience), and exp (token expiration time) claims and values.
         {
          "iss": "a29ca932394c4cade747d79062f06",
          "sub": "a29ca932394c4cade747d79062f06",
          "aud": "https://identity.oraclecorp.com/",
          "nbf": 1339954481,
          "exp": 1339954481,
          "iat": 1339954481,
          "jti": "b2cdfckd-3gre-2u2d-4120-2065f10cfbd4"
        }

        The sub parameter value is the client ID of the application obtained from the OAuth configuration tab in the Oracle Cloud Console.
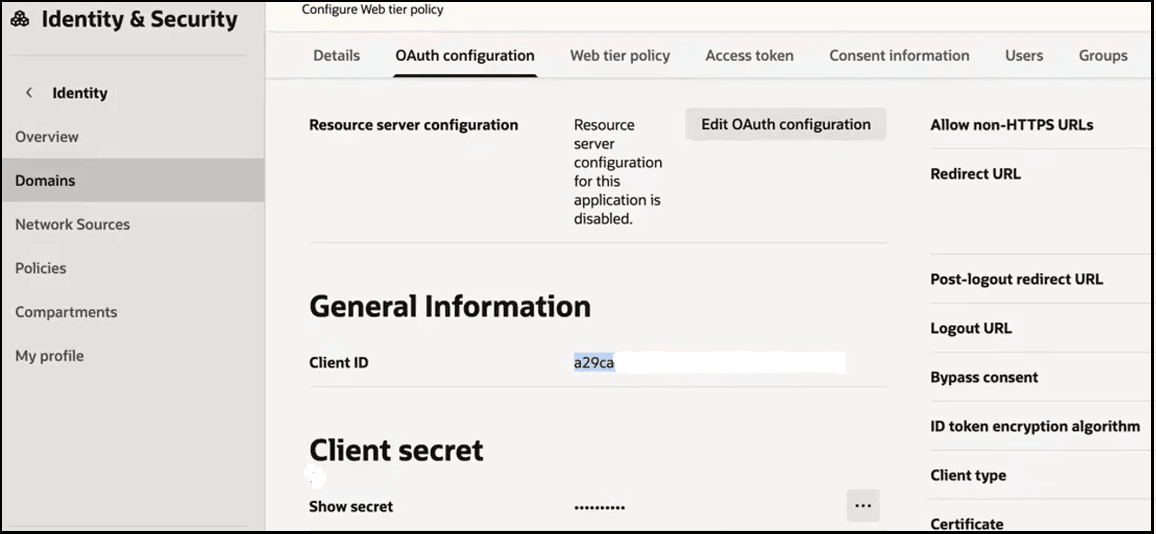

        Oracle Identity & Security console showing the OAuth configuration tab for an application. The left sidebar highlights Domains. The main panel shows resource server configuration, general information with a redacted client ID, and a client secret section. The right side lists OAuth settings such as redirect URLs, logout URL, consent bypass, token encryption algorithm, client type, and certificate.

      Additional claims, including custom claims, can also be included in both files. See the documentation provided by the service provider for instructions on how to configure these claims.

    7. For the JWT Private Key Alias field, enter the same name you specified when uploading the signing key certificate in Step 2. This name is used to generate the JWT assertion.
    8. Click Optional security if you want to specify optional scopes or access token request values. For this example, none are specified. The way to specify the scope and access token request values varies from service providers. Some service providers require values.
  4. Test and then save the connection.
    You are ready to create an integration that uses this connection to call the web service.
  5. In the navigation pane, click Design, then Integrations.
  6. Create an application integration to call the web service and receive a Success message in the response.
  7. Add and configure the SOAP Adapter trigger connection.
  8. Add and configure the SOAP Adapter invoke connection to call the web service and receive a response.
  9. Map the source and target elements. For this example, a jobid source element is mapped to a Body target element.

    Data mapping canvas with source fields jobId and userName from a “test Request (SOAP)” message on the left, and an “out Request (SOAP)” target structure on the right containing ConnectivityProperties, EndpointProperties, SecurityProperties, and Body. A mapping line connects jobId to the target’s SecurityProperties.

    If you instead select the OAuth using JWT User Assertion security policy, the elements in the mapper differ slightly. A source userName element is provided for propagating user name identity to SecurityProperties. The SecurityProperties element is disabled with the OAuth Client Credentials using JWT Client Assertion security policy.


    Mapping editor showing a SOAP source request with required jobId and userName fields connected to a SOAP target request, which contains ConnectivityProperties, SecurityProperties, and Body sections.

  10. Complete the remaining design of the integration.
    When complete, the integration looks as follows:
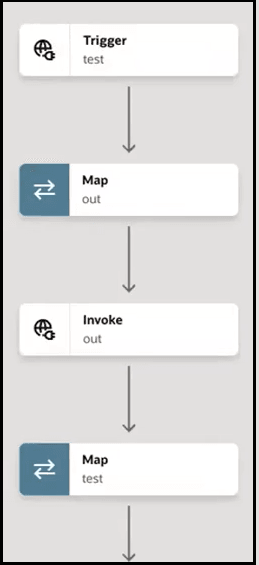

    A vertical workflow shows five connected steps: Trigger (test), Map (out), Invoke (out), Map (test), followed by an end icon.

  11. Assign a business identifier, then activate the integration.
  12. Hover over the row of the integration on the Integrations page.
  13. Select Actions Actions icon, then select Run.
  14. In the Body field, specify the job ID value in your content:
    <job:GetJobStatusRequest>
      <job:jobId>value</job:jobId>
    </job:GetJobStatusRequest>
  15. Run the integration.
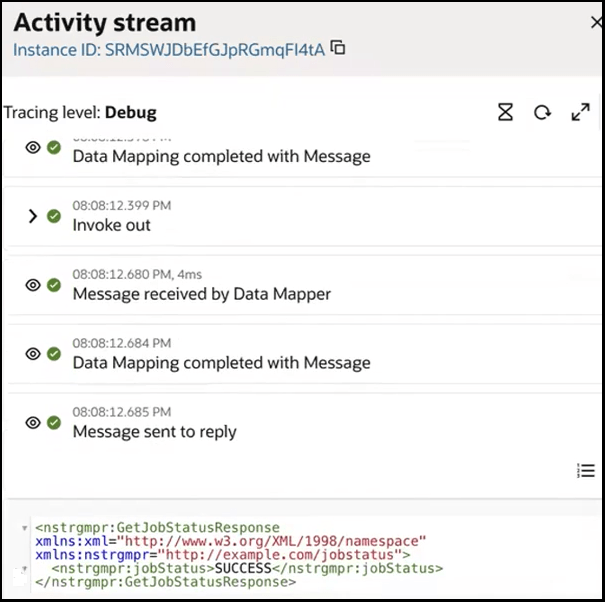
    The activity stream provides details, including the response sent back.

    In the Configure and run page, the response message indicates that the service provider validated the JWT client assertion and responded back with a Success message.


    Activity stream panel in Debug tracing mode showing successful workflow events: “Invoke out,” “Message received by Data Mapper,” “Data Mapping completed with Message,” and “Message sent to reply.” The detail pane displays XML indicating GetJobStatusResponse with GetJobStatusSUCCESS.

See .