11 Tips for New Robot Builders
While building a robot, you'll record the actions that a robot completes using the recorder, all while harnessing the power of control and power of the low-code capabilities. Keep reading to learn useful tips and tricks for these building tools.
1. Open the Application to Record in Before Starting the Recorder
You can record actions only in the browsers that are open before you start the recorder. But, not to worry: If you open an application after starting the recorder, just stop and restart the recorder.
2. Select an Action Before Starting the Recorder
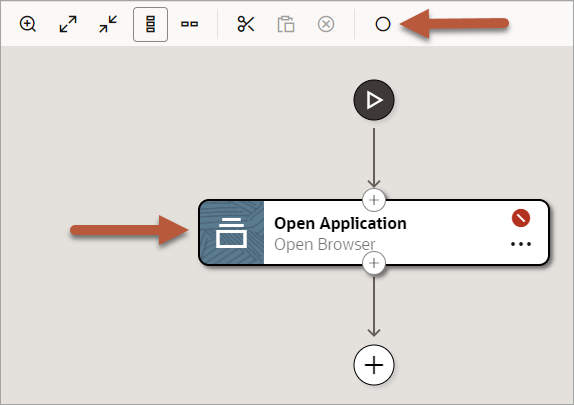
To enable the Record after the selected action
![]() button on the canvas, you must first select an action on the canvas.
button on the canvas, you must first select an action on the canvas.

3. Understand Where the Recorder Adds Actions
When you select an action on the canvas and then select Record, the recorder adds the new actions after the currently selected action, with the following exceptions:
-
Foreach loop
When you record from a foreach loop, the recorder asks whether you want to add the action after or within the foreach loop.
-
Switch condition
When you record from a switch condition, the recorder always adds the actions within the condition, since you cannot record after a condition branch.
Bonus tip: If you missed adding an action, you can still add it, even if the recorder is still running. Note that the Recording cursor location icon appears on the currently selected action.

To select a different action, simply point to another action, and select Place recording cursor.

The next action that you record is inserted after the selected action.
4. Wait for the Green Shading
When recording or when targeting a field, hover your cursor over a UI element and note the shading that appears. While the shading is purple and the icon above the field is a magnifying glass, the recorder is still collecting information about the element. Don't select the element yet.

After the shading turns green and the icon changes to a target, select the UI element.

5. If the Whole Page Turns Green, Press Esc
If you hover over an element that covers the entire page, the entire page becomes shaded green. Cancel the targeting by pressing Esc.
6. Target the Correct UI Element
When you point to a UI element while recording, you can often target multiple options, such as the icon on a button, the button itself, and an element that encloses the button. Most of the time, you can target any of these options, and the robot works as expected. However, if the robot must enter text into a field, select the field, not its label.

7. Select the Correct Robot Action
While you select a field while recording, a drop-down list shows all of the available actions for the UI control.

The recorder selects the action that you are most likely to use, but you can select a different option from the drop-down list.
8. Familiarize Yourself with an Application's HTML
To build a robot using the low-code capabilities, you should have some familiarity with reviewing the HTML of a web page.
For example, you should understand the structure of the website or application that you're interacting with and feel comfortable viewing the source for the application's HTML
This familiarity is helpful because the appearance of a UI element is sometimes different from its underlying HTML code. For example, if a robot must interact with a checkbox, you might add the checkbox action to the robot. However, if the checkbox isn't coded as a checkbox in its HTML, the checkbox action can't interact with the element.
And remember: If you don't want to wade through a page's HTML, use the recorder to build your robot. The robot reviews the HTML for each element that you select and provides the available actions for the element.
For help working with HTML and XPaths, see View HTML and XPaths.
9. Customize Oracle Integration to Fit Your Working Style
Think about your preferred working style:
-
Define the big picture first, and then build the smaller components.
-
Define the smaller components first, and use them to construct the big picture.
-
Build every component when you need it.
Oracle Integration supports all of these working styles. For example:
-
Optimize your working experience to match your preferences by updating your build settings.
-
Understand your options for building robot resources.
Every robot requires a trigger. Additionally, most robots require variables, validation, and custom data types. The timing of when you create these resources is up to you: Either before or as you build the robot.
10. To Find Stuff Fast, Use Search
When you have a robot with many actions, finding the action you need to update can take a little time. A Search panel helps you find what you need quickly.
In the toolbar to the right of the canvas, click
Search
![]() .
.
The Search panel contains a tree that lists all the actions in the
robot, including their names and unique identifiers, prefaced with
lc (lc1, lc2, and
so on).
11. Choose a Layout That Suits You
-
If your monitor looks like it belongs in a movie theater, you might prefer to see your robot in a horizontal layout.
On the toolbar above the canvas, select Horizontal layout
 .
.
Select Vertical layout
 to switch back to the original view.
-
If you're working on a small screen or want to minimize distractions, make the most of your screen's real estate by enlarging the canvas.
On the toolbar above the canvas, select Maximize
 .
.
Select Minimize
 to go back to the original view.
If you get stuck while recording, troubleshooting help is available. See Troubleshoot the Recorder.