Propagate User Identity from the REST Adapter to Oracle NetSuite with Custom JWT Claims
You can propagate the user identity between the REST Adapter and Oracle NetSuite with custom JWT claims. This section provides an overview of designing an integration and propagating the user identity at runtime in Postman.
- Create Connections
- Create and Design an Application Integration
- Create the Runtime Token ID and Token Secret Values in Oracle NetSuite
- Add the Custom Claim APIs to the Oracle Cloud Infrastructure Identity and Access Management Instance of Oracle Integration
- Configure the Client Token to Use
- Run the Integration Using the Runtime Token ID and Token Secret Values
Create Connections
- Create a REST Adapter trigger connection.
- Create an Oracle NetSuite Adapter invoke connection with the Token-Based Authentication security policy. See Configure Connection Security in Using the Oracle NetSuite Adapter with Oracle Integration 3. During configuration, you specify the token ID and token secret values.
Create and Design an Application Integration
- Create an application integration.
- Add and configure the REST Adapter trigger connection in the integration
canvas. The identity propagation portion of the
configuration process is described below.
- On the Resource Configuration page,
select Configure Custom JWT
Claims.

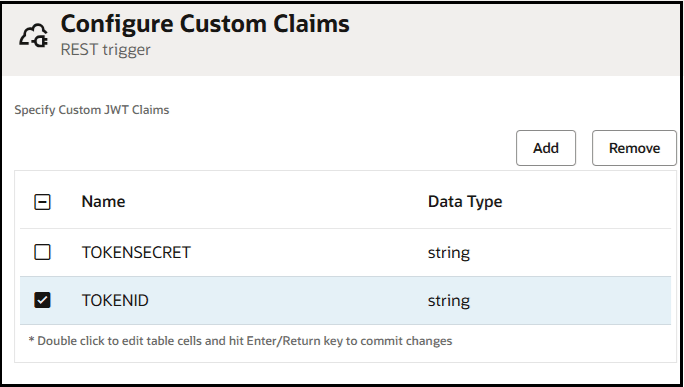
- On the Custom Claims page, add
custom JWT claims for token secret and token ID.
These claims must also be defined in the Oracle Cloud Infrastructure Identity
and Access Management instance.

- On the Resource Configuration page,
select Configure Custom JWT
Claims.
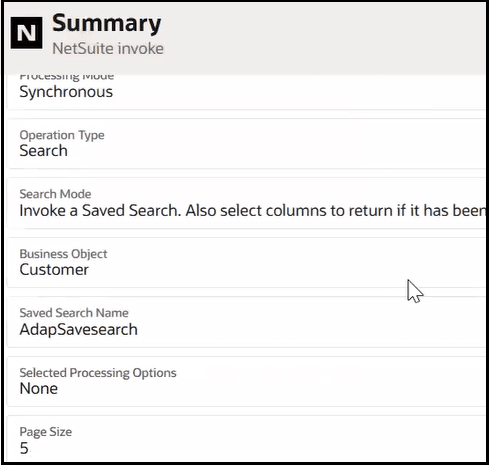
- Add and configure the Oracle NetSuite Adapter invoke connection in the
integration canvas. Configure the adapter to address your
business needs. There are no identity propagation
settings that require configuration. For this example, the
Summary page for the Oracle NetSuite Adapter looks as follows upon completion.

- Open the mapper and expand the Sources and Target sections.
- In the source Custom Claims
section under Security Properties,
map the previously defined TOKENID
and TOKENSECRET custom JWT claim
elements to the target Token Id and
Token Secret elements.
The target Security Properties section automatically appears whenever you create a new endpoint connection to Oracle NetSuite. The Custom Claims mappings enable the user identity to be propagated and automatically authenticated only in Oracle NetSuite. The target Token Id and Token Secret elements enable you to override the client ID and client secret values configured for the Token-Based Authentication security policy of the Oracle NetSuite Adapter at design-time.

Note:
- You must use the Custom Claims elements for user propagation with Oracle NetSuite. Do not use the Subject elements.
- To make the Security Properties section visible in an already-created Oracle NetSuite Adapter invoke connection, open the Adapter Endpoint Configuration Wizard, click Continue on each page, then click Finish.
- Complete integration design.
- Create a business identifier, and activate the integration.
Create the Runtime Token ID and Token Secret Values in Oracle NetSuite
You must create the token ID and token secret values that you want to specify at runtime when propagating the user identity to Oracle NetSuite. These values are specified for the token ID and token ID parameters at runtime.
- Sign in to Oracle NetSuite.
- Click Home in the main menu.
- Scroll down on the left side of the page.
- Click Manage Access Tokens under the Settings section.
- Click New My Access Token.
- Select ICS Integration Record
from the Application Name list, and
click Save.
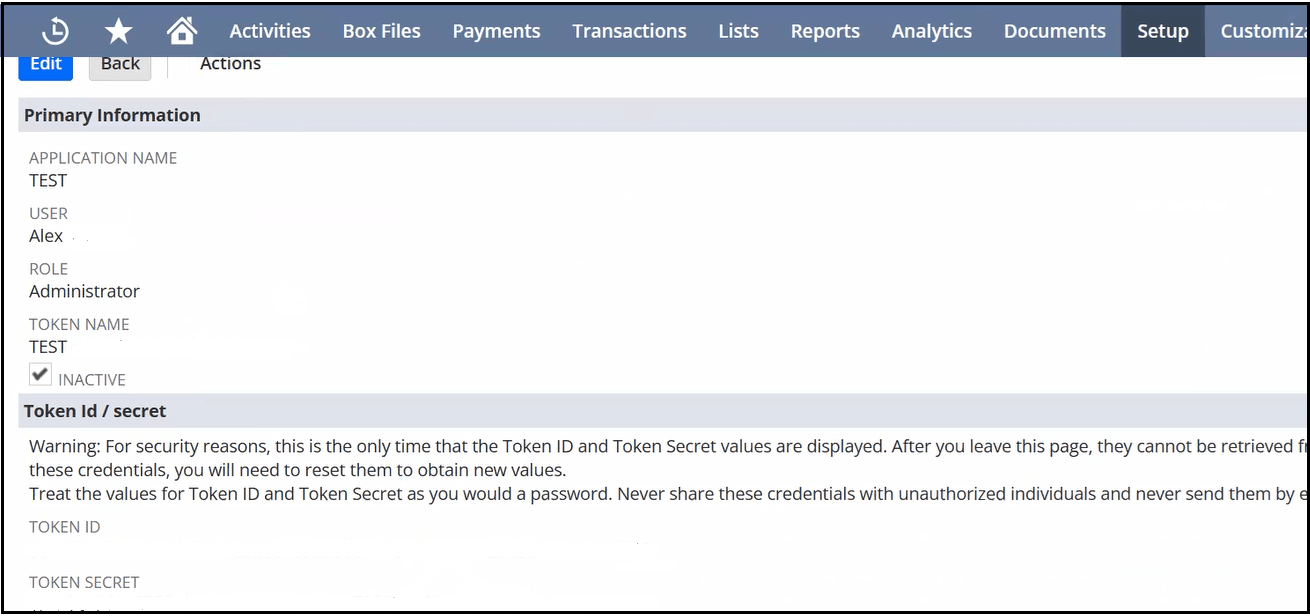
The token secret and token ID values to specify at runtime are created (obfuscated in the following image for security reasons).

- Copy the token ID and token secret values for specifying at runtime.
Add the Custom Claim APIs to the Oracle Cloud Infrastructure Identity and Access Management Instance of Oracle Integration
You must add the custom claim APIs to the Oracle Cloud Infrastructure Identity and Access Management instance of Oracle Integration. See Prerequisites for Identity Propagation Between the REST Adapter and Oracle NetSuite. The following steps describe how to make this association in Postman at runtime.
- Open a tool to run the integration. For this example, Postman is used.
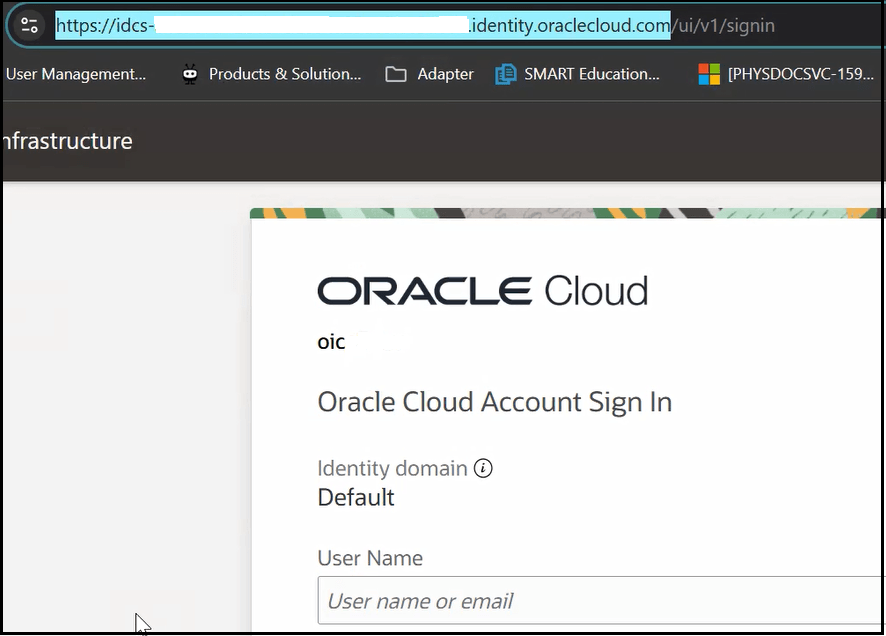
- Go to the Oracle Cloud Infrastructure Identity
and Access Management
login page and copy the URL that begins with
idcs-.
- Paste the URL into the Post field in Postman.
- Add
/admin/v1/CustomClaimsto the end. This action associates the custom claim APIs with the Oracle Cloud Infrastructure Identity and Access Management instance of Oracle Integration.https://idcs-URL_value.identity.oraclecloud.com/admin/v1/CustomClaims
- Under Body, click
JSON, paste in the entire
JSON body, and make the following updates.
schemas: Enter the custom claims schema.name: Enter the exact name of the token ID custom claim you added on the Custom Claims page when configuring the REST Adapter in Create and Design an Application Integration. The names must match. If you change the name on the Custom Claims page of the REST Adapter, you must change it here to match.value: Enter the token ID value you obtained from Oracle NetSuite in Create the Runtime Token ID and Token Secret Values in Oracle NetSuite.expression: Enterfalse.mode: Enterrequest.tokenType: EnterAT.allScopes: Enterfalsebecause the token ID is only applicable to a specific scope.scopes: Enter the scope value in which the custom JWT claim is available. You selected the scope value when creating the confidential application in the Oracle Cloud Console. The scope is used when you click Test Custom Claims to run the integration. See Prerequisites for Identity Propagation Between the REST Adapter and Oracle NetSuite.
{
    "schemas": [
        "urn:ietf:params:scim:schemas:oracle:idcs:CustomClaim"
    ],
    "name": "TOKENID",
    "value": "token_ID_value",
    "expression": false,
    "mode":  "request",
    "tokenType":  "AT".
    "allScopes":  false,
    "scopes": [
    "https://1FAE03234F573435FE325EC543F49771.integration.us-region-1.ocp.oraclecloud.com
        :443urn:opc:resource:consumer::all"]
}
Configure the Client Token to Use
You must specify additional parameter values to run your integration.
- Click Test Custom Claims.
- Click the Authorization tab,
then Body, and scroll down to
Configure New Token to
specify the following values. The client ID, client secret,
and scope values are used when triggering the integration
flow using the client credentials confidential application
for the trigger connection.
- Token name: Enter the token name. The token name can be anything. The token name is provided so that it can be re-used for other requests.
- Grant type: Select Client Credentials from the list. This is the type you selected when creating your confidential application. Custom JWT claims work with this grant type.
- Access Token URL: Specify the access token URL. This URL is used to create the access token. This is part of the OAuth client credentials security policy.
- Client ID: Specify the client ID of the user with administrator privileges to the Oracle Cloud Infrastructure Identity and Access Management instance. This is not the client ID you obtained in Create the Runtime Token ID and Token Secret Values in Oracle NetSuite.
- Client Secret: Specify the client secret of the user with administrator privileges to the Oracle Cloud Infrastructure Identity and Access Management instance. This is not the client secret you obtained in Create the Runtime Token ID and Token Secret Values in Oracle NetSuite.
- Scope:
urn:opc:idm:_myscopes_. This is the value added from the custom claims specified in Oracle Cloud Infrastructure Identity and Access Management by the user with administration privileges. - Client Authentication: Select Send as Basic Auth Header from the list.
Run the Integration Using the Runtime Token ID and Token Secret Values
- In the Get field under Authorization, enter the URL of the integration to execute.
- Click the custom_claims key,
and enter the runtime token ID and token secret values you
obtained in Create the Runtime Token ID and Token Secret Values in Oracle NetSuite. The actual token ID and token secret
names (for this example, TOKENIN and
TOKENSECRET) must match with
those names you specified on the Custom Claims page during
design time. The custom_claims key is
optional and can be added when making an access token
request.

- Click Get New Access Token,
then Proceed, and then Use
Token.
If the connection to the Oracle NetSuite endpoint is successful, the user is available. The token secret and token ID of the user were successfully propagated to Oracle NetSuite.
If you specify an incorrect token ID or token secret, that user is not available and you receive the following error. Verify that the values you entered for client ID and client secret are correct.Invalid login attempt