Use the Extract API in a Scheduled Orchestrated Integration
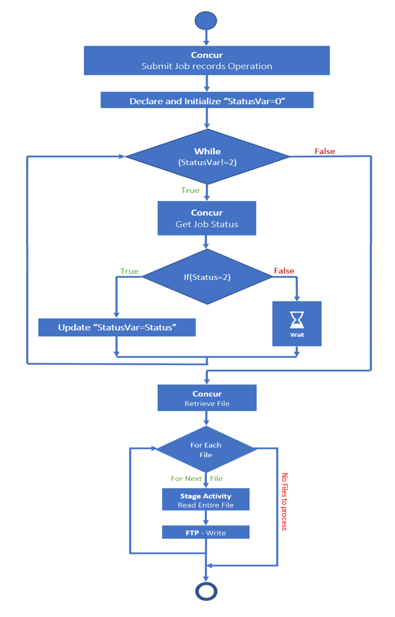
This use case provides a high level overview of how to submit a job, get job status, and retrieve the extract data of the job created by using the SAP Concur Adapter Extract API.

Description of the illustration concur_int_oview.png
-
Select and configure the SAP Concur Adapter on the Connections page.
-
Create a scheduled orchestrated integration.
-
Drag the SAP Concur Adapter into the integration as an invoke connection.
-
On the API Option page, select Extract API.
This API enables you to request the extract of available data objects, such as approved expense reports, travel requests, and payment requests.
-
On the Operations page, select SumbitJobRequest from the Select Operation list to configure the SAP Concur Adapter to submit the job.
-
-
In the request mapper, map startTime to POST.
-
Add an assign activity.
-
Create two variables to store the status of the job (for this example, named done) and a file link to retrieve the file (for this example, named Filelikvar).
-
-
Configure a while action below the assign action to check the status for the submitted job.
-
Configure the condition for the status (“done! =2”).
Note:
The status of the job is 2 if the job is completed. This is returned by SAP Concur.
-
-
Drag a second SAP Concur Adapter inside the while loop and configure the adapter to get the job status.
- On the API Option page, select Extract API.
-
On the Operations page, select GetJobStatus from the Select Operation list.
-
Map status-link from the SubmitJobRequest operation’s response to JobStatusLink in the request of the GetJobStatus operation.
-
Drag a switch action into the integration.
-
Configure the condition for the status variable to check the job status.
-
-
Drag an assign action in the switch action to update the status.
If the status is completed (that is, status = ”2”), it is updated in the variable created in Step 5.
-
Update done to status and Filelikvar to file-link.
-
In the Otherwise condition of the switch action, drag a wait action.
-
Configure the wait action to wait for 2 minutes.
-
-
Drag a third SAP Concur Adapter connection outside of the while action.
-
On the API Option page, select Extract API.
-
On the Operations page, select the RetrieveFile operation. The RetrieveFile operation downloads the file to a virtual file system (VFS) directory. The VFS location of the downloaded file is returned in the response of the RetrieveFile operation along with the file(s) name.
-
-
In the mapper, map $Filelikvar to file-link.
-
Drag a for-each action into the integration.
-
Name the activity (for this example,
foreachis entered). -
Drag the files element from the response of RetrieveFile to the Repeating Element field.
-
Enter a name in the Current Element Name field (for this example,
FileTempis entered). -
Click Create and complete for-each action configuration.
-
-
Drag a stage file action inside the for-each action to read the downloaded result.
-
Provide a name, and then click Next.
-
Select Read Entire File from the list.
-
In the Specify the File Name field, provide the file name for the stage file action response.
-
For the Specify the Directory to read from field, provide a file location.
You now create a schema based on the sample headers mentioned on the Summary page of the SubmitJobRequest operation for each extract.
-
On the Schema Options page, select Create a new schema from a CSV file, which maintains the response file structure.
-
On the Schema Options page, select the CSV file.
-
Check the configuration in the Summary page.
-
-
Drag an FTP Adapter connection below the stage file action configured to read the retrieved files.
-
On the Operations page, select the Write File operation.
-
On the Schema page, select to create a new schema.
-
On the Format Definition page, select a sample CSV file that maintains the response file structure (for this example, InvoiceGLEExtract.csv is selected). This is the same CSV file selected for the stage file action.
-
-
In the mapper, map the stage file action response elements to FTP Adapter request elements.
-
Add the tracking variable:
-
In the upper-right corner, select Tracking from the Actions menu.
-
Drag a tracking variable.
-
-
Activate the integration.
-
From the Actions menu at the far right for this integration, select Submit Now.
You receive a run ID. You can monitor the flow using this run ID.
The integration is deployed and the web service is ready to accept requests.