Configuring the Server Manager Console to Use Custom TrustStore and KeyStore Files
It is assumed that you have already created your own TrustStore and KeyStore files by following the previous steps. In this section we will configure the Server Manager Console to use the custom TrustStore and KeyStore files we have previously created. Make sure you copy these TrustStore and KeyStore files to a location on the host machine which is accessible for the Server Manager Agent which is managing the WAS you have registered. These files should be accessible to the Server Manager Agent which is managing the WAS instance. So, you will need to provide proper access to the file location depending on your Server Manager Agent host for OS Windows/UNIX/AS400.
If you have already registered a WAS Instance and would like to use the custom TrustStore and KeyStore files:
Open the registered WAS instance page.
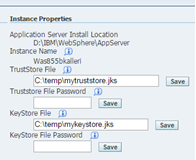
In the Instance Properties section (top right), enter the details below for each editable field:
TrustStore File - enter the complete path to the TrustStore File, including the filename, and click Save.
TrustStore File Password - enter the password used when the TrustStore file was created and click Save.
KeyStore File - enter the complete path to the KeyStore File, including the filename, and click Save.
KeyStore File Password - enter he password you have used while creating the KeyStore file, and click Save.
Restart the Server Manager Agent.
If you are registering a brand new WAS Instance and would like to use custom TrustStore and KeyStore files:
Navigate to the Create/Register A Managed Instance page.
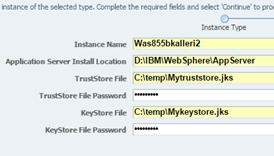
In the Instance Properties section, enter the details below for each editable field:
Instance Name - provide a valid/unique Instance name for the WAS instance.
Application Server Install Location - provide the location of your WAS Application Server Install.
TrustStore File - list the complete path to the TrustStore File, including the filename.
TrustStore File Password - enter the password used when creating the TrustStore file.
KeyStore File - list the complete path to the KeyStore File.
KeyStore File Password - enter the password used when creating the KeyStore file.
Click Continue.