Using the Drop-down Member Selector on Row Dimensions in Forms
Data source types: Planning
In forms, Planning administrators and form designers can set up easy-to-use drop-down member selectors on row dimensions. When these drop-down selectors are enabled, the form users can directly select a member from the drop-down list on the row dimension in the form.
The drop-down member selector also allows users to add data to member rows that may have otherwise been suppressed.
When using the drop-down member selector, keep in mind the following:
-
There is no visual notification as to which members have drop-downs enabled; you must click a dimension cell and, if a down arrow appears next to the cell, then there is a drop-down list enabled.
-
The drop-down content (list of members) is controlled by the form definition for the corresponding segment.
-
Selections are not retained. The drop-down selection will be lost on refresh. If you perform a Refresh after selecting a member from the drop-down, the selection is lost and the form returns to its original state.
-
The drop-down selection will be lost on saving data. Modifying data cells and saving the Excel worksheet will not retain modified drop-down selections.
-
Composite forms: Using the drop-down member selector with row dimensions is not supported.
To use this feature in Smart View requires configuration in the Form Designer in the Planning web interface. The Planning administrator or form designer specifies the drop-down selectors as segment properties for particular dimensions. For example, suppose there are two dimensions placed on row axes, Entities and Line item; the member selector drop-down may be enabled for the Entity dimension members, for the Line item dimension members, or for both. Configuration is described in Administering Planning Using the Simplified Interface.
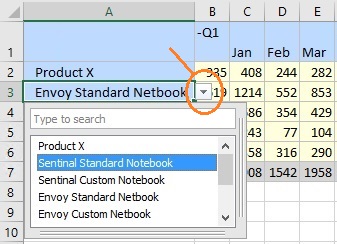
To use the drop-down selector in a Planning form, click on row dimension or member names in a form. If a drop-down arrow appears, click it to view and select members from the drop-down list, as shown in Figure 7-2.
Figure 7-2 Drop-down Member Selector on a Row Dimension Cell
Example
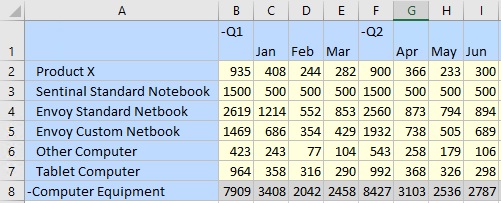
In this example, rows with #Missing values are suppressed, and you were tasked with inputting the values for the Sentinal Standard Notebook. It happens that in the database, the values for the Sentinal Standard Notebook for January through June are all #Missing. When you open the form, there is no row for Sentinel Standard Notebook.
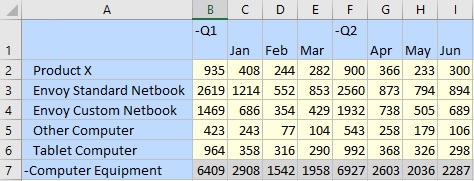
Use the drop-down member selector on a row and choose Sentinal Standard Notebook from the list.
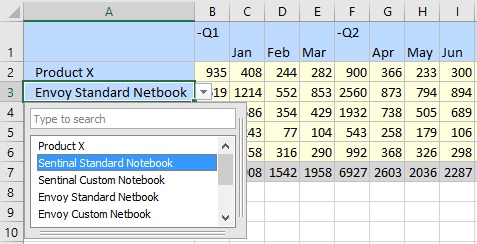
Sentinal Standard Notebook now appears in place of Envoy Standard Netbook. Note that the data values in the row have not changed. You can type over the existing values to input the values you require. In this example, you would type 500 in each month column, January through June.
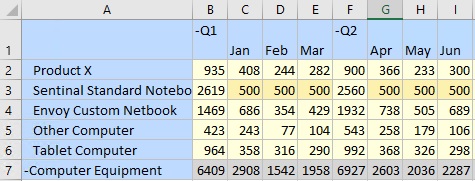
In the Planning ribbon, click Submit. Note that the row for Sentinal Standard Notebook is added to the form as this row now contains values. Also, the values in the row for Computer Equipment are recalculated. Only the modified values are saved for the drop-down member that was changed. No inherited values from other members are changed.
