Send Email using Live Feed Tool
You can configure the Live Feed tool to send you email notifications when certain specific live feed events occur.
Prerequisite
- Before subscribing to notifications, make sure that you have first created a live feed.
- Configure the mail service:
For the live feed tool to send notifications, you need to configure the Simple Mail Transfer Protocol (SMTP) Settings in the Data Studio Settings.
Refer to the Send Email on Autonomous Database chapter for more details.Note
The Live Feed tool uses the UTL_SMTP package in the back end to provide an interface. While UTL_SMTP itself does not inherently support encryption like OAuth2, which is required by some providers (e.g., Microsoft 365), using a secure connection (SSL/TLS) can encrypt the communication between your application and the SMTP server. However, UTL_SMTP does not natively support OAuth2, which is becoming increasingly common for authentication with large email providers.The following rules apply while configuration:
- The SMTP server port must be 25 or higher. The only ports likely to be used here are 587 (most common for modern setups, typically with StartTLS), 465 (Secure Sockets Layer) or 25 (no encryption).
- The SMTP server host name must not be blank.
- The E-mail address field must not be blank.
- Typically, clients will need to provide authentication credentials to access their SMTP server. Additionally, most setups will likely use StartTLS for encryption. However, the specific requirements can vary depending on how the company or provider has configured their system.
You can configure the email notifications in the following locations:
Configure Email Notifications on the Live Feed tool
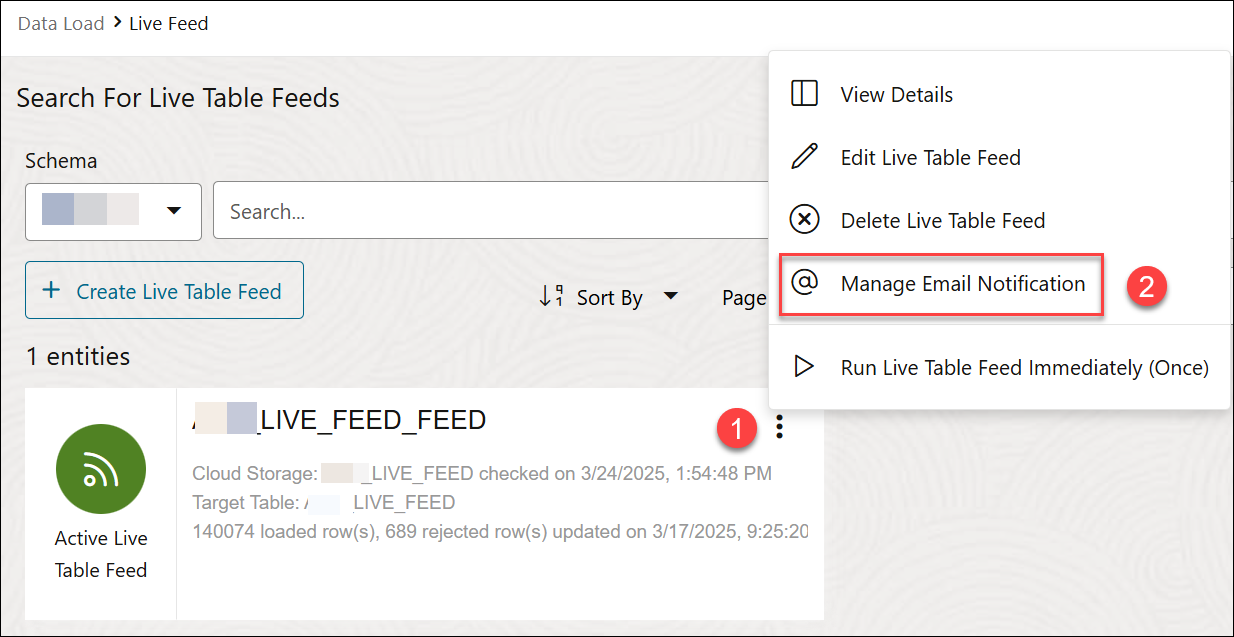
After you have created a Live Table Feed using the Live Feed tool, navigate to the Live Feed tool .
You will view the Live Table Feed card on the Live Feed tool page.
- Click the Actions icon on the card and select Manage Email Notification.
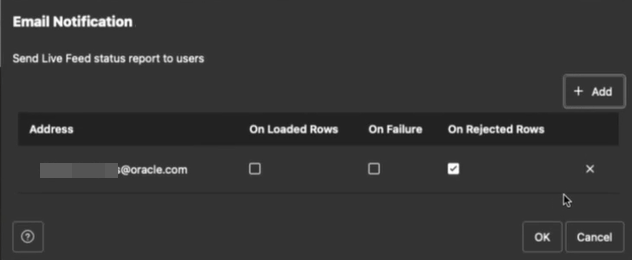
- On the Email Notification dialog, select +Add to add your email address where you will receive the notification.
- Enter the email address.
- Select any of the available options to receive email notifications based on the following conditions:
- On Loaded Rows: Select this option if you want to be notified in case the Live Feed successfully imports new data into your table.
- On Failure: Select this option if you want to be notified in case the Live Feed fails to run due to an error. For example, if the storage location for your files is missing, or your access credentials are no longer valid.
- On Rejected Rows: Select this option if you want to be notified in case the Live Feed encounters and rejects incorrect data. For instance, when there is a data type mismatch, such as attempting to import the word
Blueinto a column that must consist of only numbers.
- Click OK.
Configure Email Notifications on the Data Load Dashboard
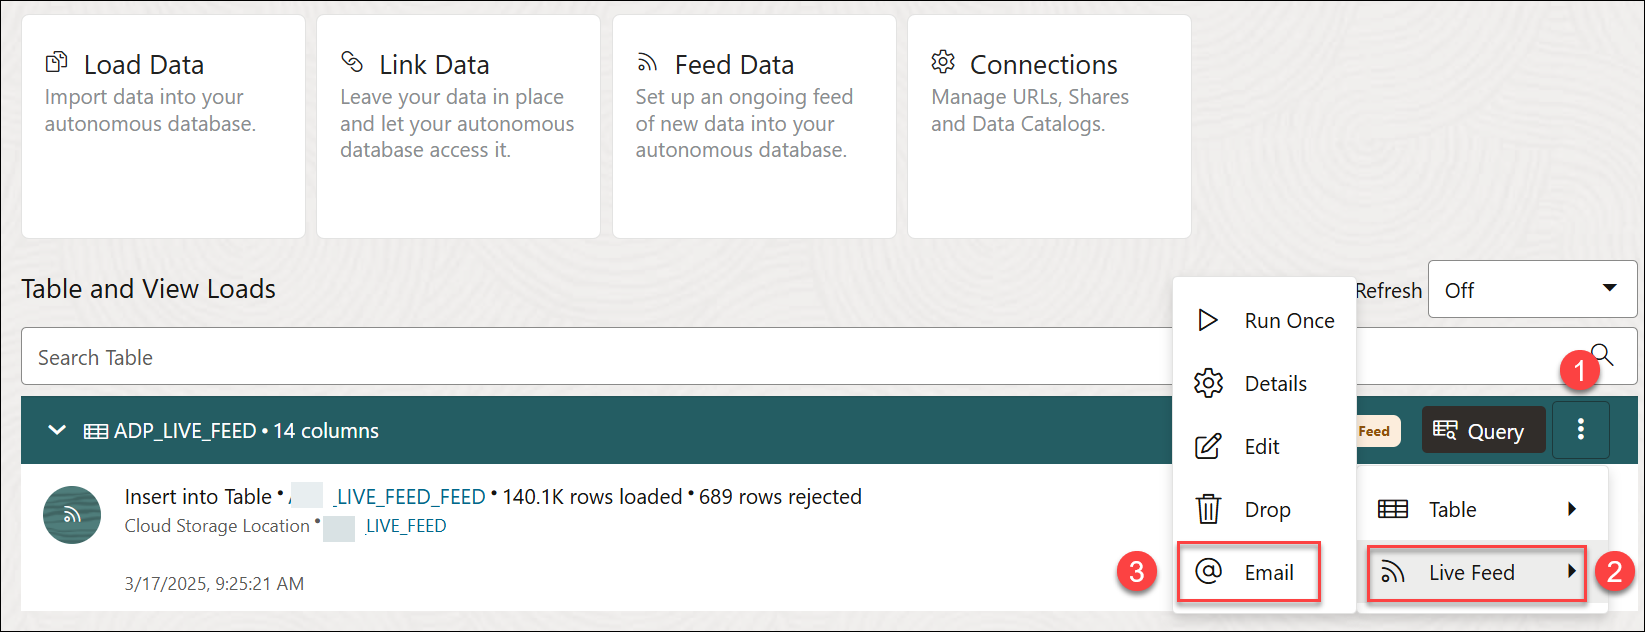
Once you have created a Live Feed, you will view the status of the feed on the Data Load Dashboard.
- Click the Actions menu on the table header, click Live Feed and select Email.
- On the Email Notification dialog, select +Add to add your email address where you will receive the notification.
- Enter the email address.
- Click OK.
Configure Email Notifications on the Catalog Tool
- Select Manage Email Notifications the Live Feed entity.
- Continue with the wizard: Progress to the next steps in the Manage Email Notifications wizard by following the same process you used previously.
After you have configured the email notifications, the subscriber with the email address specified in the Email Management notification dialog will now receive notifications according to the settings you configure during the live feed creation process.
Parent topic: Feeding Data


