Access the Spreadsheet Add-in by OCI IAM Domains
Oracle Cloud Infrastructure Identity and Access Management (OCI IAM) uses identity domains to provide identity and access management features such as authentication, Single Sign-On (SSO), and identity lifecycle management for OCI as well as for Oracle and non-Oracle applications, whether SaaS, cloud hosted, or on-premises.
The integrated application creation, OAuth configuration, and creation of the connection file should be performed by an
admin user.
After the connection file is created, it can be shared with any user to enable domain login.
- Users in OCI must have the necessary policies to manage Oracle Autonomous Databases and OCI IAM domains. For more information on policy reference of all the services, see Policy Reference.
-
An Oracle Autonomous Database must be available. For more information, see Provision an Autonomous Database Instance.
Create or use a domain integrated application
- Use an Identity Domain:
- Sign in to the OCI Console with an administrator account into the Default identity domain.
- On the OCI console navigation menu, click Integrated applications.
- On the Integrated applications list page, select Add application.
- In the Add application window, select Confidential Application, and then Launch workflow.
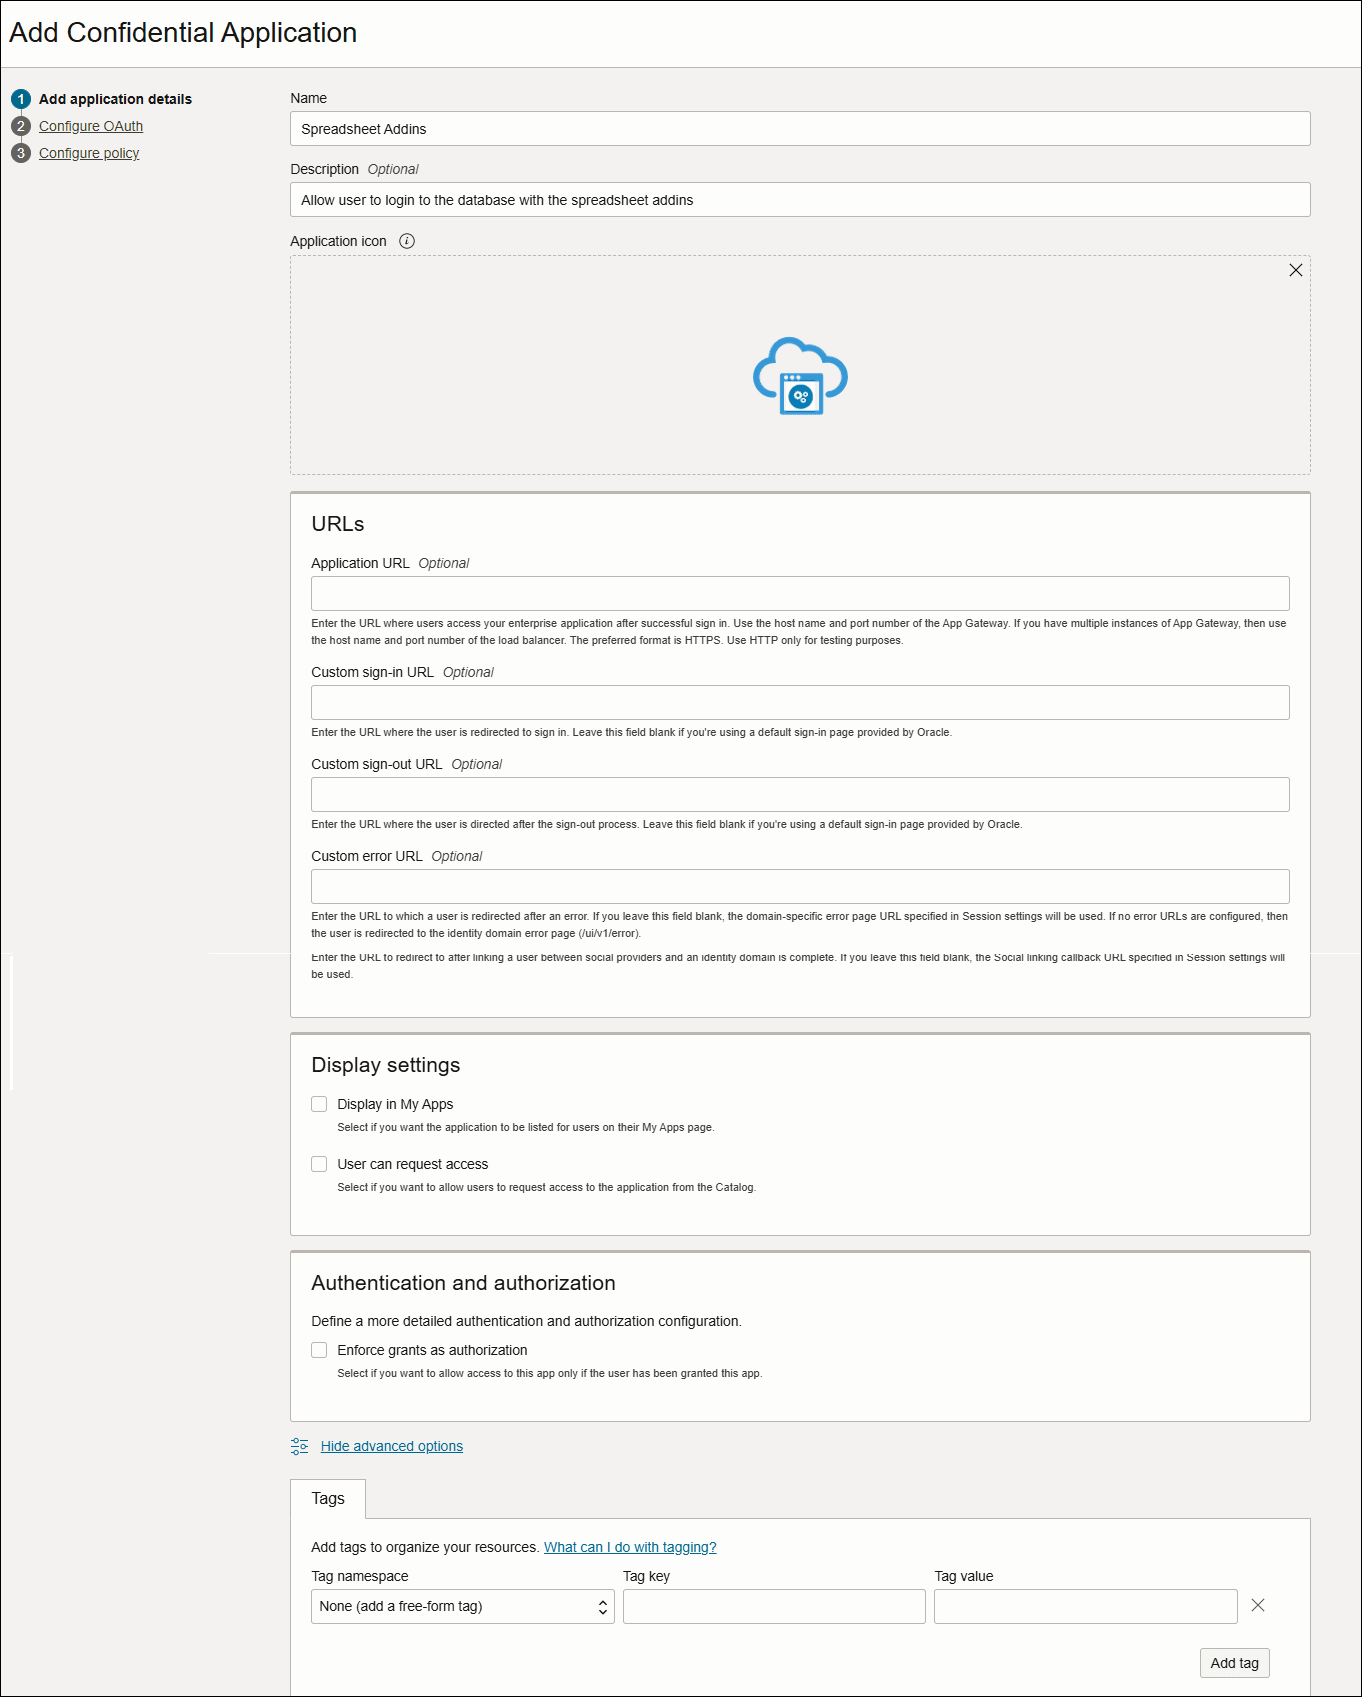
In the Add application details page, use the following table to configure application details and the display settings.
Table 3-6 Application Details and their description
Option Description Name Enter a name for the confidential application. You can enter up to 125 characters.
Consider keeping your application names as short as possible. In this example use, Spreadsheet addins.
Description Enter a description for the confidential application. You can enter up to 250 characters. Application Icon This field is optional. You can skip this field.
Click Upload to add an icon that represents the application. This icon appears next to the name of the application on the My Apps page and the Applications page
Application URL This field is optional. You can skip this field. Enter the URL (HTTP or HTTPS) where the user is redirected after a successful login.
Custom Login URL This field is optional. You can skip this field. In the Custom Login URL field, you can specify a custom login URL. However, if you are using a default login page provided by Oracle Identity Cloud Service, then leave this field blank.
Custom Logout URL This field is optional. You can skip this field. In the Custom Logout URL field, you can specify a custom logout URL. However, if you are using a default login page provided by Oracle Identity Cloud Service, then leave this field blank.
Custom Error URL This field is optional. You can skip this field. You can enter the error page URL to which a user has to be redirected, only in case of a failure. If not specified, the tenant specific Error page URL will be used.
Display in My Apps Do not select this check box. You select the check box only if you want the confidential application to be listed for users on their My Apps pages. In this case you need to configure the application as a resource server.
User can request access Do not select this check-box. You select the check box only if you want end users to be able to request access to the app from their My Apps page.
Tags Skip this field. Click Add Tag only if you want to add tags to your confidential applications to organize and identify them.
- Click Next to proceed to the Configure OAuth tab.
-
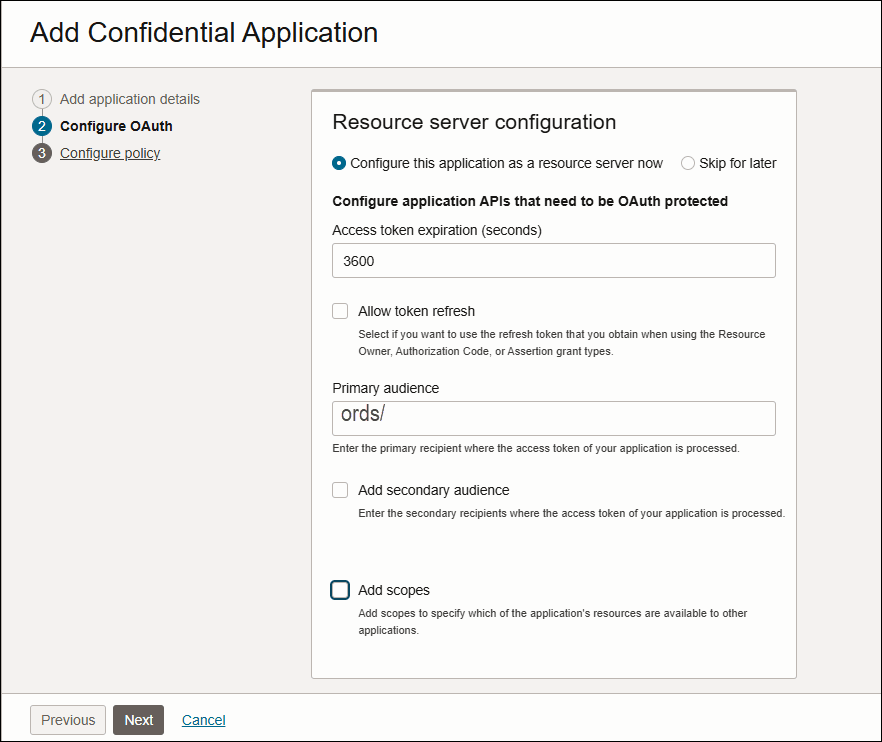
On the Resource Server Configuration wizard of the Configure OAuth tab:
Select Configure this application as a resource server now to protect resources for your application now, and to make the application visible on the My Apps page.
Use the following table to fill in the information in the Configure application APIs that need to be OAuth protected section that opens.
Table 3-7 Options and their descriptions to configure application APIs
Option Description Access Token Expiration Keep the default value of 3600 seconds. Define how long (in seconds) the access token associated with your confidential application remains valid.
Is Refresh Token Allowed Do not select this check-box. Select this check box only if you want to use the refresh token that you obtain when using the Resource Owner, Authorization Code, or Assertion grant types.
Refresh Token Expiration Do not select this option. You can define how long (in seconds) the refresh token, which is returned with your access token and is associated with your confidential application, remains valid.
Primary Audience Enter “ords/”.
This the primary recipient where the access token of your confidential application is processed.
Secondary Audiences Skip this field. You must enter the secondary recipients where the access token of your confidential application is processed, and click Add. In this example, you do not have any secondary recipients.
Add (Allowed Scopes) To specify which parts of other applications that you want your application to access, click this button to add those scopes to your confidential application.
Applications must interact securely with external partner or confidential applications. Also, applications from one Oracle Cloud service must interact securely with applications in another Oracle Cloud service. Each application has application scopes that determine which of its resources are available to other applications. - Click Add Scopes and select Add.
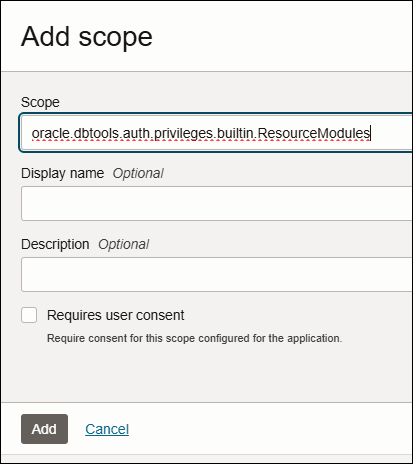
On the Add scope wizard, specify the following field value:
- Scope: oracle.dbtools.auth.privileges.builtin.ResourceModules
-
Display name: This is optional field.
- Description: This is optional field.
Click Add.
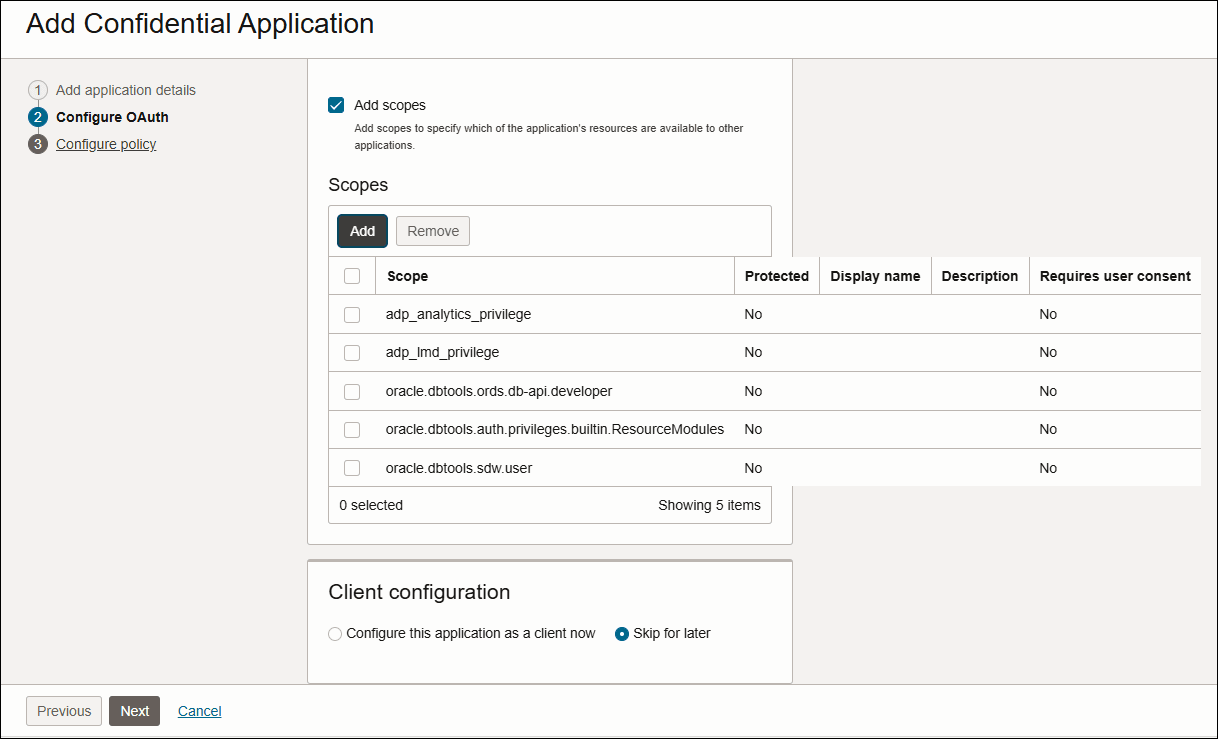
You have added
oracle.dbtools.auth.privileges.builtin.ResourceModulesas a scope.Similarly add the following scopes to the confidential application:oracle.dbtools.sdw.useroracle.dbtools.ords.db-api.developeradp_lmd_privilegeadp_analytics_privilege
Note
Only one confidential application for a domain can use the each scope, so if you want more than one application to use a scope the second application can be a mobile application that will refer to the confidential application scope. -
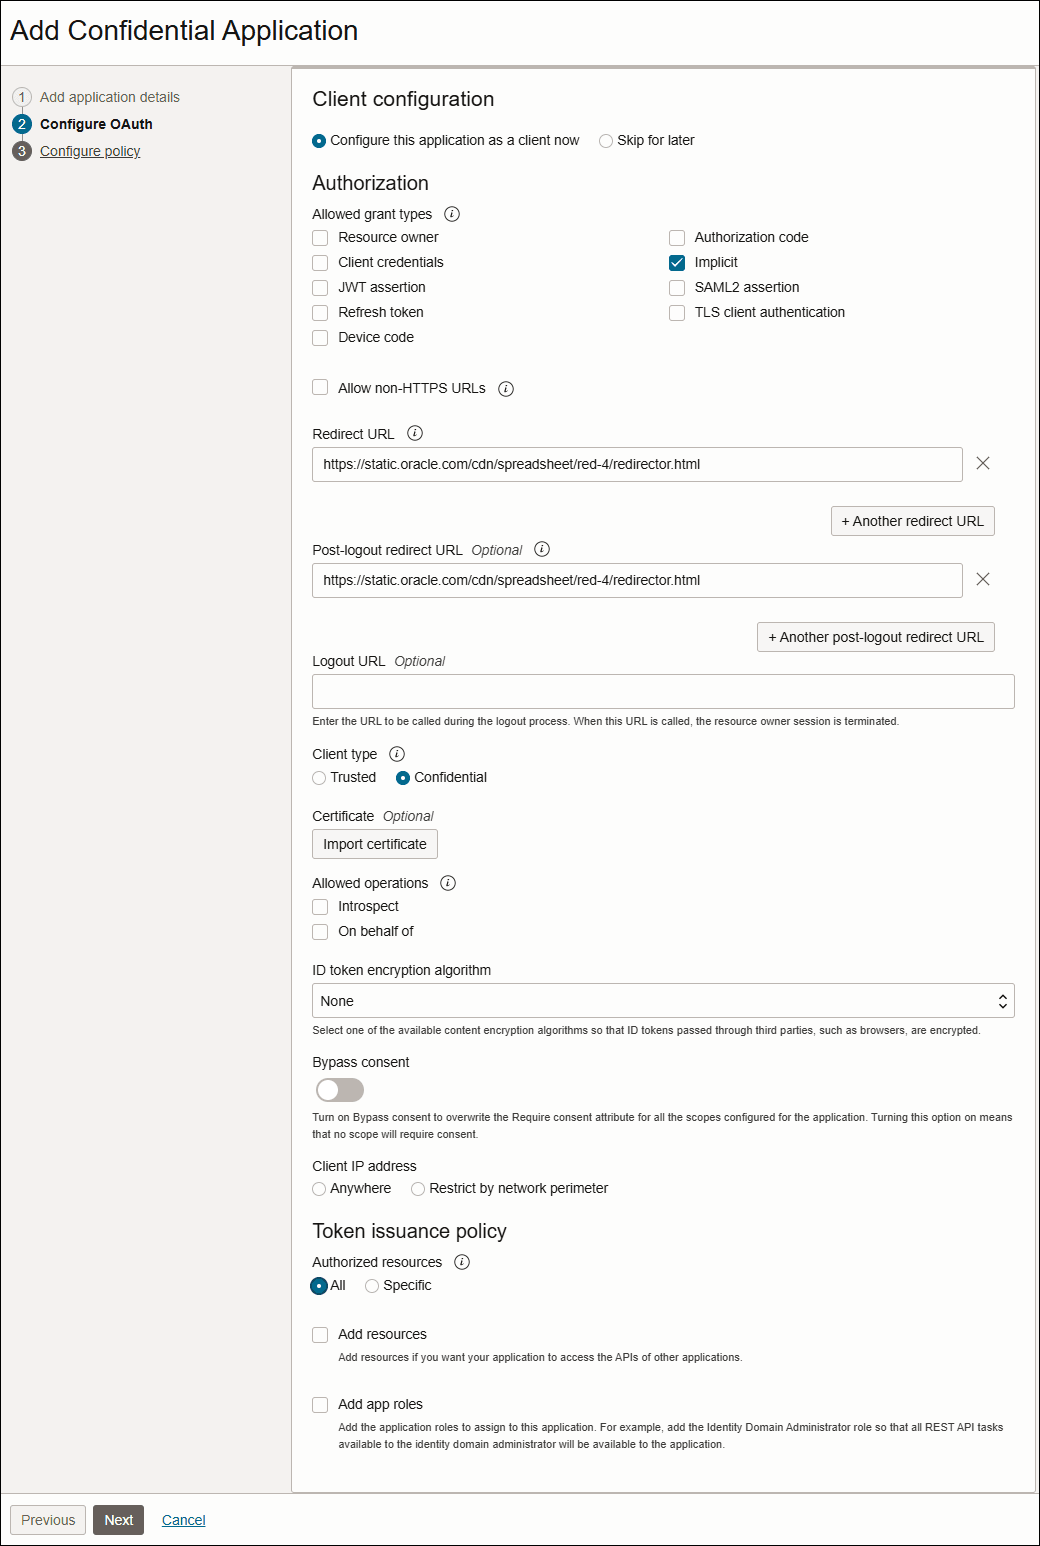
On the Add Confidential Application wizard's Client Configuration dialog,
Click Configure this application as a client now to configure authorization information for your application now.
- In the Authorization and Token Issuance Policy sections that open, use the following table to fill in the information.
Table 3-8 Client Configuration options and their description
Option Description Resource Owner Do not select this field. Use only when the resource owner has a trust relationship with the confidential application, such as a computer operating system or a highly privileged application, because the confidential application must discard the password after using it to obtain the access token.
Client Credentials Do not select this field. Use only when the authorization scope is limited to the protected resources under the control of the client or to the protected resources registered with the authorization server.
JWT Assertion Do not select this field. Use only when you want to use an existing trust relationship expressed as an assertion and without a direct user approval step at the authorization server.
SAML2 Assertion Do not select this field. Use only when you want to use an existing trust relationship expressed as a SAML2 assertion and without a direct user approval step at the authorization server.
Refresh Token Do not select this field. Select this grant type only when you want a refresh token supplied by the authorization server, and then use it to obtain a new access token.
Authorization Code Do not select this field. Select this grant type only when you want to obtain an authorization code by using an authorization server as an intermediary between the client application and resource owner.
Implicit Select this field. If the application can't keep client credentials confidential for use in authenticating with the authorization server, then select this check box. For example, your application is implemented in a web browser using a scripting language such as JavaScript. An access token is returned to the client through a browser redirect in response to the resource owner authorization request (rather than an intermediate authorization).
Device Code Do not select this field. Select the Device Code grant type only if the client doesn't have the capability to receive requests from the OAuth Authorization Server, for example, it cannot act as an HTTP server such as game consoles, streaming media players, digital picture frames, and others.
TLS Client Authentication Do not select this field. Select the TLS Client Authentication grant type only to use the client certificate to authenticate with the client. If a token request comes with an X.509 client certificate and the requested client is configured with the TLS Client Authentication grant type, the OAuth service uses the Client_ID in the request to identify the client and validate the client certificate with the certificate in the client configuration. The client is successfully authenticated only if the two values match.
Allow non-HTTPS URLs Do not select this field. Select this check box only if you want to use HTTP URLs for the Redirect URL, Logout URL, or Post Logout Redirect URL fields. For example, if you are sending requests internally, want a non-encrypted communication, or want to be backward-compatible with OAuth 1.0, then you can use an HTTP URL.
Redirect URL Enter the following application URL where the user is redirected after authentication, https://static.oracle.com/cdn/spreadsheet/red-4/redirector.html Note
Provide an absolute URL. Relative URLs are not supportedLogout URL Skip this field.
You will enter the URL where you will be redirected after logging out of the confidential application.Post Logout Redirect URL Enter the following URL where you want to redirect the user after logging out of the application. https://static.oracle.com/cdn/spreadsheet/red-4/redirector.html
Client Type Select Confidential.
The available client types are Trusted and Confidential. Choose Trusted only if the client can generate self signed user assertions.
Allowed Operations Skip this field. It is optional.
-
Select the Introspect check box only if you want to allow access to a token introspection end point for your application.
- Select the On behalf Of check box only if you want to ensure that access privileges can be generated from the user's privileges alone. This allows the client application to access endpoints to which the user has access, even if the client application by itself would not normally have access.
ID Token Encryption Algorithm The default is
none.Allowed Client IP Address Skip this field. It is optional. Authorized Resources Select All.
You can select any one of the following options to allow a client application to access authorized resources:
- All – Access any resource within a domain (All). See Accessing All Resources.
- Tagged – Access any resource with matching tags (Tagged). See Accessing Resources With Matching Tags.
- Specific – Access only those resources where an explicit association between the client and the resource (Specific) exists. See Accessing Resources With Specific Scopes.
Note
The option to define an authorized resource is available to only confidential applications. Mobile applications don't have the option to define a trust scope.Resources Skip this field. It is optional. Only if you want your application to access APIs from other applications, then click Add in the Token Issuance Policy section of the Add Confidential Application page.
Grant the client access to Identity Cloud Service Admin APIs Skip this field. It is optional. Click Add to enable your confidential application to access Oracle Identity Cloud Service APIs.
In the Add App Role window, select the application roles that you want to assign to this application. This enables your application to access the REST APIs that each of the assigned application roles can access.
-
- Click Next to proceed to the Configure policy tab of the Add Confidential Application wizard.
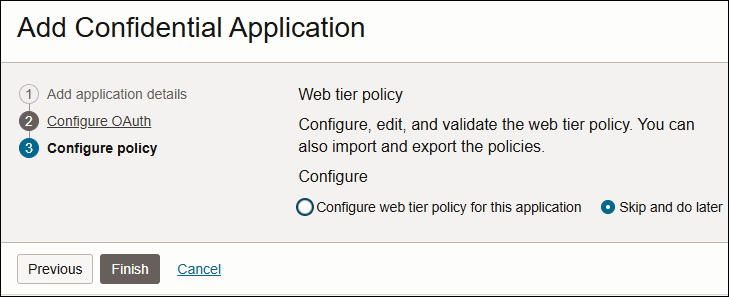
- On the Add Confidential Application wizard’s Web Tier Policy page, click Skip and do later.
- Click Finish.
The application has been added in a deactivated state. It must be activated to function.
Record the Client ID and Client Secret that appear in the Application Added dialog box.
Use this ID and secret as part of your connection settings to integrate with your confidential application, The Client ID and Client Secret are equivalent to a credential (for example, an ID and password) that your application uses to communicate with Oracle Identity Cloud Service.
You have created a Confidential Application of Type Client which is Assigned the Desired Scopes.
Enable IAM Login for Autonomous Database Schema
-
Create an ORDS JWT profile. See
https://docs.oracle.com/en/learn/secure-ords-oci-iam/index.html#task-2-create-an-ords-jwt-profile. - Ensure you have ORDS version 23.3 or higher, which supports JWTs.
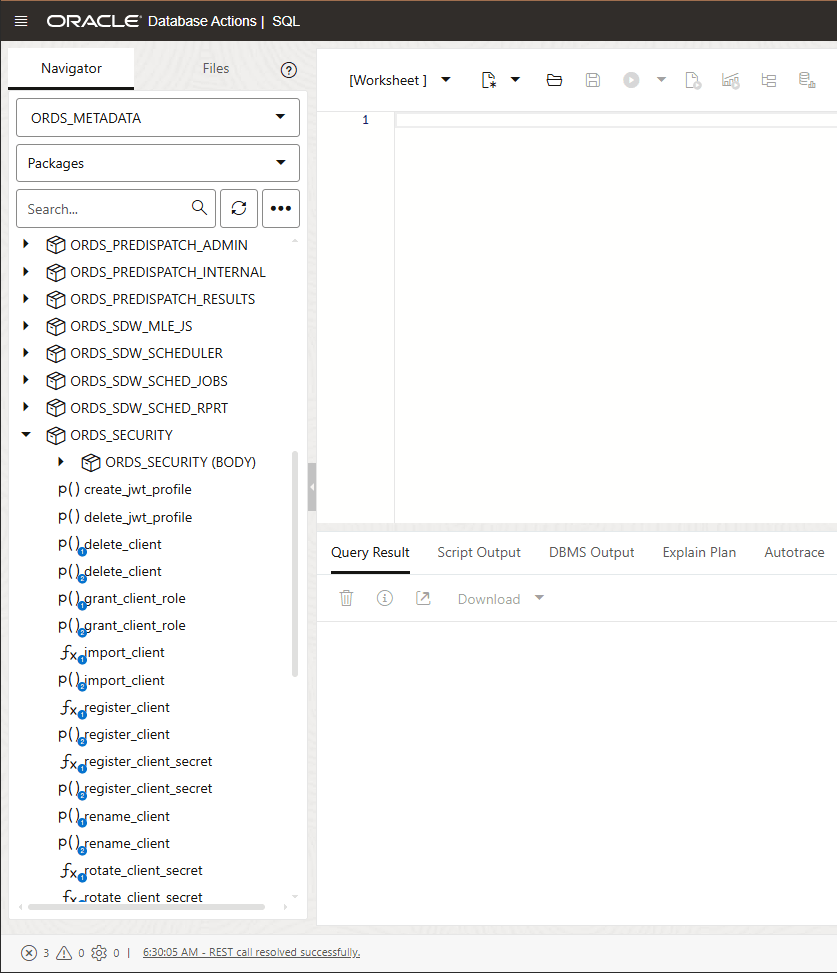
- On the SQL Worksheet, from the Navigator tab, select
ORDS_METADATAfrom the Schema drop-down list. - Select
Packagesfrom the Object type drop-down list. - Type
ORDS_SECURITYin the Search field. The search function retrieves all the entries that start withORDS_SECURITY. -
Expand the
ORDS_SECURITYpackage. - Right click
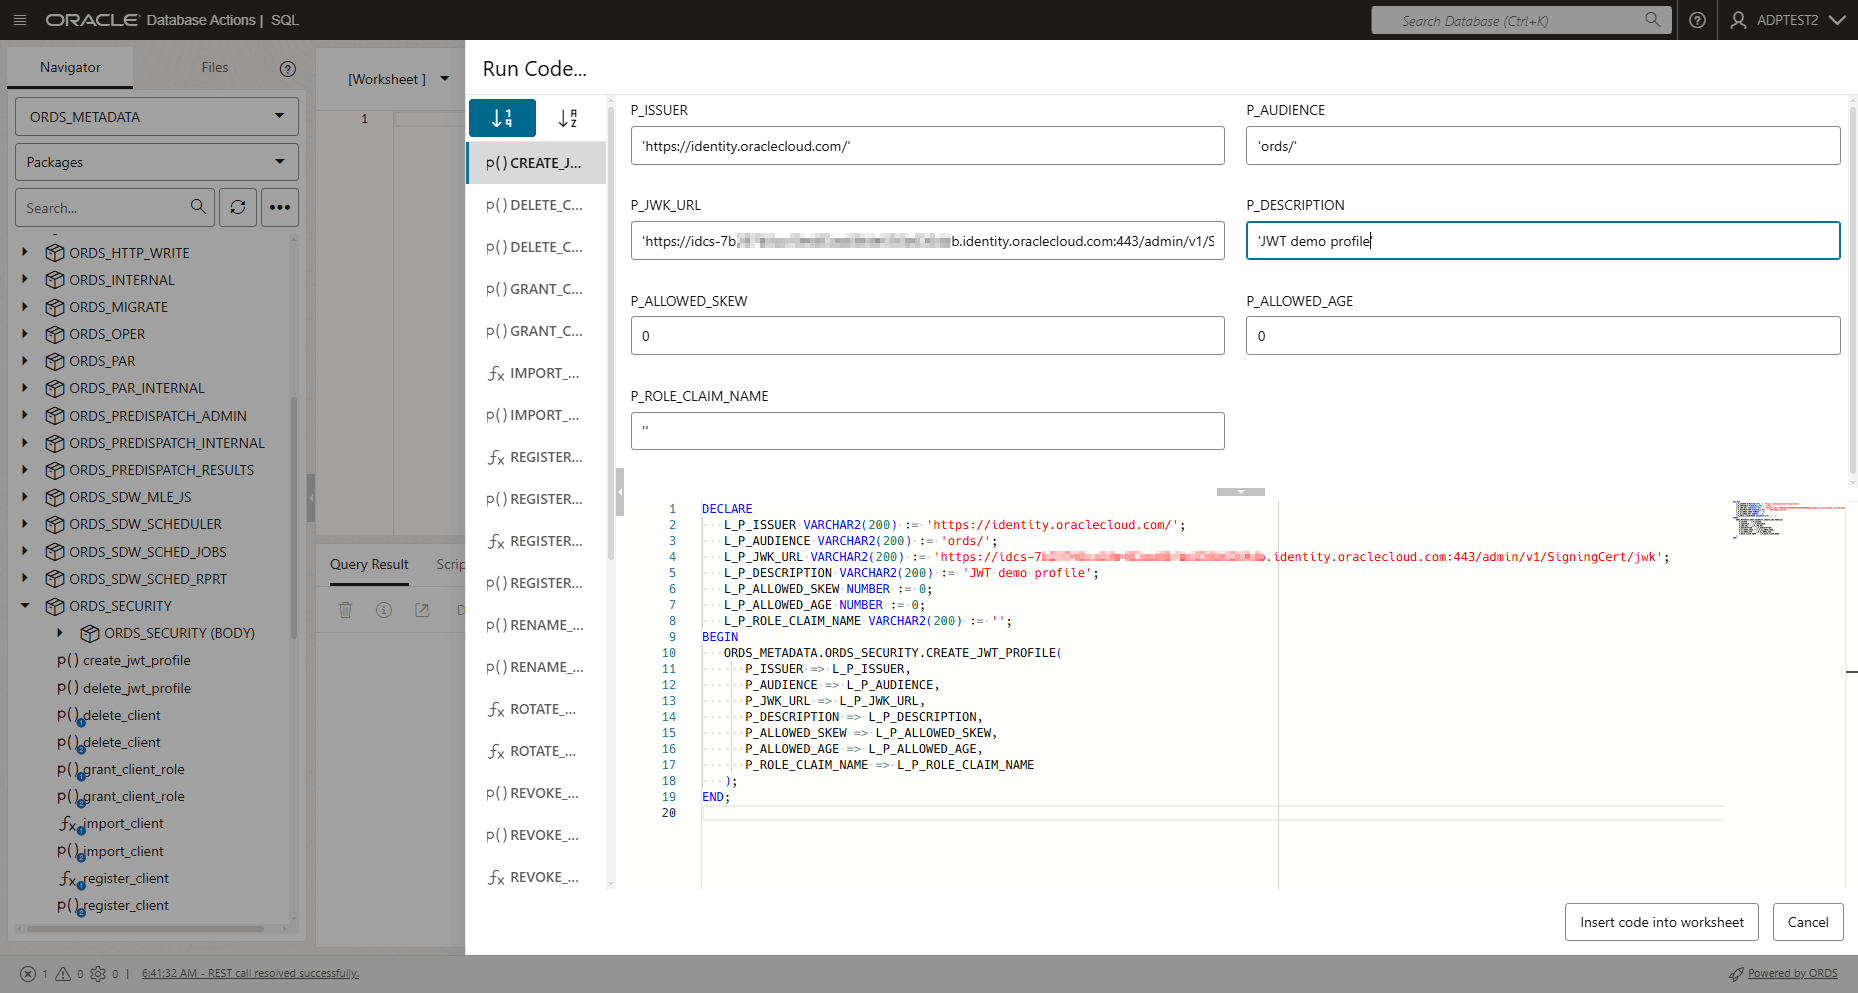
CREATE_JWT_PROFILEand clickRUN. This opens aRUN CODEdialog.On the Run Code… dialog, specify the following field values:- P_ISSUER- https://identity.oraclecloud.com/. This field must be a non-null value and must be filled within a single comma.
- P_AUDIENCE-ords/. This field must be a non-null value.
- P_JWK_URL- Append the DOMAIN URL with /admin/v1/SigningCert/jwk. It must be a non-null value starting with https:// and identify the public verification key provided by the authorization server in a JSON Web Key (JWK) format.
You can view the Domain URL in the Domain information tab present in the Domains menu of Identity & Security navigation menu of the OCI console.
See: https://docs.oracle.com/en/cloud/paas/iam-domains-rest-api/api-security-signing-certificates-jwk.htmlfor more details.
- P_DESCRIPTION- Enter the description for this profile. For example, “JWT Demo confluence”.
- P_ALLOWED_AGE-"0"
- P_ALLOWED_SKEW-"0"
Click Run Script.
Once the JWT profile is configured, end users can access ORDS protected resources by presenting JWT tokens specified in the JWT profile.
Create a connection file
-
Click on the Add button on the header of the Connections pane to add a connection. This opens an Add new connection dialog box.
- Specify the following fields on the Add new connection dialog box:
- Connection name: Enter the name of the connection.
- Autonomous Database URL: Enter the URL of the Autonomous Database you wish to connect to. Copy the entire URL from the web UI of the Autonomous Database. For example, enter or copy the following link "https://<hostname>-<databasename>.adb.<region>.oraclecloudapps.com/" to connect to the database.
- Select the connection type: OCI IAM
- Domain URL: Enter the Domain URL from the domain information tab.
- Client ID: Enter the Client ID you recorded from Create a domain integrated application.
- OAuth Client ID: Enter the Client Secret you recorded from Create a domain integrated application.
- Schema: Enter the same schema you use to Enable IAM Login for Autonomous Database Schema.
After the connection is created you can share it with other users of this domain.
Parent topic: The Data Analysis Tool
