Scenario: Create a Digital Twin Instance that uses a mTLS Certificate
If you receive data from a device, then you must use authentication with your digital twin instance. This scenario explains how to use a certificate to authenticate a digital twin instance for a device.
- Rotate certificates often.
- Limit certificate validity periods.
- Store private keys using Vaults.
- Monitor and audit connection attempts.
Before you Begin
Make sure you have the required permissions. An administrator grants access by creating the required policies. For more information, see Prerequisites for the policies required for certificates and Policy Details for the Internet of Things (IoT) Platform for policies required for IoT resources.
When you create a digital twin instance if you use a certificate for authentication, then you need the following policy so that the IoT domain can read the certificate.
Allow any-user to {CERTIFICATE_BUNDLE_READ, CERTIFICATE_READ} in compartment <compartment-name> where request.principal.type = 'iotdomain'
Allow any-user to {CERTIFICATE_AUTHORITY_BUNDLE_READ, CERTIFICATE_AUTHORITY_READ} in compartment <compartment-name> where request.principal.type = 'iotdomain'
Allow any-user to {CABUNDLE_READ} in compartment <compartment-name> where request.principal.type = 'iotdomain'
Step 1: Create a Key
You must have an existing hardware-protected, symmetric encryption key in Oracle Cloud Infrastructure (OCI). To check if you have a Master encryption key or to create a new one:
- Go to Identity & Security, and then select Vault.
- Select the Compartment you want to use for your IoT resources.
- To create a key, select Create Key and follow the instructions in Creating a Master Encryption Key.
- Or from the list of Vaults, select the Actions menu next to the Vault you want to use, and then select View Vault Details.
- Select Master encryption keys to view Keys. Select View Key Details to find the Protection Mode and confirm it's HSM (Hardware Security Module).
Step 2: Create a Certificate Authority
Use the Certificates service to create a root certificate authority (CA) or a subordinate CA. For more information, see Creating a Certificate Authority.
This example task explains how to issue a certificate with a private key that you manage externally using a subordinate CA.
You must already have a root CA to create a subordinate CA.
- Log in as an Administrator, with the correct policies to perform these actions. You must have the appropriate level of security access to create a CA.
- On the Certificate Authorities list page, select Create Certificate Authority. If you need help finding the list page, see Listing Certificate Authorities.
- Select Compartment, and then select the compartment where you want to create the CA.
- Under Certificate Authority Type, select the type Subordinate Certificate Authority: any CA that's not the root CA in a hierarchy containing other CAs.
- (Optional) Enter a unique display name for the CA. This name helps you identify the CA for administrative purposes but doesn't appear as part of the CA certificate. Avoid entering confidential information.Note
No two CAs in a tenancy can share the same name, including CAs pending deletion. - (Optional) To apply tags, select Show Tagging Options. For more information about tags, see Resource Tags.
- Select Next.
- Enter subject information. Subject information includes at least a common name (CN) to identify the owner of the CA certificate. Depending on the certificate's intended use, the subject might identify a person, organization, computer endpoint, or a device. The format of the subject information must conform to RFC 5280 standards. You can use wildcards to issue a certificate for multiple domain or subdomain names.
- Select Next.
- Under Authority Configuration, confirm or select the vault that contains the encryption key that you want to use for the CA certificate. Optionally, select Change Compartment to specify a different compartment. For information about creating and managing vaults, see Managing Vaults.
- Under Key, select the key in the vault that you want to use. The list includes only the asymmetric keys in the vault because Certificates only supports asymmetric keys. You can select from Rivest-Shamir-Adleman (RSA) keys that are 2,048 bits or 4,096 bits. You can also select elliptic curve cryptography digital signature algorithm (ECDSA) keys that have an elliptic curve ID of NIST_P384. Specifically, the list includes only these types of asymmetric keys that are protected by a hardware security module (HSM). Certificates don't support the use of software-protected keys. For more information about creating and managing keys, see Managing Keys.
- Under Signing Algorithm, depending on the key algorithm family select one of the following options:
- SHA256_WITH_RSA: RSA key with a SHA-256 hash function
- SHA384_WITH_RSA: RSA key with a SHA-384 hash function
- SHA512_WITH_RSA: RSA key with a SHA-512 hash function
- SHA256_WITH_ECDSA: ECDSA key with a SHA-256 hash function
- SHA384_WITH_ECDSA: ECDSA key with a SHA-384 hash function
- SHA512_WITH_ECDSA: ECDSA key with a SHA-512 hash function
- Select Next.
- Configure the expiry rule. Under Maximum Validity Duration for Certificates (Days), specify the maximum number of days that a certificate issued by this CA can be valid. We strongly recommend a validity period of no more than 90 days.
- On the Revocation Configuration page, if you don't want to configure a certificate revocation list (CRL), select the Skip Revocation checkbox.
- Select Next.
- Confirm that the information is correct, and then select Create Certificate Authority. It can take a few minutes to create certificate-related resources.
- If the Certificate Authority was successfully created, then the summary details is displayed.
Step 3: Generate a New Private Key
Create a private key and a certificate signing request (CSR) using OpenSSL.
For security, consider performing this step on the device to keep the key private and never share the key externally.
- Use this command to generate a new private key
private.pemand a certificate signing requestcsr.pemwith RSA 2048-bit encryption. This example shows using the-nodesparameter that specifies without password protection and uses thev3_reqextensions.openssl req -nodes -newkey rsa:2048 -keyout private.pem -out csr.pem -extensions v3_reqNote
If you are using Linux, by default theOpenSSL.cnffile comments out the extension, for example, if you see something like this in theOpenSSLconfig file:/etc/pki/tls/openssl.cnf
Then remove the# req_extensions = v3_req# The extensions to add to a certificate request#to uncomment out the extensions, so the file looks something like this:req_extensions = v3_req # The extensions to add to a certificate requestTo verifyOpenSSLis usingextensions v3_reqyou can verify the output contains:X509v3 extensions: X509v3 Basic Constraints: critical CA:FALSE This example shows the certificate request input fields and example values. Enter information that will be incorporated into your certificate report, as a Distinguished Name (DN).
Enter the common name. You can find the common name on the Subject Information tab of the Certificate details page, see step 8 Create a Certificate Authority or for help finding the certificate details page, see Listing Certificates:Country Name (2 letter code) []: US State or Province Name (full name) [Some-State]: Locality Name (eg, city) []: Organization Name (eg, company) []: Organizational Unit Name (eg, section) []: Common Name (Enter common name from the certificate details.) []:common-name Email Address [your@email.com]: Please enter the following 'extra' attributes to be sent with your certificate request A challenge password []: An optional company name []:
Step 4: Create a Certificate that's Managed Externally
You can generate a certificate signing request (CSR) and private key on the server where you plan to install the certificate, and then submit that CSR to a CA to issue a certificate, while managing the private key externally.
- In the Console, open the navigation menu, select Identity & Security.
- On the Certificates list page, the list of Certificate Authority for a specific compartment is displayed.
- Find the Certificate you want to work with, select the Actions menu at the end of the row.
- Select Issue Certificate.
- Under Certificate Type, to issue a certificate from a Certificates service CA that's managed by an external, third-party CA, select Issued by internal CA, managed externally.
- Enter a unique display name for the certificate. Avoid entering confidential information.Note
No two certificates in the tenancy can share the same name, including certificates pending deletion. - (Optional) Enter a description to help identify the certificate. Avoid entering confidential information.
- For certificates that a third-party CA manages, you don't need to provide subject information. Instead, select Next.
- Under Certificate Signing Request, provide certificate contents by selecting Upload File, and then select Select One to upload the certificate as a file in
PEMformat. - Or select Paste Content, and then select the text box to paste the certificate contents directly.
- Select Next.
- You can't configure automatic renewal for certificates that the Certificates service doesn't manage. Select Next to continue.
- Verify the summary information is correct, and then select Create Certificate.
- View the Certificate details page opens. Under the Versions, find the name of the certificate you want to view, go to the Actions menu at the end of the row, select View Content. For more information, see Viewing Certificate Details.
- Select Download and Save the Certificate PEM file.
- On the Certificate details page, go to the Subject information tab, copy the Common Name for the certificate to use in the next step.
Step 5: Create a Digital Twin Instance that uses a Certificate
To authenticate a device to send data you can create a digital twin instance using the --auth-id parameter and the <certificate-OCID> created in the previous step.
Use this command and parameters to create a digital twin instance. Replace the <common-name-for-the-certificate>. Replace the <certificate-OCID> with the Certificate OCID for your environment. Find these values on the Certificate details. For more information, see Viewing Certificate Details:
oci iot digital-twin-instance create --iot-domain-id <iot-domain-OCID> --auth-id <certificate-OCID> --external-key <common-name-from-certificate-details>For a complete list of CLI parameters, see oci iot digital-twin-instance create and see Creating a Digital Twin Instance for more information.
Optional Step 6: Get a Digital Twin's Instance Details
oci iot digital-twin-instance get --digital-twin-instance-id <digital-twin-instance-OCID>Step 7: Send Data
Depending on your scenario, you can connect to the digital twin instance using MQTTS, HTTPS, or using WebSocket. For more example scenarios, see Connecting a Device.
Using Curl
POSIX-style shells: Use thiscurlcommand when using bash, zsh, macOS Terminal, Linux, or Git Bash on Windows to send sample plain text message test the connection. Replace thedevice-cert.pemand thedevice-key.pemwith the path to the files for your environment.curl --cert /path/device-cert.pem --key /path/device-key.pem \ -H "Content-Type: text/plain" \ -d "sample data 1" \ "https://<iot-domain-short-id>.device.iot.<region>.oci.oraclecloud.com/sampletopic"Windows Powershell: Use this
curlcommand, replace thedevice-cert.pemand thedevice-key.pemwith the values for your environment.curl.exe --cert /path/device-cert.pem --key /path/device-key.pem \ -H "Content-Type: text/plain" \ -d "sample data 1" \ "https://<iot-domain-short-id>.device.iot.<region>.oci.oraclecloud.com/sampletopic"When you complete Step 3: Create a Digital Twin Instance, if you defined the external key parameter value with quotes, you must include the quotes when you send data:
"external-key". For quoting best practices, see Troubleshooting.Use any MQTT client to subscribe to a topic using MQTTS. This example uses MQTTx.
To send sample data and test the connection:
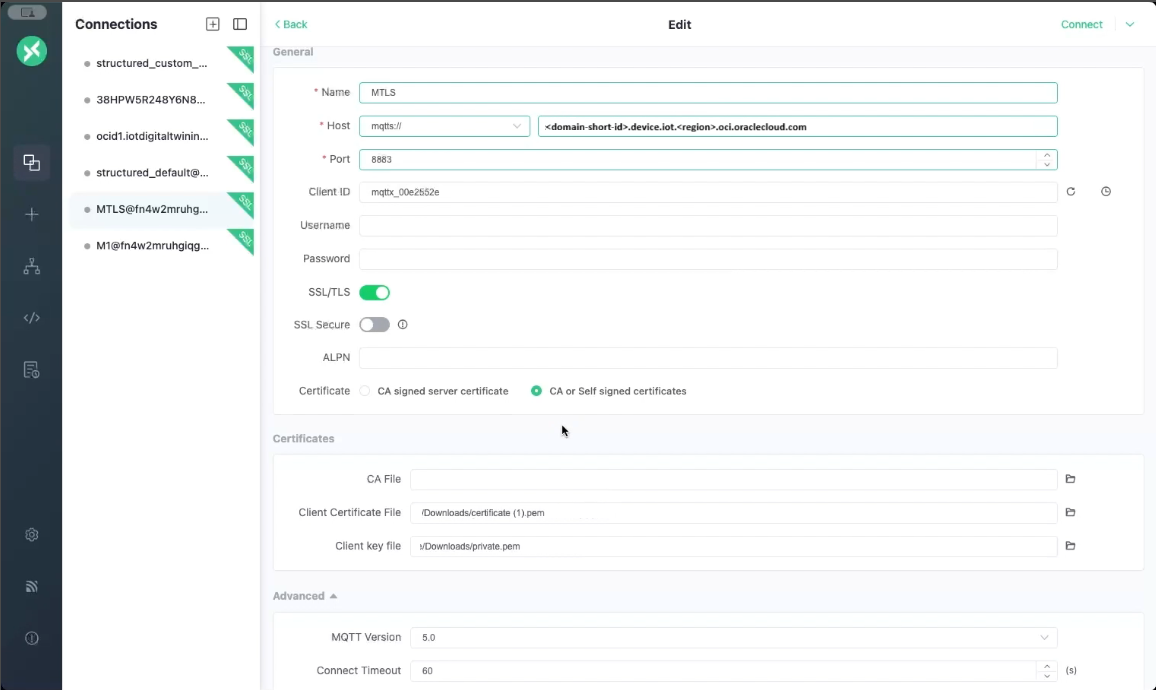
- Enter the device host as the host, for example:
mqtts://<domain-short-id>.device.iot.<region>.oci.oraclecloud.com - Enter the port:
8883 - Client ID: your-client-id
- Clean Start: True
- Turn on the toggle to enable TLS.
- Select the option: CA or Self signed certificates
- Enter the client certificate file location, from step 15 in Create a Certificate that's Managed Externally:
your-certificate.pem - Enter the client key file location, from step 1 in Generate a New Private Key:
your-private-key.pem - Select Connect.
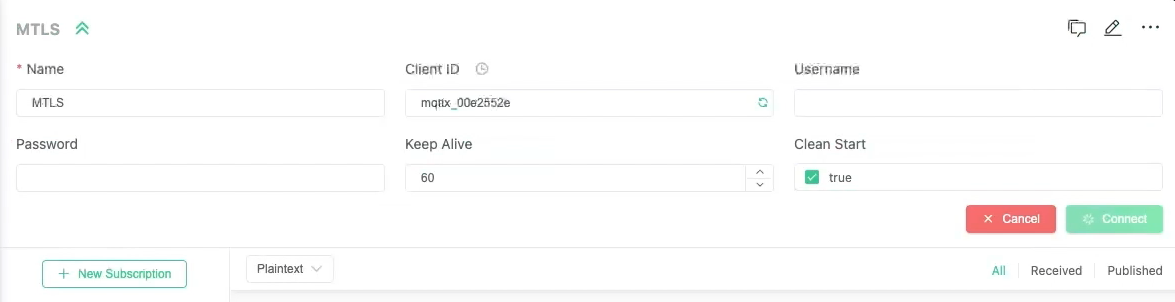
- Select New Subscription to receive data from a device.
- Enter the endpoint as the Topic.
- This example shows messages published to the
/endpoints/4321topic, at Quality of Service (QoS) level 1. topic:{ "pulse": 300, "s02": 400 }{ "test": 100 }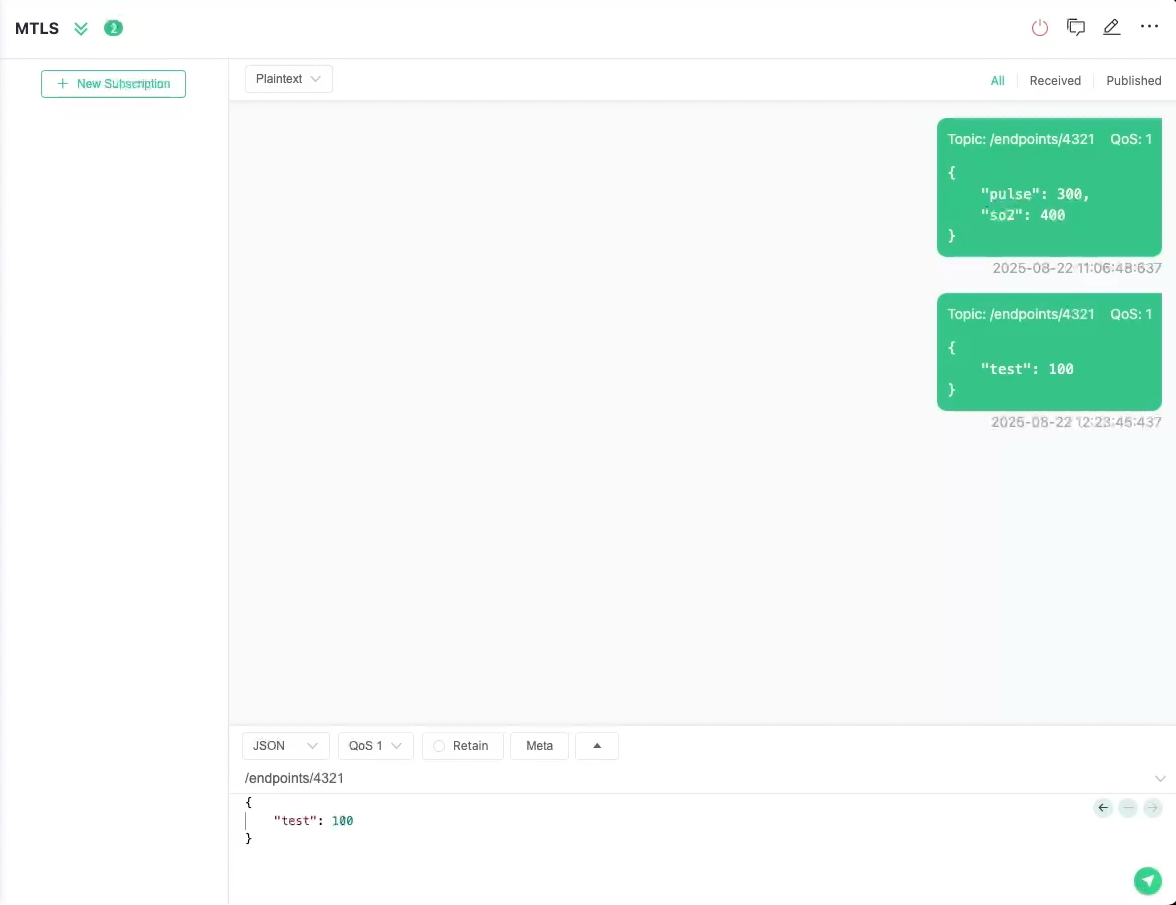
- Enter the device host as the host, for example:
Optional Step 7: Monitor the IoT Data in APEX
select * from <domain-short-id-from-device-host>__IOT.RAW_DATA
where digital_twin_instance_id = '<digital-twin-instance-ocid>'