Scenario: Connecting IoT Data to APEX
To use Oracle Application Express (APEX) with your Internet of Things (IoT) data follow these steps to configure access and connect your data.
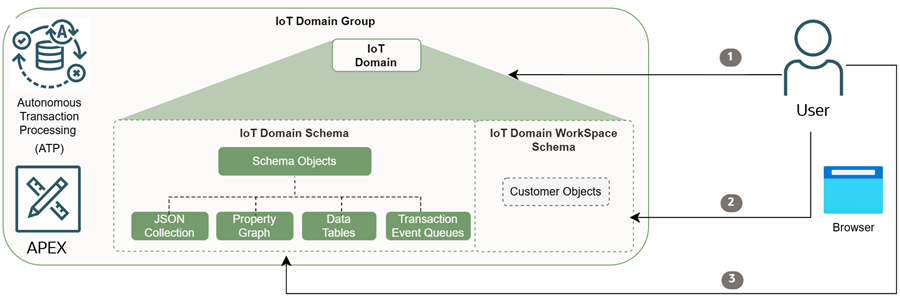
Configuring Access to your IoT Data
Using the CLI
oci iot domain configure-apex-data-access to configure access to APEX for the IoT domain. Replace the <iot-domain-OCID> with the OCID for your IoT domain and replace the <your-initial-apex-password> with the initial APEX password for your IoT environment:oci iot domain configure-apex-data-access --db-workspace-admin-initial-password "<your-initial-apex-password>" --iot-domain-id <iot-domain-OCID>
The initial APEX password must be at least 12 characters.
Using the API
ConfigureIotDomainDataAccess to configure access to APEX for the IoT domain:POST /20250531/iotDomains/{iotDomainId}/actions/configureDataAccess
{
"type": "APEX",
"dbWorkspaceAdminInitialPassword": "<your-initial-apex-password>"
}Log in to APEX
- Go to the APEX Console at the following URL:
https://<data-host-domain-group-short-id>.data.iot.<region>.oci.oraclecloud.com/ords/r/apex/workspace - Log in to the IoT domain's Workspace using the following as the workspace name and database user name, notice two underscores: __WKSP:
<domain-short-id-from-device-host>__WKSP - Go to SQL Workshop and select SQL Commands to query the IoT data.Initially, there's 2 database schemas for the IoT domain, both use the
<domain-short-id-from-device-host>, which is the host name of the IoT device:<domain-short-id-from-device-host>__IOT: Schema with read only access to your digital twin definitions and telemetry.<domain-short-id-from-device-host>__WKSP: Schema with read and write access.
Note
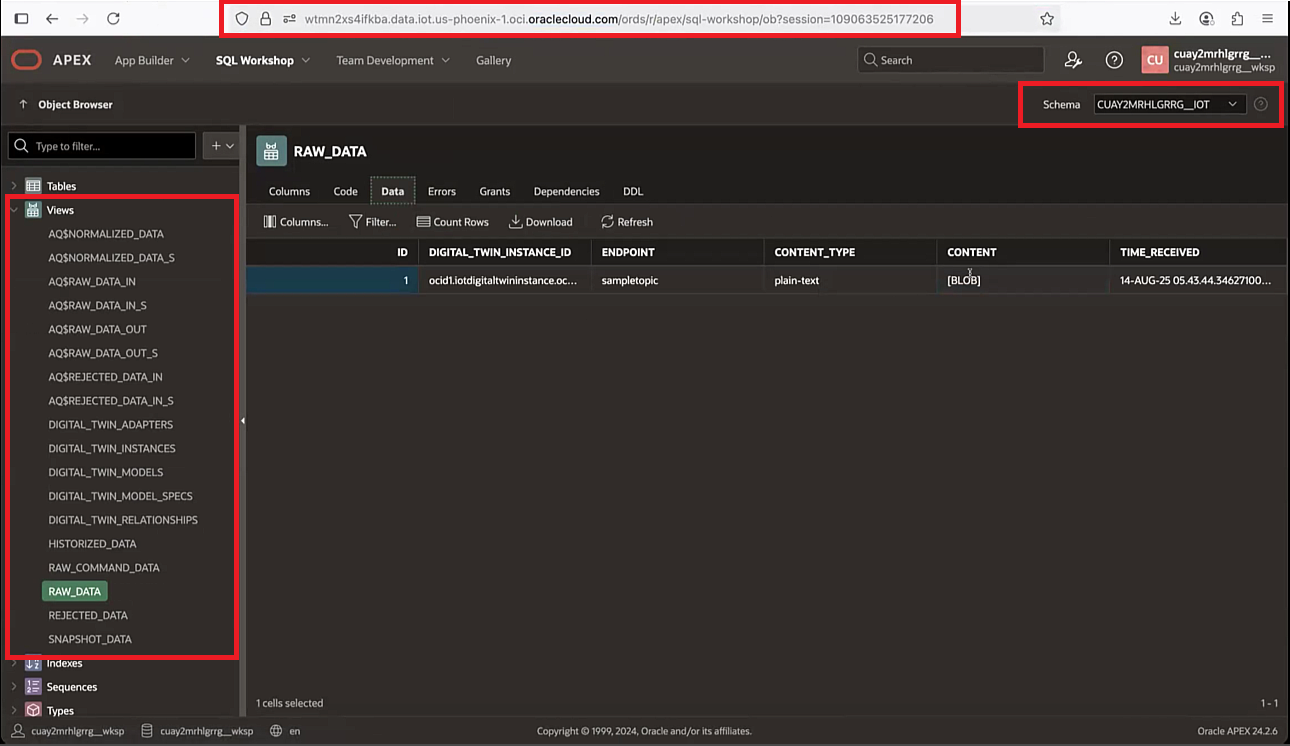
Notice the schema names contain two underscores: __IOT and __WKSP - Query IoT data by entering and running an SQL command. Confirm you selected the correct schema for the database table you are querying, for example:
- Select the
<domain-short-id-from-device-host>__IOTschema. - Run the following command, replace the type with the data you want to view:
- RAW_DATA
- HISTORIZED_DATA
- REJECTED_DATA
- RAW_COMMAND_DATA
select * from <domain-short-id-from-device-host>__IOT.RAW_DATA where digital_twin_instance_id = '<iot-digital-twin-OCID>'For reports that query larger data sets, use a time range and select only the columns required by the report. See Use Typed Values from APEX Page Items.
- Select the
- When the administrator account is created, a user is created in two different places, the Oracle database and the APEX application. These are different users with the same user name and password. You can change the passwords.
- To change the database user's password, use this SQL
ALTER USERstatement and the requiredREPLACEclause:ALTER USER <workspace-administrator-user-name> IDENTIFIED BY "<new-password>" REPLACE "<old-password>"; - To change your APEX user's password:
- As an APEX Administrator, you can change the password. After logging into APEX as the administrator, select the Set APEX Account Password option.
- As an APEX user, when you log in to the APEX application, you will be prompted to change your APEX password.
- To change the database user's password, use this SQL
- Now, you can see your IoT data in APEX and create new user accounts in APEX administration services.
To view a larger screenshot, right click and open the image in a new browser.
Use Typed Values from APEX Page Items
APEX binds Date Picker and Number Field page-item values as VARCHAR2 strings in SQL and PL/SQL. For a report that filters HISTORIZED_DATA.TIME_OBSERVED, convert date/time strings to TIMESTAMP values before comparing them with the column. See Values Bind as Strings.
The following example selects historized sample metadata within a start-inclusive, end-exclusive time range. It does not retrieve the sample's JSON value. To adapt the example for an APEX report:
- Replace
<domain-short-id-from-device-host>with your IoT domain short ID, keeping the two underscores beforeIOT. - Create or use two date/time page items in your application. Replace
P10_START_TIMEandP10_END_TIMEwith their actual names. These are example item names, not items that IoT creates for you. - Populate both items before running the report, with the start value earlier than the end value. This example expects strings without time-zone offsets, such as
2026-09-20 10:00:00.000000and2026-09-20 11:00:00.000000. Use values in the same time convention as the data being queried. TheTO_TIMESTAMPformat mask must match the strings supplied by your items; change the mask if their format differs.
SELECT h.id,
       h.digital_twin_instance_id,
       h.content_path,
       h.time_observed
FROM <domain-short-id-from-device-host>__IOT.HISTORIZED_DATA h
WHERE h.time_observed >= TO_TIMESTAMP(
        :P10_START_TIME, 'YYYY-MM-DD HH24:MI:SS.FF6')
  AND h.time_observed < TO_TIMESTAMP(
        :P10_END_TIME, 'YYYY-MM-DD HH24:MI:SS.FF6');
This is an APEX report query that uses page-item session values. If you run it in another SQL tool, supply the bind values using that tool's bind-variable mechanism.
Why this helps:
- The two bounds restrict the query to the time range needed by the report instead of requesting all retained samples. The exclusive end bound avoids counting a boundary sample twice when adjacent time windows are queried.
TO_TIMESTAMPconverts each input string, leavingh.time_observedunchanged. Matching input types avoids an implicit conversion that could interfere with use of the timestamp index. It does not guarantee a particular execution plan or response time.- Selecting metadata columns instead of
SELECT *avoids retrieving payload values that this report does not need. Add payload columns only when the report needs their contents.
For raw-data reports, use a bounded query on RAW_DATA.TIME_RECEIVED instead. See Query Input Types and Timestamp Filters for a raw-data example, and IoT Domain Database Schema for existing column definitions.