Release 11g (11.1.1)
Part Number E18861-01
Contents
Previous
Next
| Oracle Fusion Middleware User's Guide for Oracle Business Intelligence Publisher Release 11g (11.1.1) Part Number E18861-01 | Contents | Previous | Next |
View a report in your Web browser using the report viewer. Depending on the report properties and your user permissions, you may be able to select and view different layouts, interact directly with displayed data, change the output type, or send the report to someone else.
This chapter includes the following topics:
All reports reside in the catalog. Your Home page will display recently viewed and most popular reports for quick access.
To view a report
Navigate to the report.
The Catalog displays two main reports folders.
Open the appropriate folder and then click the report name or the Open link for the report. This will run the report using the options set in the report definition.
Note: Some reports are not configured for online viewing. For these reports, the Open link will not display. Select Schedule to schedule a report job. See Creating Report Jobs.
Some reports may require you to select parameter values before running the report. If the report does not immediately display data, select values for the displayed parameters and click Apply.
The following figure shows the report viewer:
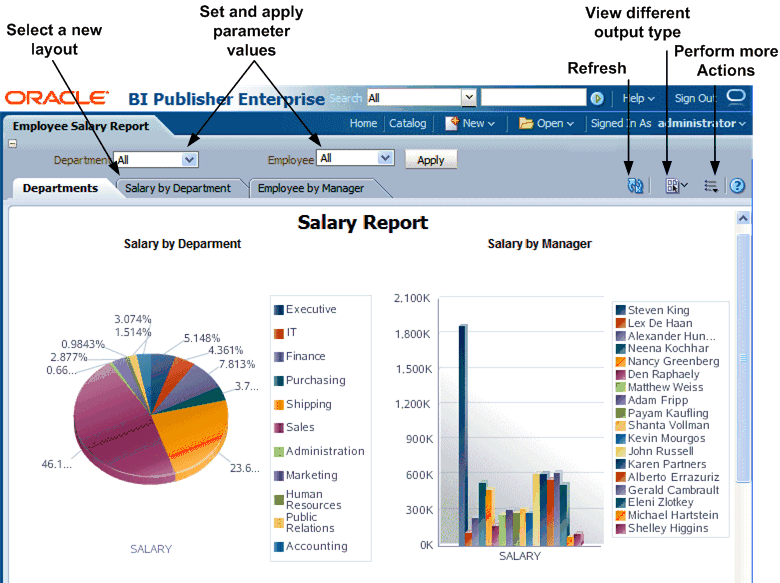
The following list describes components of the report viewer. Not all options are available for all reports:
Parameters - if the report includes parameters, these are presented as prompts in the Report Viewer.
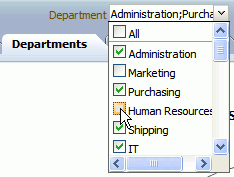
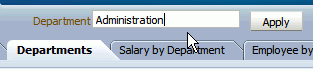
A parameter prompt may be presented in one of the following ways:
A list from which you can make a selection (as shown above). Some lists support multiple selections. A multi-select list displays a check box next to each item. Click the box to select the item. Click the box again to deselect the item.
A text box into which you can type a value.
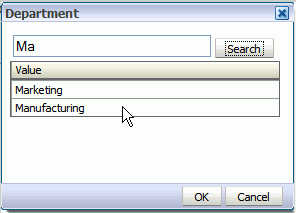
A search icon that launches a search dialog. Note that search strings are case sensitive. The % can be used as a wild card. The search will return results when the value matches the initial string.
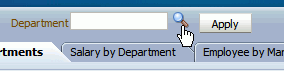
For example, in a list of department names the entry "Ma" returns the values "Marketing" and "Manufacturing". The search entry "%ing" would return "Accounting", "Manufacturing", and "Purchasing". Select the value from the returned list and click OK.
A date picker that launches a calendar from which to select the date.
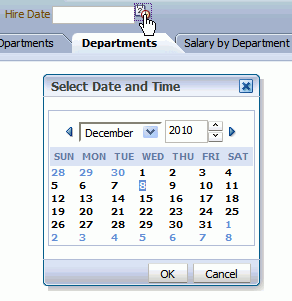
After selecting or entering a parameter value, click Apply.
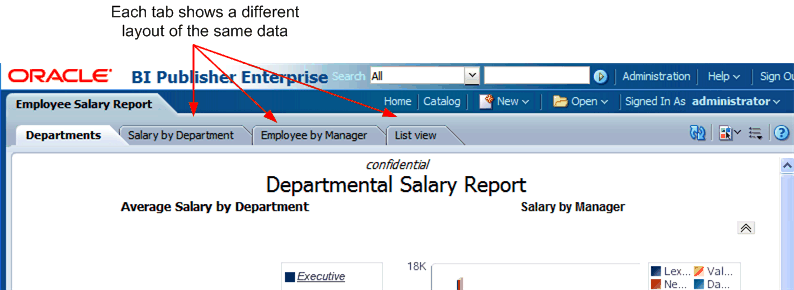
Layout - if multiple layouts are available they will be displayed as separate tabs in the report viewer page. To view the report displayed in a different layout, click the tab.
View Report - this list contains other output types that are available for this report. The output will be rendered in your browser or you may be prompted to open an appropriate application for viewing.
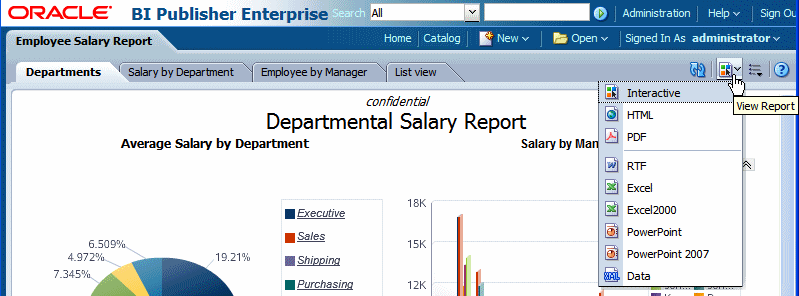
Possible output options are:
Interactive - this output is only available for layouts designed using BI Publisher's Layout Editor. Interactive output enables pop-up chart value displays, scrollable and filterable tables, and other interactive features for a report.
HTML - (Hypertext Markup Language) formats the report for browser viewing.
PDF - (Portable Document Format) formats the report as PDF and opens the report in Adobe Acrobat reader. This output type is optimized for printing.
RTF - (Rich Text Format) is a format used by word processing applications. If you have a word processing application installed, such as Microsoft Word or OpenOffice.org, you will be prompted to open the application for viewing.
Excel - choose this output type to view the report in Excel if you have Microsoft Excel 2003. This option generates an MHTML format file that can be opened in Excel 2003 or later. This option supports embedded images, such as charts and logos.
Excel 2000 - choose this output type only if you are running the earlier versions of Microsoft Excel 2000 or 2002. This option generates HTML that can be opened in Excel. It does not support embedded images.
Excel 2007 - choose this option to generate the report in Excel .xlsx (Excel XML format). If you have Excel 2007 or later installed, this option provides the best preservation of layout and formatting.
PowerPoint - choose this output type to generate a PowerPoint file compatible with Microsoft PowerPoint 2003.
PowerPoint 2007 - choose this output type to generate a PowerPoint 2007 file.
Flash - displays output for templates designed using Adobe Flash. You must have the Adobe Flash Player Plug-in installed for your Web browser.
CSV - displays the data in comma separated value format. The data must be in a simple <rowset>/<row> structure.
Data - displays the report data as XML.
Important: For Safari browser users: The Safari browser renders XML as text. To view the XML generated by the data engine as XML, right-click inside the frame displaying the data and then click View Frame Source. This is a display issue only. The data will be saved properly if you choose to export the data.
MHTML - (Mime HyperText Markup Language) this format enables you to save a Web page and its resources as a single MHTML file (.mht), in which all images and linked files will be saved as a single entity. Use this option if you want to send or save HTML output and retain the embedded images and stylesheet formatting.
PDFZ - (Zipped PDF) - this option is only available for reports that have been designed to enable zipped PDF output. BI Publisher generates a zip file containing the report PDF output and index files.
FO - generates an XML file with the XSL-FO information.
The Actions menu provides more actions that you can take on the report. The complete list of possible options follows. The options that are available to you will depend on your user privileges and properties set for the report. The full list of options is shown in the following figure:
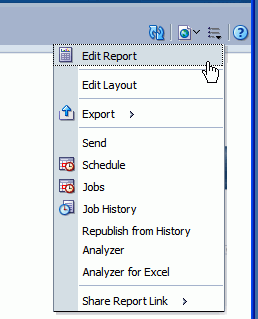
Edit Report enables you to update the report definition. For example, you can add or create new layouts, update the report properties, or change the default parameter values. See Creating a New Report, Oracle Fusion Middleware Report Designer's Guide for Oracle Business Intelligence Publisher for information on using the report editor.
Edit Layout enables you to update a layout. If the layout was created using BI Publisher's Layout Editor, the Layout Editor will launch in your browser. See Creating a BI Publisher Layout Template, Oracle Fusion Middleware Report Designer's Guide for Oracle Business Intelligence Publisher. If the layout was not created in the Layout Editor, you will be prompted to save the template file. You can then open it in the appropriate application.
Export exports the report to the default application for the output type you select (for example: Adobe Acrobat for PDF output or Microsoft Excel for Excel output).
Send enables you to schedule the report for immediate delivery to an e-mail address, printer, or other destination.
The Send action launches the Schedule Report Job page where you can select the output, destination, and notification options.
Note: You cannot send a report in Interactive mode. First, select a different output type (such as PDF or HTML) from the View Report list and then click Send.
Schedule creates a job to run and distribute the report. See Creating Report Jobs.
Jobs enables you to view and manage currently scheduled jobs for this report. See Viewing and Managing Report Jobs.
Job History enables you to view completed and running report jobs. See Viewing and Managing Report History.
Republish from History enables you to select a previously scheduled, completed job and specific output for viewing in the report viewer.
Analyzer enables you to create ad hoc pivot views of the data using the Online Analyzer. See Using the Online Analyzer.
Analyzer for Excel exports the report data to Microsoft Excel. See Using the Oracle BI Publisher Analyzer for Excel.
Share Report Link enables you to generate a link that you can copy and reuse, based on the report that you are currently viewing. When you select one of the options, a dialog displays the URL to the report. You can control what will be displayed by the URL as follows:
Current Page displays the current page as shown.
No Header displays the current report without the BI Publisher logo, tabs, or navigation path.
No Parameters displays the current report without the header or any parameter selections. The Actions menu, Export, and View Report menus will still be available.
Document Only displays the URL to the current report document only. No other page information or options will be displayed.
Note: Share Report Link is a report property that can be disabled. See Defining Report Properties, Oracle Fusion Middleware Report Designer's Guide for Oracle Business Intelligence Publisher for information on setting this and other report properties.
Note: Your administrator must assign you the appropriate permissions to use this feature.
The online Analyzer enables you to create ad hoc analyses of your data by quickly dragging and dropping your report data elements into a pivot table structure. You can then save your pivot table as a layout for the report. The interface enables you to easily rearrange and pivot your data by dragging items to different row, column or summary positions.
You can limit the data displayed in your pivot table by defining page-level filters. The page-level filter is an element from your data set by which to specify the results displayed in the table. Drag and drop the desired element from the data pane to the Page item area to automatically create a menu of the values for that element. You can then select a value from the list to filter the results in the table to display only the data that corresponds to your selection.
After selecting all the data elements for the table, choose whether to view the Sum, Average, or Count of the data.
This topic contains two procedures:
Because the data presented in the Online Analyzer is from the source XML file, no data type information is available; therefore, number formats cannot be localized according to Report Locale preferences.
To access the Online Analyzer:
From the Report Viewer, click Actions, then click Analyzer.
The Analyzer toolbar enables you to perform the following functions:
New creates a new empty pivot table structure. If you have already created an analysis that you want to save, you must click Save before you click New.
Export - enables you to export and save your pivot table as a BI Publisher layout.
Move decimal left - click once to display an additional decimal position. You can continue clicking to move the decimal multiple times.
Move decimal right - click once to remove the display of a decimal position. You can continue clicking to move the decimal multiple times.
This procedure describes how to create an interactive pivot table using the Online Analyzer:
To create an interactive pivot table
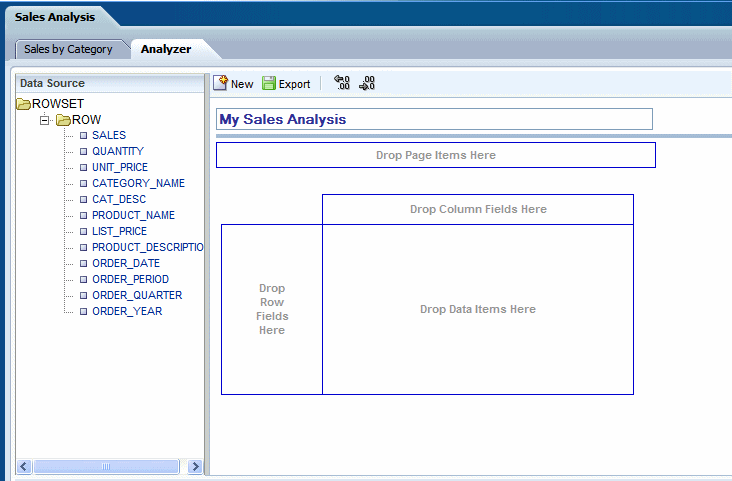
The following example displays the usage of the Analyzer with a simple Sales Analysis report:
From the report viewer, click Actions and then click Analyzer.
The Analyzer interface displays the list of data fields on a pane and an empty pivot table structure on the adjacent pane, as shown in the following figure.
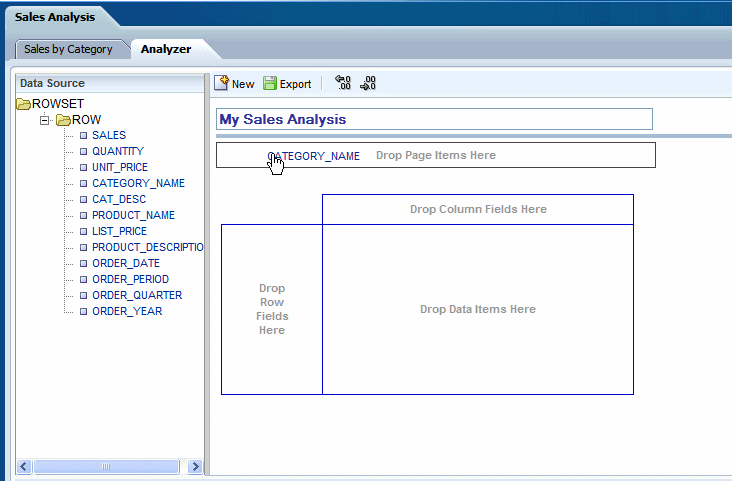
To filter by CATEGORY_NAME, drag the item to the Page Items region, as shown in the following figure:
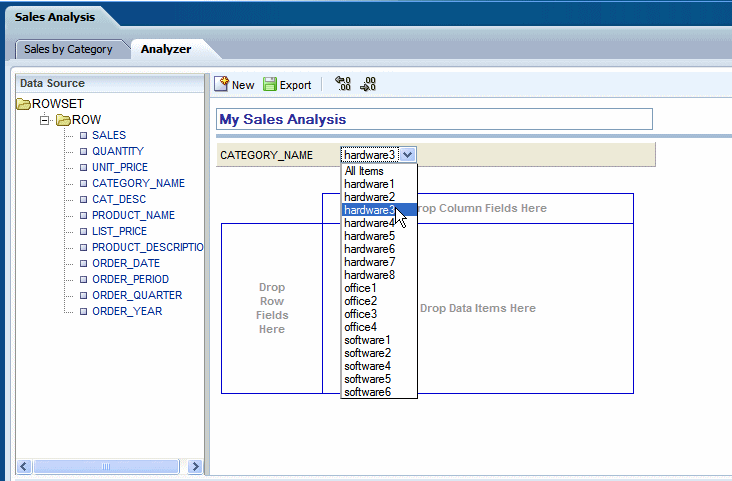
Now you can choose a value from the CATEGORY_NAME list to filter the page data as shown in the following figure:
To view product sales by year, drag PRODUCT_NAME into the Row Field area, and drop ORDER_YEAR into the Column Field area. Drop the SALES data into the table body area, as shown in the following figure:
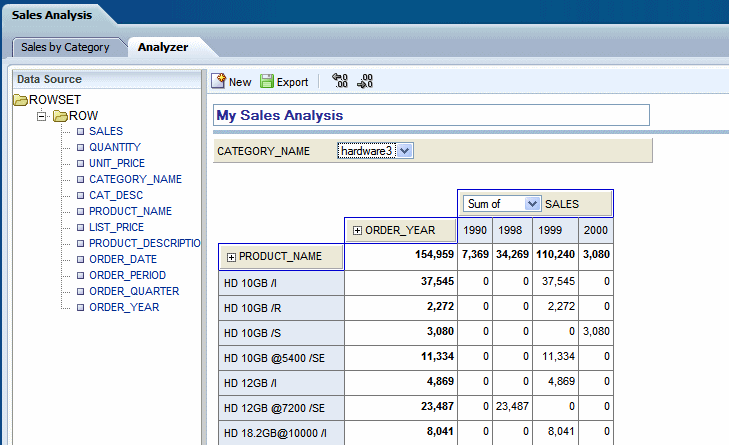
You can now see the calculated sales totals as a sum of the data items.
Add the dimension of ORDER_PERIOD to the table by dragging the data item over the ORDER_YEAR as shown in the following figure:
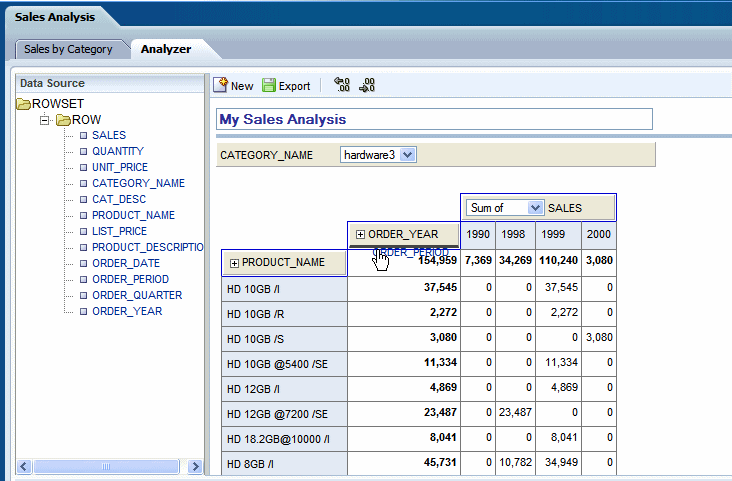
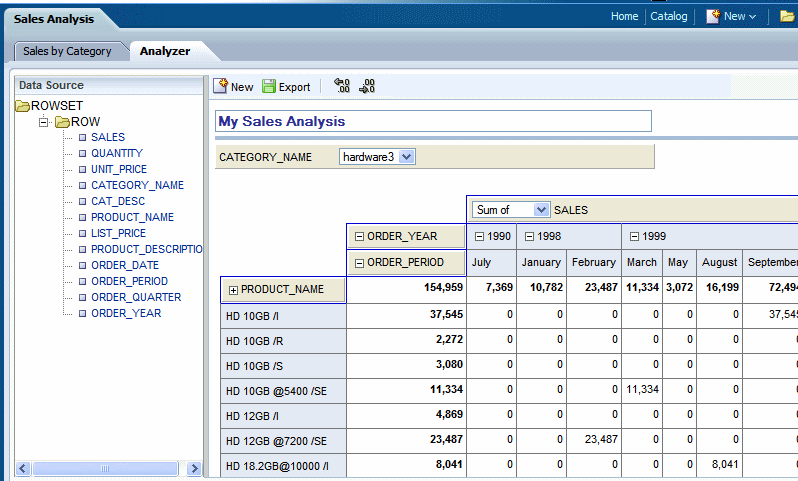
Now you can click the ORDER_YEAR to open it up to display each ORDER_PERIOD total. Click again to close the item and view only the ORDER_YEAR total.
Saving Your Interactive Pivot Table as a Layout
You can save your pivot table as a layout for your report by exporting it and saving it as a BI Publisher layout. The export command saves the pivot table as the BI Publisher layout type (.xpt). It will then have all the features and properties of a BI Publisher layout.
Click Export.
In the dialog, enter a name. The analyzer layout will be saved as a layout selection for this report.
Close the Online Analyzer.
On the Actions menu, click Edit Report.
From the Report Editor, click View a List to display the layouts in the list view.
Locate your new layout in the layout table and select a locale for it.
Click Save.
Note: Your administrator must assign you the appropriate permissions to use this feature.
Download and install the Analyzer for Excel from the Home Page, Get Started region: Click Download BI Publisher Tools and then click Analyzer for Excel.
Microsoft .NET Framework 3.0 or later
If not installed on your computer, you will be prompted to download it the first time you use the Analyzer for Excel.
Supported version of Microsoft Excel. See System Requirements and Certification for the most up-to-date information on supported hardware and software.
Important: If you have previously installed the Analyzer for Excel, and you are installing a later version, perform the following:
Uninstall the current version of Analyzer for Excel from the Control panel, using the Add or Remove Programs function.
Remove Xmlpreportaddin.xla from the add-ins list.
To remove it from Word 2003: On the Tools menu, click Add-ins, then click Xmlpreportaddin.xla to remove it.
To remove it from Word 2007 or 2010: Click the Office button, then click Excel Options, then click Add-Ins. Next to Manage: Excel Add-ins, click Go. Select the box next to Xmlpreportaddin. When prompted, delete it from the list.
The Analyzer for Excel offers two modes: online mode and offline mode. The report designer sets the mode as a property of the report. The online mode is the default mode and is described in this section. For information on the offline mode, see Excel Analyzer Options, Oracle Fusion Middleware Report Designer's Guide for Oracle Business Intelligence Publisher.
The Analyzer for Excel enables you to:
Export the results of the report query to an Excel spreadsheet
Log in to BI Publisher Enterprise from Excel to refresh your data, apply new parameter values, and apply layout to the report data
Create Excel Analyzer layouts and upload them to the BI Publisher server
Access and run your reports from an Excel session
From the report viewer, click the Actions toolbar button, then select Analyzer for Excel from the list. You will be prompted to save or open the report file.
When you open the file in Excel, select Enable Macros from the Excel dialog.
Note: You must enable macros to use the Analyzer for Excel in online mode.
Your report data displays in an Excel worksheet and the Oracle BI Publisher menu appears on your Excel menu bar. Note that the data are the results of the report query with no layout or filtering applied.
You can now manipulate the report data in Excel.
If the report has parameters, the parameter fields will appear at the top of the worksheet, but you must log in to apply new parameter values. See the Analyzer for Excel help, or Using the Oracle BI Publisher Menu.
You must log in to enable all the menu commands.
Login enables you to log in to BI Publisher. See Logging in Through Excel.
Show Report Parameters – displays the updateable parameters and available layouts for the report in a toolbar.
Analyzer for Excel Toolbar
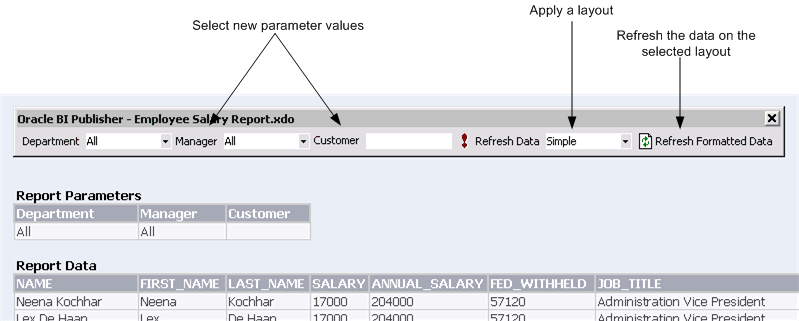
To update the data, select a new parameter value then click Refresh Data to refresh the data in the current sheet.
To apply a layout, select the layout, then click Refresh Formatted Data. This will download the report as HTML into a new worksheet. Select the new worksheet to see the data with the new layout applied.
Note: The layout you select must have HTML as an available output.
To change the parameter values from this worksheet, select the new values, then click Refresh Data, then click Refresh Formatted Data.
Update Excel Template
If you have edited the layout and wish to save your changes, use this option to upload the updated layout to the report definition in the BI Publisher catalog.
Note that to include charts in your saved layout, you must create them on the same worksheet that is downloaded by the Excel Analyzer.
Add as New Excel Template
Use this option to upload your layout and save it to the report definition.
View Report Online
Launches the report viewer page.
Browse for Reports Online
This feature enables you to select reports from the BI Publisher catalog and open them directly in Excel. You can either download the report data to Excel, or download an existing layout to update it or to use as a starting point for a new layout. See About the Open Template Dialog.
Preferences - select your locale and proxy settings if required.
When you use the Open Template dialog to initiate the layout building process, you can then use the Update Excel Template options from the Oracle BI Publisher Menu to upload the layout directly to the appropriate report in the BI Publisher catalog.
Workspace
Select Oracle BI Publisher to browse the catalog.
Reports Pane
The Reports pane lists the reports in the selected folder. Select a report to display the available layouts in the Layout Templates pane.
Open Layout Template Downloads and opens the selected template in the Analyzer for Excel.
To start a new template, select <New> from the list of templates then select Open Layout Template; or double-click <New>.
Use the Report Browser’s Up icon to move up the directory structure.
Use the View As menu to view the folder contents as Large Icons, Small Icons, List or Details.
Once you have installed the Analyzer for Excel, you can log in to the BI Publisher from Excel, you do not have to log in to BI Publisher first.
Once you have Excel open, select Log in from the Oracle BI Publisher menu. The BI Publisher log in screen will prompt you to enter your credentials and to select (or enter) the Report Server URL. For example: http://example.com:7001/xmlpserver.
Important: For Oracle BI Enterprise Edition installations, the URL must point to the /xmlpserver as shown above.
![]()
Copyright © 2010, 2011, Oracle and/or its affiliates. All rights reserved.