1 Introduction to Decision Center Reports
Decision Center is a thin client tool for business users to explore, modify, and examine the structure and data gathered by a deployed Inline Service. Decision Center provides a number of reports and editors to allow users to make changes to the Inline Service and redeploy it to Real-Time Decision Server.
Decision Center offers three ways to navigate: the Inline Service Navigator, the toolbar, and the tabs and subtabs.
This chapter contains the following topics:
1.1 Accessing Decision Center
To access Decision Center from any computer, open a Web browser and go to http://server_name:port/ui.
The Oracle Real-Time Decisions application port is typically 9704.
In the Sign In window, enter your User Name and Password, then click Sign In.
Then, assuming that you have deployed at least one Inline Service, open up an Inline Service.
1.2 About the Inline Service Navigator
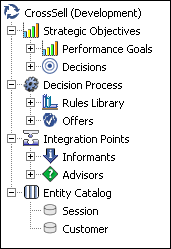
The left pane of Decision Center is the Inline Service Navigator, a tree structure showing the elements that comprise the Inline Service.
Clicking on any element in the Inline Service Navigator will bring the corresponding reports for that element into the right-hand viewing pane.
Figure 1-1 shows the Inline Service Navigator.
1.3 About the Decision Center Toolbar
Many tasks can be accomplished using the Decision Center toolbar. Table 1-1 lists the Decision Center toolbar icons.
Table 1-1 Decision Center Toolbar Icons
| Icon | Click this icon to... |
|---|---|
|
|
Select previous object |
|
|
Select next object |
|
|
Select an Inline Service |
|
|
Select perspective |
|
|
Promote an Inline Service to a different deployment state |
|
|
Redeploy the Inline Service |
|
|
Discard changes |
|
|
Print the current report page |
|
|
Create new filtering rule |
|
|
Create new scoring rule |
|
|
Delete filtering rule (appears when filtering rule is accessed) |
|
|
Delete scoring rule (appears when scoring rule is accessed) |
Note:
Do not use browser printing options for printing a Decision Center report, including browser print icons or menu print options.1.4 About Perspectives
Decision Center lets you work with an Inline Service from several perspectives. A perspective defines the initial layout in Decision Center. Each perspective provides a set of functionality aimed at accomplishing a specific type of task, and works with specific types of resources. Perspectives control which elements of an Inline Service are visible, and which reports associated with those elements are visible.
Decision Center has three perspectives: Explore, Design, and At a Glance. The Inline Service Navigator changes according to the perspective you are using.
Custom perspectives can be defined to further control which elements and reports are visible.
This section contains the following topics:
1.4.1 About the Explore Perspective
The Explore perspective provides a reporting view into an Inline Service. It enables a business analyst to explore the key elements of Oracle RTD Decisions.
1.4.2 About the Design Perspective
The Design perspective enables a business analyst not only to analyze an Inline Service, but also to make modifications to an Inline Service.
These modifications include:
-
Adjust and create scoring and filtering rules.
-
Adjust weighting for Performance Metrics on Decisions.
-
Add and remove segments on Decisions.
-
Modify the eligibility rules for choices and choice groups
-
Modify the filtering rules of choices and choice groups.
-
Deploy an Inline Service to a different server.
-
Redeploy an Inline Service after it has been changed.
Modifications can only be made when an Inline Service is opened for editing (in the Select Inline Service window) and with the Design perspective.
1.4.3 About the At a Glance Perspective
The At a Glance perspective provides a managerial view into an Inline Service.
The At a Glance perspective gives a high-level summary of Inline Service elements and reports contained in the Inline Service.
1.5 About the CrossSell Example
To illustrate Decision Center features and reports, this guide uses the cross selling example that is included with Oracle Real-Time Decisions. Ask your system administrator to deploy this example to help you explore Decision Center.
The CrossSell Inline Service example is a simple implementation of cross-selling and retention decisions for a financial services contact center. As calls come into the center, information about the customer and the channel of the contact is captured.
Based on what we know of this customer, a cross selling offer is selected that is extended to the customer. The success or failure of that offer is tracked and sent back to the server, so that the underlying decision model has the feedback that helps to refine its ability to make a better cross selling recommendation.
We will use the CrossSell example to explore the reports in Decision Center.
1.6 Time Window Reporting
Users can choose the time period for many of their Decision Center reports by selecting values for the Time Window and Show Incomplete Time Window parameters in the report header.
Decision Center users can report on the information learned in:
-
Any specific time window - by selecting it from the Time Window list of values
-
Only the current time window - by selecting it from the Time Window list of values and selecting Show Incomplete Time Window
-
The special case of the current time window + previous time window - by selecting the current time window from the Time Window list of values and leaving Show Incomplete Time Window unchecked
1.7 General Report Information
This section contains supplementary report information about the values that may appear in various reports.
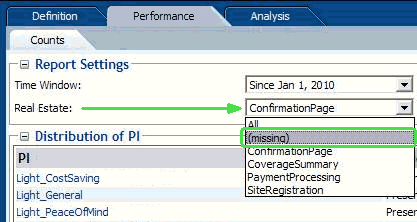
In many Decision Center reports, you can filter the results by choosing a partition attribute value in the report header, as in the following Performance Counts example.

Description of the illustration missing.gif
For these reports, a value of "(missing)" in the filtering list of values for the partitioning attribute indicates that a null value for that attribute was presented at least once.
