Workshop includes XMLBeans, an open source technology for binding XML to Java objects. XMLBeans provides multiple ways to access bound XML, but within Workshop the principal means is by generating Java types by compiling WSDL and XSD (schema) files, then binding XML to the generated types.
This topic includes information on:
Compiling Schema for Java Types to Use in Projects
Enabling Automatic Java Type Generation with the XMLBeans Builder
Turning off Automatic Schema Compilation
Generating a JAR File that Contains Java Types Generated from Schema
Guiding XMLBeans Type and Package Naming During Compilation
Supporting the Interface Extension Mechanism
Note: XMLBeans is one of the Apache open source technologies. For more information and documentation on XMLBeans, see the Apache XMLBeans web site.
Specifically, in Workshop you might find that XMLBeans are handy for the following:
If you want to use types generated by XMLBeans from schema in your project, you can do so in one of two ways: with automatic schema compilation through the XMLBeans Builder or by creating a JAR file that contains the generated types.
Important: You should not use both of these techniques with the same schemas in the same project. If you do, you will end up with two sets of essentially the same generated types on your project's classpath. If you begin with one technique, be sure to "undo" the other before switching. For example, if you've added the XMLBeans Builder facet, be sure to remove the facet (or remove the schemas from the schema source path) before generating a types JAR. Conversely, you should remove a generated types JAR from your project's classpath before adding the XMLBeans Builder facet.
When you remove the XMLBeans Builder facet, the IDE removes Java types that the builder generated.
You can have the IDE automatically generate Java types from your WSDL and XSD files by using the XMLBeans Builder. In this way, as you make changes to the WSDL or schema, updated types are generated. (This facet replaces the functionality provided by the Schemas project type in WebLogic Workshop version 8.1.)
The builder is a project facet that:
Note that you can create a JAR file from automatically generated types.
You can create a JAR file with the generated types, then put the JAR file on your project's classpath. You might prefer this option if you don't anticipate any changes to the WSDL or schema from which types are generated. By using a types JAR rather than the XMLBeans Builder, you can also avoid the overhead present when the IDE compiles schemas at build time. Note that if your WSDL or schema files change, you'll need to manually recreate the JAR file.
You get automatic schema compilation by using the XMLBeans builder, a facet you can add to your project. The XMLBeans builder is an Eclipse incremental project builder (similar to the Java builder) that can be enabled on either WTP faceted projects (via the XMLBeans Builder facet) or on plain Java projects (by selecting the Enable XMLBeans Builder check box in the XMLBeans page of the project's properties.
When you enable the XMLBeans Builder facet, the IDE creates a "schemas" directory in your project (you can rename the directory, add additional directories or specify inclusion/exclusion filters later) and adds this directory to a schema source compilation path. WSDL and XSD files you put into this directory will be automatically compiled (when your project is built) into Java types that the IDE puts on your project's classpath. You can change the schema compilation path as described in Setting the Schema Compilation Source Path. (See the note above for important information about the XMLBeans Builder.)
For WTP faceted projects (WebLogic EJB, Dynamic Web and Utility), you can add the XMLBeans Builder in one of two ways:
In either case, the user interface through which you add the facet is pretty much the same. The steps include:
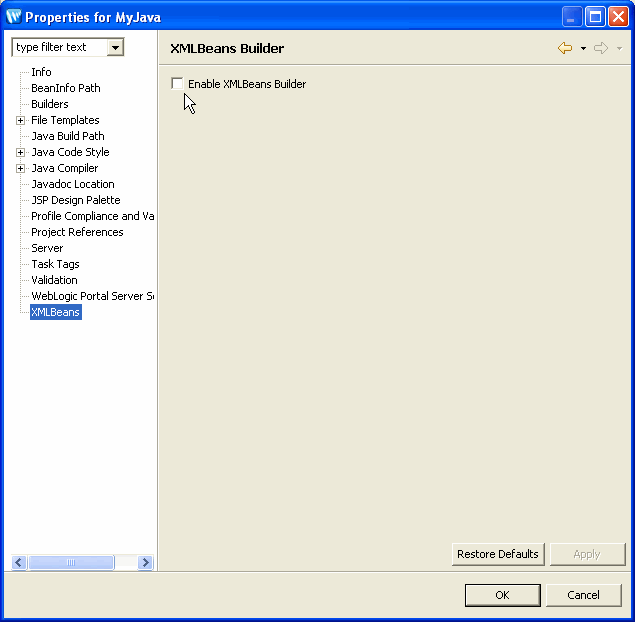
For plain Java projects, you can enable the XMLBeans builder via the XMLBeans page in the project properties dialog.
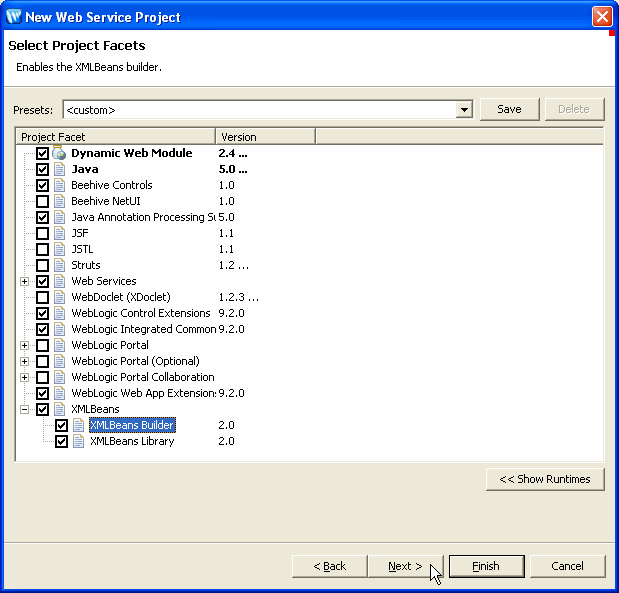
Under Select Project Facets, you select the XMLBeans Builder facet by expanding the XMLBeans node, then selecting the XMLBeans Builder check box. (The following user interface is also used when you add the facet to an existing project.)
For an introduction to project facets, see Setting Project Facets.
The options include:
XMLBeans Library (selected by default for all project types except EAR projects)
XMLBeans Builder
After you've selected the XMLBeans Builder facet, click Next.
Once you've selected the XMLBeans Builder facet and clicked Next, you'll find two tabs through which you can set properties related to Java type generation. These include user interface for setting the locations for source and binary files generated during schema compilation and for setting XMLBeans schema compilation options.
The Generated File Locations tab provides a way for you to set the locations of JAVA and CLASS files generated from your WSDL or XSD files. (XMLBeans also generates other kinds of files, including XSB files, that it uses internally.) Typically, you'll want to leave these paths unchanged. (This user interface is also used when you add the facet to an existing project as well as in project properties for XMLBeans.)
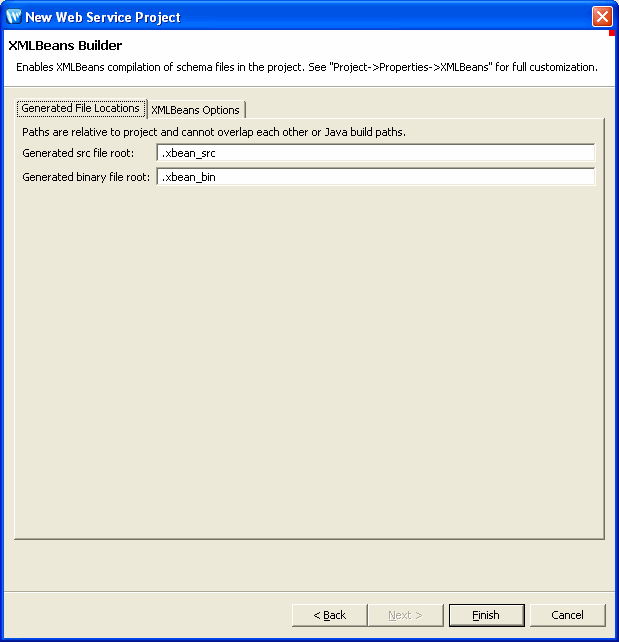
The generated src file root box contains the name of the directory that will contain Java source files generated by XMLBeans. These generated source files are compiled into the standard Java output folder for you project (such as build/classes) along with the other compiled results of your project. The default is ".xbean_src".
The generated binary file root box contains the name of the directory that will contain other files generated by XMLBeans. This directory is added to the project classpath and is exported to dependent projects. The default for the binary file root directory is ".xbean_bin".
Click the XMLBeans Options tab to set schema compilation options.
The XMLBeans Options tab provides a way for you to set options specific to schema compilation. Most of the options listed here are exposed by the open source XMLBeans schema compiler that the IDE uses, so you'll find them also documented in connection with the xmlbean Ant task at the Apache XMLBeans web site.
After you add the builder, you can change these and other settings through the project properties dialog. The XMLBeans category of project properties includes tabs for setting the generated file locations and XMLBeans options you set when adding the builder. (This user interface is also used when you add the facet to an existing project as well as in project properties for XMLBeans.)
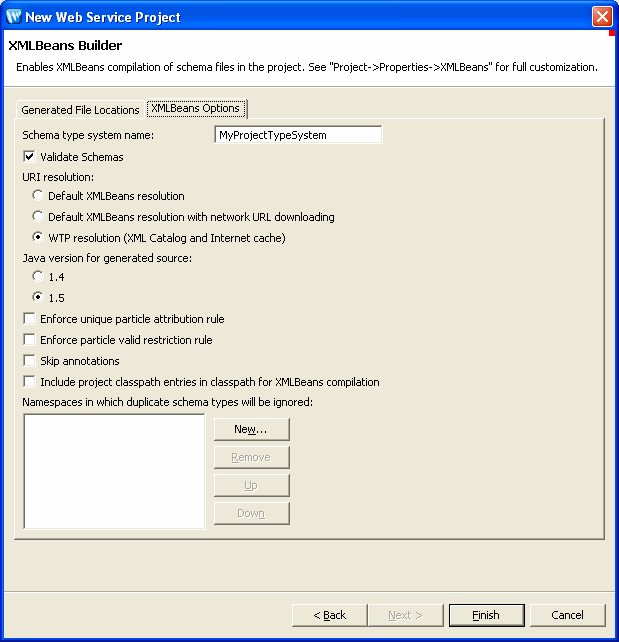
These options are described in the following table. (Note that the semantics for some of the Ant task attributes differs slightly from the options in the IDE user interface.)
|
|||||||||||||||||||||||||||||||||||||||||
When compiling WSDL and XSD files into Java types, the IDE looks at directories on the schema source path for files to compile. This path is automatically set when you add the XMLBeans Builder facet, but you can make changes to it with the Source Paths tab, as shown in the following illustration. This is similar to a source path for JAVA file compilation. In fact, you can specify that those JAVA source paths themselves be used for locating WSDL and XSD files to compile.

If you don't want automatic schema compilation, you can disable the XMLBean Builder facet. This procedure for doing so differs between WTP faceted project and Java projects.
If you want a JAR file that contains Java types generated from your schema, you can get it in one of two ways, as described below. Note that these produce slightly different results, so you should keep in mind what you'll be using the JAR file for.
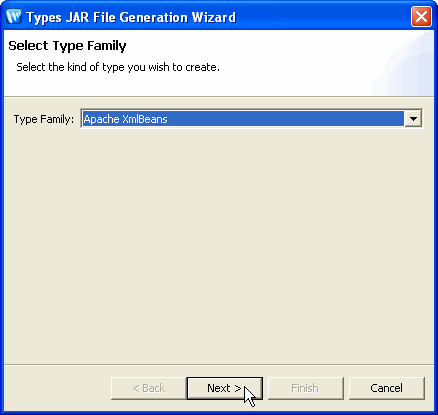
You can use an IDE menu command to generate a JAR file that contains the types when you want it. This is known as generating a types JAR. You might find this useful if you aren't using automatic compilation of Java types from schema. (Contrast this with the procedure for getting a JAR file from types that were generating through automatic schema compilation.)
Note: Be sure to see the note above for important information about types JARs.
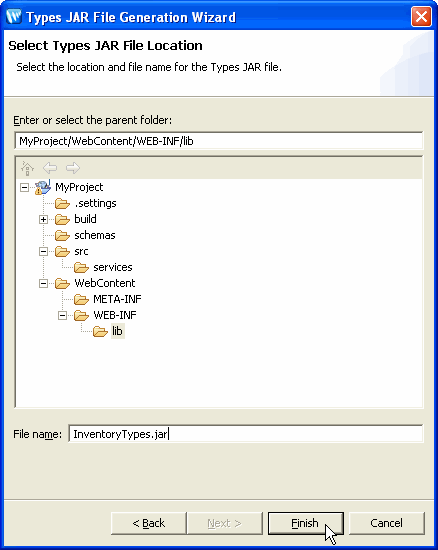
By using the following steps you can create a JAR file that includes generated Java types as well as the other XMLBeans-related artifacts you might need, including XSDCONFIG files. A JAR file created this way gets you the output of the XMLBeans Builder.
Depending on how your project is set up to compile schema, the resulting Java types might not be easily discoverable in the IDE. For example, if you use the XMLBeans Builder facet to enable automatic compilation, the generated Java types are put into the generated file locations — which, by default, aren't visible in the Package Explorer or Project Explorer views.
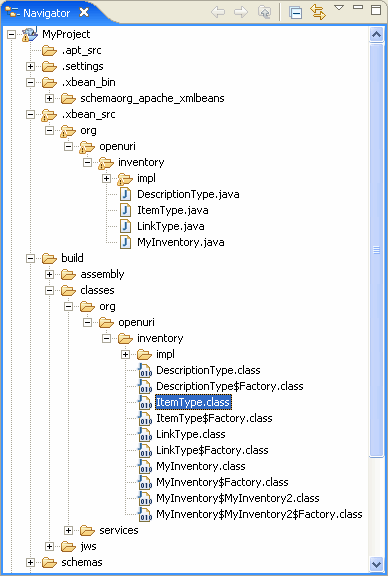
XMLBeans Builder output — Use the IDE's Navigator view to locate Java source and binary files generated during schema compilation. The following illustration shows the default generated file paths as displayed in the Navigator view. Note, too, that compiled CLASS files are put into the build/classes directory with other classes resulting from your project's code.
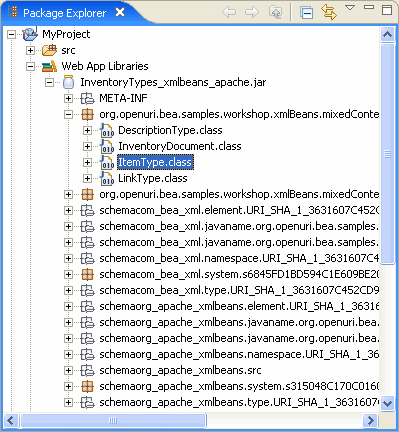
Types JAR output — Use the Package Explorer or Project Explorer views to browse the JAR's contents, just as you would with another JAR file. The following illustration shows how this might look.
When compiling a WSDL or schema into Java types, the XMLBeans builder will by default try to use your schema type names and URIs when naming generated Java types and Java packages, respectively. You can customize the names of resulting Java types and packages by using an XSDCONFIG file that maps a schema type name or namespace URI to a Java type name or package name that you specify. You put this file in the directory that holds the WSDL and XSD files you're compiling.
Coercing type naming in this way does not change the names for the underlying schema types — it merely determines the names for corresponding generated Java types. Selecting your own names for compiled types can be useful when you want to control type name length, locale, capitalization, and so on.
Note: Due to a Windows operating system limitation on file path lengths (256 characters), you might have trouble compiling schemas in which the generated types are nested in a very deep package hierarchy. This may result in an error message stating that a particular class couldn't be found. To work around this limiitation, try using your XSDCONFIG file to guide the naming of generated packages so that the hierarchy is less deep, package names are shorter, and so on.
To Guide Type Naming During Compilation
For example, you might decide that a PURCH_ORDER schema element and CUST schema type should be called PurchaseOrder and Customer as Java types.
This should be a directory that is on the schema compilation source path — by default, the "schemas" directory.
<!-- An XSDCONFIG file must have a root "config" element in the
    http://xml.apache.org/xmlbeans/2004/02/xbean/config namespace. Also, be sure
    to declare any namespaces used to qualify types in your schema (here,
    the namespace corresponding to the pol prefix). -->
<xb:config xmlns:pol="http://openuri.org/easypoLocal"
    xmlns:xb="http://xml.apache.org/xmlbeans/2004/02/xbean/config">

    <!-- Use the "namespace" element to map a namespace to the Java package
        name that should be generated. -->
    <xb:namespace uri="http://openuri.org/easypoLocal">
        <xb:package>com.myco.potracker</xb:package>
    </xb:namespace>

    <!-- Use the "qname" element to map schema type names to generated
        Java type names. In these examples, the name attribute's value is the
        XML element name; the javaname attribute's value is the Java type
        that should be generated. -->
    <xb:qname name="pol:CUST" javaname="Customer"/>
    <xb:qname name="pol:PURCH_ORDER" javaname="PurchaseOrder"/>
</xb:config>
When you build the schema project, the compiler will use the XSDCONFIG file to define names for generated Java types.
XMLBeans provides a mechanism through which interfaces generated during schema compilation will extend interfaces in your project. Likewise, generated implementation classes will implement extended interface methods via handler classes. You specify the interfaces to extend and the handler classes to use through an XSDCONFIG file. For more information on the interface extension mechanism, see the XMLBeans wiki.
If you're using the interface extension mechanism, the IDE must of course know where your interaces and handlers classes are. You can take one of the following approaches: