|
|
The WLDF Instrumentation component provides the means for uniquely identifying requests and tracking them as they flow through the system. You can configure WLDF to check for certain characteristics of every request that enters the system (such as the originating user or client address) and then attach a context to the request. The context is defined by a unique ID and by flags that represent the characteristics of the request. Context IDs are recorded in the log and can be used to:
Diagnostic context is available at both the system level and the application level, with some differences in how it is configured and used.
The process of configuring and using diagnostic context is described in the following sections:
A diagnostic context contains a unique context ID and a dye vector, which identifies characteristics of the context.
The diagnostic context for a request is created and initialized when the request enters the system; for example, when a client makes an HTTP request. The context remains attached to the request, even as the request crosses thread boundaries and Java Virtual Machine (JVM) boundaries. The diagnostic context lives for the duration of the life cycle of the request.
Every diagnostic context is identified by an ID that is unique in the domain. Because the ID travels with the request, it is possible to track given requests as they flow through the system.
Contextual information travels with a request as a 64-bit dye vector, where each bit is a flag to identify the presence of a dye. Each dye represents one attribute of a request; for example, an originating user, an originating client IP address, access protocol, and so on.
When a dye flag for a given attribute is set, it indicates that the attribute is present. When the flag is not set, it indicates the attribute is not present.
For example, consider a configuration where the dye ADDR1 is configured to indicate that a request originated from IP address 127.0.0.1. The dye flag ADDR2 is configured to indicate that a request originated from IP address 127.0.0.2. If a request from IP address 127.0.0.1 enters the system, the ADDR1 dye flag in the dye vector for the request is set. The ADDR2 dye flag remains unset.
Diagnostic and monitoring features that take advantage of the diagnostic context can examine the dye vector to determine if an attribute is present. In the example above, the administrator could configure a diagnostic monitor to trace every request that is dyed with ADDR1, that is, that originated from IP address 127.0.0.1.
The dye vector also contains a THROTTLE dye, which is used to set how often incoming requests are dyed. For more information about this special dye, see THROTTLE Dye Flag.
For a list of the available dyes and the attributes they represent, see Dyes Supported by the DyeInjection Monitor. The process of configuring dye vectors and using them is discussed throughout the rest of this chapter.
Diagnostic context is configured as part of a diagnostic module. The primary mechanism for configuring the diagnostic context is the DyeInjection monitor, which is a standard diagnostic monitor. The joinpoints where the DyeInjection monitor is woven into the code are those locations where a request can enter the system. The diagnostic action is to check every request against the DyeInjection monitor’s configuration, then create and attach a context to the request, setting dye flags as appropriate. For information about diagnostic monitor types, pointcuts (which define the joinpoints), and diagnostic actions, see Configuring Instrumentation.
This overview describes the configuration and use of context in a server-scoped diagnostic module.
DyeInjection monitor.DyeInjection monitor by assigning values to dyes, for example, USER1=username1, USER2=username2, ADDR1=ip_address1, ADDR2=ip_address2, and so forth.DyeInjection monitor examines the request to see which dye values in the dye vector match attributes of the request, if any. For example, it checks to see if the request originated with username1 or username2, and it checks to see if the request came from ip_address1 or ip_address2.DyeInjection monitor “injects” that dye into the request. This is done by setting the dye flag for that dye in the dye vector attached to the request. For example, if a request originates with username2 from ip_address1, the DyeInjection monitor sets the dye flags USER2 and ADDR1. (USER1 and ADDR2, therefore, remain unset.)USER2 and ADDR1). | Note: | All dye vectors also contain one of the implicit PROTOCOL dyes, as explained in Configuring the Dye Vector via the DyeInjection Monitor. |
((dye-mask & dye-vector) == dye-mask)--the diagnostic action for the monitor will be triggered when that request is processed. These steps are discussed in more detail in the following sections.
To create contexts for requests, you must:
To configure the DyeInjection monitor, you assign values to the dyes in the dye vector. The available dye flags are described in Table 11-1. When WLDF evaluates an incoming request to create a context for it, it checks for the presence of the values specified in the dye vector. When a value is present, WLDF sets that flag. This process is called dyeing the request or injecting a dye into the request.
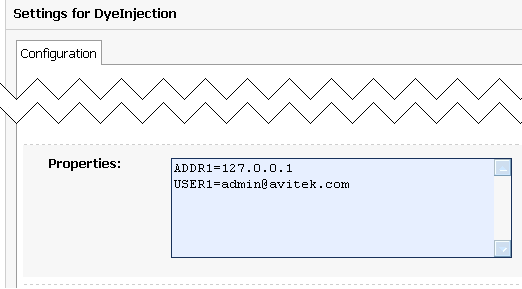
For example, to monitor all requests initiated by a user named admin@avitek from a client at IP address 127.0.0.1, assign the value admin@avitek to USER1 and assign the value 127.0.0.1 to ADDR1. Then, when user admin@avitek initiates a request from a client with IP address 127.0.0.1, that request is dyed with USER1 and ADDR1; in other words the USER1 and ADDR1 flags in the dye vector (in the context for the request) are both set.
In the Administration Console, you assign values to dyes by typing them into the Properties field of the Settings for DyeInjection page.
These settings appear in the descriptor file for the diagnostic module, as shown in the following code listing.
<wldf-resource>
  <name>MyDiagnosticModule</name>
  <instrumentation>
    <enabled>true</enabled>
    <wldf-instrumentation-monitor>
      <name>DyeInjection</name>
      <enabled>true</enabled>
      <dye-mask xsi:nil="true"></dye-mask>
      <properties>ADDR1=127.0.0.1
        USER1=admin@avitek</properties>
    </wldf-instrumentation-monitor>
  <!-- Other elements to configure instrumentation -->
  <instrumentation>
<!-- Other elements to configure this diagnostic monitor -->
<wldf-resource>
The dyes available in the dye vector are listed and explained in the following table.
Use the
ADDR1, ADDR2, ADDR3 and ADDR4 dyes to specify the IP addresses of clients that originate requests. These dye flags are set in the diagnostic context for a request if the request originated from an IP address specified by the respective property (ADDR1, ADDR2, ADDR3, ADDR4) of the DyeInjection monitor.
|
|
Use the
CONNECTOR1, CONNECTOR2, CONNECTOR3 and CONNECTOR4 dyes to identify characteristics of connector drivers.
These dye flags are set by the connector drivers to identify request properties specific to their situations. You do not configure these directly in the Administration Console or in the descriptor files. The connector drivers can assign values to these dyes (using the Connector API), so information about the connections can be carried in the diagnostic context.
|
|
DYE_0 to DYE_7 are available only for use by application developers. See Using weblogic.diagnostics.context.
|
|
The
DyeInjection monitor implicitly identifies the protocol used for a request and sets the appropriate dye(s) in the dye vector, according to the protocol(s) used.
PROTOCOL_HTTP is set in the diagnostic context of a request if the request uses HTTP or HTTPS protocol.
PROTOCOL_IIOP is set in the diagnostic context of a request if it uses Internet Inter-ORB Protocol (IIOP).
PROTOCOL_JRMP is set in the diagnostic context of a request if it uses the Java Remote Method Protocol (JRMP).
PROTOCOL_RMI is set in the diagnostic context of a request if it uses the Java Remote Method Invocation (RMI) protocol.
|
|
Use the
USER1, USER2, USER3 and USER4 dyes to specify the user names of clients that originate requests. These dye flags are set in the diagnostic context for a request if the request was originated by a user specified by the respective property (USER1, USER2, USER3, USER4) of the DyeInjection monitor.
|
You must explicitly set the values for the dye flags USERn, ADDRn, COOKIEn, and CONNECTORn. in the DyeInjection monitor. However, the flags PROTOCOL_HTTP, PROTOCOL_IIOP, ROTOCOL_JRMP, PROTOCOL_RMI, PROTOCOL_SOAP, PROTOCOL_SSL, and PROTOCOL_T3 are set implicitly by WLDF. When the DyeInjection monitor is enabled, every request is injected with the appropriate protocol dye. For example, every request that arrives via HTTP is injected with the PROTOCOL_HTTP dye.
The THROTTLE dye flag can be used to control the volume of incoming requests that are dyed. THROTTLE is configured differently from the other flags, and WLDF uses it differently. For more information, see Using Throttling to Control the Volume of Instrumentation Events.
When the DyeInjection monitor is enabled in a diagnostic module, a diagnostic context is created for every incoming request. Even if no properties are explicitly set in the DyeInjection monitor, the context for every request will contain a unique context ID and a dye vector with one of the implicit PROTOCOL dyes. If the DyeInjection monitor is not added to a diagnostic module or if it is disabled, no diagnostic contexts will be created for any incoming requests.
You can use the DyeInjection monitor as a mechanism to restrict when a delegating or custom diagnostic monitor in the diagnostic module is triggered. This process is called dye filtering.
Each monitor can have a dye mask, which specifies a selection of the dyes from the DyeInjection monitor. When dye filtering is enabled for a diagnostic monitor, the monitor’s diagnostic action is triggered only for those requests that meet the criteria set by the mask.
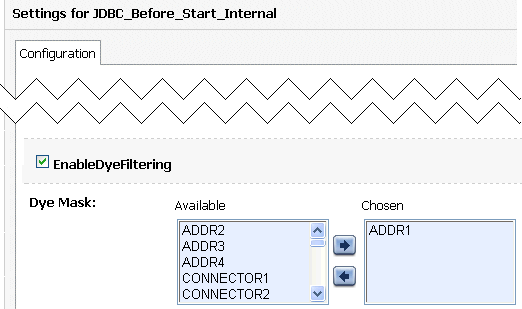
For example, consider a JDBC_Before_Start_Internal diagnostic monitor that has a TraceAction action attached to it. If dye filtering is not enabled, any request that is handled by JDBC_Before_Start_Internal will trigger a TraceAction. However, you could use a dye mask to trigger those TracActions only for requests that originated from a IP address 127.0.0.1, as explained below:
DyeInjection monitor so that ADDR1=127.0.0.1, and enable the DyeInjection monitor. For instructions, see Configuring the Dye Vector via the DyeInjection Monitor.JDBC_Before_Start_Internal diagnostic monitor. In the Administration Console, you do this in the Settings for JDBC_Before_Start_Internal page, as described below and shown in Figure 11-2. JDBC_Before_Start_Internal page. (See the Administration Console online help for complete instructions for adding and configuring the JDBC_Before_Start_Internal diagnostic monitor in a diagnostic module.)JDBC_Before_Start_Internal page, move ADDR1 from the Available list to the Chosen list.
With this configuration, the TraceAction action will be triggered for the JDBC_Before_Start_Internal diagnostic monitor only for those requests that originate from IP address 127.0.0.1.
These settings are persisted to the descriptor file for the diagnostic module as shown in the following code listing.
<wldf-resource>
  <name>MyDiagnosticModule</name>
  <instrumentation>
    <enabled>true</enabled>
    <wldf-instrumentation-monitor>
      <name>DyeInjection</name>
      <enabled>true</enabled>
      <properties>ADDR1=127.0.0.1</properties>
    </wldf-instrumentation-monitor>
    <wldf-instrumentation-monitor>
      <name>JDBC_Before_Start_Internal</name>
      <dye-mask>ADDR1</dye-mask>
      <dye-filtering-enabled>true</dye-filtering-enabled>
      <action>TraceAction</action>
    </wldf-instrumentation-monitor>
  <!-- Other elements to configure instrumentation -->
  <instrumentation>
<!-- Other elements to configure this diagnostic monitor -->
<wldf-resource>
A dye vector attached to a request can contain multiple dyes, and a dye mask attached to a delegating monitor can contain multiple dyes. For a delegating monitor’s dye mask to allow a monitor to take action on a request, all of the following must be true:
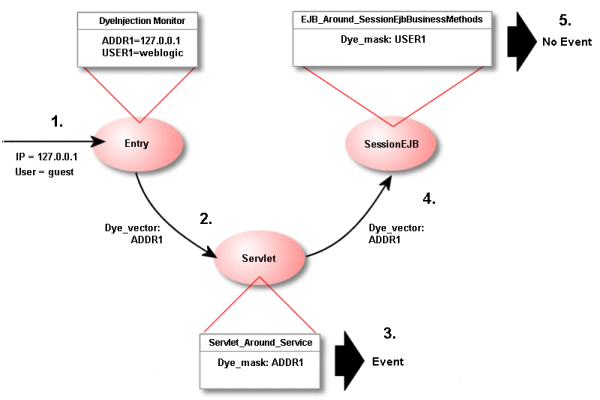
DyeInjection monitor are enabled for the diagnostic module targeted to the server. (If the DyeInjection monitor is not added or is disabled, dye filtering is disabled.)weblogic-diagnostics.xml descriptor.Figure 11-3 illustrates how dye filtering works, using a diagnostic module with three diagnostic monitors:
guest from IP address 127.0.0.1 enters the system. The user guest does not match the value for USER1 in the DyeInjection monitor, so the request is not dyed with the dye vector USER1. The originating IP address (127.0.0.1) matches the value for ADDR1 defined in the DyeInjection monitor, so the request is dyed with the dye vector ADDR1. ADDR1) enters the Servlet component, where the diagnostic monitor Servlet_Around_Service is woven into the code. (Servlet_Around_Service triggers diagnostic actions at the entry of and exit of certain servlet and JSP methods.) Dye monitoring is enabled for the monitor, and the dye mask is defined with the single value ADDR1.Servlet_Around_Service, the diagnostic monitor checks the request for dye vector ADDR1, which it finds. Therefore, the monitor triggers a diagnostic action, which generates a diagnostic event, for example, writing data to a log.SessionEJB component, where the diagnostic monitor EJB_Around_SessionEjbBusinessMethods is woven into the code. (EJB_Around_SessionEjbBusinessMethods triggers diagnostic actions at the entry and exit of all SessionBean methods) Dye monitoring is enabled for the monitor, and the dye mask is defined with the single value USER1.SessionBean method (instrumented with EJB_Around_SessionEjbBusinessMethods), the diagnostic monitor checks the request for dye vector USER1, which it does not find. Therefore, the monitor does not trigger a diagnostic action, and therefore does not generate a diagnostic event.
Throttling is used to control the number of requests that are processed by the monitors in a diagnostic module. Throttling is configured using the THROTTLE dye, which is defined in the DyeInjection monitor.
| Note: | The USERn and ADDRn dyes allow inspection of requests from specific users or IP addresses. However, they do not provide a means to look at arbitrary user transactions. The THROTTLE dye provides that functionality by allowing sampling of requests. |
Unlike other dyes in the dye vector, the THROTTLE dye is configured through two properties.
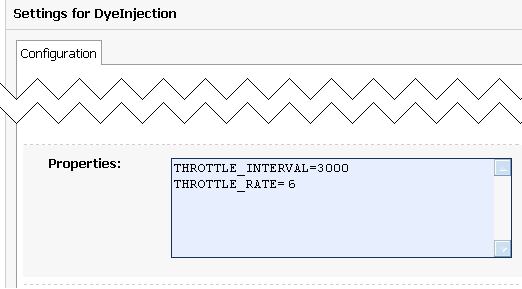
THROTTLE_INTERVAL sets an interval (in milliseconds) after which a new incoming request is dyed with the THROTTLE dye.
If the THROTTLE_INTERVAL is greater than 0, the DyeInjection monitor sets the THROTTLE dye flag in the dye vector of an incoming request if the last request dyed with THROTTLE arrived at least THROTTLE_INTERVAL before the new request. For example, if THROTTLE_INTERVAL=3000, the DyeInjection monitor waits at least 3000 milliseconds before it will dye an incoming request with THROTTLE.
THROTTLE_RATE sets the rate (in terms of the number of incoming requests) by which new incoming requests are dyed with the THROTTLE dye.
If THROTTLE_RATE is greater than 0, the DyeInjection monitor sets the THROTTLE dye flag in the dye vector of an incoming request when the number of requests since the last request dyed with THROTTLE equals THROTTLE_RATE. For example, if THROTTLE_RATE = 6, every sixth request is dyed with THROTTLE.
You can use THROTTLE_INTERVAL and THROTTLE_RATE together. If either condition is satisfied, the request is dyed with the THROTTLE dye.
If you assign a value to either THROTTLE_INTERVAL or THROTTLE_RATE (or both, or neither), you are configuring the THROTTLE dye. A THROTTLE configuration setting in the Administration Console is shown in the following figure.
Listing 11-3 shows the resulting configuration in the descriptor file for the diagnostics module.
<wldf-resource>
  <name>MyDiagnosticModule</name>
  <instrumentation>
    <wldf-instrumentation-monitor>
      <name>DyeInjection</name>
      <properties>
        THROTTLE_INTERVAL=3000
        THROTTLE_RATE=6
      </properties>
    </wldf-instrumentation-monitor>
  </instrumentation>
<!-- Other elements to configure this diagnostic monitor -->
</wldf-resource>
Listing 11-4 shows the configuration for a JDBC_Before_Start_Internal delegating monitor where the THROTTLE dye is set in the dye mask for the monitor.
<wldf-resource>
  <name>MyDiagnosticModule</name>
  <instrumentation>
    <wldf-instrumentation-monitor>
      <name>JDBC_Before_Start_Internal</name>
      <enabled>true</enabled>
      <dye-mask>THROTTLE</dye-mask>
    </wldf-instrumentation-monitor>
  </instrumentation>
<!-- Other elements to configure this diagnostic monitor -->
</wldf-resource>
Dye masks and dye filtering provide a mechanism for restricting which requests are passed to delegating and custom monitors for handling, based on properties of the requests. The presence of a property in a request is indicated by the presence of a dye, as discussed in Configuring the Dye Vector via the DyeInjection Monitor. One of those dyes can be the THROTTLE dye, so that you can filter on THROTTLE, just like any other dye.
The items in the following list explain how throttling is handled:
THROTTLE dye, but it does not have to. If THROTTLE is included in a dye mask, then THROTTLE must also be included in the request’s dye vector for the request to be passed to the monitor. However, if THROTTLE is not included in the dye mask, all qualifying requests are passed to the monitor, whether their dye vectors include THROTTLE or not.THROTTLE property is set in the DyeInjection monitor, dye filtering will not take place and throttling will not take place.THROTTLE is configured in the DyeInjection monitor, delegating monitors ignore dye masks but do check for the presence of the THROTTLE dye in all requests. Only those requests dyed with THROTTLE are passed to the delegating monitors for handling. Therefore, by setting a THROTTLE_RATE and/or THROTTLE_INTERVAL in the DyeInjection monitor, you reduce the number of requests handled by all delegating monitors. You do not have to configure dye masks for all your delegating monitors to take advantage of throttling.THROTTLE, only those requests that are dyed with THROTTLE are passed to the delegating monitor. This behavior is the same as when dye filtering is not enabled and THROTTLE is configured in the DyeInjection monitor.
The weblogic.diagnostics.context package provides applications limited access to a diagnostic context.
An application can use the weblogic.diagnostics.context.DiagnosticContextHelper APIs to perform the following functions:
DYE_0 through DYE_7 flags in a context’s dye vector. (Note that there is no way to set these flag bits via XML. You can configure DyeInjection monitor <properties> to set the non-application-specific flag bits via XML, but setDye() is the only method for setting DYE_0 through DYE_7 in a dye vector.)
A monitor, or another application, that is downstream from the point where an application has set one or more of the DYE_0 through DYE_7 flags can set a dye mask to check for those flags, and take an action when the flag(s) are present in a context’s dye vector. If a payload is attached to the diagnostics context, any action taken by that monitor will result in the payload being archived, and thus available through the accessor component.
Listing 11-5 is a short example which (implicitly) creates a diagnostic context, prints the context ID, checks the value of the DYE_0 flag, and then sets the DYE_0 flag.
package weblogic.diagnostics.examples;
import weblogic.diagnostics.context.DiagnosticContextHelper;
public class DiagnosticContextExample { public static void main(String args[]) throws Exception {
System.out.println("\nContextId=" +
DiagnosticContextHelper.getContextId());
System.out.println("isDyedWith(DYE_0)=" +
DiagnosticContextHelper.isDyedWith(DiagnosticContextHelper.DYE_0));DiagnosticContextHelper.setDye(DiagnosticContextHelper.DYE_0, true);
System.out.println("isDyedWith(DYE_0)=" +
DiagnosticContextHelper.isDyedWith(DiagnosticContextHelper.DYE_0));
}
}


|