
|
|
|
|
|
|
| | | |
The following sections describe how to use the Node Manager:
Overview of Node Manager
Node Manager is a Java program that enables you to start and kill WebLogic Managed Servers remotely from the Administration Console. Node Manager is a separate Java program that is provided with the WebLogic Server software.
Using the Node Manager to kill a remote Managed Server is an alternative to the facility for stopping Managed Servers provided in the Administration Console. Killing a remote server process is intended for situations where the server is hung or is unresponsive.
In order to enable remote starting of Managed Servers, you need to configure and run one Node Manager on each machine where your Managed Servers will be running. A single Node Manager process on a machine can handle remote starting and killing of all the Managed Servers on that machine. To ensure availability of Node Manager, Node Manager should be configured as a daemon on UNIX machines or as a Windows NT service on Windows NT machines. This ensures that the Node Manager is available for starting the Managed Servers on that machine.
When the Node Manager is running, it can start or kill any Managed Server installed and configured on its machine at the request of the Administration Server. All communication between Node Manager and the Administration Server uses the Secure Socket Layer protocol.
Node Manager Logs
When you start the WebLogic Server, various startup or error messages may be printed to STDOUT or STDERROR. These messages are also displayed in the right pane of the Administration Console during startup of a server. At other times, these files can be retrieved by right clicking on the server in the left pane of the Administration Console and selecting the option Get StdOut for this server or Get StdErr for this server.
The Node Manager saves these messages in files in the Node Manager log file directory. By default this directory is called NodeManagerLogs and is created in the directory where you start the Node Manager. If you want to change the name of the directory, this can be done from the command line when starting the Node Manager. For more information, see Command-Line Arguments.
A separate log file subdirectory is created for each Managed Server started by the Node Manager on that machine. The logs stored in this directory include:
servername.pidservername. This is used by the Node Manager to kill the server process when requested by the Administration Server to do so.configservername-output.logStdOut when an attempt is made by the Node Manager to start the Managed Server named servername. If a new attempt is made to start the server, this file is renamed by appending _PREV to the file name.servername-error.logStdErr when an attempt is made by the Node Manager to start the Managed Server named servername. If a new attempt is made to start the server, this file is renamed by appending _PREV to the file name.The Node Manager logs are also stored by the Administration Server in temporary files in a directory called /config/NodeManagerClientLogs on the Administration Server machine. There is a subdirectory for each Managed Server which you have attempted to start via the Node Manager. Each log in these subdirectories corresponds to an attempt to carry out some action, such as starting or killing the server. The name of the log file includes a timestamp that indicates the time at which the action was attempted. It is recommended that you periodically delete the accumulated client logs from past actions using the Node Manager.
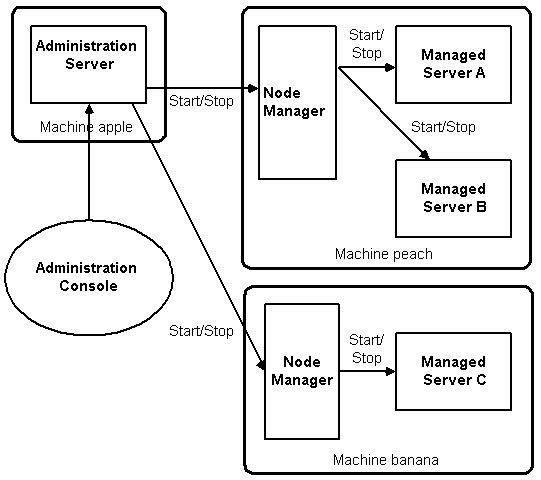
The Node Manager architecture is illustrated in Figure 3-1.
Figure 3-1 Node Manager Architecture
Setting Up Node Manager
All communication between Node Manager and the Administration Server uses the Secure Socket Layer protocol, which provides authentication and encryption. Client authentication is enforced to ensure mutual authentication is used in all communication between the Administration Server and the Node Manager. For further security, Node Manager also uses a list of trusted hosts; only commands from an Administration Server on one of these hosts will be accepted. To configure the Node Manager you will need to edit the trusted hosts file to add one line for each machine with an Administration Server that can send commands to this Node Manager. By default, the trusted hosts file is named nodemanager.hosts and is installed under the \config directory. By default this file contains two entries:
localhost
127.0.0.1
You can change the name of the file where Node Managed looks for the list of trusted hosts on the command line. For more information, see Command-Line Arguments.
You can use either the IP address or DNS name of each trusted host. However, if you use a DNS name, you will need to enable reverse DNS lookup when starting the Node Manager. To do this, you would use the following command-line argument:
-Dweblogic.nodemanager.reverseDnsEnabled=true
By default reverse DNS lookup is disabled.
In a typical production environment the Node Manager will not be running on the same machine as the Administration Server. Therefore, you will need to edit the trusted hosts file so that it lists only the machines where you will be running an Administration Server that will be starting or killing the Managed Servers on that machine. Each entry in the trusted hosts file consists of a single line that is either the DNS host name or IP address of the machine of an Administration Server machine.
Note: In order for the Node Manager to be able to communicate with the Administration Server when it starts Managed Servers, the listen address of the Administration Server must have been set to a DNS name or IP address when the Administration Server was started.
Setting Up Node Manager for Secure Socket Layer Protocol
The Node Manager uses the Secure Socket Layer (SSL) protocol in its communication with the Administration Server. To provide security in communication between the Node Manager and the Administration Server, two-way SSL authentication is used.
Authentication requires use of the public key infrastructure. This includes a private key as well as a certificate. The certificate typically contains the public key of the user and is signed by the issuer of the certificate to authenticate the binding between the user name and the enclosed public key.
Node Manager uses certificates in X509 format. The private keys used with Node Manager conform to the Private Key Cryptography Standards (PKCS) #5 and #8. PKCS #5 is an the password-based encryption standard and describes the method for encrypting private keys with a password. PKCS #8 is the private key syntax standard and specifies the characteristics of the private key.
The various pieces of the public key infrastructure used by Node Manager differ from the format used by WebLogic Server digital certificates, which conform to an earlier standard. The main differences are:
A demonstration certificate for use with Node Manager is provided with the WebLogic software. This is located at /config/demo.crt. It is recommended that you get a new certificate for a production environment.
The steps for setting up digital certificates for use with Node Manager are as follows:
Step 1: Obtain a Digital Certificate and Private Key
Use one of the following methods to obtain digital certificates for use with Node Manager:
Step 2: Converting a WebLogic-Style Private Key
If you want to use WebLogic-style certificates with Node Manager, you will first need to convert the private key to the newer PKCS #5/#8 format. A tool to do this is provided with the WebLogic software.
The tool for converting WebLogic-style certificates for use with Node Manager is called wlkeytool and is located in:
/bin directory under the root WebLogic installation directory on Windows systems
/lib directory of the root WebLogic installation directory on UNIX systems
The syntax for using wlkeytool is:
wlkeytoolold_keynew_key
You will be prompted for the private key password to unlock the old key. Press return if it has no password. You will then be prompted to enter a password to use in encrypting the new key. A password is required for use with Node Manager.
For example:
wlkeytool demokey.pem demokey_new
Step 3: Merging the Certificates into a Single Certificate File
WebLogic Server uses separate certificate files (with .pem file extension) for the private key, the public key, and the certificate authority (or a series of certifying authorities). In addition to the requirement that the private key be password-protected PKSC #5/#8 format, Node Manager combines these components of the certificate into a single certificate file (with a .crt file extension).
Note: Although the components of the user SSL identity are combined in a single file, the private key information is not transmitted between servers.
The three components are simply concatenated into a single file with a .crt extension. For example:
cat demokey_new democert.pem ca.pem > demo.crt
In this example, ca.pem is the WebLogic certificate authority file and is identical in content to the default trustedCerts file, trusted.crt, and democert.pem is the public key file. The file demokey_new is the result of running wlkeytool on demokey.pem, as described in Step 2: Converting a WebLogic-Style Private Key.
For more information about digital certificates and Secure Sockets Layer, see Managing Security.
Setting Up the Administration Server to Use Node Manager
To configure the Administration Server to use Node Manager to start and stop WebLogic Managed Servers, there are several steps you need to carry out. You can accomplish these tasks using the WebLogic Administration Console.
Step 1: Create a Configuration Entry for the Machine
You need to create an entry in the domain configuration for each machine on which you have installed Managed Servers. To do this, do the following:
Step 2: Configure Node Manager on Each Machine
For each machine where you want to use Node Manager, modify the configuration entry for that machine accordingly:
config/demo.crt. It is recommended that you get a new certificate for a production environment. See Managing Security for information on how to do this.
config/trusted.crt. The certificate authority referred to in the digital certificate you are using must be listed in this file.
Step 3: Configure Startup Information for Managed Servers
For Node Manager to start the WebLogic Managed Server, it must be provided with the startup parameters and options you want to use when starting that Managed Server. To set this up:
There are five fields here that can be filled out to provide configuration information that the Administration Server will use when starting the target Managed Server:
Note: If you don't specify values for these fields and attempt to start the target server from the Administration Console, the Node Manager will attempt to start the target server with the values for these attributes that were used when starting the Node Manager. The Node Manager will be able to start the Managed Server in that case if you specified the required values on the command line when starting the Node Manager.
You can specify the BEA Home directory. This is the root directory under which all BEA products and licenses were installed for the target Managed Server.
This is the root directory where the WebLogic software was installed.
The classpath for starting the Managed Server.
At a minimum you will need to specify the following values for the classpath option:
/weblogic/lib/weblogic_sp.jar
/weblogic/lib/weblogic.jar
You may need to also include the path to the root directory where you installed the JDK that is used when starting the Managed Server. For more information about setting the classpath, see Starting and Stopping WebLogic Servers.
In the Arguments field enter any other arguments you want passed to the startup command.
For example, you may want to set the maximum and minimum Java heap memory. Using the -ms64m and -mx64m options would specify a default allocation of 64 megabytes of Java heap memory to the WebLogic Server, for example.
Note: Do not specify server name, user name or password. Also, do not specify the address and port of the Administration Server.
The JVM's security policy file is used by default. There is also a WebLogic security policy file available, located at weblogic/lib/weblogic.policy.
Platform Support for Node Manager
The Node Manager is available for use only on Windows and UNIX platforms. Native libraries are available for running the Node Manager on Windows, Solaris, HP-UX, AIX and Red Hat Linux operating systems. For UNIX operating systems other than Solaris and HP UX, you will need to use the following argument on the java command line when starting the Node Manager:
-Dweblogic.nodemanager.nativeVersionEnabled=false
Note: If you wish to start the Node Manager on a UNIX operating system other than Solaris or HP UX, you cannot have any white space characters in any of the parameters that will be passed to the java command line in starting the Node Manager. For example, if you try to use the parameter
-Dweblogic.Name=big iron
this will not work due to the space character in the name big iron.
Starting the Node Manager from the Command Line
There are two ways to start the Node Manager. You can start the Node Manager from the java command line, or you can use Node Manager start scripts. For information about using scripts, see Starting the Node Manager Using Start Scripts. Node Manager can also be set up as a Windows service. If Node Manager is a Windows service, it will be automatically restarted whenever Windows reboots. For information on setting up Node Manager as a Windows service, see Setting Up Node Manager as a Windows Service.
Setting Up the Environment
Before starting the Node Manager, there are a number of environment variables that need to be set. One way to set the environment variables would be to run the scripts provided with the WebLogic Server software. The script is called setEnv.sh on UNIX and setEnv.cmd on Windows. This script is located in the directory install_dir/config/domain_name, where install_dir is the directory where you installed WebLogic and domain_name is the name of the domain.
Note: If you use the Node Manager start scripts (startNodeManager.cmd on Windows, startNodeManager.sh on UNIX) to start the Node Manager, you do not need to set the environment variables as these are set by the Node Manager start script. For more information, see Starting the Node Manager Using Start Scripts.
Setting the Environment Variables on Windows
Make sure that the JAVA_HOME environment variable points to the root directory where you installed the JDK that you are using for the Node Manager. For example:
set JAVA_HOME=D:\bea\jdk131
Node Manager has the same JDK version requirements as the WebLogic Server.
You also need to set the WL_HOME environment variable. For example:
set WL_HOME=D:\bea\wlserver6.1
In addition, you need to set your PATH environment variable to access the Node Manager classes and the java executable. For example:
set PATH=%WL_HOME%\bin;%JAVA_HOME%\bin;%PATH%
Setting the Environment Variables on UNIX
Assuming you have set the WL_HOME environment variable to point to the directory where you installed WebLogic, the following is an example of setting the PATH variable to point to the WebLogic and JDK software:
PATH=$WL_HOME/bin;$JAVA_HOME/jre/bin:$JAVA_HOME/bin:$PATH
In the above example it is assumed that the JAVA_HOME variable points to the root directory of the JDK installation.
You also need to set the path to the native UNIX libraries that be used by the Node Manager. The following is an example on Solaris:
LD_LIBRARY_PATH=$LD_LIBRARY_PATH:$WL_HOME/lib/solaris:$WL_HOME/lib/solaris/oci8
16_8
The following is an example on HP UX:
SHLIB_PATH=$SHLIB_PATH:$WL_HOME/lib/hpux11:$WL_HOME/lib/hpux11/oci816_8
Setting the Classpath
The classpath can be set either as an option on the java command line or as an environment variable. The following is an example (on Windows NT) of setting the classpath as an environment variable:
set CLASSPATH=.;.\lib\weblogic_sp.jar;.\lib\weblogic.jar
Starting the Node Manager
If you don't use a start script to start the Node Manager, be sure to start the Node Manager in the root installation directory where you installed the WebLogic Server software. This is the directory that contains the \config subdirectory.
The command to start the Node Manager is:
java weblogic.nodemanager.NodeManager
Command-Line Arguments
The listen address of the Node Manager needs to be set when it is started. You can specify the address on which the Node Manager will listen for requests from the Administration Server with the following parameter:
-Dweblogic.nodemanager.listenAddress=host
where host is the DNS name or IP address of the machine where the Node Manager is started.
The default port on which the Node Manager will listen for requests from the Administration Server is 5555. You can change this with the following startup parameter:
-Dweblogic.nodemanager.listenPort=port
The Node Manager creates logs for each Managed Server that it is responsible for. By default, these are subdirectories under a directory NodeManagerLogs. You can change the location of this directory with the following startup parameter:
-Dweblogic.nodemanager.savedLogsDirectory=path
The Node Manager uses Secure Socket Layer for its communication with the Administration Server. For this reason, you must specify a digital certificate when starting the Node Manager. You can specify the location of the certificate with the following startup parameter:
-Dweblogic.nodemanager.certificateFile=path_to_cert
The default certificate type used with Node Manager is RSA. If you want to specify a different certificate type (such as DSA), use the following argument on the command line:
-Dweblogic.nodemanager.certificateType=type
where type is either RSA or DSA.
To pass the private key password, used to access the encrypted private key, use the following argument on the command line:
-Dweblogic.nodemanager.certificatePassword=pkpassword
where pkpassword is the private key password.
The certificate authority, or chain of authority, used to certify the user's identity is contained in a trusted certificate authorities file. By default this is config/demo.crt. You can specify another trusted certificate authorities file by using the following argument on the command line:
-Dweblogic.nodemanager.trustedCerts=path
where path is the location of the trusted certificate authorities file.
You also need to specify the location of the BEA home directory — the root directory under which all BEA products and licenses are installed. You can specify the BEA home directory with the following command-line argument:
-Dbea.home=directory
If you used DNS host names rather than IP addresses in the trusted hosts file, then you must also include the following startup parameter:
-Dweblogic.nodemanager.reverseDnsEnabled=true
By default, reverse DNS is disabled.
You can also specify the name of the file that contains the list of trusted hosts with the following startup parameter:
-Dweblogic.nodemanager.trustedHosts=path
where path specifies the location of the trusted hosts file. By default this file is located in the /config directory.
The default location of the WebLogic security policy file is weblogic/lib/weblogic.policy. To specify a different location for this file, use the following argument on the command line:
-Djava.security.policy==policy_file
where policy_file specifies the location of the WebLogic policy file.
By default Node Manager does not do SSL host name verification. If you want to turn on host name verification, use the following argument on the command line:
-Dweblogic.nodemanager.sslHostNameVerificationEnabled=true
Classpath Option
Node Manager also requires some of the same Java classes that are used by WebLogic Server. When starting the Node Manager, the following must be included as values in the -classpath option on the java command line:
Starting the Node Manager Using Start Scripts
Sample start scripts are provided for use in starting Node Manager. These scripts are located in the /config directory where you have installed the WebLogic Server software. The start script for Windows is named startNodeManager.cmd. The start script for UNIX machines is named startNodeManager.sh.
Edit the start script for Node Manager to correctly specify the Node Manager listen address. Set the listen address by including the following argument in the startup command:
-Dweblogic.nodemanager.listenAddress=host
where host is the DNS name or IP address of the machine where the Node Manager will run.
Before invoking Node Manager the start script run setEnv script in the domain directory, or export the PATH and CLASSPATH variables in both the startNodeManager and startWebLogic scripts. Otherwise you may encounter class not found exceptions when using Node Manager.
Remote Starting and Killing of Managed Servers
If you have the Node Managers running on machines where you have Managed Servers configured, you can start the Managed Server as follows:
When you start the Managed Server, the messages that are usually printed to STDOUT or STDERROR when starting a WebLogic Server are displayed in the right pane of the Administration Console. These messages are also written to the Node Manager log file for that server.
You can stop the Managed Server in the same way:
The Kill this server... option instructs the Node Manager on the machine where the target Managed Server is running to kill the target WebLogic Server process.
Note: The Kill this server... option cannot be used to stop the Administration Server.
The Distinction Between Stopping and Killing a Managed Server
If you right click on the name of a server in the left pane of the Administration Console, one of the options is Stop this server.... This option does not use the Node Manager to stop the selected server. If you select the Stop this server... option, the Administration Server sends an administrative shutdown request to the selected server. The Node Manager is not used in that case. Unlike the Kill this server... option, the Stop this server... option can be used to shut down the Administration Server.
Because the Stop this server... option uses the administrative capability of a Managed Server to initiate a shutdown, it can only be used if the server is alive and responding to administrative requests. The Kill this server... option would be typically used in situations where the target server is hung or not responding to administrative requests from the Administration Server.
The same pop-up menu gives you access to the StdOut and StdErr output generated by the Managed Server. Select the Get StdOut for this server option to view the StdOut output or select Get StdErr for this server to view the StdErr output.
Starting and Killing Domains and Clusters
You can also start or kill all of the Managed Servers in the active domain:
If you start the entire domain from the Administration Console, the results displayed in the right pane will consist of a series of links to the results for each Managed Server that was configured for that domain.
You can also start or kill all of the Managed Servers in a selected cluster in a single action in a similar manner.
Note: You cannot start or kill the Administration Server using the Node Manager.
Setting Up Node Manager as a Windows Service
The directory install_dir/config/mydomain (where install_dir is the root directory of the WebLogic Server installation and mydomain is the default configuration directory name specified during installation) contains scripts for installing and uninstalling the WebLogic Server as a Windows service. The script installNtService.cmd is used to install WebLogic Server as a Windows service; the script uninstallNtService.cmd is used to uninstall WebLogic Server as a Windows service. You can copy and modify these scripts to install or remove Node Manager as a Windows service.
In the following procedure it is assumed that mydomain is the default configuration directory specified during installation. If you specified a different name for the default configuration directory during installation, substitute it for mydomain throughout.
To install Node Manager as a Windows Service, do the following:
installNtService.cmd from the install_dir/config/mydomain directory (install_dir is the root of the WebLogic software installation) and rename it installNMNtService.cmd.
uninstallNtService.cmd from the install_dir/config/mydomain directory (install_dir is the root of the WebLogic software installation) and rename it uninstallNMNtService.cmd.
installNMNtService.cmd to include the command line instruction you want to use to start the Node Manager and make sure that you modify the startup command to change the target startup class from weblogic.Server to weblogic.nodemanager.NodeManager. For information on command-line options, see Starting the Node Manager from the Command Line.
nodemanager.
uninstallNMNtService.cmd so that the target service name is the one you use in the installNMNtService.cmd script for starting the Node Manager as a Windows service.
c:\bea\wlserver6.1.
installNMNtService.cmd.
Removing Node Manager as a Windows Service
To uninstall Node Manager as a Windows service, invoke the script uninstallNMNtService.cmd.
|
|
|
|
|
|
|
Copyright © 2001 BEA Systems, Inc. All rights reserved.
|