|
|
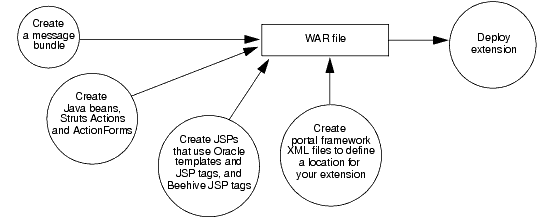
This section describes how to add a portlet that uses the Administration Console’s JSP templates, styles, and user input controls. For example, you can add portlets that render your content as one of the following:
ContentBook that summarizes the resources you have provided and that enables users to navigate to a specific resource or to invoke actions on the resource from the table. (See Figure 2-5 for an example of a WebLogic Server table.)ContentBook that enables users to monitor or configure resources that you have provided.Figure 7-1 illustrates the process. The steps in the process, and the results of each are described in Table 7-1. Subsequent sections detail each step in the process.
Oracle recommends that you define all of the text strings that your JSPs display in a message bundle. For information about creating a message bundle, see Creating a Message Bundle.
To use the bundle in your JSPs:
fmt.tld tag library:
<%@ taglib uri="http://java.sun.com/jsp/jstl/fmt" prefix="fmt" %>
<fmt:setBundle basename="bundle" var="current_bundle" scope="page"/>
where bundle is the name of your bundle.
<fmt:message key="property-name" bundle="${current_bundle}"/>
<fmt:message key="myextension.myTab.introduction" bundle="${current_bundle}"/>
WebLogic Server provides a <wl:form> JSP tag that can render a variety of HTML input controls, such as text controls, check boxes, and radio controls. You can configure a form to be read-only or to allow user input. Forms that allow user input must include buttons that enable users to post the form data for processing in the business layer.
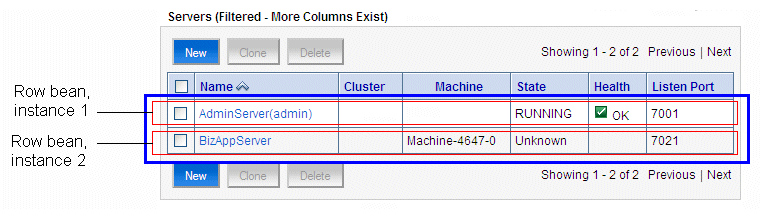
WebLogic Server provides a <wl:table> JSP tag that renders data in a tabular format. Each row in the table represents a single entity such as a WebLogic Server instance, an application, or a log message (see Figure 7-2). You can configure table columns to render hypertext links, which enable users to navigate to pages that provide more information about an item in the table. You can also create a table column that contains an HTML check box control. If a user selects a check box for a table row and clicks a submit button, your extension can invoke business logic on behalf of the entire row. For example, you can use a check box to delete an item that a row represents.
Both of these tags use Apache Struts Actions and ActionForms to pass data between the business layer and the presentation layer.
Apache Struts supports multiple techniques for instantiating and populating ActionForm beans (form beans). For example, you can code your own concrete Java bean that contains getter and setter methods for each property in the form. Or you can use the Struts DynaActionForm bean, which dynamically configures a Java bean to contain the properties that are declared in the Struts configuration file.
If you are using Oracle JSP tags to render a form in the Administration Console, you can use any technique for creating and populating form beans that Struts supports. (The example in Example: How Struts Portlets Display Content uses a DynaActionForm bean instead of coding a custom Java bean.)
Regardless of the technique that you choose, your Java bean must contain the following property:
handle, which can be of type com.bea.console.handles.Handle or a custom Handle class that you create.
The portal framework uses this property to correlate an ActionForm bean with the data source that populates the bean, such as an MBean. See Handles for ActionForms and Row Beans.
If you are using Oracle JSP tags to render a table in the Administration Console, you must create two form beans: one bean that represents the rows in the table (called a row bean) and another bean (called a table bean) that contains the collection of row beans. Each property in the row bean is rendered as a table column. For example, in Figure 7-2, each row bean instance contains a name, state, health, and listenPort property.
To create a row bean, you must create a concrete Java bean that defines each property. You cannot use the Struts DynaActionForm bean to dynamically contain the properties that are declared in the Struts configuration file.
To create a table bean, you can use any technique for creating and populating form beans that Struts supports. Regardless of the technique that you choose, your table bean must contain the following properties:
content, which must be of type java.util.Collection This is the property that you must use to contain the row beans.
handle, which can be of type com.bea.console.handles.Handle or a custom Handle class that you create.
While the portal framework requires you to declare this property for form beans and table beans, its usefulness is limited with table beans. Typically, a table bean is simply a collection of row beans; the row beans expose an underlying data source but the table bean does not. Unless you need to keep track of which Action class has populated your table bean, you do not need to set the value of this property of the table bean (but you must declare it). See Handles for ActionForms and Row Beans.
If you configure your table to include a column of check boxes, which enables you to invoke a Struts Action on the selected table row beans, your table bean must also contain the following property:
chosenContents, which can be an array of any primitive type or an array of com.bea.console.handles.Handle. For information on how to work with check boxes in a table, see Add Buttons and Checkboxes to Tables.
To uniquely identify an instance of an ActionForm bean or a row bean and to establish a correlation between the bean and its underlying data source, you can create and use a Handle object. A Handle object is a Java object that implements the com.bea.console.handles.Handle interface.
The Apache Struts controller servlet places Handle objects in HttpServletRequest objects, thus making them available to any Struts Action, Beehive Page Flow, or JSP.
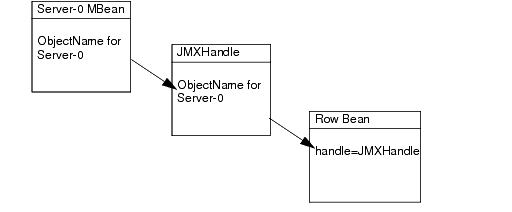
The Administration Console uses Handle objects when linking from a row in a table JSP (see Figure 7-2) to the corresponding configuration JSP. For example, for a ServerMBean instance named Server-0, the Administration Console populates row bean with data from the Server-0 MBean. The Administration Console passes the JMX object name for Server-0 to a new a Handle object (of type com.bea.console.handles.JMXHandle) and sets the Handle object as the value of the row bean’s handle property (see Figure 7-3). When a user clicks a link in the table JSP, the Struts controller looks in the row bean’s handle property, uses the handle value to determine which server instance has been selected, and displays the configuration page for the selected server.
If the underlying data source for your ActionForm beans or row beans is an MBean, you can use the com.bea.console.handles.JMXHandle object. See
JMXHandle in the Administration Console API Reference.
If the underlying data source for your beans is not an MBean, you can create your own Java class that implements the com.bea.console.handles.Handle interface. See
Handle in the Administration Console API Reference.
To render HTML forms and tables and populate them with data, the Administration Console uses JSP tags that load data from Java beans. Most of these beans contain data that a Struts Action has loaded from a WebLogic Server MBean. To submit user input, the JSP tags forward to Struts Actions, and most of these Actions update data in a WebLogic Server MBean.
If you use Administration Console JSP tags, you must create your own Struts ActionForms and Actions.
The following sections describe creating Java beans, Struts Actions, and ActionForms to use with forms and tables:
For information on Apache Struts, see The Apache Struts Web Application Framework at http://struts.apache.org/.
To create Struts artifacts that pass data between the business layer and a JSP in the presentation layer:
org.apache.struts.action.Action class that populates a Java bean (form bean) with data from your business layer.
If your form allows user input, create another Action class to process the data that users post from the form.
See Create Struts Action Classes for Handling Form Data.
Action classes will populate and use.
If your form allows user input, you can use the same form bean to populate the form and to return user input to your Action class that processes data.
Action mapping that the Struts controller uses to instantiate your form bean and invoke your Action class that populates the form.
If your form allows user input, create another Action mapping that the Struts controller uses when users submit the form.
To create Struts Action classes that handle form data:
org.apache.struts.action.Action class that populates the form bean. (See Listing 7-1.)
The Struts controller passes an empty ActionForm bean to your Action class. To populate the bean, implement the following method:Action.execute(ActionMapping actionMapping,
ActionForm actionForm,
HttpServletRequest httpServletRequest,
HttpServletResponse httpServletResponse)
ActionForm bean as a DynaActionForm bean.DynaActionForm.set() method for each property that you defined in the <form-bean> element, except for the handle property.
For example, if you defined two properties named name and totalRx:
DynaActionForm form = (DynaActionForm) actionForm;
form.set("name",namefromMBean);
form.set("totalRx",totalRxfromMBean);
handle property. (See Handles for ActionForms and Row Beans.)
For example, if your underlying data source is an MBean, use JMXHandle and set the the handle property to the MBean’s ObjectName:
ObjectName anMBean = newcom.bea.medrec:Type=com.bea.medrec.controller.
ObjectName("
RecordSessionEJBMBean,Name=MedRecEAR");
form.setHandle(new JMXHandle(anMBean));
DynaActionForm bean into the request object that was also passed to the class:
httpServletRequest.setAttribute("form-bean-name", form);
where form-bean-name matches the name that you configure for the form bean in the Struts configuration file (see Configure Struts ActionForms and Action Mappings).
ActionMapping.findForward() method for the ActionMapping object that was passed to the Action class:return actionMapping.findForward("success"); Action class that processes the form data.
When a user posts data from the form (by clicking an HTML button), the Struts controller passes a populated ActionForm bean to your Action class. To process the data, implement the following method:Action.execute(ActionMapping actionMapping,
ActionForm actionForm,
HttpServletRequest httpServletRequest,
HttpServletResponse httpServletResponse)
ActionForm bean that was passed in the request as a DynaActionForm bean. DynaActionForm.get() method for each property that you want to process.
For example, if you want to process the properties named name, totalRx, and handle:
DynaActionForm form = (DynaActionForm) actionForm;
String nameValue = (String) form.get(namefromMBean);
Integer totalValue = (Integer) form.get(totalRxfromMBean);
JMXHandle handle = (JMXHandle) form.get(handle);
For example, if the name and totalRx properties represent attributes in a MBean and you want to change the values of the MBean attributes, use the handle property to get the JMX object name of the MBean instance, and then use JMX APIs to set the MBean attributes to the values that were posted from the form:
ObjectName oName = handle.getObjectName();
MBeanServer.setAttribute(oName, new Attribute(("Name", nameValue));
MBeanServer.setAttribute(oName, new Attribute(("TotalRx", totalValue));
ActionMapping.findForward() method for the ActionMapping object that was passed to the Action class:return actionMapping.findForward("success"); root-dir/WEB-INF/classes directory.
Listing 7-1 is an example org.apache.struts.action.Action class that accesses a custom MBean and uses it to populate a form bean.
import javax.management.MBeanServer;
import javax.management.ObjectName;
import javax.management.MalformedObjectNameException;
import javax.naming.InitialContext;
import javax.servlet.http.HttpServletRequest;
import javax.servlet.http.HttpServletResponse;
import org.apache.struts.action.DynaActionForm;
import org.apache.struts.action.Action;
import org.apache.struts.action.ActionForm;
import org.apache.struts.action.ActionForward;
import org.apache.struts.action.ActionMapping;
public class MedRecMBeanFormAction extends Action {
   public ActionForward execute(ActionMapping actionMapping,
                                 ActionForm actionForm,
                                 HttpServletRequest httpServletRequest,
                                 HttpServletResponse httpServletResponse)
      throws Exception {
      try {
         // Establish a local connection to the Runtime MBean Server
         InitialContext ctx = new InitialContext();
         MBeanServer server =
            (MBeanServer) ctx.lookup("java:comp/env/jmx/runtime");
         // Create an ObjectName that corresponds to a custom MBean that
         // has been registered in the Runtime MBean Server
         ObjectName anMBean = new ObjectName(
            "com.bea.medrec:Type=com.bea.medrec.controller.
              RecordSessionEJBMBean,Name=MedRecEAR");
         //Get the value of the custom MBean’s “Name” attribute
         String namefromMBean = (String)server.getAttribute
            (anMBean, "Name");
        // Get the value of the custom MBean’s “TotalRx” attribute
         Integer totalRxfromMBean = (Integer) server.getAttribute
            (anMBean, "TotalRx");
// Populate the form bean
DynaActionForm form = (DynaActionForm) actionForm;
form.set("name",namefromMBean);
form.set("totalRx",totalRxfromMBean);form.set("handle",(new JMXHandle(anMBean)));
        // Set the form bean in request. The name of the
        // form bean must match the “form-bean” name in your
        // Struts configuration file
        httpServletRequest.setAttribute("medrecMBeanEJBForm", form);
      } catch (Exception ex) {
          ex.printStackTrace();
      }
      return actionMapping.findForward("success");
   }
}
To create a Struts configuration file that declares your ActionForms and Action mappings:
If you have not already created a configuration file, create a text file in root-dir/WEB-INF (see Create a Directory Tree for the Extension). Name the file struts-auto-config-module.xml
where module is a name that you have chosen for your Struts module. Consider using the name of your company to avoid possible naming conflicts. You must create your own Struts module; the default Struts module is reserved for Oracle Actions and ActionForms. For information about Struts modules, see the Apache Struts User Guide at
http://struts.apache.org/struts-doc-1.2.x/userGuide/index.html.
DynaActionForm bean. Your Action class will refer to this bean name when it populates the bean and returns it to the Struts controller.
Use a name that reflects the name of the Struts Action that you will use to populate the bean instance.
Action mapping that Struts will use to populate the form bean, serialize the bean, put it into an HTTP request, and forward the request to a JSP, replace the following values in Listing 7-2:Action mapping. Your .portlet file will refer to this Action name.<action> element that specifies a custom class that you will create to process the form data.
For form-bean-name of this second <action> element, you can use the same form bean that initially populated the form. If you want to post only a subset of the data for processing, instead of using the same form bean you can configure another one that defines only the properties that you want to process.
Upon success, this additional <action> element can forward to the Action mapping that you configured in the previous step. This reloads the JSP with the updated data.
<?xml version="1.0" encoding="ISO-8859-1" ?>
<!DOCTYPE struts-config PUBLIC
   "-//Apache Software Foundation//DTD Struts Configuration 1.1//EN"
   "struts-config_1_1.dtd">
<struts-config>
   <form-beans>
      <form-bean name="form-bean-name"
        type="org.apache.struts.action.DynaActionForm">
        <form-property name="handle" type="com.bea.console.handles.Handle"/>
         <!-- insert additional “form-property” elements here -->
      </form-bean>
   </form-beans>
   <action-mappings>
      <action path="/action-name"
         type="custom-Action-class"
         name="form-bean-name"
         scope="request"
         validate="false">
         <forward name="success" contextRelative="true"
            path="/ext_jsp/form-jsp.jsp"/>
      </action>
      <!-- insert additional “action” elements here -->
   </action-mappings>
   <message-resources parameter="global"/>
   <message-resources parameter="validationmessages" key="VALIDATIONMESSAGES"/>
   <message-resources parameter="genresources" key="GENRESOURCES"/>
   <message-resources parameter="global" key="GLOBAL"/>
</struts-config>
To create a Java row bean, Struts Action, and ActionForm for a JSP that uses the WebLogic Server <wl:table> JSP tag:
Compile your Java bean and save it in a package structure that begins in the root-dir/WEB-INF/classes directory.
If you have not already created a configuration file, create a text file in root-dir/WEB-INF (see Create a Directory Tree for the Extension). Name the file struts-auto-config-module.xml
where module is a name that you have chosen for your Struts module. Consider using the name of your company to avoid possible naming conflicts. You must create your own Struts module; the default Struts module is reserved for Oracle Actions and ActionForms. For information about Struts modules, see the Apache Struts User Guide at
http://struts.apache.org/userGuide/index.html.
form-bean-name, a unique name that you assign to this instance of a DynaActionForm bean. Your Action class will refer to this bean name when it populates the bean and returns it to the Struts controller.
Use a name that reflects the name of the Struts Action that you will use to populate the bean instance.
<form-property name="contents" type="java.util.Collection"/>
This property will contain the collection of row beans that your Action class instantiates and populates.
Action mapping that Struts will use to populate the row beans and the table bean, serialize the beans, put them into an HTTP request, and forward the request to a JSP, replace the following values in Listing 7-2:Action mapping. Your .portlet file will refer to this Action name.org.apache.struts.action.Action class that populates the row beans and table bean. (See Listing 7-3.)
To populate the beans, implement the following method:Action.execute(ActionMapping actionMapping,
ActionForm actionForm,
HttpServletRequest httpServletRequest,
HttpServletResponse httpServletResponse)
ArrayList.ActionForm bean (table bean) as a DynaActionForm bean.content property to contain the ArrayList of row beans:
DynaActionForm table = (DynaActionForm) actionForm;
table.set("contents",rowBeanArray);
httpServletRequest.setAttribute("table-bean-name", table);
where table-bean-name is the name that you configured for the table bean in the Struts configuration file (see Listing 7-2).
ActionMapping.findForward() method for the ActionMapping object that was passed to the Action class:return actionMapping.findForward("success"); Action class and save it in a package structure that begins in the root-dir/WEB-INF/classes directory.import java.util.ArrayList;
import java.util.Collection;
import java.util.Iterator;
import java.util.Set;
import javax.management.MBeanServer;
import javax.management.ObjectName;
import javax.management.MalformedObjectNameException;
import javax.naming.InitialContext;
import javax.servlet.http.HttpServletRequest;
import javax.servlet.http.HttpServletResponse;
import org.apache.struts.action.DynaActionForm;
import org.apache.struts.action.Action;
import org.apache.struts.action.ActionForm;
import org.apache.struts.action.ActionForward;
import org.apache.struts.action.ActionMapping;
public class RetrieveCustomMBeansAction extends Action {
   public ActionForward execute(ActionMapping actionMapping,
                                 ActionForm actionForm,
                                 HttpServletRequest httpServletRequest,
                                 HttpServletResponse httpServletResponse)
      throws Exception {
      try {
         // Establish a local connection to the Runtime MBean Server
         InitialContext ctx = new InitialContext();
         MBeanServer server =
            (MBeanServer) ctx.lookup("java:comp/env/jmx/runtime");
         // Create a name pattern for all MedRec EJB MBeans
         ObjectName namepattern = new
              ObjectName("com.bea.medrec:Type=com.bea.medrec.controller.
               RecordSessionEJBMBean,*");
         // Get all MedRec EJB MBeans for all applications
         Set objects = server.queryNames(namepattern, null);
         // Walk through each of these MBeans and get the object name
         // and the value of its TotalRX attribute
         Iterator i = objects.iterator();
         while (i.hasNext()) {
            ObjectName anMBean = (ObjectName) i.next();
            String identifier = anMBean.toString();
            Integer totalRxfromMBean =
               (Integer) server.getAttribute(anMBean, "TotalRx");
            // Instantiate a row bean.
            MedRecMBeanTableBean row = new MedRecMBeanTableBean(anMBean);
               // Set the properties of the row bean
               row.setCanonicalName(anMBean.getCanonicalName());
               row.setTotalRxinTableBean(totalRxfromMBean);
               // Add each row bean to an ArrayList
               result.add(row);
         }
      } catch (Exception ex) {
            ex.printStackTrace();
      }
// Instantiate the table bean
DynaActionForm form = (DynaActionForm) actionForm;
// Set the array of row beans as the value of the table bean’s “contents”
// property
form.set("contents",result);
      // Set the table bean in request. The name of the
      // table bean must match the “form-bean” name in your
      // Struts configuration file
      httpServletRequest.setAttribute("genericTableForm", form);
      return actionMapping.findForward("success");
   }
}
Most portlets in the Administration Console JSPs that are based on the tableBaseLayout_netui and configBaseLayout_netui templates.
The following sections describe how to create JSPs that use these templates:
Table 7-2 describes the JSP templates that you can use for your Administration Console extensions. All of the templates are located in the /layouts directory, which is relative to the WEB-INF directory of the Administration Console. WebLogic Server does not publish the templates themselves, but Using Oracle Templates and JSP Tags describes how to use them.
If these templates do not meet your needs, you can create your own templates and structure the content directly in your JSP.
The Administration Console uses this template for all of its JSPs that render a single table (see Figure 2-5).
|
|
You can use this template to render an introductory description, an HTML form, and Save button that posts the form data for processing by your custom Java classes.
This template does not check for user permissions or require users to click the Lock & Edit button in the Change Center portlet.
|
|
The Administration Console uses this template for all of its JSPs that render an introductory description, an HTML form, and Save and Cancel buttons (see Figure 2-4).
The template output depends on whether the user has privileges to modify the domain’s configuration.
If a user has permission, the template outputs an HTML table with four rows. The first and last rows display Save and Cancel buttons along with a message indicating whether the user has a lock on the configuration and can make changes. If a user does not have permission, the table does not contain these rows.
|
Before you create a form JSP, create Struts artifacts that pass data between the business layer and the JSP. See Create Struts Artifacts for a Form JSP: Main Steps.
To create a form JSP (see Listing 7-4):
root-dir/jsp root-dir is your development directory. For more information, see Setting Up a Development Environment.<%@ taglib uri="/WEB-INF/console-html.tld" prefix="wl-extension" %>
<%@ taglib uri="http://struts.apache.org/tags-html" prefix="html" %>
<%@ taglib uri="http://java.sun.com/jsp/jstl/fmt" prefix="fmt" %>
<%@ taglib uri="http://beehive.apache.org/netui/tags-template-1.0" prefix="beehive-template" %> For information about these tag libraries, see JSP Tag Libraries.
<fmt:message> tags to display localized text, use <fmt:setBundle/> to specify the name of the message bundle.
This <fmt:setBundle/> tag enables you to specify the bundle name once, and then refer to this value from <fmt:message> tags by variable.
<beehive-template:template templatePage="/layouts/configBaseLayoutNoTransact.jsp">
Do not close the tag yet. All other JSP tags in a form JSP are nested in this template tag.
| Note: | If your form modifies attributes of WebLogic Server MBeans, use the configBaseLayout_netui.jsp template instead. See JSP Tag Libraries. |
<beehive-template:section name="configAreaIntroduction"> tag. Inside this tag, provide an introductory sentence or paragraph that describes the form. This description is rendered above the form.<beehive-template:section name="form"> <wl-extension:template
name="/WEB-INF/templates/form.xml"> tag.This template creates a form that matches Administration Console configuration pages (such as Domains: Configuration: General).
The template also generates a button that submits the form.
<wl-extension:form> and specify values for the following attributes:action, (optional) if your form accepts user input, specify the path of a Struts Action that is invoked when a user submits this form. The Struts module that defines the Action path is specified in the request.bundle, (optional) specify the name of a message bundle that contains localized names of your column headings.readOnly, (optional) specify “true” to make this form read-only (for example, if you are displaying read-only monitoring data).<wl-extension> tag corresponding to the type of control that you want to render (see
WebLogic Server JSP Tags Reference):<wl-extension:checkbox> <wl-extension:chooser-tag> <wl-extension:hidden> <wl-extension:password> <wl-extension:radio> <wl-extension:select> <wl-extension:text> <wl-extension:text-area>
Alternatively, you can use <wl-extension:reflecting-fields>, which generates an HTML input tag for each property in a form bean. For example, for a bean property that contains a java.lang.String, the tag generates a text control; for a boolean, it generates a checkbox. This tag uses the default form bean, which is passed to the JSP in the request.
singlechange="false" attribute in the <wl-extension> tags described in the previous step. This attribute enables users to post form data without starting a WebLogic Server edit session.
inlineHelpId attribute in each <wl-extension> tag in the previous step. <wl-extension:form>, <beehive-template:section>, and <beehive-template:template> tags.<%@ page language="java" %><%@ taglib uri="/WEB-INF/console-html.tld" prefix="wl-extension" %>
<%@ taglib uri="http://struts.apache.org/tags-html" prefix="html" %>
<%@ taglib uri="http://java.sun.com/jsp/jstl/fmt" prefix="fmt" %>
<%@ taglib uri="http://beehive.apache.org/netui/tags-template-1.0" prefix="beehive-template" %>
<fmt:setBundle basename="mycompany" var="current_bundle" scope="page"/>
<beehive-template:template templatePage="/layouts/configBaseLayoutNoTransact.jsp">
<beehive-template:section name="configAreaIntroduction">
<fmt:message key="mycompany.myresource.introduction"
bundle="${current_bundle}"/>
</beehive-template:section>
<beehive-template:section name="form">
<html:xhtml/>
<wl-extension:template name="/WEB-INF/templates/form.xml">
<wl-extension:form action="/MyCompanyMyResourceUpdated" bundle="core">
<wl-extension:text property="MyResourceName"
labelId="mycompany.myresource.name.label"
inlineHelpId="mycompany.myresource.name.label.inlinehelp"
singlechange="false"/>
<wl-extension:select
property="MyResourceWidgets"
labelId="mycompany.myresource.widgets.label"
inlineHelpId="mycompany.myresource.widgets.label.inlinehelp"
singlechange="false">
<wl-extension:optionsCollection
property="MyResourceAvailableWidgets"
label="label" value="value"/>
</wl-extension:select>
</wl-extension:form>
</wl-extension:template>
</beehive-template:section>
</beehive-template:template>
Before you create a table JSP, create Struts artifacts that pass data between the business layer and the JSP. See Create Struts Artifacts for a Table JSP.
To create a table JSP for monitoring resources (see Listing 7-5):
root-dir/ext_jsp, where root-dir is your development directory. | Note: | The directory named root-dir/jsp is reserved. The root directory of your extension must not contain a directory named jsp. |
For more information, see Setting Up a Development Environment.
<%@ taglib uri="/WEB-INF/console-html.tld" prefix="wl-extension" %>
<%@ taglib uri="http://struts.apache.org/tags-html" prefix="html" %>
<%@ taglib uri="http://java.sun.com/jsp/jstl/fmt" prefix="fmt" %>
<%@ taglib uri="http://beehive.apache.org/netui/tags-template-1.0" prefix="beehive-template" %>
For information about these tag libraries, see JSP Tag Libraries.
<fmt:message> tags to display localized text, use <fmt:setBundle/> to specify the name of the message bundle.
This <fmt:setBundle/> tag enables you to specify the bundle name once, and then refer to this value from <fmt:message> tags by variable.
<beehive-template:template
   templatePage="/layouts/tableBaseLayout_netui.jsp">
Do not close the tag yet. All other JSP tags in a table JSP are nested in this template tag.
<beehive-template:section name="configAreaIntroduction"> tag. Inside this tag, provide an introductory sentence or paragraph that describes the table. This description is rendered above the table.<beehive-template:section name="table"> <wl-extensions:table> tag and specify values for the following minimal attributes:name, specify the name of the form bean that you configured for this table.property, specify the name of the form-bean property that contains row beans.bundle, (optional) specify the name of a message bundle that contains localized names of your column headings.captionEnabled, (optional) specify “true” to generate a title above the table.captionEnabled attribute, create a <wl-extension:caption> tag. Inside this tag, provide a caption for the table.<wl-extension:column> tag and specify values for the following attributes:<wl-extension:table>, <beehive-template:section>, and <beehive-template:template> tags.<%@ page language="java" %><%@ taglib uri="/WEB-INF/console-html.tld" prefix="wl-extension" %>
<%@ taglib uri="http://struts.apache.org/tags-html" prefix="html" %>
<%@ taglib uri="http://java.sun.com/jsp/jstl/fmt" prefix="fmt" %>
<%@ taglib uri="http://beehive.apache.org/netui/tags-template-1.0" prefix="beehive-template" %>
<fmt:setBundle basename="core" var="current_bundle" scope="page"/>
<beehive-template:template templatePage="/layouts/tableBaseLayout_netui.jsp">
   <beehive-template:section name="configAreaIntroduction">
      <fmt:message key="core.server.servertable.introduction"
            bundle="${current_bundle}"/>
   </beehive-template:section>
   <beehive-template:section name="table">
      <wl-extension:table name="extensionForm"
             property="contents"
             captionEnabled="true"
            bundle="core">
         <wl-extension:caption>
            <fmt:message key="server.table.caption"
                 bundle="${current_bundle}"/>
         </wl-extension:caption>
         <wl-extension:column property="name"
            label="server.table.label.name"/>
         <wl-extension:column property="clusterName"
            label="server.table.label.cluster"/>
         <wl-extension:column property="machineName"
            label="server.table.label.machine"/>
      </wl-extension:table>
</beehive-template:section>
</beehive-template:template>
Your table JSP can provide a link from each row to a configuration page or some other related page. The linking mechanism uses a Handle object to determine which pages are related to a specific table row (see Handles for ActionForms and Row Beans).
You can use any of the following JSP tags to link from a table:
<wl:column-link>, which requires you to specify the label of the page and portlet instance to which you want to link. The handle causes the portlet to display data related to the specific row that you selected.<wl:column-dispatch>, which uses metadata to determine the page and portlet to display. Instead of specifying the page and portlet label, you add a metadata tag to the page declaration and then specify the metadata value in the <wl:column-dispatch> tag. Using metadata enables you to change page labels without breaking links. The handle is still used to cause the portlet in the page to display data related to the specific row that you selected.The following sections describe how to create a table column for navigating:
To create and populate a handle property:
handle whose data type is com.bea.console.handles.Handle:
public com.bea.console.handles.Handle getHandle() {
   return handle;
}
public void setHandle(Handle handle) {
   this.handle = handle;
}
Action class that populates the row bean, set the value of the handle property.
If you populate your row bean from data in an MBean, create a com.bea.console.handles.JMXHandle object that contains the JMX ObjectName of the MBean. Then set the JMXHandle object as the value of the handle property:
javax.management.ObjectName anMBean = newcom.bea.medrec:Type=com.bea.medrec.controller.
ObjectName("
RecordSessionEJBMBean,Name=MedRecEAR");
row.setHandle(new JMXHandle(anMBean));
If your populate your row bean from some other type of data source, you can create a JMXHandle object by passing a String to the constructor instead of an ObjectName. The String must contain the following character sequence: Type=identifier, where identifier is something that is meaningful to you:
row.setHandle(new JMXHandle(“Type=myDataSource”));
You can also create and set a custom Handle object. See
Handle in the Administration Console API Reference.
Action class.
To use the <wl:column-link> tag:
render tag library into your table JSP:
<%@ taglib uri="render.tld" prefix="render" %>
Oracle provides this tag library in its runtime environment.
<wl:table> tag, add the following attribute:heckBoxValue="handle" <wl:column> tag that renders the column from which you want to link, nest the <wl:column-link> JSP tag:
<wl:column-link portlet="portlet-instanceLabel">page-definitionLabel
<render:pageUrl pageLabel=""/>
</wl:column-link>
The label is defined in the instanceLabel attribute of the <netuix:portletInstance> element, which is in the .book file for the page that contains the portlet.
The label is defined in the definitionLabel attribute of the <netuix:page> element, which is in the page’s .book file.
For example:<wl:column property="Name"
label="medrecMBean.name.label">
<wl:column-link portlet="medrecMonitorTabPortlet">
<render:pageUrl pageLabel="medrecMonitor"/>
   </wl:column-link>
</wl:column>
| Note: | The <render:pageUrl/> tag is a convenience tag for generating a portal framework URL. |
To use the <wl:column-dispatch> tag:
.book file that defines the page to which you want to link, find the page’s <netuix:page> element and nest the following element:
<netuix:meta name="perspective-name" content="ObjectType-value"/>
perspective attribute of the <wl:column-dispatch> tag. For example, specify myCompany-configuration-page.ObjectType property in the row bean’s Handle object. See
Handle.getObjectType() in the Administration Console API Reference.
For example, assume that you populate your row bean from data in an MBean. You use the MBean’s ObjectName to construct a JMXHandle object and then set the object as the value of the row bean’s handle property. If the MBean’s ObjectName is "com.mycompany:Name=myApp1,Type=myAppMBean", then the value of JMXHandle.ObjectType is myAppMBean.
For example:<netuix:meta name="myCompany-configuration-page" content="myAppMBean"/>
<wl:table> tag, add the following attribute:heckBoxValue="handle" <wl:column> tag that renders the column from which you want to link, nest the <wl:column-dispatch> JSP tag:
In a table that you create using the <wl:table> tag, you can use buttons by themselves or in conjunction with a column of checkboxes or radio buttons.
When used by themselves, buttons can forward to page UI control. For example, in the WebLogic Server Servers table (see Figure 7-2), users click on a New button to launch the Create a Server assistant.
When used in conjunction with a checkbox, buttons can process data on behalf of one or more table rows. For example, if each row in your table represents an instance of a custom MBean that provides monitoring data for your application, you can enable users to select a checkbox for one or more rows and click a button that resets the values in the corresponding MBean instances.
The following sections describe adding checkboxes and buttons to tables:
<wl-extension:table> tag:
singlechange=”false”
controlsenabled=”true”
The controlsenabled attribute enables the table to display buttons. The singlechange attribute enables users to click the button without having to lock the domain’s configuration. (See
WebLogic Server JSP Tags Reference.)
<wl-extension:table> opening tag, add the following tags:
<wl:button-bar>button-label
<wl:button-bar-button labelid=""page-definitionLabel
pageLabel=""/>
</wl:button-bar>
<fmt:setBundle> element.
The label is defined in the definitionLabel attribute of the <netuix:page> element, which is in the page’s .book file.
For example, to link to the Servers table page:
<wl:button-bar>
<wl:button-bar-button
labelid="Servers"
pageLabel="ServerTableBook" />
</wl:button-bar>
To process data on behalf of one or more table rows, use checkboxes and a button to post the data to an HTTP request. You must also create a Struts Action or Page Flow that can retrieve and process the posted data:
chosenContents to the definition of the table’s ActionForm bean.
The data type for this property must be either an array of primitive types or of com.bea.console.handles.Handle.
The <wls:table> tag adds one element to this array for each checkbox that is selected when the user submits the table.
For example:<form-property name="chosenContents"
type="[Lcom.bea.console.handles.Handle;"/>
<wl-extension:table> tag:
singlechange=”false”property-name
controlsenabled=”true”
showcheckboxes="true"
checkBoxValue=""
where property-name is the name of a property in the row bean. The data type of this property must match the data type that you have declared for the chosenContents property.
The <wl:table> tag adds the value of this row bean to the array in the table bean’s chosenContents property.
If you want the table to render radio buttons, which allow users to select only a single row, add the following attribute:
<wl-extension:table> opening tag, add the following tags:
<wl:button-bar>button-label
<wl:button-bar-button labelid=""portlet-instanceLabel
portlet=""page-definitionLabel
pageLabel=""/>
</wl:button-bar>
button-label is the text that you want to display on the button or the name of a property that you have defined in the bundle that has been declared in the JSP’s <fmt:setBundle> element.
portlet-instanceLabel is the label of a portlet instance that contains the Struts Action or Beehive Page Flow that you want to launch when a user clicks the button. The label is defined in the instanceLabel attribute of the <netuix:portletInstance> element, which is in the .book file for the page that contains the portlet.
Instead of immediately launching an Action or Page Flow, you can specify a portlet that contains a JSP. The JSP can ask users for confirmation before launching an Action or Page Flow.
page-definitionLabel is the unique label of the page that contains the instance of the portlet to which you want to forward.
The label is defined in the definitionLabel attribute of the <netuix:page> element, which is in the page’s .book file.
Action that can process the posted data:Action. Make sure that the portlet’s instanceLabel matches the value that you specified in step 1c.
<netuix:portletInstance markupType="Portlet"
instanceLabel="medrecMonitor.Tab.Portlet"
contentUri="/portlets/medrec_monitor_tab.portlet"/>
For information about creating a portlet, see Define a Portlet.
ActionForm bean that contains a property named chosenContents. The data type for this property must be the same data type that you specified in step 1a.
For example:<form-bean name="processButtonForm"
type="org.apache.struts.action.DynaActionForm">
<form-property name="chosenContents"
type="[Lcom.bea.console.handles.Handle;"/>
</form-bean>
ActionForm bean to a Java class for processing.
For example:<action path="/ProcessButtonAction"
type="com.bea.medrec.extension.MedrecMBeanButtonAction"
name="processButtonForm"
scope="request"
validate="false">
<forward name="success" contextRelative="true"
path="/ext_jsp/button_view.jsp"/>
</action>
The following steps describe a table that correlates a table row with an underlying MBean data source and clears the values of attributes in the MBean:
<wl-extension:table> tag to render checkboxes. You specify that if a user selects the checkbox for a row, the value of the row bean’s handle property will ultimately be posted to the request object:
<wl-extension:table
    showcheckboxes="true"
    checkBoxValue="handle"
...
>
The row bean’s handle property contains a JMXHandle object, which contains the ObjectName of the MBean instance that populated the row.
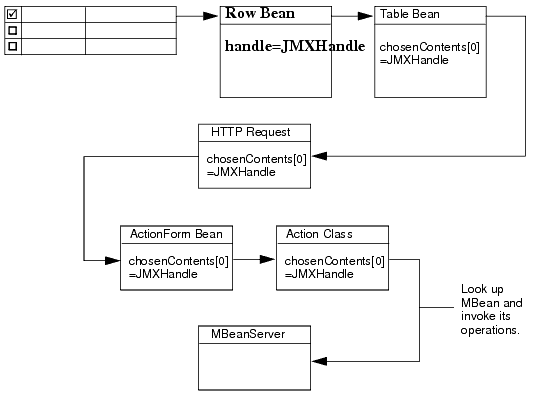
JMXHandle object to an array in the table bean’s chosenContents property. Then it posts the table bean. (See Figure 7-4.)ActionForm bean) and writes the serialized bean in the HTTP request object. Then it forwards the request to a specified portlet.Action mapping, which does the following:ActionForm bean and populates it with data from the HTTP request.Action class and makes the ActionForm bean available to the class.Action class iterates over the form bean’s chosenContents array (which contains instances of JMXHandle). For each element in the array, the class does the following:ObjectName that is encoded in the JMXHandle object,MBeanServer to look up the MBean.MBeanServer to invoke an MBean operation that clears an attribute value.Action mapping forwards to a JSP.
By adding a single attribute to the <wl:table> tag, you can enable your users to configure which table columns the table displays. The Administration Console persists the preference for each user and for each instance of the portlet that displays the table. If you reuse a table in multiple portlet instances, each user can set a different preference for the table in each portlet instance.
To enable users to configure the set of table columns that your table displays, add the following attribute to your <wl:table> tag: customize=”true”.
<wl-extension:table
    customize="true"
...
>
When the Administration Console displays the JSP that contains the table, it renders a “Customize this table” link above the table title. The link causes the table JSP to display a section that contains a chooser control and an Apply or Reset button.
You can add your portlet directly to the desktop, but if you want your portlet to display as a tab or subtab in the ContentBook, you must define books or pages to contain it. In addition, you must create a netuix-extension.xml file which specifies where to locate your portlet, books, and pages and which functions as the deployment descriptor for your extension.
See Adding Portlets and Navigation Controls.


|