|
|
Portal administrators can use the WebLogic Portal Administration Console to add other administrators and portal end-users. Developers might prefer to perform these tasks with JSP tags and controls in Workshop for WebLogic if the portal will have a large number of users. See Adding and Updating Users with JSP Tags and Controls for instructions on adding users with JSP tags and controls. You should set up groups before you add users.
| Note: | See the Interaction Management Guide for instructions on setting up Personalization. See the Security Guide for instructions on setting up Delegated Administration and Visitor Entitlement. |
Administrators with full user management rights can use the following tools to create and manage a small number of users:
Developers can use the following tools to create and manage a large number of users:
createUser JSP tag or create a new JSP tag in Workshop for WebLogic. You can also use this tag to create the ability for visitors to your portal to register themselves. Other JSP tags let you let you place users in groups, change passwords, and delete users.createUser action in the User Provider control in Workshop for WebLogic. You can also use the User Provider control to create the ability for visitors to your portal to register themselves. Other controls let you place users in groups, change passwords, and delete users.com.bea.p13n.security.management.authentication.AtnManagerProxy Java class to add users, change passwords, and delete users. When you use the API to create a user, a User Profile is not automatically created. For more information, see the
Javadoc.Adding a user with any of these methods (except the Java API) adds the user to the user store and creates a basic User Profile that contains the user’s identity (name and password). The Java API does not automatically create a User Profile when you add a user. You can use other user properties (such as address, phone number, e-mail, and so on) to set up Personalization and define rules for Delegated Administration and Visitor Entitlement.
This chapter includes the following sections:
This section contains the following topic:
You can add users to WebLogic Portal through internal or external user stores. The default SQLAuthenticator authentication provider and RDBMS user store is included when you install WebLogic Server. You can also access other user stores, such as openLDAP, that already contain your users.
If you have a large number of users stored in a user store, you might want to use the WebLogic Scripting Tool to retrieve those users. You can also use Workshop for WebLogic to programmatically get access to the users. Use the Administration Console if you want to add a small number of administrators with special privileges to manage portal content and users.
| Tip: | You can use WebLogic Portal’s internal RDBMS user store for large numbers of users and groups. The internal LDAP is sufficient for storing policies for roles and entitlement. |
The WebLogic Portal Administration Console lets you access more than one user store, so you can select users and groups from multiple user stores. The Administration Console contains a list of available user stores. For instructions on adding a new external user store, see the Security Guide.
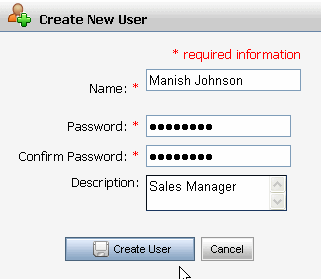
Perform the following steps to create a new user:
If you are storing users, passwords, and groups in a user store outside of WebLogic Server (such as an OpenLDAP server or Novell NDS), you can connect that provider to WebLogic Server (assuming it is a supported type), and the users in that external provider can log into your portal. In addition to the default RDBMS user store, you can use multiple external user stores in WebLogic Server and WebLogic Portal.
| Tip: | WebLogic Portal does not support multiple RDBMS authenticators under a single Security realm. |
| Note: | If you do not see a list of groups, verify that you built a group hierarchy tree for the user store. If you built a group hierarchy tree and still do not see a list of groups, the user store probably does not allow read access. You can enable read access to the user store by following the instructions in the Security Guide. |
After you create a new user, you can create a User Profile to capture more information about the user. See Editing User Profile Property Values for more information.
If you decide to use multiple user stores (not the default RDBMS user store built into WebLogic Server), most of the effort is setting up and configuring those providers and then connecting WebLogic Server to those providers. You can configure that repository to be writable in the WebLogic Server Administration Console. See the Security Guide for instructions on setting up a single user store or multiple user stores.
After your external user stores are connected to WebLogic Server, you can view its existing groups by building a group hierarchy tree in WebLogic Portal. A tree view of groups provides a convenient visual way to change profile values, find users in groups, and add users and groups to rules for Delegated Administration and Visitor Entitlement. See Building a Group Hierarchy Tree. After you build the group hierarchy tree, you should see the provider’s users and groups in WebLogic Portal.
This section contains two topics that explain how to add additional users to an external user store (such as openLDAP):
See the Security Guide for instructions on setting up a user store and connecting it to WebLogic Server. The default configuration for supported external user stores is read-only access to users and groups from the WebLogic Server Administration Console. If the provider does not allow write access, you must add users in the user store itself.
Perform the following steps to add a user directly to the external user store:
No, you cannot use WebLogic Portal to create a user in this user store. You must create the user or group directly in that provider. (If the User Provider field is set to Yes, you can use WebLogic Portal to create a user.)If your external user store contains additional properties for users and groups (for example, e-mail and phone), accessing those properties involves separate development steps for creating a UUP. See Configuring a UUP for instructions.
See the Security Guide for instructions on setting up a user store and connecting it to WebLogic Server. The default configuration for supported external user stores is read-only access to users and groups from the Administration Console. If the provider allows write access, you can add additional users to an external user store (such as RDBMS) by adding users in the user store itself.
Perform the following steps to use an outside tool to add a user to an external user store:
Yes, you can use WebLogic Server or WebLogic Portal to create a user in this user store. If you need to make the user store writable, follow the instructions in the
Security Guide. (If the User Editor field does not appear or is set to No, you cannot use WebLogic Portal to create a user.)Do not store identical user names or group names in more than one user store.
If your external user store contains additional properties for users and groups (for example, e-mail and phone), accessing those properties involves separate development steps for creating a UUP. See Configuring a UUP for instructions.
| Tip: | If you make changes to any user store configuration setting in the WebLogic Server Administration Console, restart the server. Restarting the server prevents exceptions in the WebLogic Portal Administration Console. |
If you remove a user store in the WebLogic Server Administration Console, you must also remove the provider from the WebLogic Portal Administration Console.
Perform the following steps to remove a user store from the Administration Console:
You can add a user to one or more groups. If your user store does not allow write access to users and groups, you will not be able to add users to groups with the Administration Console. You must add users to groups in the user store directly. See Planning a User and Group Strategy for more information on planning users and groups.
This section contains the following topics:
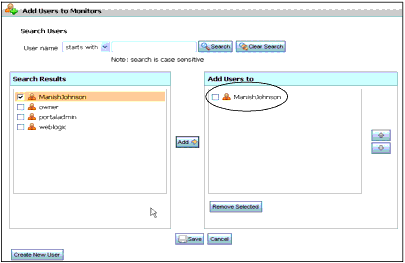
Perform the following steps to add a user to a group:
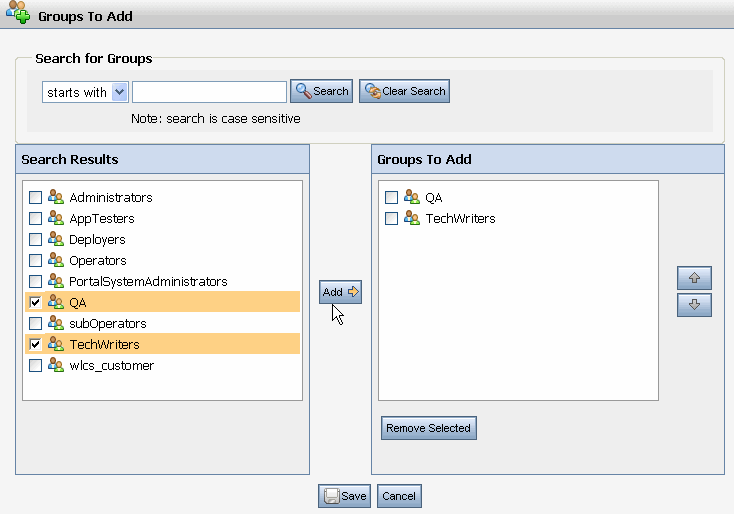
Perform the following steps to add a user to more than one group:
To remove a group from the Group to Add list, select the check box next to the group and click Remove Selected.
A user can belong to more than one group. If you are using an RDBMS user store, be aware of case sensitivity when looking up users and groups. For example, Bob is different than bob.
Perform the following steps to see a list of groups to which a user belongs:
| Note: | If a list of groups is not displayed, verify that you built a group hierarchy tree for the user store. If you still do not see a list of groups, the user store probably does not allow read access. See the Security Guide for instructions. |
A group does not own a user, so you can add and remove users from groups without affecting the user's properties. Removing a user from a group removes the user from any Delegated Administration or Visitor Entitlement roles based on that group. For example, if you remove a user from the Administrators group, that user might no longer have full administrative access to the Administration Console.
Removing a user from a group does not delete the user from the system or change the user's profile properties. You can remove multiple users from one group, or remove a single user from multiple groups.
Perform the following steps to remove multiple users from a single group:
Perform the following steps to remove a single user from multiple groups:
You can search for a user or update a user’s password in the Administration Console.
This section contains the following topics:
The WebLogic Portal Administration Console provides a way for you to locate users that are not already members of a selected group. If you need to perform administrative tasks, such as editing User Profiles, removing users from a group, or deleting users from the system, you must first locate those users in the system.
The Delegated Administration and Visitor Entitlement features also provide tools for user lookup when adding users to roles.
WebLogic Portal support two ways to locate users by username:
Perform the following step to search for a user by username:
Perform the following step to search for users by username:
| Tip: | If you are using an RDBMS user store, be aware of case sensitivity when looking up users and groups. For example, Bob is different than bob. |
You might need to reset a password if a user lost or cannot remember a password. If you have the appropriate Delegated Administration rights, you can change any user’s password. See the Security Guide for instructions on setting up Delegated Administration.
Ensure that your user knows the new password, because once the password is changed there is no way to find out what it is. If a user forgets a password, a portal administrator must change it again.
Perform the following steps to change a user's password:
When you delete a user, you remove the user from the user store. The deleted user is no longer available in any other group or subgroup, and the user will not be able to log into your portal. To get the user back in the system, you must create the user again.
If you want to remove the user from a group without removing the user from the entire system, see Deleting a User From a Group.
If you are using an external user store to store users and groups (one that is not the default RDBMS user store built into WebLogic Server), and you want to remove a user from that provider, the provider might be configured to prevent user removal from an outside tool, such as the Administration Console. See the Security Guide for instructions.
If the User Remover field for the user store is set to No, you cannot remove users from that provider with the Administration Console. You must remove users directly from that provider.
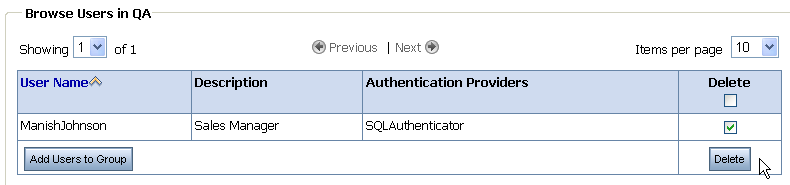
Perform the following steps to delete a user from WebLogic Portal:
| Note: | You can also delete a user by selecting Everyone in the User tree, selecting the check box next to the user’s name in the Browse Users tab, and clicking Delete.) |
If the user is explicitly listed in a Delegated Administration or Visitor Entitlement role, remove that user from the role definition on the Delegated Administration or Visitor Entitlement pages. See the Security Guide for more information.


|