

|
This chapter provides an overview of how to configure delegated administration using the WebLogic Portal Administration Console. Delegated administration provides a mechanism for propagating WebLogic Portal Administration Console privileges within a hierarchy of roles.
In your organization, you typically want individuals to have different access privileges to various administration tasks and resources. For example, a system administrator might have access to every feature in the WebLogic Portal Administration Console. The system administrator might then create a portal administrator role that can manage instances of portal resources in specific desktop views of your portal, and a library administrator role that can manage your portal resource library.
WebLogic Portal has one predefined delegated administration role, PortalSystemDelegator. By default, all members of the Administrators group are assigned the PortalSystemDelegator role. Anyone assigned the PortalSystemDelegator role has unlimited access to administrative tasks anywhere in the enterprise portal application. Other delegated administration roles only have access to resources if that access has been explicitly granted.
You can create as many different administrators as you need by creating administrator roles and then assigning role membership dynamically, based on username, group membership, user profile property values, session and request attributes, and date and time functions.
You can use delegated administration to propagate access privileges within a hierarchy of roles that define the structure for delegated administration. You have flexibility in the way you set up your administration hierarchy and assign privileges to your administrators. Given the appropriate privileges, administrators can delegate both the privilege to administer a given resource capability and the privilege for the delegatee to delegate further. For additional information on role hierarchies, see Setting Up a Delegated Administration Role Hierarchy.
This chapter includes the following sections:
Perform the following steps to create a new delegated administration role:
PortalSystemDelegator role is the top level parent role, and exists before any other delegated administration roles have been created.The new delegated administration role appears in the resource tree.
You can now define the role by adding users to the role, adding groups to the role, or using expressions. For more information, see Adding Users, Groups, and Conditions in Delegated Administration Roles.
| Note: | When you are establishing your delegated administration role hierarchy, child role names must be unique. For example, you cannot have a delegated administration role called RoleA with a child role of RoleB if you already have a child role called RoleB elsewhere in the hierarchy. |
Once you create delegated administration roles in the WebLogic Portal Administration Console, you can assign users and groups to them. You can also use expressions, based on use profile properties, dates, and times, to determine who is assigned a delegated administration role.
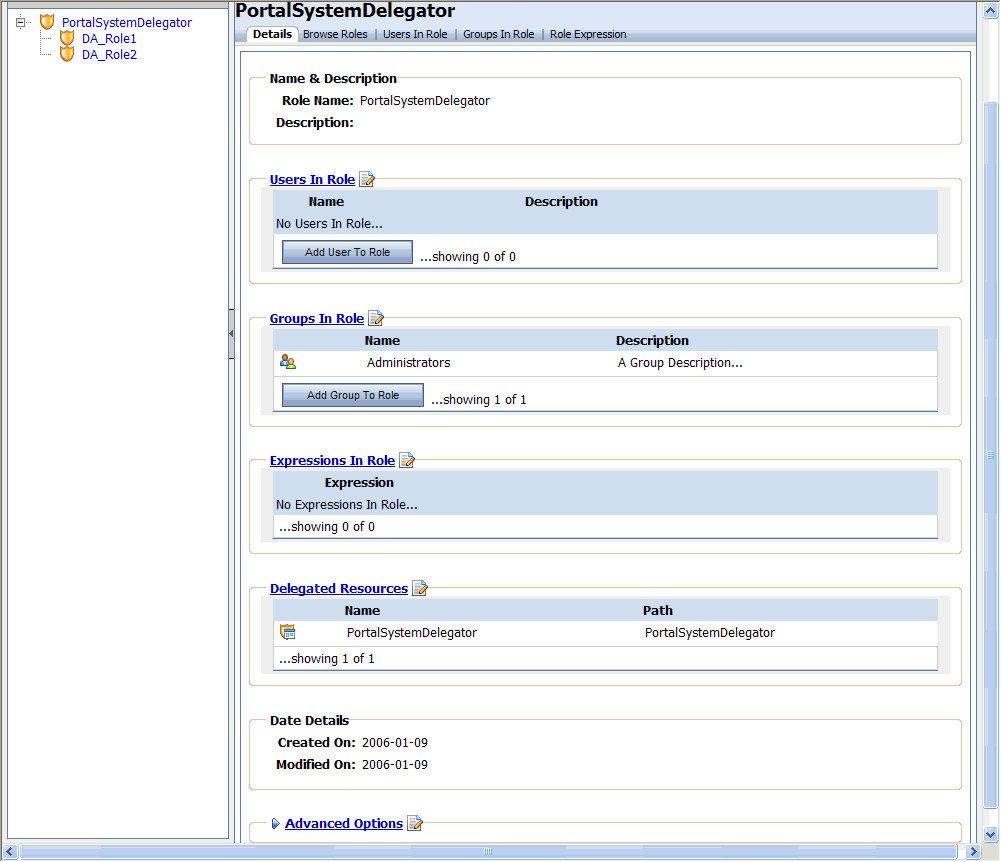
Figure 6-2 shows the Details tab for the PortalSystemDelegator role.

When you add a user to a role, you grant that user access the administrative privileges attributed to that role. This section describes how to add one or more users to a role.
If you have a large number of users you want to add to a role, for the best performance add users to groups, then create roles with those groups, or use expressions.
| Tip: | Roles can sometimes be mapped directly to groups. The difference between groups and roles is that group membership is statically assigned by a server administrator, while role membership is dynamically determined based on information including the username, user profile property values, group membership, and dates and times. Roles can also be scoped to specific WebLogic resources within a single application in a WebLogic Server domain, while groups are always scoped to an entire WebLogic Server domain. |
Perform the following steps to add one or more users to a delegated administration role:
| Tip: | If you are using an SQL authentication provider, be aware that user names are case sensitive. For example, user Bob is different than user bob. |
Any users you have added now appear in the Users in Role section of the Details and Users in Role tabs.
When you add a group to a role, you grant the members (users) of that group—and users in any sub-groups of that group—access to the administrative privileges attributed to that role.
Perform the following steps to add a group to a delegated administration role:
| Tip: | If you are using an SQL authentication provider, be aware that group names are case sensitive. For example, group Managers is different than group managers. |
| Note: | If a list of groups is not displayed, make sure you have built a group hierarchy tree for the authentication provider. If you do not see a list of groups after building a group hierarchy tree, the authentication provider might not allow read access. To see if your authentication provider allows read access, view the authentication provider details, as described in Viewing Authentication Provider Details. |
| Note: | You can activate a text field for group name entry for authentication providers that do not allow read access, as described in Enabling Text Entry for Authentication Providers. |
Any groups you have added now appear in the Groups in Role section in the Details and Groups in Role tabs.
You can use expressions to set conditions, in addition to username and group membership, that dynamically determine membership in a delegated administration role. Conditions specify the values of user profile properties, session and request attributes, dates, and times.
For example, you can define a role with the following type of expression: If a logged-in user has the administrator property set to true and the time is between 9 a.m. and 5 p.m. PST, the user is a role member.
Perform the following steps to add conditions to a delegated administration role:
Specify a date using the calendar.
Specify a date using the calendar.
Specify a date and time using the calendar.
Specify a time range using the calendars.
Specify a date range using the calendars.
Specify a range of dates and times using the calendars.
To set characteristics, you must specify a Property Set, a Property from the property set, a Value for the property, and the ANY or ALL comparator. Specify a property value from the pull-down menu. You can click Add Another Value to add multiple properties and corresponding values.
Specify WSRP registration properties. For more information, see the Federation Guide.
| Tip: | User profile properties, HTTP session and request properties, and WSRP registration properties are created by developers in Workshop for WebLogic. |
| Note: | If you define roles with expressions whose evaluation changes during the processing of a request, you may need to adjust your portal application cache settings to ensure that the correct role definition is retrieved instead of a cached role. |
You can change who is assigned a role by removing users, groups, and conditions from delegated administration roles.
If you want to revoke user access to administrative privileges associated with a role, you can remove the user from the role.
Perform the following steps to remove one or more users from a delegated administration role:
Users you have removed no longer appear in the Users in Role tab or in the Details tab under Users in Role.
Perform the following steps to remove one or more groups from a role:
Groups you have removed no longer appear in the Groups in Role tab or in the Details tab under Groups in Role.
Perform the following steps to remove one or more conditions from a role:
Conditions you have removed no longer appear in the Role Expressions tab or in the Expressions in Role section of the Details tab.
You can modify an existing expression in a delegated administration role, as long as you do not want to change the type of condition. For example, if you created a condition based on a date range, you can change the dates.
You can also add a condition from the Role Expressions tab; see Adding Conditions to Delegated Administration Roles with Expressions for more information. To remove a condition, see Removing Conditions in Delegated Administration Roles.
Perform the following steps to modify a role condition:
The modified condition appears in the list of conditions.
You can allow a selected role to manage sub-roles. For example, you can allow another administrator to create child roles, delete them, move them, and add users to them in the selected role. Each role in the node can be granted the privileges to edit its subordinate roles.
| Note: | You can modify those roles that are below you in the administrator hierarchy. You cannot modify your own role or any roles above you in the hierarchy. |
Perform the following steps to grant delegation authority to an existing role:
| Tip: | If you want parent roles to automatically be granted any capabilities granted to a child role, select the check box Implicitly grant the capabilities of a sub-role to its parent role. This option is displayed only when the PortalSystemDelegator role is selected in the tree, because it is applied globally to all roles. |
Figure 6-3 shows the Advanced Properties dialog.

Once you have created a role, you can select it in the Delegated Administration tree.
Perform the following steps to view the details about a delegated administration role:
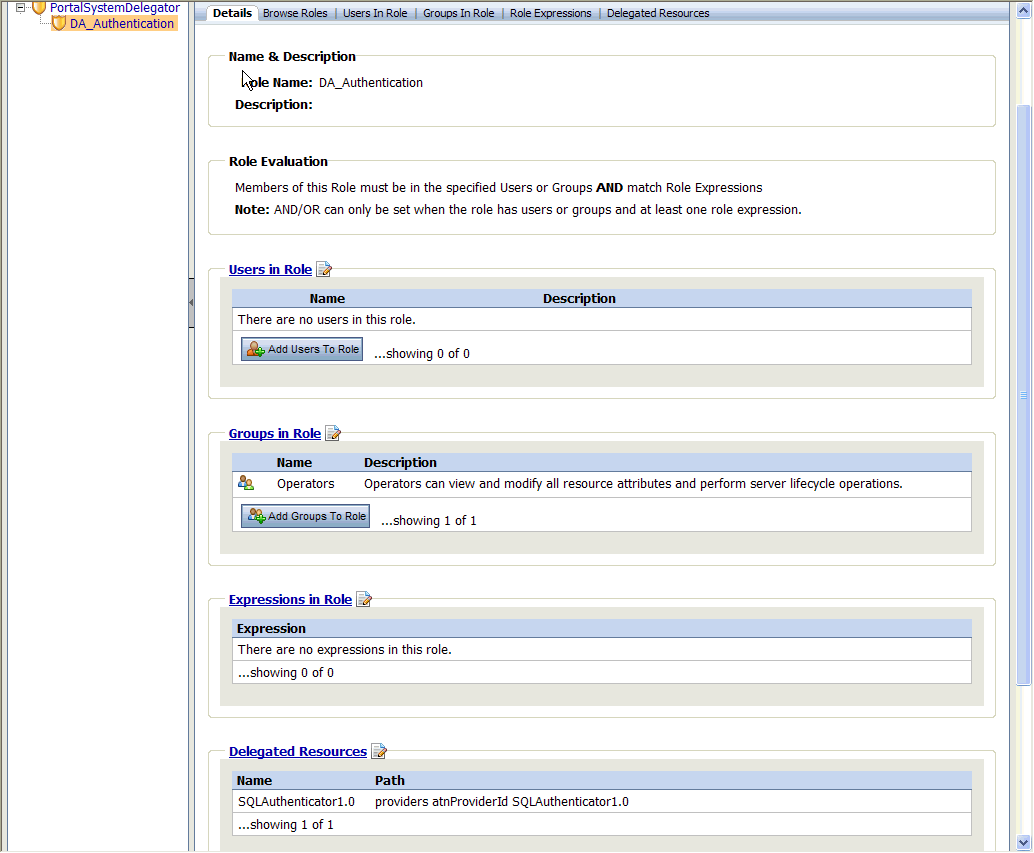
Figure 6-4 shows the Details tab for the DA_Authentication role.

You can view summary information about a delegated administration role to learn how the role is being used and what resource capabilities it has. This is useful because before you can delete a delegated administration role, you have to remove the security policies associated with the role.
| Tip: | You can delete security policies from the policy summary page, or from the Delegated Admin tab for the specific resource. |
Perform the following steps to view a delegated administration role's policy summary information:
There you can view the information for the role's security policies:
| Tip: | From this tab, you can delete a security policy by selecting the check box in the Delete column and clicking Delete. |
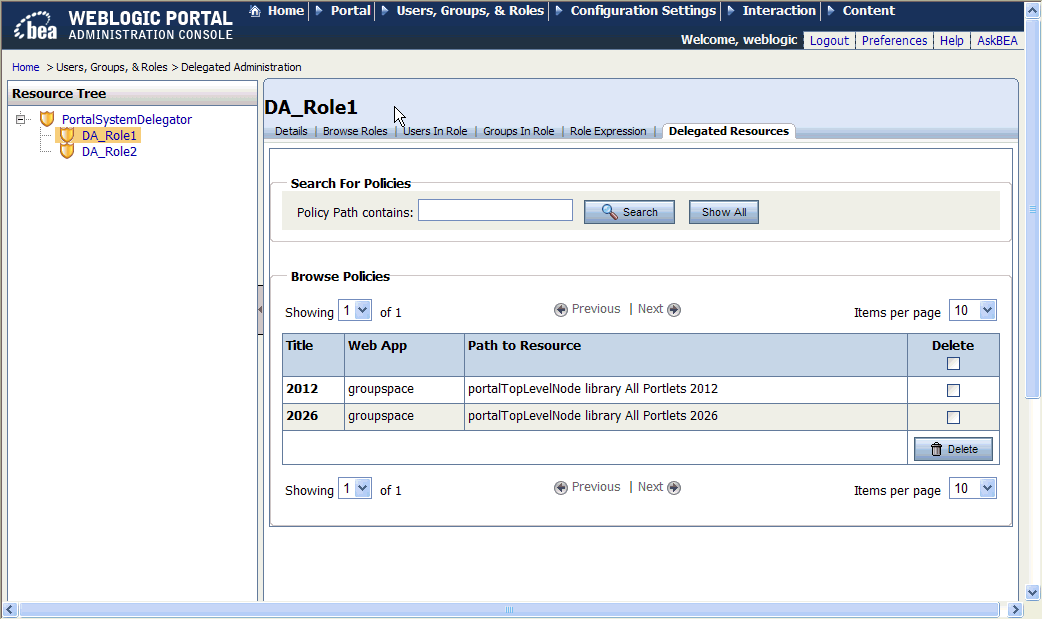
Figure 6-5 shows the Delegated Resources tab.

You can change the name and description of existing delegated administration role if there are no security policies associated with the role. For information about viewing the policies associated with a role, see Viewing the Delegated Administration Role Policy Summary.
| Tip: | If there are policies associated with a role, it does not appear as editable in the Details tab. |
Perform the following steps to rename a delegated administration role:
The new role name appears in the Delegated Administration tree and the tabs.
When you delete a delegated administration role, the child roles associated with it are also deleted.
A delegated administration role can only be deleted when no security policies are associated with it. If there are security policies associated with a role you are trying to delete, a warning is displayed. You must delete all such references before you can delete the role.
Perform the following steps to delete a delegated administration role:
If you receive a message that the role cannot be deleted while resource dependencies exist, select the Delegated Resources tab for that role to view, and optionally delete, the resource dependencies. For more information, see Viewing the Delegated Administration Role Policy Summary.
You can determine which portal administrators can manage each authentication provider by assigning delegated administration roles to the provider.
The only capability that can be specified for an authentication provider is Can Use. This allows you to manage users and groups from this authentication provider.
| Note: | If you attempt to assign a delegated administration role to a group as described in Setting Delegated Administration on Groups, and you do not have Can Use capability, a dialog box asks if you would like to grant access to the provider as well. If you click OK, you provide access to the authentication provider and assign the delegated administration role to the group. If you click Cancel, the role is not allowed access to the authentication provider. |
Perform the following steps to assign delegated administration to an authentication provider:
You can remove a role from the Roles to Add section by selecting the check box next to the role and clicking Remove Selected.
The roles you have added are listed in the Browse Roles Delegated to this Resource section.
If you no longer want administrator capabilities to be available for an authentication provider, you can remove administrator capabilities from it.
The only administrator capability for authentication providers is Can Use, so if you edit the role to remove this capability, the delegated administration role is removed from the authentication provider.
Perform the following steps to remove delegated administration on an authentication provider:
The changes you make are reflected in the Browse Roles Delegated to this Resource section.
You can determine which portal administrators can manage each group by assigning delegated administration roles to the group. Table 6-1 describes administrator capabilities for groups.
| Tip: | If you are using more than one authentication provider, it is possible to have a group in one provider with an identical name to a group in another provider. When you set delegated administration on a group, an administrator in that delegated administration role is able to administer that group in all providers that contain that group, if the administrator also has administrator capabilities for the other providers. |
Perform the following steps to assign delegated administration to a group:
| Note: | If a list of groups is not displayed, make sure you have built a group hierarchy tree for the authentication provider. If you do not see a list of groups after building a group hierarchy tree, the authentication provider might not allow read access. To see if your authentication provider allows read access, view the authentication provider details, as described in Viewing Authentication Provider Details. |
| Note: | You can activate a text field for group name entry for authentication providers that do not allow read access, as described in Enabling Text Entry for Authentication Providers. |
You can remove a role from the Roles to Add section by selecting the check box next to the role and clicking Remove Selected.
| Note: | Roles that are allowed to administer groups must also have Can Use capability to access the authentication provider. If the delegated administration role you are assigning to the group does not have access to the authentication provider, a dialog box asks if you would like to grant access to the provider as well. Click OK to provide access to the authentication provider and assign the delegated administration role to the group. Click Cancel if you do not want the role to have access to the authentication provider. The delegated administration role is not assigned to the group if you click Cancel. |
The roles you have added are listed in the Browse Roles Delegated to this Resource section.
If you no longer want administrator capabilities to be available for a group of users, you can remove delegated administration from the group. You can also change the capabilities of a delegated administration role on a group, which is also described in this procedure.
| Tip: | You can also remove a delegated administration role from a group from the Delegated Resources tab for that role. From this tab, delete a security policy by selecting the check box in the Delete column and clicking Delete. |
Perform the following steps to remove or edit delegated administration on a group:
| Note: | If a list of groups is not displayed, make sure you have built a group hierarchy tree for the authentication provider. If you do not see a list of groups after building a group hierarchy tree, the authentication provider might not allow read access. To see if your authentication provider allows read access, view the authentication provider details, as described in Viewing Authentication Provider Details. |
| Note: | You can activate a text field for group name entry for authentication providers that do not allow read access, as described in Enabling Text Entry for Authentication Providers. |
The changes you make are reflected in the Browse Roles Delegated to this Resource section.
Security policies determine what capabilities a delegated administration role has for a given portal resource. You can set delegated administration on portal resources in the resource library or in the desktop (Portals node). Within the library, you can set administrator capabilities on specific books, pages, and portlets, or all resources in each of these categories.
You can control administrator access to the following types of portal resources in the library:
Each has administrator capabilities that are based on the type of resource, as shown in Table 6 -2.
Table 6-3 describes each administrator capability.
Perform the following steps to set delegated administration on a portal resource in the library:
You can remove a role from the Roles to Add section by selecting the check box next to the role and clicking Remove Selected.
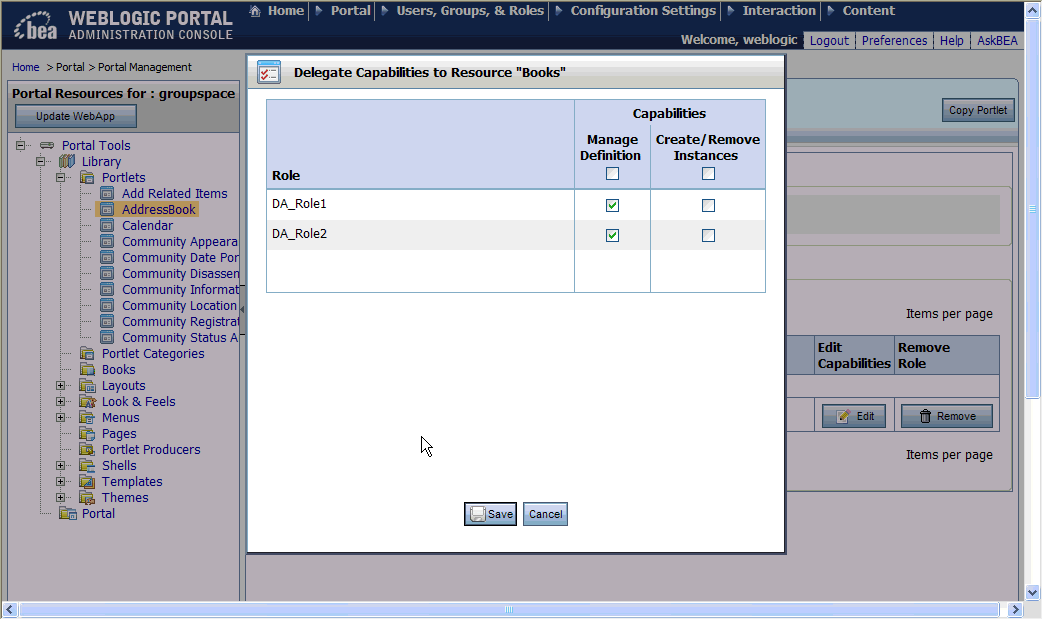
The roles you have added are listed in the Browse Roles Delegated to this Resource section. Figure 6-6 shows an example Delegate Capabilities to Resource Dialog.

Security policies determine what capabilities a delegated administration role has for a given portal resource. You can set delegated administration on portal resources in the library or in the desktop (Portals node). Within a given desktop you can set administrator capabilities on specific instances resources, such as a page, book, or portlet in that desktop. You can also set administrator capabilities on an entire desktop or community.
You can control administrator access to the following types of portal resources in the desktop:
The only capability that can be specified for a desktop instance of a portal resource is the Manage Instance capability. This allows administrators to manage that specific instance of the resource.
Perform the following steps to set delegated administration on a portal resource in the desktop:
You can remove a role from the Roles to Add section by selecting the check box next to the role and clicking Remove Selected.
The roles you have added are listed in the Browse Roles Delegated to this Resource section.
If you no longer want administrator capabilities to be available for a portal resource, you can remove administrator capabilities from it. You can also change the capabilities of a delegated administration role on a portal resource, which is also described in this procedure.
In the desktop, the only administrator capability for a resource instance is Manage Instance, so if you edit the role to remove this capability, the delegated administration role is removed from the resource instance.
| Tip: | You can also remove a delegated administration role from a portal resource from the Delegated Resources tab for that role. From this tab, you can delete a security policy by selecting the check box in the Delete column and clicking Delete. |
Perform the following steps to remove or edit delegated administration from a portal resource or type of portal resource:
The changes you make are reflected in the Browse Roles Delegated to this Resource section.
You can determine the level of access portal administrators have in administering interaction management resources (campaigns, placeholders, segments, and content selectors) by setting delegated administration on them.
The only administrator capability for interaction management resources is Can Manage, which determines whether the administrator can manage that interaction management resource.
Perform the following steps to set delegated administration on an interaction management resource:
You can remove a role from the Roles to Add section by selecting the check box next to the role and clicking Remove Selected.
The changes you make are reflected in the Browse Roles Delegated to this Resource section.
If you no longer want administrator capabilities to be available for an interaction management resource, you can remove administrator capabilities from it.
The only administrator capability for interaction management resources is Can Manage, so if you edit the role to remove this capability, the delegated administration role is removed from the interaction management resource.
Perform the following steps to remove delegated administration from an interaction management resource:
The changes you make are reflected in the Browse Roles Delegated to this Resource section.
You can determine the level of access portal administrators have in administering for content management resources.
You can create delegated administration roles to control administration access to the following types of content management resources:
Each has administration capabilities that are based on the type of resource, as shown in Table 6 -4.
| Tip: | The capabilities you assign to a delegated administration role determine how the administrator participates in the content workflow. For example, a role that is not granted Publish capabilities cannot transition content to the Published or Retired status. |
The capabilities that can be specified for content are described in Table 6-5.
The capabilities that can be specified for content types are described in Table 6-6.
The capabilities that can be specified for content workflows are described in Table 6-7.
The only capability that can be specified for a repository is the Manage capability. This determines whether administrators can modify the properties of the repository.
Perform the following steps to set delegated administration on content:
You can remove a role from the Roles to Add section by selecting the check box next to the role and clicking Remove Selected.
The roles you have added are listed under Browse Roles Delegated to this Resource.
If you no longer want administrator capabilities to be available for content, a content type, or a workflow, you can remove administrator capabilities from it. You can also change the capabilities of a delegated administration role on the content management resource, which is also described in this procedure.
| Tip: | You can also remove a delegated administration role from a content management resource from the Delegated Resources tab for that role. From this tab, you can delete a security policy by selecting the check box in the Delete column and clicking Delete. |
Perform the following steps to remove or edit delegated administration on a content management resource:
The changes you make are reflected in the Browse Roles Delegated to this Resource section.
You can determine the level of access portal administrators have in administering visitor entitlement roles by setting delegated administration on them.
The only administrator capability for visitor entitlements is Manage Role, which determines whether the administrator can manage that visitor entitlement role.
Perform the following steps to set delegated administration on a visitor entitlement role:
You can remove a role from the Roles to Add section by selecting the check box next to the role and clicking Remove Selected.
The changes you make are reflected in the Browse Roles Delegated to this Resource section.
If you no longer want administrator capabilities to be available for a visitor entitlement role, you can remove administrator capabilities from it.
The only administrator capability for visitor entitlements is Manage Role, so if you edit the role to remove this capability, the delegated administration role is removed from the visitor entitlement role.
Perform the following steps to remove delegated administration from a visitor entitlement role:
The changes you make are reflected in the Browse Roles Delegated to this Resource section.


|