|
|
An Event is generated when a user interacts with a web interface. Events can include logging in, clicking or viewing a graphic, clicking a button, navigating to another page in a portal, and so on.
WebLogic Portal provides an events framework that lets you leverage events in many ways: to trigger Campaigns, persist event data in the database, and provide other types of functionality when events occur.
| Note: | Interaction Management events are different than portlet events, which provide a framework for interportlet communication. See the Portlet Development Guide. |
The following examples show functionality you can provide with the event framework:
This chapter describes the components of the event framework, helps you plan an event strategy by explaining the purpose and use of each piece of the framework, describes WebLogic Portal's predefined events, and provides guidance and instructions on using events in your applications.
This chapter includes the following sections:
Each Event is an instance of an Event object that is identified with a unique name, or type. Each Event type can get and set specific attributes, depending on its function. In each of the previous examples, the event must capture specific information. For example, to capture the number of times users access a portal page, a ClickPage event might get and set the name of the page that was clicked. To identify which pieces of content are viewed, a DisplayContent event might get and set the ID and type of each displayed content item.
After events set their attribute values, you can persist those values in any desired way. WebLogic Portal provides a default mechanism for persisting event attributes in a database as XML. When event data is stored in the database, you can mine that data to perform analytics, run reports, or even feed event data back into your applications. For example, you can create a portlet that runs SQL queries against the database and returns the number of times each portal page was visited. You can also develop your own persistence functionality. For example, you can store event data in a file, or you can write the data to database tables without structuring the data in XML.
Sometimes, events do not require attributes or persistence. Their only purpose could be to trigger some other type of functionality. For example, if you want to determine how many times a download link is clicked regardless of who clicked it, a ClickDownloadLink event (and an accompanying event listener) can increment a database field value by 1.
You can also make Campaigns more powerful by using events in your Campaign definitions. For example, you can send a user a predefined e-mail automatically when the user generates the UserRegistration event by registering in a portal; or display a personalized piece of content when an event with specific attribute values is generated.
Figure 9-1 shows the event framework, which gives you the flexibility to handle events in many ways. Table 9-1 describes the pieces of the framework.
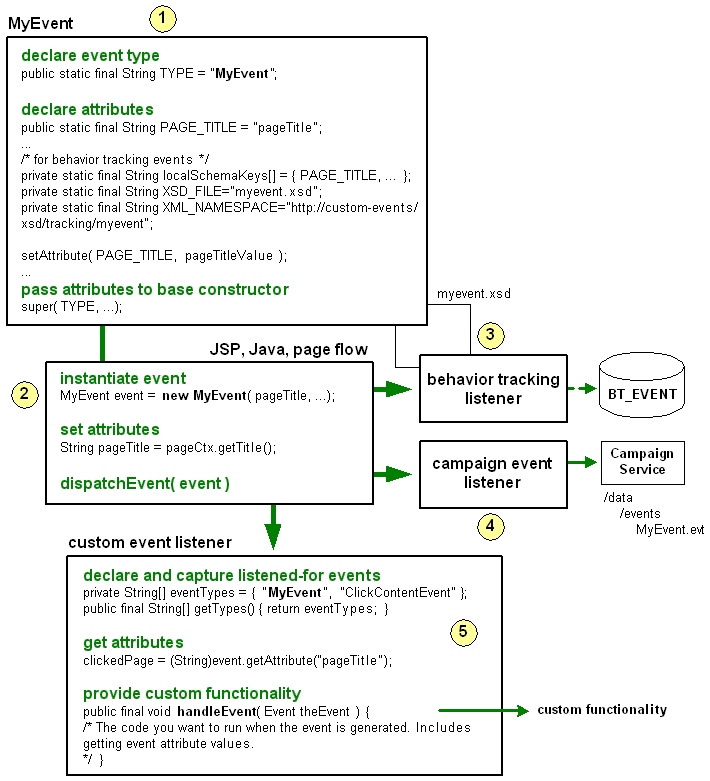
An event is an object that extends either the
Event or TrackingEvent class. The event identifies itself to the Event service with a unique name, or type, declares the attributes it will use, and passes the event type and the attributes to the base class constructor.
Events can contain whatever type of attributes you want to capture. For example, you can capture the name of a page or a portlet that is selected for viewing; you can capture the name of a JSP in a Page Flow to gauge which JSPs are being visited most often. You can trigger a Campaign when a specific JSP is viewed; you can capture information about content retrieved from the virtual content repository, or you can capture product information when a user adds an item to a shopping cart.
|
|
Wherever you want to generate the event in your application (whether from a JSP, a Java class, or a Page Flow), create an instance of the event. In your code, set the attribute values the event needs, and pass them to the event as arguments in the order the event expects them. The argument order is defined in the event class. Tell the Event Service to dispatch the event. Dispatching an event tells all the interested event listeners that the event has occurred, causing them to perform their actions.
|
|
The Behavior Tracking listener listens for all events that extend the
TrackingEvent class and are registered with the Behavior Tracking service.
The Behavior Tracking listener's function is to move the XML document of event attributes, created by the event and the XML schema, to a buffer. The Behavior Tracking Service then moves the XML document to the
BT_EVENT table in the database in an interval you determine.
You can retrieve Behavior Tracking data from the database for reporting or analytical purposes, such as determining the amount of traffic a page or portlet receives.
By default, the Behavior Tracking listener is not registered with the Event service. You must register the Behavior Tracking listener to enable Behavior Tracking, as described in Enabling Behavior Tracking.
|
|
The Campaign event listener listens for and handles all events, except excluded events listed in the
wps.jar file's listeners.properties file. When an event occurs, the Campaign event listener calls the Campaign service. The Campaign service takes a snapshot of the current HTTP request, and evaluates the data in the request against any Campaigns you have created to see if any Campaign actions need to be executed.
Campaigns are completely dependent on events. If no events occur, the Campaign service is never called, and no Campaign actions are executed.
In addition to the basic function of calling the Campaign service with an event, you can also use events within Campaign definitions by executing Campaign actions if a specific event occurs or if an event has specific properties. For example, you can define a Campaign in the following ways:
In order to use events and event properties in Campaign definitions, you must create an event property set for each event you want to use in Campaigns (stored in your application's
/data/src/events directory in Workshop for WebLogic). An event property set contains the exact names of the attributes you are setting in your event. The Campaign Editor interface uses the event property set in drop-down fields that you use to create the Campaign definition.
For information on Campaigns, see Building a Campaign.
|
|
Create a custom event listener only if you want to perform custom functionality when an event occurs. A custom listener tells the Event service which events to monitor (which events trigger it to perform its custom functionality). For example, with a custom event listener, you can implement your own persistence mechanism to store event attributes, or you can respond to an event in real time by modifying a User Profile or displaying related products when a user clicks a product image.
The base class you implement,
EventListener, provides two methods: getTypes(), which lets the listener advertise which event types it is interested in, and handleEvent(), which lets you perform your custom functionality.
|
WebLogic Portal's event framework provides many options for generating and handling events, as described in the previous section. See the guidelines in Planning Your Behavior Tracking Strategy to determine the pieces of the event framework you need to implement.
This section contains the following topic:
Creating custom events, listeners, and event property sets involves adding files to your application and updating your application CLASSPATH. If you are adding events and property sets to an application that is already deployed, these changes require application redeployment for the events and CLASSPATH updates, and running the BEA Propagation Utility to update the event properties in the database. For deployment instructions, see the
Production Operations Guide.
See Part IV Production for other deployment and production tasks.
WebLogic Portal provides predefined Behavior Tracking events. The events capture different attributes and use the Behavior Tracking listener and the Behavior Tracking Service to persist the attributes as XML in the BT_EVENT table when they are generated, or dispatched. You must enable Behavior Tracking to persist the event attributes (as described in Enabling Behavior Tracking). You can also use these events to trigger Campaigns.
The following predefined events are provided for compatibility with legacy WebLogic Portal commerce applications: AddToCartEvent, PurchaseCartEvent, and RemoveFromCartEvent. If you want to dispatch these events in new commerce applications, you must create your own code and Content Management properties to set and get the event property values, and you must dispatch these events from your application code (for example, Page Flows and JSPs).
If you want to perform custom event handling when any of the predefined events is dispatched, create a custom event listener, as described in Creating Custom Event Listeners.
This section contains the following topics:
Use the SessionLoginEvent to dispatch an event when a user logs into a portal and is authenticated.
If Behavior Tracking is enabled, the event property values are written to the BT_EVENT table in the database when the event is generated and the event is registered with the Behavior Tracking Service as a persisted event, as shown in Figure 9-3.
The SessionBeginEvent and the SessionEndEvent are generated automatically. A SessionBeginEvent is generated when a user accesses a web site running on WebLogic Portal. A SessionEndEvent is generated when the session ends, such as when the user closes the browser or the session times out.
If Behavior Tracking is enabled, the event property values are written to the BT_EVENT table in the database when the events are generated and the event is registered with the Behavior Tracking service as a persisted event, as shown in Figure 9-3.
The SessionBeginEvent and the SessionEndEvent do not have corresponding property sets in a portal application. By default, the Campaign listener does not listen for these events, so they cannot be used to trigger Campaigns. For more information on starting a Campaign, see
Triggering a Campaign.
Use the UserRegistrationEvent to dispatch an event when a user registers in a portal (when the user is added to the user store programmatically with a registration portlet, for example).
If Behavior Tracking is enabled, the event property values (in particular the user ID) are written to the BT_EVENT table in the database when the event is generated and the event is registered with the Behavior Tracking service as a persisted event, as shown in Figure 9-3.
Use AddToCartEvent to dispatch an event when a user adds an item to a shopping cart. This event lets you capture information such as currency type, quantity of the item being added, unit list price, and SKU. These properties must be represented somehow in your shopping cart and content type to use this event.
If Behavior Tracking is enabled, the event property values are written to the BT_EVENT table in the database when the event is generated and the event is registered with the Behavior Tracking service as a persisted event, as shown in Figure 9-3.
The RemoveFromCartEvent generates an event when a user removes an item from a shopping cart. This event lets you capture information such as currency type, quantity of the item being added, unit list price, and SKU. These properties must be represented somehow in your shopping cart and content type to use this event.
If Behavior Tracking is enabled, the event property values are written to the BT_EVENT table in the database when the event is generated and the event is registered with the Behavior Tracking service as a persisted event, as shown in Figure 9-3.
The PurchaseCartEvent dispatches an event when a user makes a purchase. This event lets you capture information such as currency type, order number, and total purchase price. These properties must be represented somehow in your shopping cart to use this event.
If Behavior Tracking is enabled, the event property values are written to the BT_EVENT table in the database when the event is generated and the event is registered with the Behavior Tracking Service as a persisted event, as shown in
Figure 9-3.
WebLogic Portal provides a Rule Event control that lets you generate a Behavior Tracking event whenever you fire a rule in a page flow using the Rules Executor control. The Rule Event control gets all necessary properties, including the names of the rule set and the rule that was fired.
If Behavior Tracking is enabled, the event property values are written to the BT_EVENT table in the database when the event is generated and the event is registered with the Behavior Tracking service as a persisted event, as shown in Figure 9-3.
The Rule Event does not have a corresponding property set in a portal application. Rules are often used instead of Campaigns, because they provide more flexibility and power; so creating a rule event property set to trigger a Campaign when a rule is fired is not a likely scenario. However, if you want to create a rule property set to trigger a Campaign when a rule is fired, create an event property set called RuleEvent.evt and add the following single, unrestricted string properties: ruleset-name and rule-name. For instructions on creating property sets, see Creating a Property Set.
For more information on using rules, see the Rule Event Control and Creating Advanced Personalization with Rules.
If Behavior Tracking is enabled, a DisplayCampaignEvent is automatically generated when a Campaign places a content item in a Placeholder. The event property values are written to the BT_EVENT table in the database when the event is generated and the event is registered with the Behavior Tracking service as a persisted event, as shown in Figure 9-3.
Using the Display Content Event control with a <BehaviorTracking:displayContentEvent/> JSP tag let you generate a Behavior Tracking event when you display a piece of content in a JSP.
See Table 9-2 for details on how get the document-id and document-type properties.
If Behavior Tracking is enabled, the event property values are written to the BT_EVENT table in the database when the event is generated and the event is registered with the Behavior Tracking service as a persisted event, as shown in Figure 9-3.
A Display Content Event does not have a corresponding property set in a portal application. By default, the Campaign service does not listen for these events, so they cannot be used to trigger Campaigns. For more information, see Triggering a Campaign.
The <productTracking:displayProductEvent> JSP tag lets you generate a Behavior Tracking event when you display a product from your catalog.
See Table 9-2 for details on how get the application-name, category-id, document-id, document-type, and SKU properties.
If Behavior Tracking is enabled, the event property values are written to the BT_EVENT table in the database when the event is generated and the event is registered with the Behavior Tracking service as a persisted event, as shown in Figure 9-3.
A Display Product Event does not have a corresponding property set in a portal application. By default, the Campaign service does not listen for these events, so they cannot be used to trigger Campaigns. For more information, see Triggering a Campaign.
The CampaignUserActivityEvent dispatches an event when a generic Campaign event occurs. This event creates a new DisplayCampaignEvent and associates users with specific Campaign and Scenario instances. These properties must be represented to use this event.
If Behavior Tracking is enabled, the event property values are written to the BT_EVENT table in the database when the event is generated and the event is registered with the Behavior Tracking Service as a persisted event, as shown in
Figure 9-3.
Using the ClickCampaignEvent with the ClickThroughEventFilter generates an event when a user clicks a content item displayed by a Campaign.
Perform the following steps to enable content clicking:
web.xml and weblogic.xml files, as described in Generating Events for Content Clicks.
If Behavior Tracking is enabled, the event property values are written to the BT_EVENT table in the database when the event is generated and the event is registered with the Behavior Tracking service as a persisted event, as shown in Figure 9-3.
Use the ClickProductEvent with the ClickThroughEventFilter to generate an event when a user clicks a product content item. Product content items typically exist in a catalog or shopping cart. The ClickProductEvent lets you capture information such as product category and SKU. Both of those properties must be represented somehow in your content type to use this event.
To enable content clicking, include the appropriate entries in your portal web project's web.xml and weblogic.xml files, as described in Generating Events for Content Clicks.
If Behavior Tracking is enabled, the event property values are written to the BT_EVENT table in the database when the event is generated and the event is registered with the Behavior Tracking service as a persisted event, as shown in Figure 9-3.
Use the ClickContentEvent with the ClickThroughEventFilter to generate an event when a user clicks any content item that was retrieved from the virtual content repository, but not as the result of a Campaign.
To enable event generation on content clicking, include the appropriate entries in your portal web project's web.xml and weblogic.xml files, as described in Generating Events for Content Clicks.
If Behavior Tracking is enabled, the event property values are written to the BT_EVENT table in the database when the event is generated and the event is registered with the Behavior Tracking service as a persisted event, as shown in Figure 9-3.
WebLogic Portal provides predefined events that can be generated when a user clicks a content item in a portal. In particular, the <BehaviorTracking:clickContentEvent> and the <productTracking:clickProductEvent> JSP tags enable content click events. The ClickCampaignEvent also generates content click events. To enable content to be clicked so that an event is dispatched to the Event service, use the ClickThroughEventFilter, add the EventService to the web.xml file and the weblogic.xml file, and enable Campaign clickthroughs.
This section contains the following topic:
Use the ClickThroughEventFilter whenever you use /ShowBinary pattern in a URL. ShowBinary (which is mapped to the ShowPropertyServlet) displays binary web content, such as graphics. Use /ShowBinary in the content URL in your JSPs. After you map the ClickThroughEventFilter to the /ShowBinary URL pattern, use /ShowBinary in your JSP as part of the URL with a click event JSP tag. Then, when a user clicks the content, a click content event is generated by the ClickThroughEventFilter.
To enable this capability, add the following filter and filter mapping to your portal web project's web.xml file:
<filter>
    <filter-name>ClickThroughEventFilter</filter-name>
    <filter-class>
    com.bea.p13n.tracking.clickthrough.ClickThroughEventFilter
    </filter-class>
</filter>
<filter-mapping>
    <filter-name>ClickThroughEventFilter</filter-name>
    <url-pattern>/ShowBinary/*</url-pattern>
</filter-mapping>
Assuming you have added the filter mapping to your web.xml file, the following JSP code displays a content item from the virtual content repository (that has already been retrieved from an iterator, not shown) and provides the mechanism for click content event generation:
<!-- The JSP tag gets the documentId of a content item, which provides
     the ClickThroughEventFilter with the parameters it needs to
     generate an event. The id attribute stores the data retrieved
     by the tag. This JSP tag alone does not generate the event. -->
<BehaviorTracking:clickContentEvent documentId="<%= node.getName() %>" id="eventInfo" /><!-- A URL variable uses /ShowBinary to provide the clickable link,
which is mapped to the ClickThroughEventFilter. The eventInfo variable
provides the ClickThroughEventFilter with the required event parameters
when a user clicks the link. -->
<% String url = request.getContextPath() + "/ShowBinary"+node.getPath() + "?" + eventInfo;%><!-- Now if the user clicks the link, a ClickContentEvent is generated by
the ClickThroughEventFilter. The ShowBinary servlet displays the
content from the virtual content repository in its binary form
(such as a graphic). -->
<a href="<%= url %>"><img src="<%=request.getContextPath() + "/ShowBinary" + node.getPath()%>" ></a>
To enable Campaign clickthroughs that trigger the predefined ClickCampaign Event, you must configure your content items with specific properties, as described in Setting up Content.
Other predefined events track changes made to the virtual content repository or to the repository configuration. The events capture different attributes and use the Behavior Tracking listener and the Behavior Tracking Service to persist the attributes as XML in the BT_EVENT table when they are generated, or dispatched. You must enable Behavior Tracking to persist the event attributes (as described in Enabling Behavior Tracking).
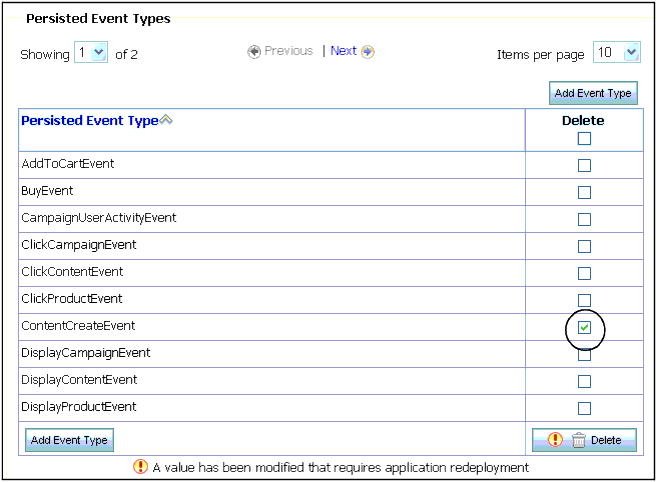
The following events track repository changes: CampaignUserActivityEvent, ContentConfigEvent, ContentCreateEvent, ContentDeleteEvent, and ContentUpdateEvent.
If you want to perform custom event handling when any of the predefined events is dispatched, create a custom event listener, as described in Creating Custom Event Listeners.
The ContentConfigEvent dispatches a new event when a user makes a configuration change to the virtual content repository. This event lets you capture information, such as the action that was performed on the repository. The properties must be represented to use this event.
If Behavior Tracking is enabled, the event property values are written to the BT_EVENT table in the database when the event is generated and the event is registered with the Behavior Tracking Service as a persisted event, as shown in
Figure 9-3.
The ContentCreateEvent dispatches an event when a user adds content to the virtual content repository. This event lets you capture information, such as the content type, the path where the new content was created, the content's status, and so on. The properties must be represented to use this event.
If Behavior Tracking is enabled, the event property values are written to the BT_EVENT table in the database when the event is generated and the event is registered with the Behavior Tracking Service as a persisted event, as shown in
Figure 9-3.
The ContentDeleteEvent dispatches an event when a user removes content from the virtual content repository. This event lets you capture information, such as the content type, the path where the content existed before it was removed, the content's status, and so on. The properties must be represented to use this event.
If Behavior Tracking is enabled, the event property values are written to the BT_EVENT table in the database when the event is generated and the event is registered with the Behavior Tracking Service as a persisted event, as shown in
Figure 9-3.
The ContentDeleteEvent dispatches an event when a user changes content from the virtual content repository. This event lets you capture information, such as the content type, the path where the content existed before it was updated, the content's status, and so on. The properties must be represented to use this event.
If Behavior Tracking is enabled, the event property values are written to the BT_EVENT table in the database when the event is generated and the event is registered with the Behavior Tracking Service as a persisted event, as shown in
Figure 9-3.
WebLogic Portal's predefined events set many of their attribute values automatically. However, there are attributes that you must set manually in your code. Table 9-2 describes the attributes needed by the predefined events and shows you the methods you can use to set the attributes in your code. You can also use these methods to set attributes in your custom events.
You can get some attributes from other generated events. For example, whenever a Campaign displays a piece of content, a DisplayCampaignEvent is generated. The DisplayCampaignEvent sets an attribute called placeholder-id. (It also sets other attributes.) If you want to set the placeholder-id for a custom event, you can get the attribute from the DisplayCampaignEvent using the getAttribute() method on that event. For example: DisplayCampaignEvent.getAttribute( "aPlaceholderId" );
The default PointBase database in a WebLogic Portal domain (and the SQL scripts used to build a portal database for other database types) include Behavior Tracking tables that are ready to use for storing Behavior Tracking data. However, you must manually activate Behavior Tracking to use Behavior Tracking events.
| Note: | These steps assume you are working in a development or testing environment with an exploded application. If you try to enable Behavior Tracking for an application that is in an EAR file, the configuration is saved only in memory, and Behavior Tracking will not be enabled if you restart the server. This is because the configuration needs to be written to the META-INF/wps-config.xml file. That file is read-only in an EAR. |
If you are using a database other than PointBase, see the Database Administration Guide for instructions on creating a separate database for Behavior Tracking events.
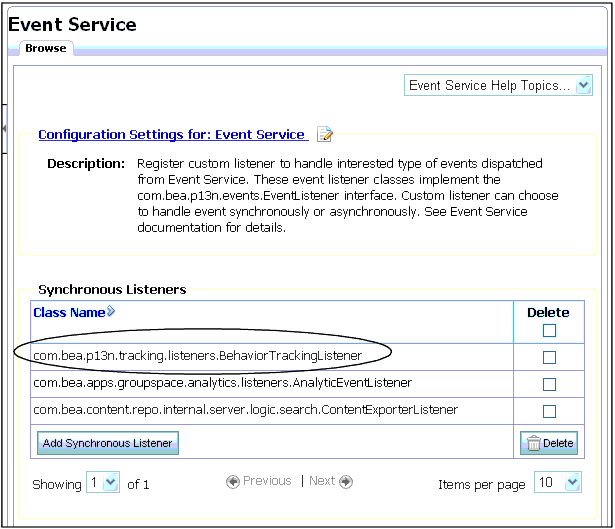
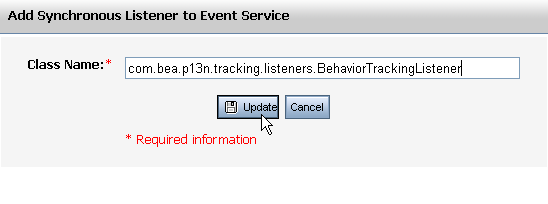
Perform the following steps to activate Behavior Tracking by registering the BehaviorTrackingListener class with the Event service:
com.bea.p13n.tracking.listeners.BehaviorTrackingListener| Note: | Synchronous listeners receive events immediately. Asynchronous listeners use a thread scheduler to receive events. |
wps-config.xml file is updated. Behavior Tracking is activated, as shown in Figure 9-2. You do not need to restart the server or redeploy your application.
By default, Behavior Tracking data is not written to the database immediately when a Behavior Tracking event occurs. The events are stored in a buffer. You can determine how often Behavior Tracking data is moved to the database from the buffer.
Perform the following steps to determine how often Behavior Tracking data is moved to the database:
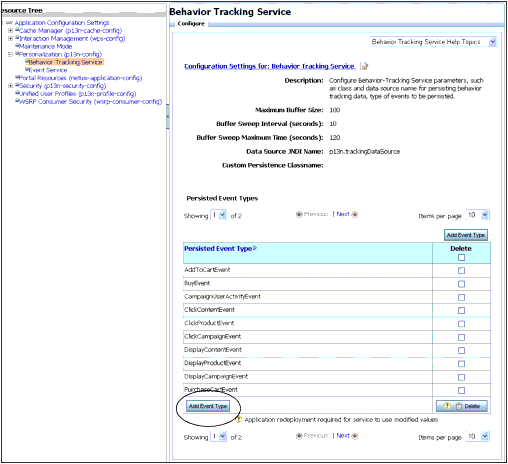
p13n.trackingDataSource) and Custom Persistence Classname (null). These fields provide the default behavior for moving event data from the buffer to the BT_EVENT table in the database. For alternative persistence, see Storing Behavior Tracking Data in Other Ways. For information on the Persisted Event Types field, see Creating a Behavior Tracking Event Class.Use Table 9-3 when you set your Behavior Tracking settings.
This section contains the following topics:
In your development or testing environment, start with a set of baseline values for Maximum Buffer Size, Buffer Sweep Interval, and Buffer Sweep Maximum. Try different values while testing peak site usage with your web application until you find the ideal balance between the number of database operations and the amount of data being stored.
| Tip: | If you do not use Behavior Tracking, you should disable Event services. See Disabling Behavior Tracking. |
Behavior Tracking event data, by default, is stored in the database in the BT_EVENT table. If you want to persist your event data in a different place or in a different way, such as to a different database table or to a file, create a custom event listener that provides the alternative persistence logic. For information on creating custom listeners, see Creating Custom Event Listeners.
If you are using Behavior Tracking, you can improve performance by storing Behavior Tracking data in a separate database. The Database Administration Guide contains instructions for creating a separate Behavior Tracking database for each type of database.
If WebLogic Portal's predefined events do not capture the specific combinations of attributes you need, you can create your own custom events. You can create two types of custom events: Behavior Tracking events and regular events.
For guidance on custom events and what type to create, see Understanding When to Create a Custom Event and Understanding When to Use a Predefined Event. Creating a custom event involves creating the Event class and creating the XML Schema.
This section contains the following topics:
WebLogic Portal provides the two base event objects that work with the Event Service: Event and TrackingEvent. These base classes provide the necessary methods required by the Event Service.
When you create an event class you extend one of the base classes, declare the event attributes you want, and pass the event data (such as the event type) to the base class constructor.
This section provides instructions on creating custom regular events and custom Behavior Tracking events.
Create a custom regular event when none of WebLogic Portal's predefined events capture the event attributes you want, and you do not want to use the Behavior Tracking service for persisting event data as XML in the BT_EVENT table. You can trigger Campaigns with custom regular events and perform your own event handling if you create a custom event listener.
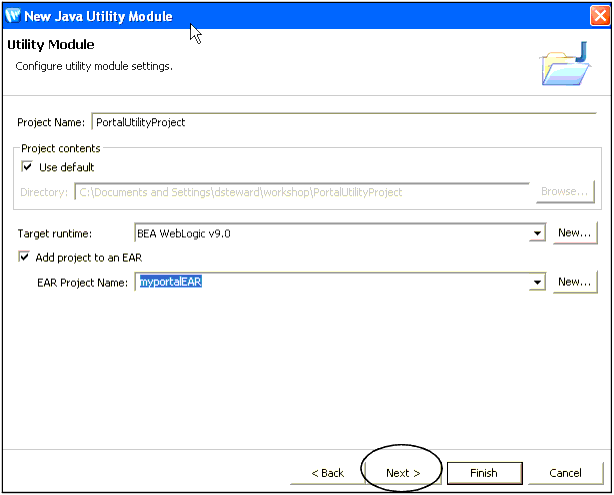
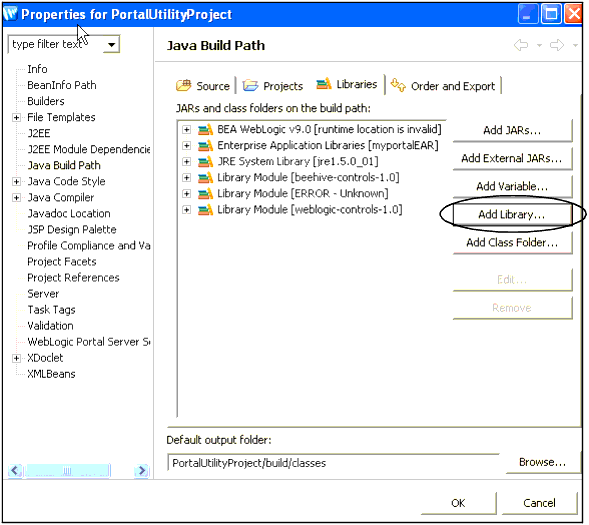
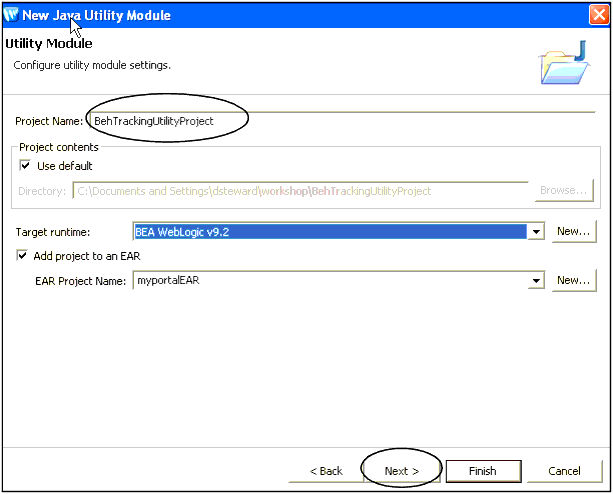
The steps involve creating a utility project, which is generally used to develop general-purpose Java code that is not directly part of special entities, such as web services, controls, or EJBs.
| Note: | You can also view the sample event class ResourceDisplayedEvent.java in the following file:
http://download.oracle.com/docs/cd/E13218_01/wlp/docs81/interm/src/sample_events.zip. |
The steps in this chapter refer to the \src folder in the Package Explorer View. Your src directory might be named differently.
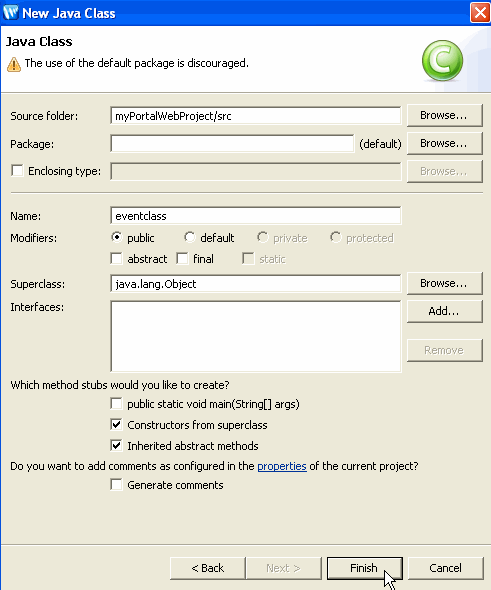
Perform the following steps to create a custom event class:
p13n-app-lib library module CLASSPATH containers to the project. Perform the following steps:
The new class appears in the \src directory of your portal web project.
public static final String FOO_ATTRIBUTE = "fooAttribute";
public static final String SESSION_ID = "session-id";
public static final String USER_ID = "user-id";public MyEvent(
String fooAttributeValue,
String user_id,
HttpServletRequest request,
HttpSession session| Note: | If you use events to trigger Campaigns, you must have a string called user-id that contains the User's Profile name. You must also have a request attribute of type com.bea.p13n.http.Request. The request attribute, however can be added at runtime with the following code:event.setAttribute("request", new Request(request, true)); |
super( TYPE );setAttribute( FOO_ATTRIBUTE, fooAttributeValue );
setAttribute( SESSION_ID, session_id );
if( user_id != null )
setAttribute( USER_ID, user_id );
else
setAttribute( USER_ID, "unknown" );
wherefooAttributeValueis the variable that stores the value you retrieved in your code (not shown here).
Create a custom Behavior Tracking event if none of WebLogic Portal's predefined events captures the event attributes you want, and you need to use WebLogic Portal's Behavior Tracking framework to persist event data as XML in the BT_EVENT table.
You can use these events in Campaigns and create a custom listener that performs special handling on the event, but unless you want to use the Behavior Tracking framework to store event data as XML, you do not need to create a custom Behavior Tracking event. If you do not want to use the Behavior Tracking service, create a custom regular event as described on Creating a Regular Event Class.
Your Behavior Tracking event works with its own XML schema to store the event data as XML in the BT_EVENT database table. Information about that schema must be included in your event class, as described in the following steps.
The steps involve creating a utility project, which is generally used to develop general-purpose Java code that is not directly part of special entities, such as web services, controls, or EJBs.
| Note: | You can also view the sample Event class ResourceDisplayedEventBT.java in the following file:
http://download.oracle.com/docs/cd/E13218_01/wlp/docs81/interm/src/sample_events.zip. |
The steps in this chapter refer to the src folder in the Package Explorer View. Your src directory might be named differently.
Perform the following steps to create a Behavior Tracking event class:
Your new utility project is automatically associated with your EAR project.
p13n-app-lib library module CLASSPATH containers to the project. Perform the following steps:
The new class appears in the \src directory of your portal web project.
XML_NAMESPACE key. This is the namespace URL used by your Behavior Tracking event's XML schema to uniquely identify it. For example:private static final String XML_NAMESPACE = "http://www.yourdomain.com/myschemas/tracking/mytrackingschema";
private static final String XSD_FILE = "mytrackingschema.xsd";
TrackingEvent constructor. For example:public static final String SESSION_ID = "session-id";
public static final String USER_ID = "user-id";
public static final String PAGE_LABEL = "pageLabel";
TrackingEvent constructor. These keys are used to get the Behavior Tracking data that is put into the database. List the keys as an array of string objects.private static final String localSchemaKeys[] =
{
SESSION_ID, USER_ID, PAGE_LABEL
};
The localSchemaKeys order is important, because it corresponds to the order in which the XML schema needs the event properties for the XML output. An XML file will be invalid if elements are out of order.
The SESSION_ID and the USER_ID are data elements in the localSchemaKeys array that are useful in implementing a tracking event. The SESSION_ID, which must not be null, is the WebLogic Server session ID that is created for every session object. The USER_ID is the username of the user who triggered the event.
public MyEvent(
    String fooAttributeValue,
    String user_id,
    HttpServletRequest request,
HttpSession session| Note: | If you use events to trigger Campaigns, you must have a string called user-id that contains the User's Profile name. You must also have a request attribute of type com.bea.p13n.http.Request. The request attribute, however can be added at runtime with the following code:event.setAttribute("request", new Request(request, true)); |
TrackingEvent constructor and pass the required arguments back to it in the required order. For example:{super(
TYPE,
session,
XML_NAMESPACE,
XSD_FILE,
localSchemaKeys,
request );
setAttribute( PAGE_LABEL,  pageLabelValue );
setAttribute( SESSION_ID,  session_id );
if( user_id != null )
    setAttribute( USER_ID, user_id );
else
    setAttribute( USER_ID, "unknown" );
}
The pageLabelValue is the variable storing the value you retrieved in your code (not shown here).
behtrackingclass).\src folder will be compiled the normal way and deployed as part of the application. You can dispatch the event from a JSP, Java code, or a Page Flow, as described in Dispatching Events. If you want to use the Behavior Tracking event in Campaign definitions, create an event property set for the event, as described in Registering Events for Campaigns. If you want to perform custom functionality when the event is generated, create a custom event listener that listens for the event, as described in Creating Custom Event Listeners.You can create an event without writing an event class by using a scriptlet in a JSP. This technique is best suited for simple, Non-Behavior Tracking events that are used to trigger Campaigns. Using this technique for complex events clutters your JSP. You should use this technique in a JSP that has a form that can supply values to event properties.
Perform the following steps to create an event with a scriptlet:
For example, if you create an event property set called MyEvent.evt that contains a single, unrestricted attribute called fooAttribute, the following scriptlet is generated when you drag the property set file into a JSP:
<%
// Generate the Event object here.
// If you have a custom Event subclass for your event type,
// change this code to use it instead
com.bea.p13n.events.Event event = new com.bea.p13n.events.Event("MyEvent");// fooProperty should be a String
event.setAttribute("fooProperty", "");

// These attributes are standard to all Events.
event.setAttribute("request", new com.bea.p13n.http.Request(request, true));event.setAttribute("user-id", com.bea.p13n.usermgmt.SessionHelper.getUserId(request));
// Dispatch the Event to the EventService.com.bea.p13n.tracking.TrackingEventHelper.dispatchEvent(request, event);
%>
The scriptlet automatically gets the request and the user-id, which are required for triggering Campaigns, and the code for dispatching the event. The dispatch code uses the Behavior Tracking API, but it also dispatches regular events.
You must supply the value for fooProperty, which could come from the value of a form field.
If you want to perform custom functionality when the event is generated, create a custom event listener that listens for the event, as described in Creating Custom Event Listeners.
Behavior Tracking events, by default, store their property values in the database as XML. For each type of Behavior Tracking event, the Event service uses a specific XML schema to create the XML. When you create a custom Behavior Tracking event, you must also create an XML schema for the Behavior Tracking service to use.
When creating an XML schema for a custom Behavior Tracking event, consider the following connection points between the schema and your event class:
XSD_FILE key in your event class must match the name of the actual XSD file.XSD_NAMESPACE key in your event class must match the targetNamespace attribute value in your XSD file.localSchemaKeys[] array.For example, if your event class contains this list of schema keys, your XSD file must list those properties in the same order:
private static final String localSchemaKeys[] =
{
SESSION_ID, USER_ID, PAGE_LABEL_KEY
};
You can view the sample XSD file, ResourceDisplayedEventBT.xsd, which is located in the following file:
http://download.oracle.com/docs/cd/E13218_01/wlp/docs81/interm/src/sample_events.zip.
When you use XSD, you need to change only the targetNamespace and xmlns= attribute values to your namespace, and add your custom event attributes, in order.
You can view the XSDs for WebLogic Portal's predefined events at the following location: weblogic81\p13n\lib\p13n_app.jar.
A user might not be associated with an event. In such a case, use the minOccurs="0" attribute for the user-id attribute in the XSD file. For example:
<xsd:element ref="user-id" minOccurs="0"/>
After you create the schema, add it to your portal application's p13n_app.jar file using the following steps.
p13n_app.jar file by creating a copy of it and naming it p13n_ejb.orig, for example.<yourschema>.xsd file to the lib/schema/ directory.p13n_app.jar file. In a command window (that has the JAR utility in the environment), switch to the application directory and run the following command:jar uvf p13n_app.jar lib\schema\<yourschema>.xsd
The schema is added to the JAR file.
p13n_app.jar file.
An event listener serves one purpose: when an event occurs for which the listener is listening, the listener performs some type of programmatic functionality. WebLogic Portal provides the following two listeners that handle events in specific ways:
listeners.properties file in the wps.jar file) and calls the Campaign service to evaluate and trigger Campaign actions.BT_EVENT database table. (You must manually register this listener to activate Behavior Tracking, as described in Enabling Behavior Tracking.) For example, you could create a custom event listener that listens for the SessionLoginEvent, SessionBeginEvent, and SessionEndEvent. You can add the user-id field of these events to a list to keep track of who has logged in.
If you create and register a custom Behavior Tracking event, that event is handled by the BehaviorTrackingListener and the CampaignEventListener. If you create a custom regular event, that event is handled by the CampaignEventListener.
However, there may be times when you want to provide more programmatic functionality when events occur, whether the events are custom events or WebLogic Portal's predefined events. For example, you may want to persist event data to a file or another database table, show related products when a user clicks a product image, or modify a User's Profile when the user submits a form. For these additional types of functionality, you must create custom event listeners.
WebLogic Portal provides a base event listener object called EventListener. This base class, which you must implement in your custom listener, provides two methods for listening for and responding to events:
The steps to create a custom event listener involve creating a utility project, which is generally used to develop general-purpose Java code that is not directly part of special entities, such as web services, controls, or EJBs.
| Note: | You can also view the sample event listener customEventListener.java in the following file:
http://download.oracle.com/docs/cd/E13218_01/wlp/docs81/interm/src/sample_events.zip. |
The steps in this chapter refer to the \src folder in the Package Explorer View. Your src directory might be named differently.
Perform the following steps to create a custom event listener for regular events or Behavior Tracking events:
Your new utility project is automatically associated with your EAR project.
p13n-app-lib library module CLASSPATH containers to the project. Perform the following steps:MyEventListener. Select the Constructors from superclass check box and the Inherited abstract methods check box and click Finish.
The new class appears in the \src directory of your portal web project.
EventListener. For example:
public class MyEventListener
    implements EventListener
{
private String[] eventTypes = {"MyEvent, ClickContentEvent"};
public String[] getTypes()
{
   return eventTypes;
}
handleEvent() method to provide the programmatic functionality you want the listener to perform when the listened-for events occur:
public void handleEvent( Event ev )
  {
      //Put your custom code here.
      //This code is executed when the events occur.
  }
}
\src folder will be compiled the normal way and deployed as part of the application. You can dispatch the event listener from a JSP, Java code, or a Page Flow, as described in Dispatching Events. If you want to use the event listener in Campaign definitions, create an event property set for the event, as described in Registering Events for Campaigns.com.bea.p13n.events.custom.listeners.MyEventListener
| Note: | Synchronous listeners receive events immediately. Asynchronous listeners use a thread scheduler to receive events. |
With events and listeners in place, you can dispatch those events in your JSPs, Java code, and Page Flows. Dispatching an event means that the Event service sends an event object to any listeners interested in the event. Those listeners, in turn, handle the events in their own ways.
In the sample events provided in the
http://download.oracle.com/docs/cd/E13218_01/wlp/docs81/interm/src/sample_events.zip, file a sample event called ResourceDisplayedEventBT, is dispatched from two portal framework skeleton JSP files: book.jsp and page.jsp. The book.jsp skeleton is responsible for rendering portal book and page navigation (such as tabs), and the page.jsp skeleton provides the area for portlets to be displayed.
The code shown in Listing 9-1 is inserted in each of the book.jsp and page.jsp. files. This example uses code from the page.jsp file. The code dispatches a ResourceDisplayEventBT event when portlets are viewed on a page.
<%@ page import="com.bea.p13n.tracking.TrackingEventHelper,
     examples.events.ResourceDisplayedEventBT" %>
...
ResourceDisplayedEventBT rde;
...
ResourceDisplayedEvent rde = new ResourceDisplayedEvent(
				 ppc.getLabel(),
     				 portletTitle,
    				 "portlet",
     				 sessionID,
    				 userId,
    				 "true", // portlet is being displayed
				 request,
   				 session );
// New mechanism for dispatching an event in 9.2:
EventService es = TrackingEventHelper.getEventService();
TrackingEventHelper.dispatchEvent(es, rde);
...
The code performs the following actions:
TrackingEventHelper, which is used to dispatch the event.TrackingEventHelper. dispatchEvent ( rde ) method.The event is then sent to the listeners registered to receive it, and the listeners handle the event in their own ways. Figure 9-1 illustrates the event life cycle, and in this example, the skeleton JSP is Item 2 in the diagram.
Creating an Event With a Scriptlet also describes how to dispatch an event for which you have created no event class. Dispatching events when content is clicked requires special instructions, as described in Generating Events for Content Clicks. Some predefined events have their own dispatch methods. See Using Predefined Events.
You can use events to activate the Campaign Service and to make your Campaigns more powerful by triggering Campaign actions based on events and their attribute values.
When you use an event in a Campaign, you do not have to explicitly tell the Campaign service about your events. The Campaign listener listens for all events that are not explicitly excluded in the listeners.properties file in the wps.jar file.
When an event occurs for which the Campaign listener is listening, the listener calls the Campaign service. The Campaign service takes a snapshot of the current request and evaluates the request data against all the Campaign rules you have defined to see if any actions need to be performed.
In addition, you can use events in Campaigns in another way: as part of a Campaign action. For example, you can define a Campaign action that displays personalized content only if the user clicks the Home page in a portal (triggered by some sort of click page event). To use events as part of a Campaign definition, you must create an event property set, as described in Registering Events for Campaigns.
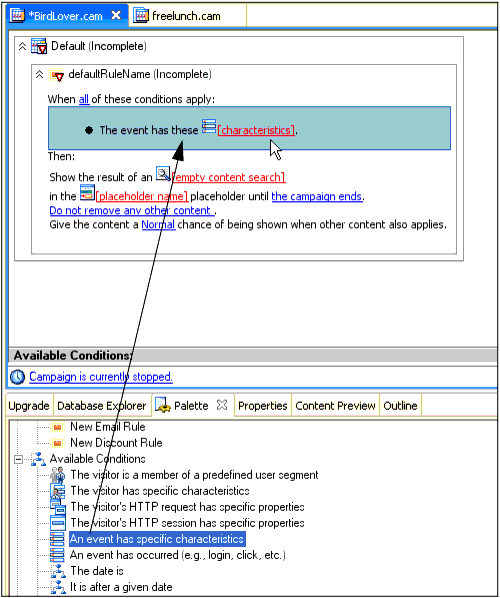
An example of using an event in a Campaign definition is illustrated in Figure 9-12, where a Campaign scenario is triggered if an event has specific property values (characteristics). When you add An event has specific characteristics to your Campaign scenario and click the characteristics link in the Campaign Editor, you can select the event properties and determine which property values will trigger the Campaign Action to occur. The event property set you created enabled the property selection.
To control your Campaign, especially when you want personalized content to display, create events that trigger Campaign actions at the key places in your application. For more information on controlling personalized content, see Managing Placeholders for Optimal Performance. For instructions on creating a Campaign, see Building a Campaign.
This section contains the following topic:
If you want to use a custom event to trigger a Campaign, you must create an event property set. The properties you create for the event match the attribute names defined in your event class.
For example, the sample ResourceDisplayedEvent class uses the following properties: resourceId, resourceLabel, resourceType, session-id, user-id, and resourceSelected. In your event property set, you can define properties for any or all of those attributes, but the property names must exactly match the event attribute names.
For instructions on creating event property sets, see Creating Custom Events. For instructions on registering event property sets, see Enabling Behavior Tracking.
If you create, modify, or delete event property sets after an application is deployed, you must update those property set definitions in the database using the BEA Propagation Utility. For more information, see the Production Operations Guide.
You can debug the Event service and review the console output.
Perform the following steps to debug the event service:
weblogic81\portal\debug.properties.usePackageNames: on
com.bea.p13n.cache: on
# Turns on debug for all classes under events
com.bea.p13n.events: on
# com.bea.p13n.events.internal.EventServiceBean: on
# Turns on debug for all classes under
# com.bea.p13n.tracking: on
com.bea.p13n.tracking.internal persistence: on
# Selectively turn on classes
com.bea.p13n.mbeans.BehaviorTrackingListerner: on
com.bea.p13n.tracking.listeners.BehaviorTrackingListerner: on
com.bea.p13n.tracking.SessionEventListerner: on
| Tip: | Events will fire for a content repository that was upgraded to 9.2 (unless you turned event tracking turned off at the repository level). Events can include repository configuration changes, as well as content additions, updates, and deletions to the repository. See the Upgrade Guide for more information on performing an upgrade. |
You can use content events to track content changes to your virtual content repository and modifications to the repository's configuration. Content changes include who added, updated, or deleted content or content properties and the date and time the change was made in the repository. You can also track who performed the changes (including the date and time the changes were made) to the repository's configuration, its content types, or content workflow. For more information on these events, see Generating Content Events.
You could also configure a content event to watch for content changes and then perform an action. For example, when a user adds a resume document to the content repository, an e-mail is sent to the HR Director.
These content events are saved in the Behavior Tracking database for historical tracking. For more information on content management, see the Content Management Guide.
Perform the following steps to track content changes:
com.bea.p13n.tracking.listeners.BehaviorTrackingListener. See Figure 9-13.ContentCreateEvent to determine new content that was added to the content repository, who added it, and when.| Tip: | To view the tracked changes to the content repository, you can create a log file of the repository content changes that are contained in the Behavior Tracking database tables, or you could enable listeners to provide specific logged output. |
You can disable the persistence of Behavior Tracking events by unregistering the Behavior Tracking listener or removing individual events.
This section contains the following topics:
Perform the following steps to unregister the Behavior Tracking listener:
| Note: | Events could still be triggered to fire by the application, but they are not persisted to the database table. |
Perform the following steps to remove default events:


|