
| Download Docs | Site Map | Glossary | |
|
|
|||
| bea.com | products | dev2dev | support | askBEA |
 |
 |
|
|||||||
| e-docs > WebLogic Platform > WebLogic Portal > Development Guide > Creating a New Portal in a New Domain |
|
Development Guide
|
Creating a New Portal in a New Domain
Step 1: Create the New Domain
This section shows how to run the Domain Configuration Wizard to create a new complete set of enterprise applications which include all the administration, commerce, personalization and portal functionality offered by the WebLogic Portal platform.
Figure 2-1 Select the WLP Domain
Figure 2-2 Choose Server Type
Figure 2-3 Choose Domain Location
Figure 2-4 Configure Server
Note: For more information on options in the Domain Configuration Wizard, consult "Using the Configuration Wizard" at http://download.oracle.com/docs/cd/E13196_01/platform/docs70/confgwiz/index.html.
Figure 2-5 Create Administrative User
Figure 2-6 Create Start Menu Entry
Figure 2-7 Verify Configuration Summary
Figure 2-8 End Configuration Wizard
You are now ready to create a new portal and an associated portal Web application.
Notes on the Resources You Just Created
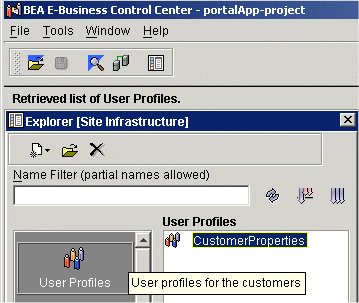
Site Infrastructure Provided by the Configuration Wizard: As part of creating the new domain, the domain wizard also creates a complete enterprise application called portalApp. With the portalApp-project file open in the E-Business Control Center, click the Site Infrastructure tab and select User Profiles, as shown in Figure 2-9. Notice that a user property set called CustomerProperties is already in place.
Figure 2-9 User Profiles
J2EE Resources Provided by the Configuration Wizard: The new enterprise application, as yet a blank template, includes built-in support for foundation services, personalization, interaction management, intelligent administration, and integration services. A look into the newly created directory shows the JARs used to implement these services, as shown in Figure 2-10. Figure 2-10 JARs in the New Enterprise Application Directory
Step 2: Create the New Portal
With the supporting enterprise application resources in place, take the following steps to create and deploy a new portal.
Figure 2-11 Entering the Username and Password You Created for the Domain
Note: For UNIX platform only: By default, none of the new domain scripts have executable privileges, so they must be granted these privileges by a system administrator.
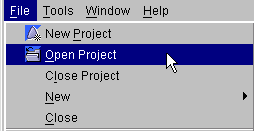
Figure 2-12 A: Opening a Project File
Figure 2-13 B: Opening a Project File
Figure 2-14 Opening the New Portal dialog
Figure 2-15 Portal Wizard Screen
Figure 2-16 Naming the New Portal
Figure 2-17 Naming the New Portal Web Application
Figure 2-18 Select a Portal Template
Note: If you are running the E-Business Control Center on the server machine, the default location should be correct.
Figure 2-19 Select a Location for Resource Files
Figure 2-20 Summary
Listing 2-1 Different Types of Portal Resources
\portalApp\NewPortalWebApp\framework\skins\futurism\images\select_page_view.gif
\portalApp-project\application-sync\webapps\NewPortalWebApp\security.wf
Figure 2-21 Hot Deploying the New Portal
Figure 2-22 Enter the Administrator Username and Password
Figure 2-23 Processing Message During Hot Deployment
Figure 2-24 Hot Deploy Success Message
http://<hostname>:<port>/portalAppTools/
If you are running the tools locally, the URL should be:
http://localhost:7501/portalAppTools/
Note: Do not use weblogic/weblogic.
Figure 2-25 Logging Into the Administration Tools
Figure 2-26 Clicking the Portal Management Icon
Figure 2-27 Information About the Portal You Created in the Wizard, Viewed in the Administrator Tools
http://<hostname>:<port>/<newportalwebappname/index.jsp
If you are running the tools locally and used the sample names provided, the URL should be:
http://localhost:7501/NewPortalWebApp/index.jsp
Figure 2-28 New Portal Viewed Through Your Browser
Step 3: Add a Portlet
Now that the portal is deployed and running, use the Portlet Wizard to add a new portlet to the portal.
Figure 2-29 Choosing to Create a new Portlet
Figure 2-30 Portlet Wizard Screen
Figure 2-31 Name the Portlet
Figure 2-32 Associate the Portlet with a Portal Page
Figure 2-33 Select Portlet Components
Figure 2-34 Select a Content Type
<BEA_HOME>\user_projects\<domainname>\beaApps\
portalApp\<portalwebappname>\portlets
Figure 2-36 View Summary
Figure 2-37 Unmark Options and Close the Next Steps Window
Figure 2-38 The Syncronize Button in the E-Business Control Center
Note: For this example, the Default connection settings, localhost:7501, should work.
Figure 2-39 Synchronization Is Complete
To see this portlet from the browser, it must be designated as visible and available, as shown in Step 4: Make New Portlet Visible.
Step 4: Make New Portlet Visible
The new portlet is now on the server, but must be made available using the WebLogic Portal Administration Tools.
Figure 2-40 Logging Into the Administration Tools
Figure 2-41 Go to Portal Management
Figure 2-42 Select Default Group Portal
Figure 2-43 Manage Pages and Portlets
Figure 2-44 Click Edit Portlets
Figure 2-45 Choose to Set Attributes
Figure 2-46 Set Portlet Attributes
Figure 2-47 Viewing the New Portlet

|

|

|