
|
|
|
|
|
|
Customizing Portals and Portlets
This topic begins with some basic developer tasks, and then introduces some more advanced developer-orientated concepts specific to the WebLogic Portal platform.
This topic includes the following sections:
Creating a New Portal Web Application
This section explains using a copy of the sample portal web application as a template to create your own portal web application. This task requires working with the native file system, the WebLogic Server Console, and the E-Business Control Center.
Copy and Rename the Web Application Files
\\bea\wlportal4.0\applications\portal\sampleportal-project\application-sync\webapps\sampleportal
to this directory:
\\bea\wlportal4.0\applications\portal\sampleportal-project\application-sync\webapps\myportal
The new, renamed directory now contains all the J2EE application elements required of a web application, as shown in Figure 5-1.
Figure 5-1 The myportal Directory
Listing 5-1 Metadata Files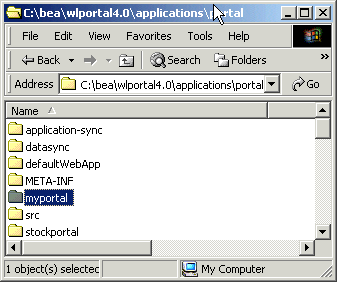
\bea\ebcc4.0\applications\portal\application-sync\webapps\myPortal\
<BEA_HOME>\ebcc4.o\applications\portal\application-sync\webapps\stockportal\
portlet2.wf
\portlet3.wf
\worldnews.wf
Deploy the Application in the WLP Server
username: system
password: <password you entered to boot server>
Deployments > Applications > Portal
Configure a new Web Module
Module URI: myportal
Context URI: myportal
Deploy the New Web Application
Deployments > Applications > Portal
Deployments > Applications > Portal > myportal
Target the Application to Your Server
Deployments > Applications > portal > myportal > Targets tab
The J2EE web application deployment is complete.
Edit Portal Metadata Using the EBCC
This process uses the E-Business Control Center to edit metadata on the J2EE portions of your new portal web application.
Open Existing Portal Application
//EBCC4.0/applications/portal
Define a New Portlet
/portlets/portlet3/welcome.jsp
/framework/titlebar.jsp
/portlets/dictionary/images/pt_dictionary.gif
My Sample Portlet
MyPortlet
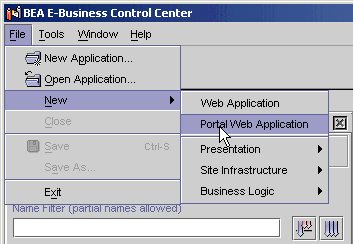
Define a New Web Application
This task creates new metadata for the new portal web application.
Figure 5-2 Create a New Portal Web Application
Create a New Portal
This task edits the metadata for the new portal web application.
/framework/page.jsp
/framework/header.jsp
/framework/footer.jsp
/framework/vnav_bar.jsp
/framework/hnav_bar.jsp
Set Defaults on New Portal
Synchronize the Metadata Using the EBCC
Now that the metadata is edited, it must be moved to the server using a special Synchronization process.
Configure Connection Settings
The E-Business Control Center allows you to save different synchronization profiles as Connection Settings. This procedure shows how to configure one set.
Synchronize Data
username: system
password: <password you entered to boot server>
Modify Cookie Parameters in Deployment Descriptor
To prevent the new portal from using the generic cookie for authentication, take the following steps:
Listing 5-2 Editing Cookie Parameters for Deployment Descriptor
Replace this:
<session-param>
<param-name>CookieName</param-name>
<param-value>JSESSIONID_STOCKPORTAL</param-value>
</session-param>
<session-param>
<param-name>CookiePath</param-name>
<param-value>/stockportal</param-value>
</session-param>
with this:
<session-param>
<param-name>CookieName</param-name>
<param-value>JSESSIONID_webapp name</param-value>
</session-param>
<session-param>
<param-name>CookiePath</param-name>
<param-value>/webapp directory name</param-value>
</session-param>
Providing a unique pathname to which the browser sends cookies prevents other portals deployed in the same domain from using the same autologin cookies. After making this edit and re-starting WebLogic Portal, the new portal should use its own authentication cookie.
Verify Your Deployment
WebLogic Portal includes two ways to verify the deployment was successful - one is the obvious method of navigating to the URL and viewing the portal web application from the point of view of a Visitor. The other is to use the Data Repository Browser, shown below.
Verify Application Using Browser
You should see your newly-deployed portal web application if you navigate to
http://<hostname>:7501/myportal
Verify Data Synchronization Using Data Repository Browser
http://<hostname>:7501/portalDataSync/index.html
username: system
password: <password you entered to boot server>
Creating Your Own Portlet
This section outlines how to create a new portlet and position it inside an existing portal.
Define a New Portlet
Figure 5-3 Create New Portlet Button
Note: The following clarifications apply to Table 5-1:
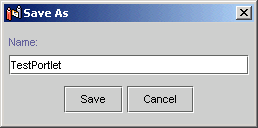
Figure 5-4 Save as TestPortlet
Place New Portlet into Existing Portal Definition
In order to see the new portlet, references to it need to be placed in the following sections of the portal definition:
General Setting for the Portal
Specific Pages in the Portal
Default Settings for the Portal
Deploy the New Portlet
The metadata for the new portlet has now been edited. Next, deploy the metadata as well as the J2EE application files.
Synchronize the Metadata to the Server
Use the E-Business Control Center to synchronize this metadata to the server. This section outlines the basic steps to perform this task. For detailed instructions on operating the E-Business Control Center, consult the Guide to Using the E-Business Control Center.
Note: Make sure that in your Synchronization Settings, the realm is set to weblogic, and that the application is set to portal.
Install the J2EE Application Files for New Portlet
At this point in the procedure, there is metadata on the server that defines a portal called myportal. Since it mostly reuses existing J2EE files, most parts of this new portal web application should already be visible, with one exception: The portlet we have defined and named TestPortlet has no J2EE application files yet.
For this example, we'll copy an existing portlet directory and alter the existing files to construct the TestPortlet.
BEA_HOME\wlportal4.0\applications\portal\stockportal\portlets
Verify the Portlet is Deployed
Navigate to the following directory:
http://<host>:7501/stockportal/
The new test portlet should appear below the E-Docs portlet in the center column of the Home page of the sample portal.
Note: To make this new portlet available for authenticated visitors, the Group Portal attributes must be set so the portlet is available and visible to the user. The simplest way to do this is to use static personalization by setting entitlements on the portal to be available to any member of the group to which the user belongs. For instructions on setting entitlements, consult the section called "Setting Entitlements" in the Portal Administration Tools chapter.
Edit the Copied Portlet Files
Now that the JSPs are installed, and the metadata has been edited and deployed so that the framework can see your portlet, changing the content is a matter of editing the files that make up your portlet. The JSPs in this example are very simple, so you can edit them with something like Notepad. Also, notice that we're editing JSPs from within the server's native file system.
Note: While performing these exercises, leave your browser open to the stockportal page between editing the JSPs. When you re-save the edited portlet files, you can simply re-load the page using the same session.
Edit Static HTML
The JSP files that make up your new portlet include some simple HTML. Importantly, portlets do not need to be complete HTML documents. Open the portlet.jsp file and replace the "Portlet1" text with "This is the Test Portlet". Save the file and reload the stockportal in the browser. The portlet should be re-rendered and appear as shown in Figure 5-5.
Figure 5-5 Edited Portlet
About Scriptlets and JSP Tags A JSP may contain static HTML, as demonstrated in the preceding slides, and dynamic logic in the form of scriptlets and JSP tags. This section introduces some scriptlet and JSP fundamentals for those who may not be familiar with the servlet model. A scriptlet is a section of valid Java code typically used to process input and generate output for the JSP. In most cases this is display logic, because business logic is best handled by components such as EJBs. The Java code in a scriptlet is processed by the JSP compiler to create the body of a servlet that will be called when the URL for this JSP is requested. Servlets are based on a request-response architecture that is ideally suited for handling HTTP requests such as those from HTML browsers. The generated servlet is Java source code that will in turn be compiled. The resulting Java class file will be stored in a location by the server and loaded when the servlet is accessed. Errors may occur in three stages, including JSP compilation, Java compilation, and execution of the resulting servlet class. These errors may be displayed in the browser as part of the portlet body, the console where the server is running, or the server log files. For more information on servlets and JSPs, consult the J2EE specification at http://java.sun.com/. Using Java Scriptlets Within a Portlet This section outlines how to insert some simple code into the portlet.jsp file that handles a variable called username, and will display it in the body of the portlet. Note: For this example, open a new browser and navigate to the following URL: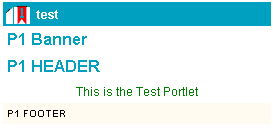
http://<hostname>:7501/stockportal/
<%
String userName = "";
%>
The user name is: <%= userName %>
<br>
<p>
Listing 5-3 Displaying the User Name
<center>
This is Our Test Portlet
</center>
<br>
<hr>
Now try some simple Java scriptlets:
<br>
<br>
<%
// Create a new String variable and set the value to an empty string.
String userName = "";
/*
To get the actual user name, first get the java.security.Principal object from the javax.servlet.http.HttpServletRequest object using the getUserPrincipal() method. The request object is available to the JSP directly. For the Principal object, use the full package name.
*/
java.security.Principal principal = request.getUserPrincipal();
/*
If the principal object is null then the user has not logged in. For this example, ignore the not-logged in case by using an if statement to only process the value if it is not null.
*/
if (principal != null)
{/*
Now get the user name as a String using the getName() method for the java.security.Principal object.
*/
userName = principal.getName();
}
%>
<%--
Display the value of the userName variable using a scriptlet. Note that the scriptlet is embedded in the HTML and is denoted by the <%= %> block. The "=" sign indicates that the scriptlet should be evaluated as string and output in the HTML. It can be any valid Java expression, including a variable or method call.
--%>
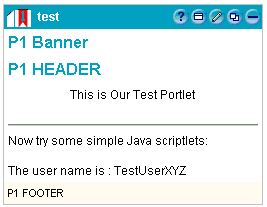
The user name is : <%= userName %>
<br>
Figure 5-6 Scriptlet without Authenticated Visitor
Figure 5-7 Scriptlet Showing Authenticated Username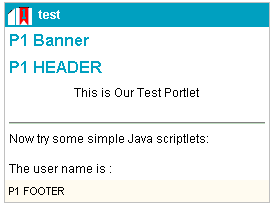
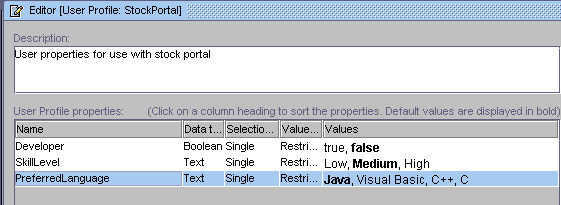
Displaying User Profile Values
This section outlines how to use a simple tag to insert a value from a user profile into your portlet. Figure 5-8 shows that the property we're going to expose is already set in the stock portal sample data.
Figure 5-8 Viewing the PreferredLanguage Property
Select the Site Infrastructure tab at the bottom right corner of the E-Business Control Center.
Click on User Profiles, then double-click on the StockPortal profile.
Notice the default setting for the PreferredLanguage property, shown in Figure 5-8.
Listing 5-4 Getting a Property from User Profile
<center>
This is Our Test Portlet
</center>
<br>
<hr>
Now try some simple Java scriptlets:
<br>
<br>
<%
// The following code is from the earlier example minus the comments
String userName = "";
java.security.Principal principal = request.getUserPrincipal();
if (principal != null)
{userName = principal.getName();
}
%>
The user name is : <%= userName %>
<br>
<hr>
Now try some simple JSP tags:
<br>
<br>
<%-- Import the User Management tag library. --%>
<%@ taglib uri="um.tld" prefix="um" %>
<%--
Get the PreferredLanguage property as a String from the StockPortal user profile property set and store the value in the preferredLanguage variable.
--%>
<um:getPropertyAsString propertyName="PreferredLanguage"
propertySet="StockPortal" id="preferredLanguage"/>
<%-- Display the preferredLanguage variable in a scriptlet. --%>
The preferred language is: <%= preferredLanguage %>
<br>
Note: About the code in Listing 5-4:
Changing User Profile Values
Using the same scriptlet code in Listing 5-4, let's change the value of the property for the test user acme/acme.
http://<hostname>:7501/portalTools/index.jsp
For More Information on JSP Tags and User Profiles
WebLogic Portal 4.0 provides a number of other JSP tags you can use to bring rich functionality into your portlets quickly and easily. Most of the major functionality provided by the WebLogic Portal platform is available via JSP tags. For more a complete list of available portal-specific JSP tags, consult Portal Management JSP Tag Library Reference.
To learn more about how user profiles are created and managed in the WebLogic Portal platform, consult Chapter 7, "Creating and Managing Users," in the Guide to Building Personalized Applications.
Several examples that use personalization JSP tags are installed with the out of the box product. You can view these working examples by navigating to the following URL:
http://<hostname>:7501/p13n
Note: Login as acme/acme.
In What Ways Can Portal be Customized?
The out of the box installation of WebLogic Portal includes a sample portal Web application which is intended to be used as a building block for your custom portals. The most basic customization involves copying and modifying this sample portal. Even if you start from scratch, many of the supporting files are already created for you. This topic explains these simple tasks, as well as creating your own portlets, applying Webflows to individual portlets, and setting up a development environment where several Business Engineers can stage their work simultaneously on a single development instance of WebLogic Portal without overwriting each other's files.
How Portals Are Defined
Portals are constructed of JSPs, image files and whatever other HTML or Javascript is needed to achieve the desired functionality. Within the WebLogic Portal platform, a portal is defined using XML metadata files maintained by the Portal Module in the E-Business Control Center, as shown in Figure 5-9.
Figure 5-9 Portal.portal XML file
Comparing the entries in this portal definition file to those appearing in the E-Business Control Center Portal module, you can infer that the XML files are metadata, containing references to the J2EE application resources that make up the application itself. The entries in this portal definition file tell the platform where to go for each of the following resources:

Note: Default settings are used to initialize the setup for a visitor. They are overwritten when the visitor chooses "customize my portal."
How Portlets Are Defined
Portlets can include some combination of the following presentation elements:
Figure 5-10 Demo Portlet with Optional Controls
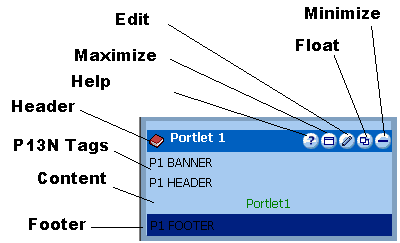
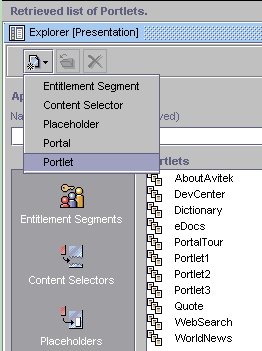
Using the E-Business Control Center, you can view a portlet definition by selecting Portlets in the Presentation tab, as shown in Figure 5-11.
Figure 5-11 Editing a Portlet
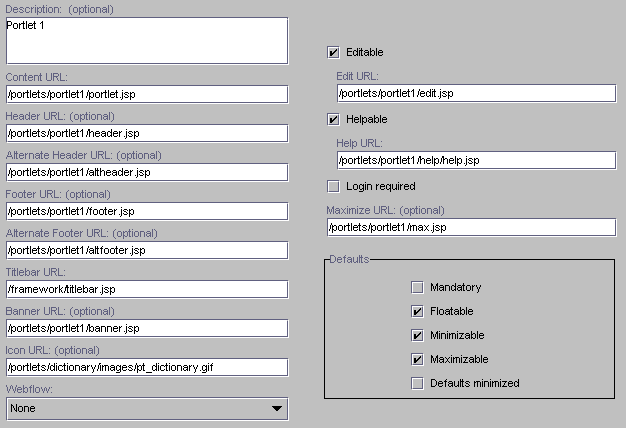
When the portlet is selected, the definition editor appears, exposing the parameters that make up a portlet in WebLogic Portal. Figure 5-12 shows the definition settings for Portlet2 in the sample portal. Figure 5-12 Portlet definition
Portlets, not unlike portals, are made up of JSPs, images and other resources, and are defined by XML metadata files. Where portal definitions determine which resources (skins and portlets) can be included, portlet definitions are more self-referential: They determine the components that make up the portlet, as well as certain presentation and navigation behaviors. Many of these definition elements are optional, and several can be determined within the portlet definition or within a Webflow specific to that portlet namespace.
How Portal Resources Are Defined
The JSPs, HTML pages, image files and directory structures for the portal web application may also be accompanied by CSS files and other sets of images used to provide skins for the new application. After these objects are installed on the server, the Business User can use the E-Business Control Center Portal Module to create references to these resources for the WebLogic Portal server.
The E-Business Control Center Portal module provides a graphical interface for specifying key parameters about a portal, and defining which resources are available to the portal, such as pages, layouts, skins and portlets. These resources can be edited offline, then synchronized later.
Define a Portal
Steps to define a portal resources are covered in Using the E-Business Control Center Portal Tool.
Look and Feel Customization
The appearance of HTML pages can be customized in many ways. WebLogic Portal provides a number of access points to replace the out-of-the-box layouts, images and HTML page styles.
The workflow is similar to other tasks you perform using the portal framework: As with portlets and other portal Web application objects, the application files (in this case, layout JSPs, cascading style sheet files and images) are created and migrated into the server's native file system using your choice of tools. The metadata is then edited and migrated using the E-Business Control Center. Finally, the application resources you have created and made available on the portal server are administrated and managed using the WebLogic Portal Administration Tools.
This section explains the implementation of layouts and skins in the out-of-the-box installation, and outlines the basic procedures for creating custom layouts and skins. After reading this section, an HTML developer familiar with cascading style sheets should be able to customize the appearance, layout and navigation buttons for portals and portlets, and be able to manage the inheritance of these look and feel objects within portal web applications.
How Layouts Are Implemented
Out of the box, WebLogic Portal provides the following five default layouts:
These layouts consist of two elements: a simple template.jsp file and a thumbnail image. The JSPs declare a set of placeholders and then insert these placeholders within the HTML fragment. The JSP resides within a layout folder, and its corresponding thumbnail image is displayed by the EBCC while the metadata is being edited. The layout folders are located in the following directory:
<portal_home>\applications\portal-project\library\portal\layouts
Create a Custom Layout
Creating a custom layout is fairly straightforward. This example uses a copy of an existing layout, shown in Listing 5-5.
Listing 5-5 template.jsp for fourcolumn layout
<%@ taglib uri='ren.tld' prefix='layout' %>
<layout:placePortletsinPlaceholder placeholders="left,leftcenter,rightcenter,right" />
<table width="100%" border="0" cellspacing="0" cellpadding="0">
<TR>
<TD WIDTH="25%" VALIGN="TOP">
<layout:render section='left'/>
</TD>
<TD WIDTH="25%" VALIGN="TOP">
<layout:render section='leftcenter'/>
</TD>
<TD WIDTH="25%" VALIGN="TOP">
<layout:render section='rightcenter'/>
</TD>
<TD WIDTH="25%" VALIGN="TOP">
<layout:render section='right'/>
</TD>
</TR>
</TABLE>
layout:placePortletsinPlaceholder
placeholders=''<placeholder names>
With the layout tag called and its placeholders declared, all that remains is to place calls to the layout tag within the HTML table. Notice that placeholders are referred to as "section" when they are used inside the HTML.
<portal_home>applications\portal\stockportal\framework\layouts
Notice that a new placeholder has been declared called center. For more detail on how these placeholders are used by the framework, consult The Auto Placer and "Homeless" Portlets.
Note: Make sure the thumbnail is named the same as the layout directory.
Listing 5-6 template.jsp for fivecolumn layout
<%@ taglib uri='ren.tld' prefix='layout' %>
<layout:placePortletsinPlaceholder placeholders="left,leftcenter,center,rightcenter,right" />
<table width="100%" border="0" cellspacing="0" cellpadding="0">
<TR>
<TD WIDTH="20%" VALIGN="TOP">
<layout:render section='left'/>
</TD>
<TD WIDTH="20%" VALIGN="TOP">
<layout:render section='leftcenter'/>
</TD>
<TD WIDTH="20%" VALIGN="TOP">
<layout:render section='center'/>
</TD>
<TD WIDTH="20%" VALIGN="TOP">
<layout:render section='rightcenter'/>
</TD>
<TD WIDTH="20%" VALIGN="TOP">
<layout:render section='right'/>
</TD>
</TR>
</TABLE>
How Skins Are Implemented
Out of the box, WebLogic Portal provides the following five default skins:
Skins are made up of .css files and some images. The thumbnail images for the EBCC reside in the following directory:
<portal_home>applications\portal-project\library\portal\skins
The folders containing images and css files reside in the following directory:
<portal_home>applications\portal\stockportal\framework\skins
For stockportal, the location of these resources is stipulated in the following file:
<portal_home>\applications\portal\stockportal\framework\resourceURL.inc
Making Custom Skins Available to the Portal Framework
To create custom skins, have an HTML designer create cascading style sheet files and HTML image files, and package them according to the skins directories in the following folder:
<portal_home>applications\portal\<yourportal>\framework\skins
portal-project\library\portal\skins
<skin-pool>
<skin-name>coologic</skin-name>
<skin-name>futurism</skin-name>
<skin-name>newskin</skin-name>
...
</skin-pool>
Note: These resources also exist within <ebcc_home>\applications\ portal\application-sync\webapps\<yourportal>
When designing skins, note that CSS attributes take precedence over non-CSS attributes. For example, if the content heading color attribute is set within the JSP:
<span class="contentheading" color="green">Test</span>
But the contentheading style is set this way:
.contentheading{
color: blue;
}
The text will be displayed blue instead of green.
Webflow and the Portal Platform
To customize the behavior of your portal Web applications, whether that means creating special navigation logic for a simple portlet, or developing complex business and presentation framework customizations that change the portal platform to suit your business case, an understanding of Webflow is required.
Figure 5-13 outlines the architecture of the portal platform, and gives insight into the way Webflow functionality is implemented.
Figure 5-13 Portal High Level Architecture
The Portal Framework as a Webflow Application With a few exceptions, Webflow works the same way in portal web applications as it does within the rest of the platform. That is, you can use Webflow to coordinate different parts of your portal web application, enabling code reuse and maintainability. Because its main function is to serve as a structure of reusable presentation and navigation modules, the Portal framework itself can be though of primarily as one large Webflow application. For this reason, the default Webflow underlying the sample portal included with WebLogic Portal, although it can be edited, should be thought of as a fundamental part of the Portal framework. As such, the portal.wf file included with the installation of the stockportal should not be edited. Unless you or your developers possess intimate knowledge of BEA Webflow functionality, the Portal Webflow should be reused as is. That said, a developer well versed in Webflow can customize the Webflow for a portal. For more information on Webflow, consult the Guide to Managing Presentation and Business Logic: Using Webflow and Pipeline. For the most part, Webflow functionality is invoked the same way within the Portal framework as it is within the rest of the WebLogic Server platform, with the Webflow servlet (in this case the PortalWebflowServlet) performing most of the routing between validation, session logic and custom processor nodes. For an exhaustive discussion of Webflow, consult the Guide to Managing Presentation and Business Logic: Using Webflow and Pipeline. This section covers those aspects of Webflow functionality that are specific to the Portal framework. Portal Presentation Logic and Webflow Webflow and WebLogic Portal could also be thought of as two complementary navigation mechanisms. The portal platform provides an array of content placeholders, each able to function as a virtual browser that controls its own state without influencing the state of its neighbor portlets. The Webflow mechanism is designed to enable the navigation logic of a web application to be controlled by a multitude of factors, meaning that Personalization, Commerce and Campaign Services can all be coordinated to influence what is presented to the visitor at runtime. While portal Webflow is largely a part of the platform you are not expected to customize, each individual portlet can be assigned its own particular Webflow. The following section explains the basic requirements in using Webflows with portlets. Note: For the most part, Webflow customization is to be performed using the Webflow Editor with the E-Business Control Center. This means you will not be editing the XML files in a text editor. This section exposes some fragments of these files for illustration only. Portlets and Webflow The Webflow associated with portals are generally not to be edited because it is fundamental to the application logic that makes up the portal platform. Individual portlets, however, can have individual Webflow files assigned to them, allowing practically all Webflow functionality to be applied to a portlet. Portlet Webflow Parameters Portal Webflow is always invoked with the following three parameters: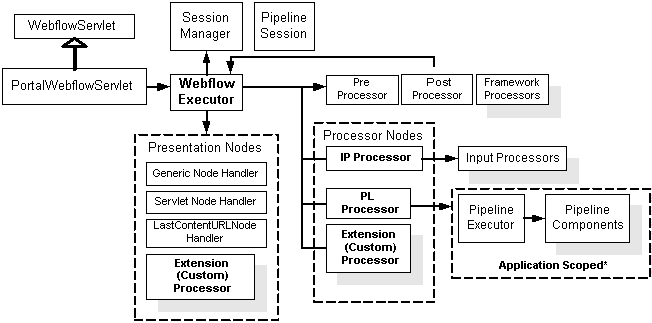
What Events Are Called on Portlet Webflow?
The out-of-the-box framework uses the following portlet events, all of which must be handled when Webflow is invoked:
These events are called when the corresponding actions are performed, and handled by the out-of-the-box framework. You can use these events within your own portlets, and you can also define your own events. Your custom events can be triggered from within your custom portlets, or they can be triggered by portlet framework events.
The Refresh Event
Understanding Webflow in portals requires a grasp of the Refresh event. To illustrate the way this event is used, consider the following page view of the sample portal shown in Figure 5-14.
Figure 5-14 Three Portlets
If a visitor minimized portlet2, a refresh event would be sent to both the other portlets via the PortalWebflowServlet, illustrated in Figure 5-13. It is this refresh event which would be used to make one portlet communicate with or respond to another portlet. (Remember that this refresh event is accompanied by the portlet namespace as well as the origin.) The Origin Parameter Portlet Webflows do not use Origin differently than other web applications. Consider what happens when a user clicks on the Next Page link in Portlet2 as shown in Figure 5-14. As you can see from looking at the Webflow fragment show in Figure 5-15, the presentation node defined as the origin is "portlet," and the destination node declared for that origin is portletB. Figure 5-15 Portlet2 Webflow Origin for Page 1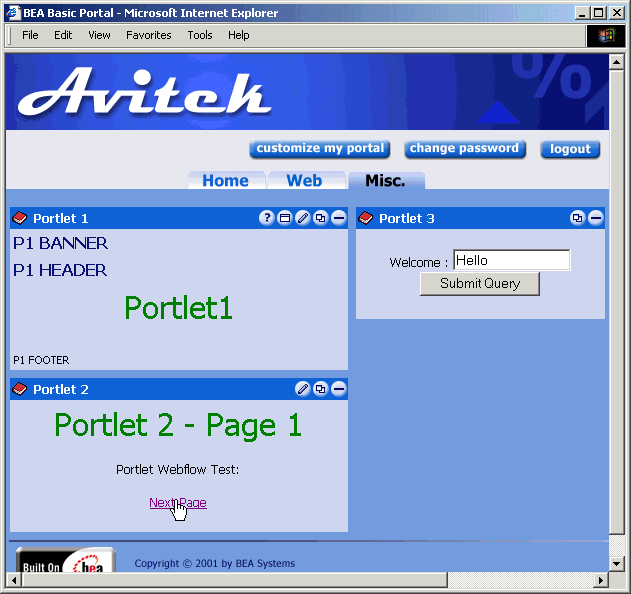
Sure enough, clicking on the "Next Page" link in page 1 of Portlet2 takes you to Page 2, as shown in Figure 5-16. Figure 5-16 Portlet Origins and Webflow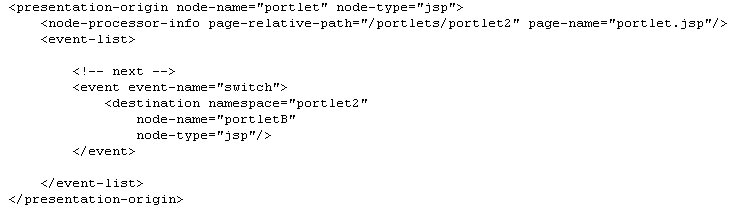
To understand how the "Previous Page" link on Page2 is made to point to the initial presentation node designated for Portlet2, look at the Webflow fragment show in Figure 5-17. Figure 5-17 Portlet2 Webflow Origin for Page 2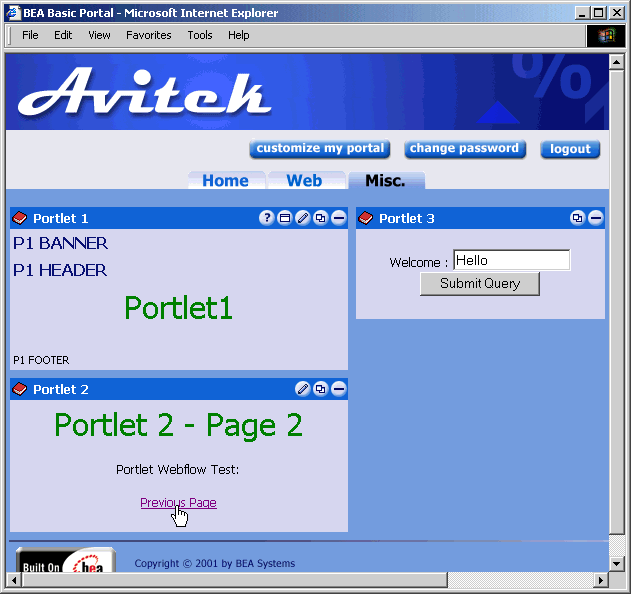
Considering this simple example illustrating the Origin parameter and the way Refresh events are handled in the portal framework, you can begin to see how much customization can be accomplished without writing any Java code. Keep in mind, however, that you will not need to edit the Webflow file directly - these fragments are shown for illustration only. The actual Webflow configuration is done using the Webflow Editor. Figure 5-18 is an image from the Webflow editor, showing a very simple portlet Webflow which navigates from one JSP to another and back. You can see an example of a Webflow this simple in portlet 2 in the stock portal. Figure 5-18 Simple Portlet Webflow Image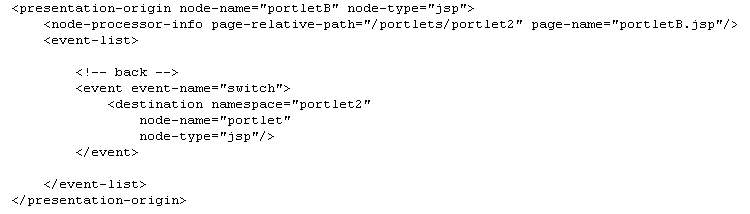
Using Webflow Within a Portlet A few general reminders could save you some time: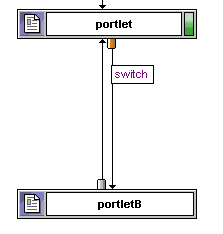
When to Use Portlet Webflow
Webflow is not mandatory - it is an advanced feature of the WebLogic Portal platform. For more information on Webflow, consult the Guide to Managing Presentation and Business Logic: Using Webflow and Pipeline. Briefly, here are some reasons to use Webflow in individual portlets:
What Portlet Webflows Can Specify
In order for them to use Webflows, portlets must observe the following contract: the Edit, Maximize and Content URLs described in the table above can either be declared within the portlet definition, or they can be handled within the Webflow for that individual portlet.
Note: By design, presentation nodes for a portlet must exist in the same namespace. Non-presentation nodes can exist in separate namespaces, but the portlet webflow must return to the originating namespace for all presentation nodes. This means that portlets may not have multiple namespaces.

|

|

|
|
|
|
Copyright © 2002 BEA Systems, Inc. All rights reserved.
|