
|
|
|
|
|
|
Synchronizing Application Data
Application data expresses your business model and specifies how your enterprise application behaves to support your business goals. For example, a campaign is a collection of application data that specifies how your enterprise application helps you reach sales or advertising goals.
A Business Engineer (BE) uses the E-Business Control Center to create, modify, and save application data to a local file system. Then a developer uses either the E-Business Control Center or a Java command to synchronize the modified data with an active enterprise application.
A System Administrator can configure the enterprise application to synchronize the data amongst a collection or cluster of active servers and applications.
This topic includes the following sections:
How Application Data is Organized and Distributed
During the development cycle, a Business Engineer (BE) creates application data on a workstation and then synchronizes it with an active enterprise application. Each environment stores the data in different formats:
This section includes the following subsections:
For recommendations on setting up a development environment to support concurrent development, refer to "Milestone 5: Set Up a Development Site" under "Workflow for Developing an E-Business Web Site" in Strategies for Developing E-Business Web Sites.
E-Business Control Center Data
The E-Business Control Center creates a separate directory tree of XML files for each application that it modifies. For example, a BE named Pat installs the E-Business Control Center on her workstation and uses it to develop campaigns, customer segments, and portlets for two different enterprise applications, Bank and Invest. (See Figure 7-1.)
Figure 7-1 One Directory Tree for Each Enterprise Application
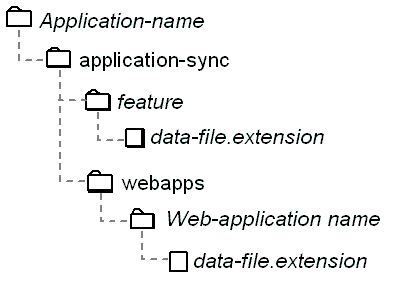
The directory tree of XML files for each application conforms to the following structure (see Figure 7-2):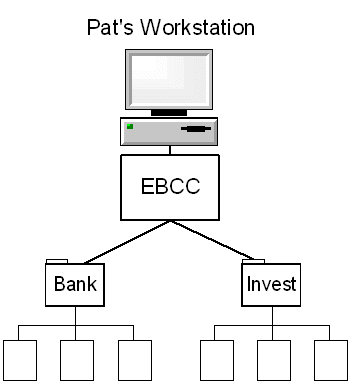
Figure 7-2 Directory Structure of Client-Side Application Data
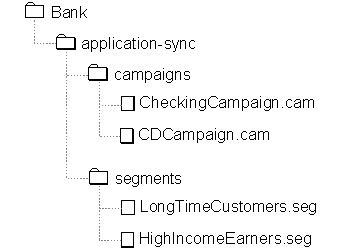
For example, for the Bank enterprise application Pat defines two campaigns and two customer segments. (See Figure 7-3.)
Figure 7-3 Example of Application Data on the Client
Table 7-1 describes directory and filename extensions for all application data types. All of the directories and files are located under root-dir/application-sync. Note that segments, contentselectors, discounts, and entitlements store all files in a subdirectory.
Scope of Application Data
With the exception of Webflow data, all application data is scoped for an enterprise application. For example, when you synchronize campaign and placeholder data, all Web applications within the enterprise application can use it.
Webflow data, however, is scoped for a single Web application to prevent ambiguities with the Web applications' namespaces. For example, a typical Web application contains a file named index.jsp. By scoping Webflow for a single Web application, the filename index.jsp is unambiguous: it refers to index.jsp in the current Web application.
Synchronized Data
When developers are ready to synchronize data, they can use either the E-Business Control Center or a Java command to synchronize the local files with a deployed application.
This section contains the following subsections:
For instructions on starting a synchronize operation, refer to Synchronizing Application Data.
For information on setting up data synchronization in a clustered environment, refer to Deploy and Configure DataSync Web Applications for the Cluster.
The DataSync Web Application and Master Data Repository
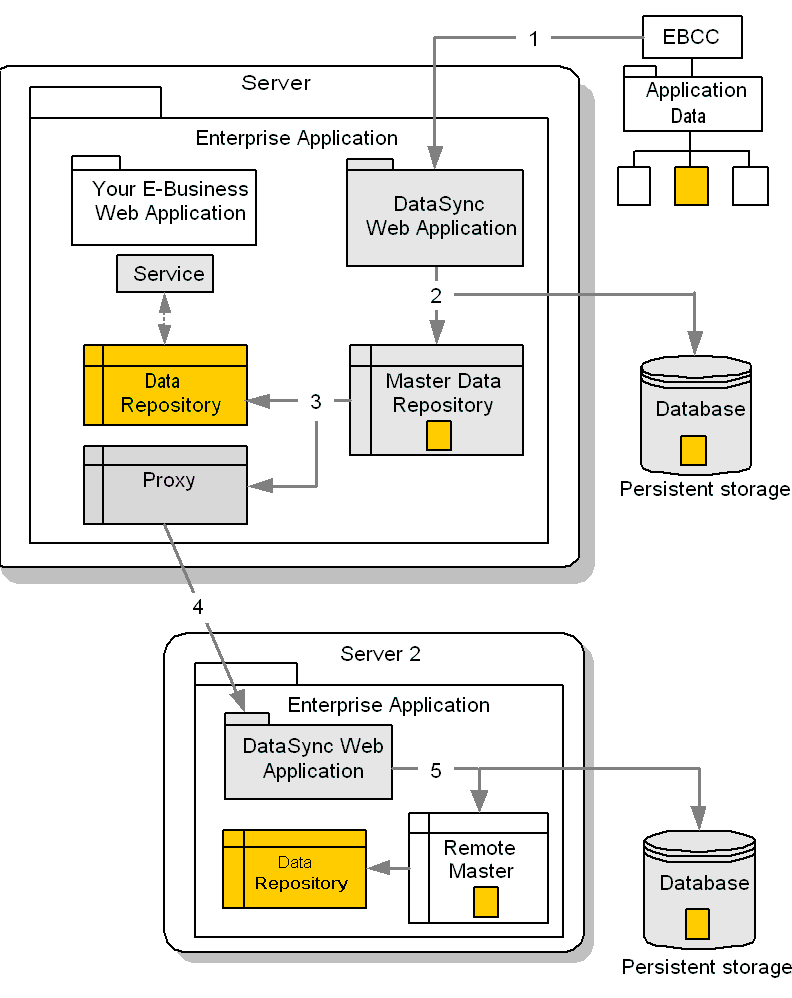
Each enterprise application includes a DataSync Web application, which receives synchronization requests from the E-Business Control Center. After it receives a request, the DataSync Web application channels the application data from the E-Business Control Center to the following locations:
The services in your enterprise application create their own Data Repositories, which contain subsets of the data that is in the Master Data Repository. (See Figure 7-4.)
Figure 7-4 The Master Data Repository
The services use the data in the Data Repositories to carry out business tasks. For example, the Rules service uses the Data Repositories to evaluate whether customers fit into a particular customer segment. This architecture enables each service to parse a small, specific set of information. For example, the Placeholder Data Repository copies placeholder-related information from the master. When the Placeholder Service requests data about placeholders, it only needs to parse the subset of information in the Placeholder Data Repository. Each time the Master Data Repository is synchronized, it notifies the Data Repositories. These Data Repositories then synchronize their data subsets with the data in the master. Proxy Data Repositories If you want to synchronize the same application data to multiple enterprise applications, you can set up a Proxy Data Repository. A Proxy Data Repository represents a notification link to a DataSync Web application that is located in another enterprise application. Usually, you use Proxy Data Repositories to synchronize multiple instances of the same enterprise applications that are deployed on different servers. (See Figure 7-5.) Figure 7-5 Proxy Data Repository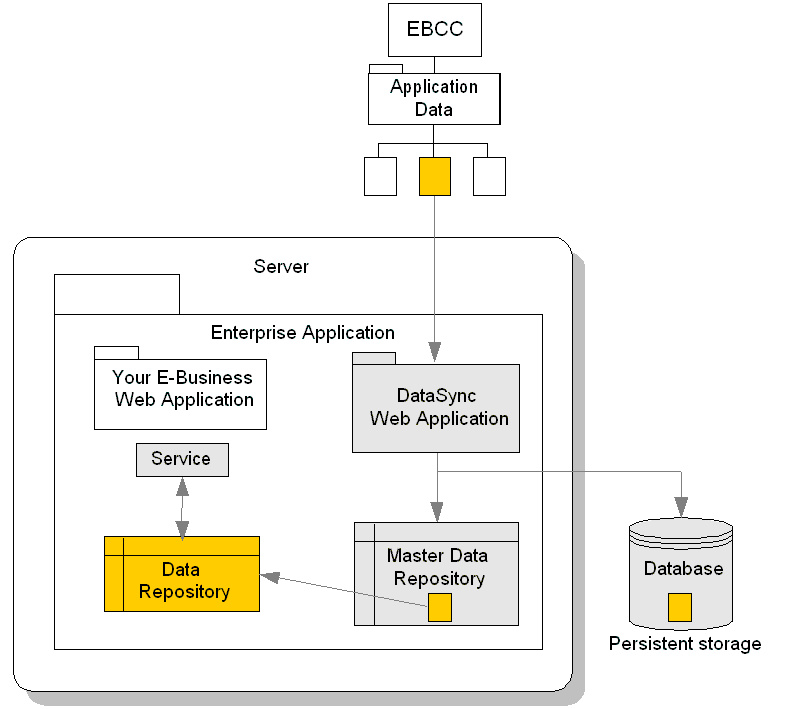
In a cluster, you can use a Proxy Data Repository to synchronize the Managed Servers. To enhance performance, the Data Repositories on Managed Servers always refer to the Master Data Repository on the proxy source; they never access the persisted data, which is located in the database. Only the Master Data Repository on the proxy source refers to the database when it needs to retrieve data from persistent storage. For more information on setting up Data Repositories for a cluster, refer to Deploy and Configure DataSync Web Applications for the Cluster and Refresh Data Repositories on Managed Servers. In a non-clustered environment, one practical application of a Proxy Server might be to keep an application in a test environment synchronized with an application in the development environment. Synchronization Process When a developer synchronizes data, the following process occurs (see Figure 7-6):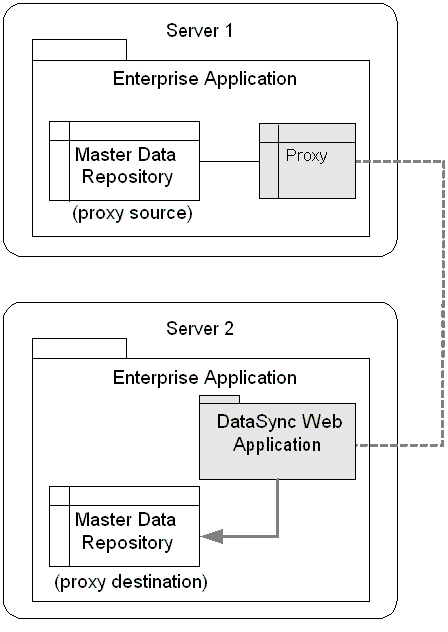
To send the XML files to the DataSync Web application, the synchronization operation uses the HTTP protocol.
The notified Data Repositories synchronize themselves with the data that is in the Master Data Repository.
The Proxy Data Repositories use XML over HTTP to forward any notification to their remote DataSync Web applications.
Figure 7-6 Synchronizing Data
Data Synchronization is Non-Transactional
The overall process of synchronizing data is non-transactional, though it includes safeguards to prevent data corruption and keeps track of its progress for you to monitor. For more information about monitoring the process of data synchronization, refer to Monitoring and Managing Data Repositories.
With the exception of updating the database, if a communications failure (or some other type of problem) prevents the E-Business Control Center or Java command from properly synchronizing one of its files, it does not abandon the synchronization process. Instead, after the process, it reports which files were successfully synchronized and which were not. To prevent data corruption, the synchronization process does not partially synchronize a file. If it cannot synchronize an entire file, it skips the file and moves to the next one in the queue.
Even after the E-Business Control Center transfers data to the DataSync Web application, other communications within and beyond the current application can fail. For example, a Proxy Data Repository might be unable to reach its remote application. If an error occurs during a given transmission, the synchronization continues for other services or machines.
With this process it is possible that one service or machine fails to be synchronized while the others are successfully synchronized. If you use a clustered environment, we recommend that you maintain at least one mirror cluster. When you want to synchronize application data to your production cluster, you can disable one mirror site and synchronize the data onto the disabled site. Before bringing the disabled site back online, you can monitor the data repositories to verify that all subordinate Data Repositories have synchronized. Then repeat the process for the other mirror.
Synchronizing Applications That Are Deployed on the Same Server
Each enterprise application that you deploy must contain its own DataSync Web application. If you deploy multiple enterprise applications onto the same server instance, you must modify the URIs of the DataSync Web applications so that each DataSync uses a unique address. The application.xml file includes XML elements that declare the URI for the DataSync Web application. For information on using application.xml to declare the DataSync Web application, refer to Adding DataSync.
Configuring a Proxy Data Repository
If you want to synchronize the same application data with multiple enterprise applications, you can set up Proxy Data Repositories. This document uses proxy source to identify the Master Data Repository that notifies a proxy of synchronization requests; it uses proxy destination to identify the remote Master Data Repository to which the proxy forwards the notification. (See Figure 7-5.)
While a typical use for Proxy Data Repositories is to synchronize applications on Managed Servers in a cluster, you can use them to synchronize independent servers that are not participating in a WebLogic Server cluster.
Note: Before you configure Proxy Data Repositories for a cluster, you must deploy two instances of the DataSync Web application. One instance will be used by Managed Servers for configuring their own Master Data Repositories; this instance contains no proxies. The other instance of the DataSync Web application is used to synchronize data across the cluster; this second instance is the Web application in which you configure proxies. For more information, refer to Deploy and Configure DataSync Web Applications for the Cluster.
Configuring Proxies
To create a Proxy Data Repository, do the following:
http://hostname:port-number/console
where datasyncWebApp is the DataSync Web application that you deployed for the purpose of synchronizing data. The name of the DataSync Web application depends on how you configured your enterprise application. For information on configuring the DataSync Web applications, refer to Adding DataSync.
In the example in Deploy and Configure DataSync Web Applications for the Cluster, this server is named datasyncBankSync.
The WebLogic Server Administration Console opens the Web Application Descriptor in an additional browser window.
Figure 7-7 Edit Web Application Descriptor
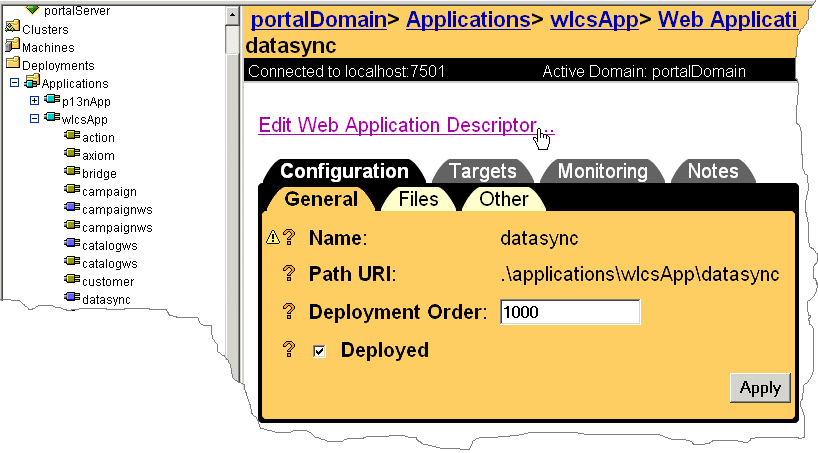
Figure 7-8 Configure a New Parameter
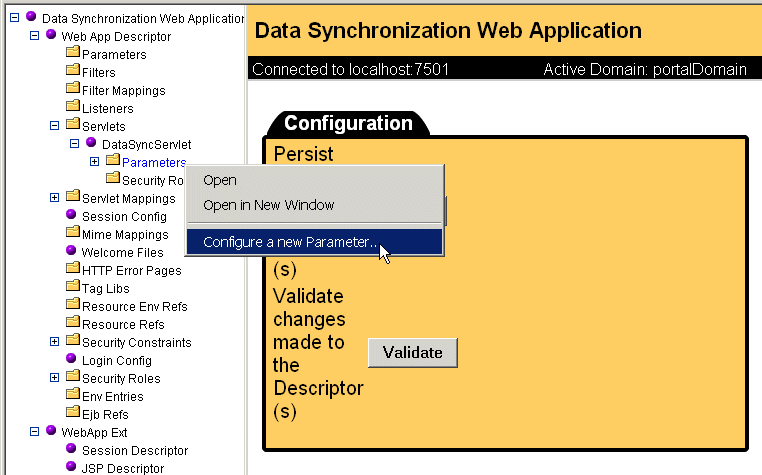
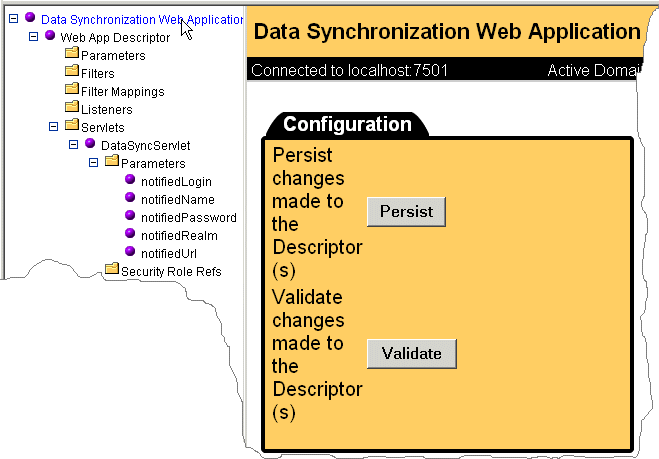
Figure 7-9 Persist Your Changes
When you synchronize data with the Master Data Repository, it notifies the Proxy Data Repository that you created.
Creating and Modifying Application Data
Before you use the E-Business Control Center to create and modify application data, you must create a directory tree that organizes the data on your computer.
This section contains the following subsections:
For information about the directory tree for application data, refer to E-Business Control Center Data.
Create an Application Data Directory Tree
For a new application, you can create the directory tree either through the E-Business Control Center or by using standard commands from your operating system. After you create the directory tree, place it under source control.
If you want to create or modify application data for an existing application, use your source control system to copy the directory tree to your computer. Then open the data in the E-Business Control Center.
Using the E-Business Control Center to Create a Directory Tree
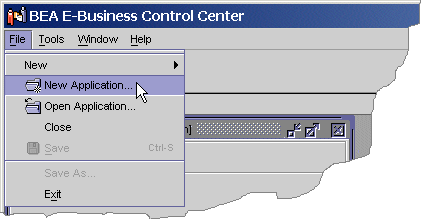
To use the E-Business Control Center to create a directory tree for saving application data, do the following:
Figure 7-10 Select New Application
The E-Business Control Center creates an empty directory tree that conforms to the schema as described in E-Business Control Center Data.
Place this directory tree under source control.
Using the Operating System to Create a Directory Tree
You can use standard operating-system commands to create an empty directory tree that conforms to the schema as described in E-Business Control Center Data.
Place this directory tree under source control.
Opening Data for an Existing Application
If another developer has already created and checked in an application-data directory tree, do the following to open it on your computer:
Do not select subdirectories within the directory tree.
Synchronizing Application Data
You can use either the E-Business Control Center or a Java command to synchronize application data. This section describes the following tasks:
Setting Up the E-Business Control Center to Synchronize Data
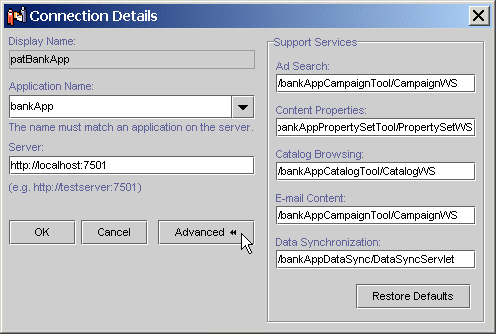
To connect to applications, the E-Business Control Center maintains connection settings. These settings provide such information as the URI of the application with which it exchanges data. Because the URIs differ for each application, create one connection setting for each application instance that you deploy.
This section describes how to modify a connection setting to specify the URI of your DataSync Web application.
If the Connections list is empty, click New.
Figure 7-11 Select an Existing Connection
/datasyncApp/DataSyncServlet Where datasyncApp is the URI for the DataSync Web application. For more information, refer to Adding DataSync. Figure 7-12 Enter URI for DataSync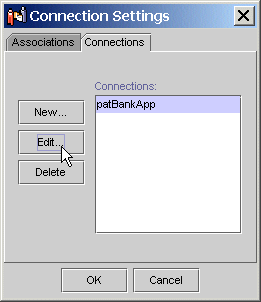
For information on the other settings in the Connection Details and Connection Settings boxes, refer to the E-Business Control Center online help or to "Using the BEA E-Business Control Center" under "Introduction to the BEA E-Business Control Center" in the Guide to Using the E-Business Control Center.
Using the E-Business Control Center to Validate Data
Before you synchronize data to an active application, you can use the E-Business Control Center to scan (validate) the directory tree of data for the current application and report the files that have incomplete data items. For example, you might have saved a discount without defining the conditions under which the discount is available.
To validate an application, do the following:
The E-Business Control Center scans the directory tree and reports any incomplete files in the box. You can synchronize data that includes incomplete data items, but you might encounter errors because of the incomplete data. (See Figure 7-13.)
Figure 7-13 Report of Validation Results
Using the E-Business Control Center to Synchronize Data When you are ready to synchronize data with an application on an active server, do the following: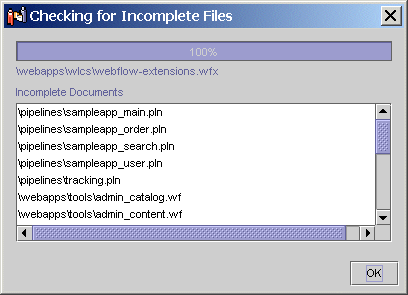
To add users or other groups to the Administrators group, use the WebLogic Portal Administration Tools. For more information, refer to "Using the User Management Tool" under "Creating and Managing Users" in the Guide to Building Personalized Applications.
Using the DirectoryDataSync Command to Synchronize Data
Before you synchronize data, consider using the E-Business Control Center to validate it. For more information, refer to Using the E-Business Control Center to Validate Data.
To synchronize application data to an active server from a command line, enter the following java command from an E-Business Control Center host:
java com.bea.p13n.management.data.DirectoryDataSync
{ -root pathname-to-directory-where-EBCC-stores-data }
{ -url http://hostname-or-IP:listen-port/datasyncApp/DataSyncServlet }
{ -user user-ID -password user-password }
{ -mode one-way-from-client | refresh-from-client }
where datasyncApp is the URI for the DataSync Web application. For more information, refer to Adding DataSync.
Synchronization Modes
You use the -mode argument to determine whether the DirectoryDataSync command synchronizes all of the files in the E-Business Control Center directory tree or only the files that have changed. To do so, supply one of the following parameters for -mode:
For example, the following command synchronizes only the data that you have modified for the Bank application:
java com.bea.p13n.management.data.DirectoryDataSync
-root d:\application-data\bank
-url http://255.251.255.01:7501/bankDataSync/DataSyncServlet
-user system -password weblogic -mode one-way-from-client
Cancelling the Command
If you cancel the command (by entering Ctrl-C, closing the command shell, or using some other method to force the command to stop), the data that has been synchronized to the application on the server might be in an inconsistent state. The next time you synchronize data, you should use the -mode refresh-from-client option.
Monitoring and Managing Data Repositories
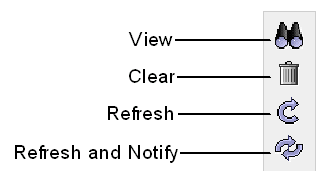
The DataSync Web application includes a set of JSPs that report the following information:
In addition, you can use the JSPs to clear and refresh the contents of each repository.
This section contains the following subsections:
Viewing the Contents of Data Repositories
To view the contents of Data Repositories, complete any of the following tasks:
View the Contents of the Master Data Repository
The Master Data Repository contains all of the data that was under the root of an application-data directory tree at the time of the last data synchronization operation. To verify that the Master Data Repository contains the same information as the RDBMS repository, refresh the contents. For more information, refer to Refreshing the Contents of Data Repositories.
To view the contents of a data repository, a DataSync Web application must be deployed on an active server. After activating the server, do the following:
http://hostname:port-number/datasyncApp/index.html
where datasyncApp is the URI for the DataSync Web application. For more information, refer to Adding DataSync.
Figure 7-14 View Contents of the Master Data Repository
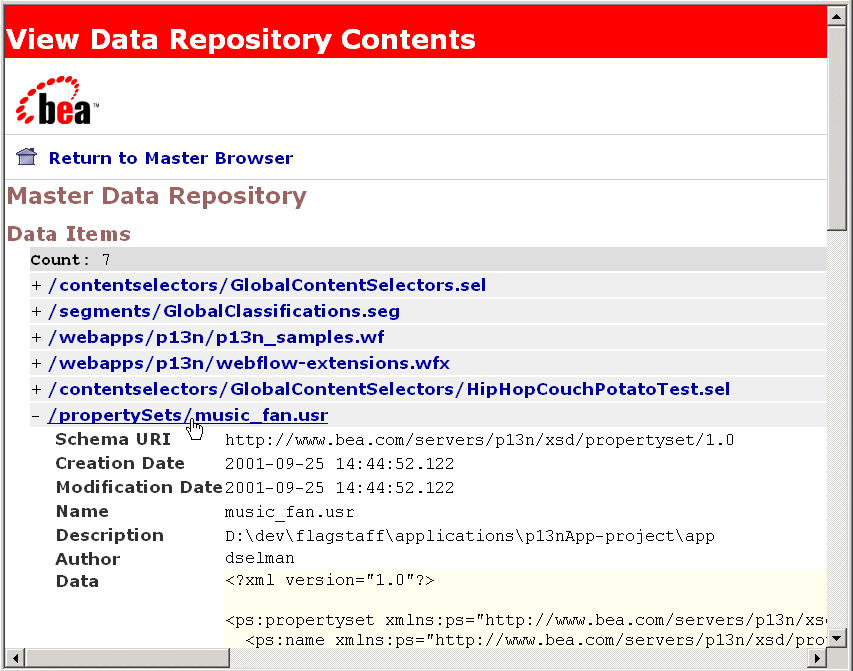
The DataSync Web application displays a list of all data items that are in the Master Data Repository. The Data Repository Browser displays the contents, which is formatted in XML. Figure 7-15 View the Contents of a Data Item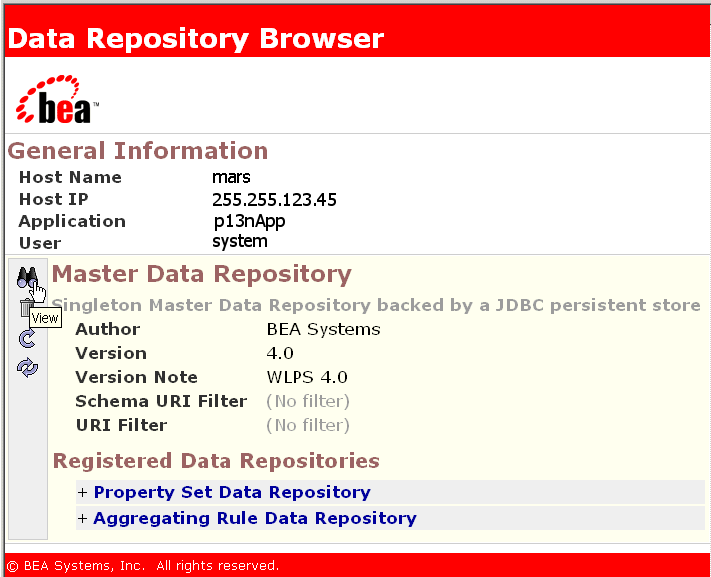
View the Contents of a Notified Data Repository
Each notified Data Repository contains its own copy of a subset of the information in the Master Data Repository. To verify that a notified Data Repository contains the same information as the Master Data Repository, refresh the contents. For more information, refer to Refreshing the Contents of Data Repositories.
To view the contents of the Data Repositories that the Master Data Repository notifies, do the following:
http://hostname:port-number/datasyncApp/index.html
where datasyncApp is the URI for the DataSync Web application. For more information, refer to Adding DataSync.
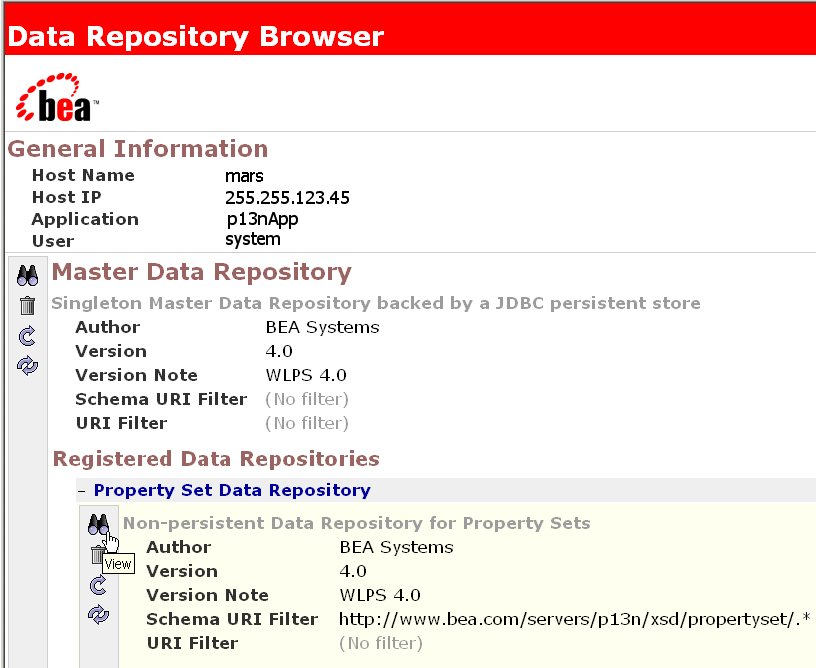
Figure 7-16 View the Contents of a Registered Data Repository
Viewing a Notification Chain
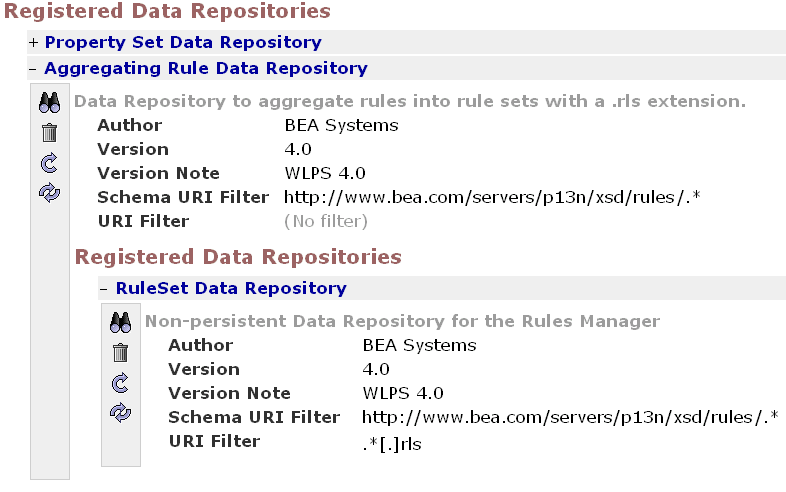
In some cases, the Master Data Repository does not directly notify a Data Repository. Instead, some Data Repositories are part of a notification chain: the Master Data Repository notifies one Data Repository, which then notifies another Data Repository. (See Figure 7-17.)
Figure 7-17 Notification Chain
For example, the Master Data Repository notifies the Aggregating Rule Data Repository, which in turn notifies the RuleSet Data Repository. The RuleSet Data Repository then synchronizes its contents with the data in the Aggregating Rule Data Repository. To view this relationship in the Data Repository Browser, do the following: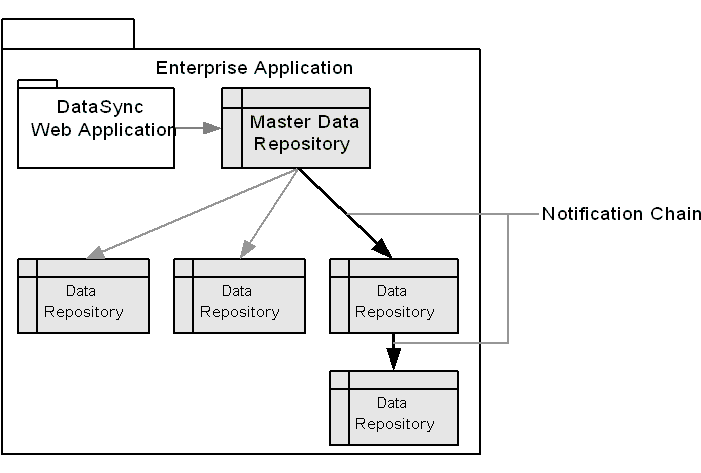
http://hostname:port-number/datasyncApp/index.html
where datasyncApp is the URI for the DataSync Web application. For more information, refer to Adding DataSync.
Figure 7-18 Viewing a Notification Chain
Clearing the Contents of Data Repositories
You can use the DataSync Web application to clear the contents of one or more Data Repositories and the corresponding data in the RDBMS repository.
To clear the contents a Data Repository, do the following:
http://hostname:port-number/datasyncApp/index.html
where datasyncApp is the URI for the DataSync Web application. For more information, refer to Adding DataSync.
Figure 7-19 Clear Contents
After you clear the contents, you must synchronize application data to repopulate the Data Repository.
Refreshing the Contents of Data Repositories
To refresh the contents a Data Repository, do the following:
http://hostname:port-number/datasyncApp/index.html
where datasyncApp is the URI for the DataSync Web application. For more information, refer to Adding DataSync.
Figure 7-20 Refresh Contents

|

|

|
|
|
|
Copyright © 2001 BEA Systems, Inc. All rights reserved.
|