
|
|
|
|
|
|
Working with the Bulk Loader
The following sections describe how to work with the Bulk Loader:
In addition to using the Bulk Loader, you can use the B2B Console to transfer data to and from the repository, as described in Importing and Exporting B2B Integration Components. For information about the repository, see Working with the Repository.
Understanding the Terminology
The following table describes some of the terms used in this chapter.
For example, consider the following repository data file: In the previous file, the following examples of the definitions are used:
<?xml version="1.0"?>
<!DOCTYPE wlc SYSTEM "WLC.dtd">
<wlc system-password="wlcsystem">
    <conversation-definition
        name="CMQPAConversation"
        version="1.1"
        business-protocol-name="XOCP"
        protocol-version="1.1">
        <role
            name="CMBuyer"
            wlpi-template="CMBuyerQPAPublic">
            <process-implementation wlpi-org="ORG1" />
        </role>
        <role
            name="CMSupplier"
            wlpi-template="CMSupplierQPAPublic">
            <process-implementation wlpi-org="ORG1" />
        </role>
   </conversation-definition>
</wlc>
Importing Data into the Repository
The following sections provide information about importing repository data:
How the Bulk Loader Imports Data
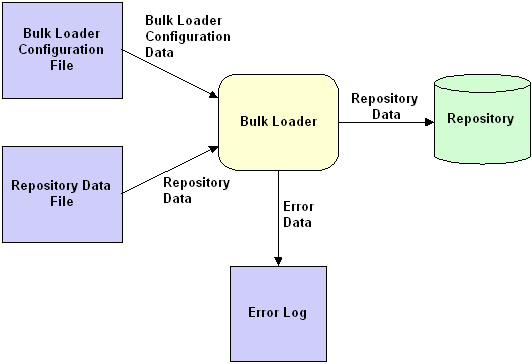
As the following figure shows, the Bulk Loader parses a Bulk Loader configuration file to get instructions about transferring data from a repository data file into the repository. Both files are XML files. If the Bulk Loader detects any errors during this procedure, it creates an error log.
Figure 7-1 Using the Bulk Loader to Import Repository Data
The following table describes the logic the Bulk Loader uses to recreate an existing element.
The following table lists the default values for special IMPLIED attributes.
Note: The abbreviation wlc is a legacy from a previous release of the product. The wlc element corresponds to the top-level node, B2B, in the B2B Console. Procedure for Importing Data into the Repository Notes: In addition to using the Bulk Loader, you can use the B2B Console to transfer data to and from the repository, as described in Importing and Exporting B2B Integration Components.
You cannot run the Bulk Loader when the B2B engine is running. If the B2B engine has shut down abnormally, thus preventing the Bulk Loader from running, you can force the import, as described in Forcing the Bulk Loader.
To import data from a repository data file into the repository:
Use the same command for importing, exporting, and deleting data. The Bulk Loader configuration file indicates which action the Bulk Loader should take.
While importing data, the Bulk Loader checks for errors, as described in Checking Data.
Note: For information about the bulkloader command, see WebLogic Integration Commands in Starting, Stopping, and Customizing BEA WebLogic Integration.
Exporting Data from the Repository
The following sections provide information about exporting repository data:
How the Bulk Loader Exports Data
As the following figure shows, the Bulk Loader parses a Bulk Loader configuration file to get instructions for transferring data from the repository to a repository data file. Both files are XML files. If the Bulk Loader detects any errors during this procedure, it creates an error log.
Figure 7-2 Using the Bulk Loader to Export Repository Data
Full and Partial Repository Exports When you export data from the repository, you can specify a full export or a partial export, as described in the following table.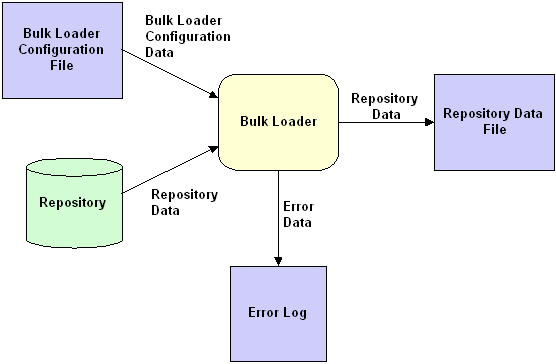
By default, the Bulk Loader performs a full repository export. To perform a partial repository export, use the entities XML element in the Bulk Loader configuration file to specify which data elements you want to export. The Bulk Loader uses the entities values to traverse the repository to the specified data elements. For example, to export a specific collaboration agreement, include the <entities> element and specify some identifying information for the collaboration agreement in the required structure, as shown in the following listing. This strategy can be used for all types of data elements. For a complete description of the entities XML element, see the WLCConfig.dtd file in the lib\dtd subdirectory of your WebLogic Integration installation directory. Listing 7-1 Example of a Bulk Loader Configuration File for Exporting a Specific Collaboration Agreement Short and Long Repository Exports When you export data from the repository, you can specify a short export or a long export, as described in the following table.
<?xml version="1.0"?>
<!DOCTYPE wlc-config SYSTEM "WLCConfig.dtd">
<wlc-config>
    <unload-processing-parameters>
       <database-url>jdbc:weblogic:oracle:REPO</database-url>
        <database-driver>weblogic.jdbc.oci.Driver</database-driver>
       <database-user-id>scott</database-user-id>
       <database-password>tiger</database-password>
       <xml-file-name>ExportRepoData.xml</xml-file-name>
       <entities>
          <wlc>
           <collaboration-agreement
              name="QPA-XOCP-TP1-TP2"
              version=1.2>
           <collaboration-agreement>
          <wlc>
       </entities>
    </unload-processing-parameters>
</wlc-config>
By default, the Bulk Loader exports repository data in the short format. To perform a long repository export, set the format attribute for the unload-processing-parameters XML element in the Bulk Loader configuration file to long. Because the long format includes internal repository data, in addition to values for various objects, we recommend that you use the long format only for the following reasons:
For an example of a Bulk Loader configuration file that specifies a format value, see Listing 7-3. For a complete description of the format attribute, see the WLCConfig.dtd file in the lib\dtd subdirectory of your WebLogic Integration installation directory, and Short and Long Repository Exports.
Procedure for Exporting Repository Data
Note: In addition to using the Bulk Loader, you can use the B2B Console to transfer data to and from the repository, as described in Importing and Exporting B2B Integration Components.
You cannot run the Bulk Loader when the B2B engine is running. If the B2B engine has shut down abnormally, thus preventing the Bulk Loader from running, you can force the export, as described in Forcing the Bulk Loader.
To export data from the repository to a repository data file:
Use the same command for importing, exporting, and deleting data. The Bulk Loader configuration file indicates which action the Bulk Loader should take.
While importing data, the Bulk Loader checks for errors, as described in Checking Data.
Note: For information about the bulkloader command, see WebLogic Integration Commands in Starting, Stopping, and Customizing BEA WebLogic Integration.
Deleting Data from the Repository
The following sections provide information about deleting repository data:
How the Bulk Loader Deletes Data
As the following figure shows, the Bulk Loader parses a Bulk Loader configuration file, which is an XML file, to get instructions about deleting data from the repository. The dotted line in the figure indicates that the Bulk Loader affects the repository without sending any data to it. If the Bulk Loader detects any errors during this procedure, it creates an error log.
Figure 7-3 Using the Bulk Loader to Delete Repository Data
Procedure for Deleting Repository Data Note: You cannot run the Bulk Loader when the B2B engine is running. If the B2B engine has shut down abnormally, thus preventing the Bulk Loader from running, you can force the deletion of the data, as described in Forcing the Bulk Loader. To delete repository data: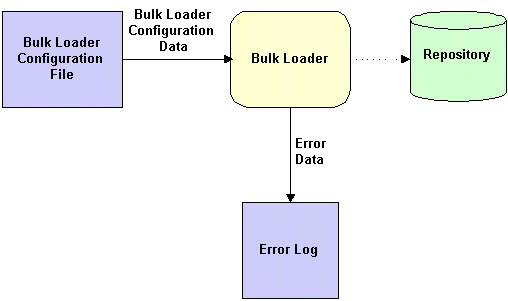
In both commands, cfg_file is the pathname of the Bulk Loader configuration file that you created in step 2.
Use the same command for importing, exporting, and deleting data. The Bulk Loader configuration file indicates which action the Bulk Loader should take.
While deleting data, the Bulk Loader checks for errors, as described in Checking Data.
Note: For information about the bulkloader command, see WebLogic Integration Commands, in Starting, Stopping, and Customizing BEA WebLogic Integration.
Working with the Bulk Loader Configuration File
Bulk Loader configuration files contain the database login information and processing instructions required to carry out the desired task. Each Bulk Loader configuration is an XML file that conforms to the WLCConfig.dtd.
Although the sections that follow provide much of the information you need to create your own Bulk Loader configuration file, you may need to refer to the WLCConfig.dtd located in the lib\dtd subdirectory for certain details.
A Bulk Loader configuration file has a fairly simple structure. The root element <wlc-config> contains one of the following elements, depending on the action:
The following table summarizes the processing parameters that can be specified to carry out each type of action.
To use the Bulk Loader to import, export, or delete data from the repository:
The following sections provide example Bulk Loader configuration files for importing and exporting data:
Bulk Loader Configuration File for Importing Data
The following listing is an example Bulk Loader configuration file for importing data into the repository.
Listing 7-2 Bulk Loader Configuration File—Import
<?xml version="1.0"?>
<!DOCTYPE wlc-config SYSTEM "WLCConfig.dtd">
<wlc-config>
    <load-processing-parameters database-initialization="no"\
       transaction-level="all">
       <database-url>
          jdbc:oracle:thin:@rdbmshost:1521:WLIDB
       </database-url>
       <database-driver>
          oracle.jdbc.driver.OracleDriver
       </database-driver>
       <database-user-id>
          scott
       </database-user-id>
       <database-password>
          tiger
       </database-password>
       <xml-file-name>
          ImportRepoData.xml
       </xml-file-name>
    </load-processing-parameters>
</wlc-config>
In addition to the processing parameters that are required in any Bulk Loader configuration file (DTD, database URL, database driver, database user ID, and database password), this example defines the following:
Although not shown in this example, the database-properties element is also available when exporting. This element can be used to specify any additional properties required by the JDBC driver.
Bulk Loader Configuration File for Exporting Data
The following listing is an example Bulk Loader configuration file for exporting data from the repository. In this case, the configuration file itself contains locale-specific characters (see xml-file-name), and therefore, the XML declaration must specify the appropriate encoding.
Listing 7-3 Bulk Loader Configuration File—Export
<?xml version="1.0" encoding="GB2312"?>
<!DOCTYPE wlc-config SYSTEM "WLCConfig.dtd">
<wlc-config>
  <unload-processing-parameters format="short">
      <database-url>
          jdbc:weblogic:mssqlserver4:WLIDB@myhost
      </database-url>
      <database-driver>
          weblogic.jdbc.mssqlserver4.Driver
      </database-driver>
      <database-user-id>
          myuserid
      </database-user-id>
      <database-password>
          mypassword
      </database-password>
      <xml-file-name>
          d:\bea1\RN2AITest\@nA&\exportedPeer1config.xml
      </xml-file-name>
      <encoding>
         GB2312
      </encoding>
     <database-properties>
          weblogic.codeset=GB2312
     </database-properties>
</unload-processing-parameters>
</wlc-config>
In addition to specifying values that are required in any Bulk Loader configuration file (DTD, database URL, database driver, database user ID, and database password), this example defines the following:
Working with the Repository Data File
The repository data file is an XML file that conforms to the WLC.dtd. To create a repository data file, create an XML file that specifies WLC.dtd in the DocType declaration, and conforms to the structure required by the DTD. Refer to the WLC.dtd, which is in the lib\dtd subdirectory of your WebLogic Integration installation directory, for the required structure.
The following listing shows a repository data file that creates an extended property set.
Listing 7-4 Example of a Repository Data File for a New Extended Property Set
<?xml version="1.0"?>
<!DOCTYPE wlc SYSTEM "WLC.dtd">
<wlc
    name="WLC"
    large-msg-support-on="ON"
    large-msg-min-size="10000"
    large-msg-location="c:\temp"
    proxy-host="andrew"
    proxy-port="7502"
    description="The WLC Hub" >
    <extended-property-set name="EPS 1">
        <xml-element name="C1">
            <xml-attribute name="C1_A1" value="C1_A1 Value"/>
            <xml-element name="C1G1">
                <xml-element name="C1G1_T1" text="C1G1_T1 Value"></xml-element>
                <xml-element name="C1G1_T2" text="C1G1_T2 Value"></xml-element>
                <xml-element name="C1G1_T3" text="C1G1_T3 Value"></xml-element>
            </xml-element>
            <xml-element name="C1G2" text="C1G2 Value"></xml-element>
            <xml-element name="C1G3" text="C1G3 Value"></xml-element>
        </xml-element>
        <xml-element name="C2">
            <xml-attribute name="C2_A1" value="C2_A1 Value"/>
            <xml-attribute name="C2_A2" value="C2_A2 Value"/>
            <xml-attribute name="C2_A3" value="C2_A3 Value"/>
            <xml-element name="C2G1" text="C2G1 Value"></xml-element>
            <xml-element name="C2G2">
                <xml-element name="C2G2_T1" text="C2G2_T1 Value"></xml-element>
                <xml-element name="C2G2_T2" text="C2G2_T2 Value"></xml-element>
                <xml-element name="C2G2GG1">
                    <xml-attribute name="C2G2GG1_A1" value="C2G2GG1_A1 Value"/>
                    <xml-element name="C2G2GG1_T1" text="C2G2GG1_T1
                        Value"></xml-element>
                </xml-element>
            </xml-element>
            <xml-element name="C2G3" text="C2G3 Value"></xml-element>
        </xml-element>
    </extended-property-set>
</wlc>
Checking Data
The following sections describe how the Bulk Loader checks data:
Creating an Error Log
To keep track of errors, the Bulk Loader creates a file named wlc.log in the current working directory. If a wlc.log file already exists, the Bulk Loader renames the existing file by appending a timestamp to the name in the following format: wlc.log.yyyy.mm.dd.hh.mi.ss. Then the Bulk Loader creates a new wlc.log file. The following table describes the fields in the timestamp.
Validating XML Files Before it processes any data, the Bulk Loader validates the XML files. The following table lists the files that the Bulk Loader validates for each type of Bulk Loader task.
To validate one of these types of XML files, the Bulk Loader checks it against the corresponding .dtd file. If the Bulk Loader detects an error in the XML file, it stops without processing the data. Checking Data Integrity After validating the XML files, the Bulk Loader checks the data integrity while it is processing the data. To check data integrity, the Bulk Loader verifies that the information in the XML files does not conflict with the information in the repository. For example, if the Bulk Loader is adding a new data element to the repository and if the new data element references another data element, the Bulk Loader makes sure that the referenced data element exists in the repository or in the repository data file. Checking Data Integrity While Importing or Deleting To have data integrity checked while data is being imported or deleted, set the transaction-level attribute in the Bulk Loader configuration file, as shown in Listing 7-3. If you do not set transaction-level, the Bulk Loader uses the default value. The Bulk Loader performs one of the following sets of actions, depending on the value of transaction-level:
If the Bulk Loader detects invalid data during a transaction for one of these types of data elements, it rolls back the current transaction and then performs the next transaction.
If the Bulk Loader detects invalid data for a B2B configuration data element at the B2B level (such as a wlc attribute), it rolls back all transactions that have been performed for that B2B element and stops.
Checking Data Integrity During an Export
If the Bulk Loader detects invalid data in the Bulk Loader configuration file, it does not perform the export.
Forcing the Bulk Loader
By default, the Bulk Loader does not import, export, or delete data while the B2B engine is running. If, for some reason, the B2B engine does not shut down normally, the Bulk Loader fails with the following error:
ERROR: WLC is still running or was shut down abnormally.
You can override this error and force the command to execute by adding the -force option to the Bulk Loader command file. You can update the existing Bulk Loader command file, or you can copy and update the file, as described in the following procedure:
java %DB_JVMARGS% -classpath %WLICP% com.bea.b2b.bulkloader.BulkLoader -v %CTLFILE%

|

|

|
|
|
|
Copyright © 2002 BEA Systems, Inc. All rights reserved.
|