


|

|
|
|
|
Defining Workflow Templates
This section discusses concepts and tasks pertaining to defining and maintaining workflow templates, template definitions, workflow variables and nodes. It includes:
Overview of Template Definition Tasks
Defining a complete workflow template definition includes creating a template, creating a template definition, designing the flow, defining variables, specifying node properties, and, optionally, defining exception handlers. While defining workflows is an iterative process, which requires revision and refinement at each level, the following steps outline the recommended order in which you should perform these tasks when defining a new template definition:
Note: You may also want to familiarize yourself with the workflow expression language and the Studio's Expression Builder and XPath Wizard tools before beginning to define workflow templates. Many of the tasks described in this section, such as creating a label for a template definition, defining a condition for a Decision node, and defining events, require entering expressions into dialog box fields. Complete information on workflow expressions is available in Using Workflow Expressions.
Alternatively, you can import previously exported event keys and calendars from existing workflow packages. For details, see Importing Workflow Packages. For procedures for defining Start properties, see Defining Event-Triggered Start Properties.
Alternatively, you can import previously exported event keys from existing workflow packages. For details, see Importing Workflow Packages. For procedures for defining Event node properties, see Defining Event Properties.
Working with Templates
A workflow template is, in essence, a folder or a container for WebLogic Integration workflow template definitions. Each workflow template can hold one or more workflow template definitions. Workflow template definitions are identified in the folder tree by an Effective and Expiry date and time, as described in Working with Template Definitions.
Figure 5-1 Workflow Templates and Workflow Template Definitions
A template has a one-to-many relationship with organizations, which means that a template is unique within the system, but can be defined for multiple organizations. A template is visible in the folder tree for each organization for which it is defined, along with all its template definitions. Any changes that are made to a template definition in the folder tree of one organization, including deletions, automatically appear in the folder tree in all other organizations with which the template is associated. When you import templates and template definitions using the Import/Export function, templates may be overwritten, but template definitions may not. If you import a template definition with the same dates as an existing one, the existing template definition will not be overwritten, but another one will be created. (For more information on importing templates, see Importing Workflow Packages). Creating a Workflow Template Note: To create a template, you must have Create Template permission. For details about permission levels, see Assigning Permissions to Users and Roles. To create a workflow template:
Figure 5-2 Template Properties Dialog Box
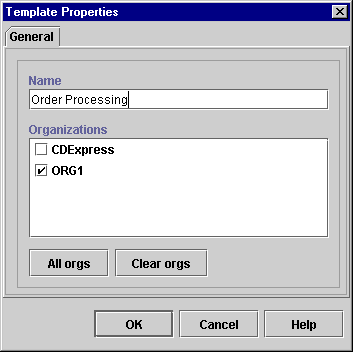
Note: If you associate a template with multiple organizations, any changes you make to the template are automatically reflected when viewing the template from different organizations.
Updating Template Properties
You can assign a template to additional organizations after it has been created or imported (for procedures, see Importing Workflow Packages), by using the Template Properties dialog box.
To update template properties:
Deleting a Template
When you delete a workflow template, the following occurs:
Note: To delete a template, you must have Delete Template permission. For details about permission levels, see Assigning Permissions to Users and Roles.
To delete a workflow template:
If there are instances of the template, you are prompted to delete the instances also. Click Yes to delete the instances, or click No to cancel the delete.
Working with Template Definitions
In the folder tree, a workflow template definition name consists of its effective and expiry dates and times. The effective and expiry dates and times represent the range of time within which the workflow template definition is available for instantiation, or run-time execution. Note that you may have multiple template definitions with the same effective and expiry dates.
To make a template definition available for instantiation, you must activate it first. At design time, you can activate as many template definitions as you want, with the only restriction being that you cannot activate template definitions with the same effective (starting) date.
The advantage of the effective and expiry feature is that it allows you to make workflow template definitions valid for exact periods of time, without having to manually inactivate and activate different template definitions over the course of the calendar year. For example, perhaps you have a cyclical business, which requires you to run a particular workflow template definition from January to March, followed by a second workflow template definition having different tasks or variables from April to June, followed by a third defined for July to September. Rather than having to manually inactivate one template definition and activate another for each quarterly period, you simply specify different effective and expiry dates, mark them all as active, and the server automatically selects the correct version when the workflow is instantiated.
On the other hand, although you can have multiple active template definitions, only one template definition can actually be instantiated at run time, which means that you should take care to design your effective and expiry dates in a rolling fashion, and avoid overlapping dates. If you have active template definitions with overlapping dates, for example, one from January to March, and another from February to April, the process engine will simply pick up the first one that it finds in the database, which is usually the first one to have been created at design time.
Note: If you want to specify different flows according to different business conditions, you should use multiple start nodes in the same template definition. For more information, see Defining Start Properties.
Creating a Workflow Template Definition
When you create a template definition, you specify its effective and expiry dates.
You can also enable auditing, which enables logging of run-time workflow information, such as client access and execution times, and allows you to make custom entries at points throughout a workflow by using the Make Audit Entry action (for more information, see Making an Audit Entry). The audit information is posted in an XML message to the default JMS audit topic, com.bea.wlpi.AuditTopic, and is written to a text file, myserver.log, located in the logs directory of the active WebLogic Integration domain on the server.
Note: To create a template definition, you must have Create Template permission. For details about permission levels, see Assigning Permissions to Users and Roles.
To create a workflow template definition:
Figure 5-3 Template Definition Dialog Box
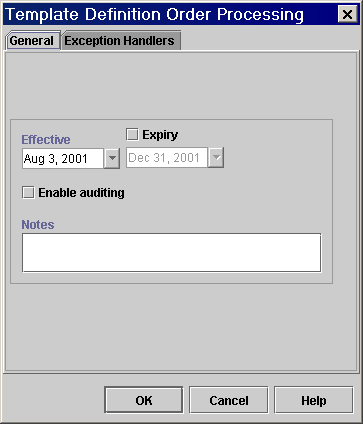
Note: If the Expiry option is not selected, the workflow template definition will always be valid and effective.
In the workflow design area, a default workflow template definition is presented along with a toolbar containing drawing shapes used for defining the workflow template. The default workflow template definition contains three shapes: Start, Task, and Done.
Figure 5-4 Workflow Design Area
You can begin to define the template definition by adding nodes and connections, as described in Working with Nodes or by adding variables, as described in Working with Variables. Opening an Existing Template Definition Although you can view read-only properties for a template definition by right-clicking any of its folders in the folder tree and selecting Properties from the pop-up menu, you cannot modify a template definition unless it is opened. Once you open a definition, it is locked and can only be opened in read-only mode by another user. Note: To open a template definition, you must have Create Template permission. For details about permission levels, see Assigning Permissions to Users and Roles. To open an existing workflow template definition: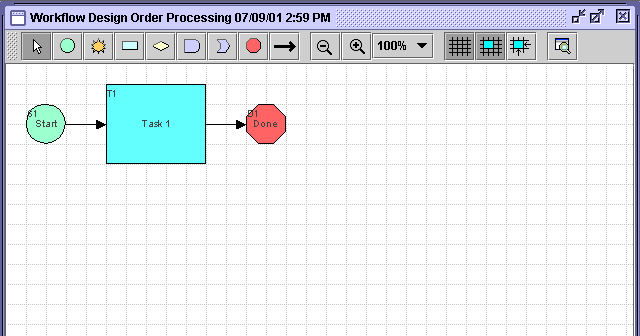
If there are existing instances of the selected workflow template definition, meaning that the selected workflow template definition has been started and an instance of the template definition exists in the server, a warning message will appear, as in the following figure.
Figure 5-5 Existing Instances Dialog Box
Note: You should not try to modify a template definition that has running instances, as this can cause unpredictable exceptions in those instances. If you want to make changes to such a template definition, you should do the following:
Saving and Closing a Template Definition
In the Studio folder tree, an asterisk (*) appears to the left of each workflow template definition that needs to be saved.
To save a template definition, do one of the following:
When you close a template definition, it is unlocked and available for use by another user.
To close a workflow template definition, do one of the following:
Updating, Labeling, and Activating a Template Definition
After you have created and opened a template definition, you can update the properties you specified when you created it (as described in Creating a Workflow Template Definition), add a label to it, and activate it.
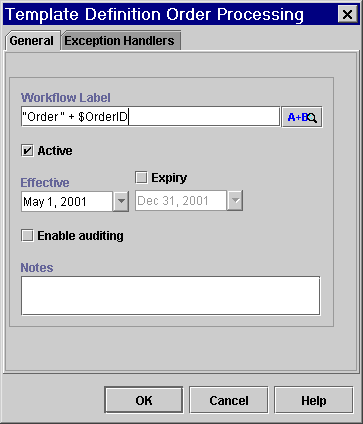
The workflow label you create here is displayed to a Worklist user in the Workflow Label column of the task list at run time. It also appears in the Workflow Label field of the Workflow Instances dialog box in the Studio at run time (for more information, see Viewing Workflow Instance Status). It is used to help identify the instance of the workflow, and could include information such as date and time, invoice number, customer name, or other relevant information that differentiates it from others. The label is formulated in workflow expression language, and can include constants, variables, operators, and other expression components. For more information about workflow expression features and syntax, see Using Workflow Expressions.
When you create a new template definition, it defaults to inactive status. Often template definitions that are currently in development are inactive to prevent premature invocation. However, before a workflow can be instantiated, or placed into the run-time environment, you must activate one of its template definitions.
To update the properties of a workflow template definition:
Figure 5-6 Updating Template Definition Properties
Copying a Workflow Template Definition
The Studio allows you to copy an existing workflow template definition within the same template. When this is done, all of the assigned workflow template definition properties are copied as well. This saves you time when you must create more than one workflow template definition with similar properties. The properties of the new workflow template definition can be modified as needed.
Note: The copied (new) workflow template definition will not be marked active. If you want to make it available for instantiation, you must activate it first. See Updating, Labeling, and Activating a Template Definition for details.
To copy an existing workflow template definition:
Printing a Template Definition
You can print workflow template definition diagrams from the Studio. There are two methods for invoking the print facility.
Figure 5-7 Print Workflow Text
The Text tab contains information relevant to each workflow node, including action and node notes, as well as details on actions within tasks, events, decisions and done nodes, including sub-actions within actions.
The Graphics tab contains a diagram of the workflow template definition.
Figure 5-8 Print Workflow Graphics
Click Print to print the information on the selected tab, or click Print All to print both the information contained in the Text tab and the diagram contained in the Graphics tab. In the Print dialog box, select the appropriate settings to print the workflow. Deleting a Template Definition When you delete a workflow template definition, the following occurs: 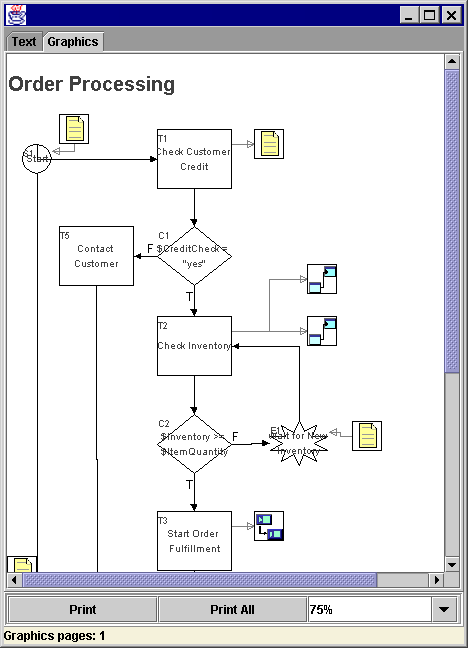
Note: To delete a template definition, you must have Delete Template permission. For details about permission levels, see Assigning Permissions to Users and Roles.
To delete a workflow template definition:
If there are instances of the template definition, you are prompted to delete the instances also. Click Yes to delete the instances, or click No to cancel the delete.
Working with Nodes
After you first create a workflow template definition, by default, the design area contains three shapes (nodes): Start, Task, and Done. The start node is set to a manual start by default and the task node assigns the task to the Worklist user who initiates the workflow. These are the minimal properties required to create a workflow that can be run. (For more information on editing Start node properties, see Defining Event-Triggered Start Properties, and for more information on editing Task node properties, see Defining Task Properties.)
The following table lists workflow shapes, their node name, and purpose.
Table 5-1 Workflow Shapes and Connections
Adding, Arranging, and Connecting Nodes
To manipulate shapes in the design area, you can do the following:
Note: For more information about the toolbar, see Using the Toolbar.
Once you have added a node to the design area, it immediately appears in the folder tree as well. Nodes are given default names, with a number indicating the order in which you placed the shape in the design area, such as T1, T2, T3, etc. for Task nodes. To rename a node and edit its properties, see Working with Node Properties.
Deleting a Node or Connection
To delete a node:
To delete a connection:
Workflow Design Guidelines and Tips
As you are adding, connecting and arranging shapes, you may wish to keep in mind the following design guidelines:
Working with Node Properties
Once you have placed node shapes into the workflow design area, you can begin specifying their properties. One of the first tasks you will want to do, for example, is to rename nodes to give them an easily recognizable view of the function they are to perform in the workflow. The following sections provide explanations and procedures for working with properties that are common to all types of nodes. For properties that are specific to each type of node, refer to the sections that discuss each node type.
To access node properties, do one of the following:
Renaming Nodes
You can provide a meaningful name for all node types, except Joins and Dones. Also, Decisions require that you enter a conditional expression to identify them. For information, see Defining Decision Properties.
To rename a node:
Specifying or Updating Successor Nodes
All node properties dialog boxes contain a Next tab which displays a list of all nodes in the current workflow. The next node in the flow is indicated by a check next to the node name. You can use this tab to specify the successor node (or nodes) to the current node or change the successor nodes defined in the design area. Selecting or deselecting check boxes on this tab automatically redraws the connection lines drawn in the design area.
Figure 5-9 Next Tab of Node Properties Dialog Boxes
Adding Notes to a Node All node properties dialog boxes contain a Notes text box that you can use to enter a comment about the node or actions contained in it. This is helpful for other users who access the same workflow and need to understand the workflow logic or design. Figure 5-10 Notes Tab of Node Properties Dialog Box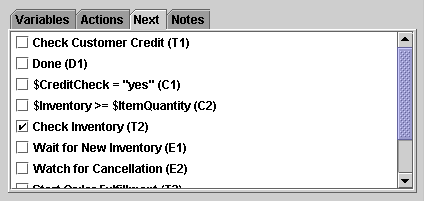
Additionally, Decision nodes and Task nodes also contain an Action Notes tab that lets you view notes defined for an action (see Adding Notes to an Action). Select an action in the left pane of the Task Properties or Decision Properties dialog box and the note that has been entered for it in the action definition is displayed. Adding, Updating, Reordering, and Deleting Workflow Actions All nodes, with the exception of Joins (AND and OR), allow you to add, update, reorder and delete actions within their properties dialog boxes. Figure 5-11 Actions Tab of Node Properties Dialog Boxes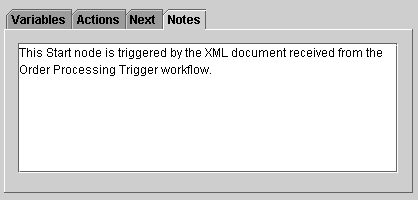
Actions define the operations that you want to perform when the node is activated. Actions specified on the Actions tabs of node properties dialog boxes are performed before the workflow proceeds to the next node (and the actions contained in it). While Task nodes require that you add actions to them, adding actions to other nodes is optional and not recommended, since in many cases the same logic can be implemented by adding successor Task nodes. Complete information for adding, updating, deleting re-ordering, and defining actions is provided in Working with Actions. Copying Nodes You can copy a shape representing a node within a workflow template definition and paste it into the current workflow template definition or into another open workflow template definition. Since any actions and properties that have been defined within the node are also copied, you can use the copying function to create reusable design patterns which may only require minor modifications. Note: If you are copying nodes between template definitions, be sure that any variables referenced by the node and its actions have been created in the target template definition, and that other referenced objects, such as roles, users and business calendars, are defined for the organization with which the template is associated. Any properties and actions that have been defined within the node are also copied. To copy a node and its properties within and between template definitions: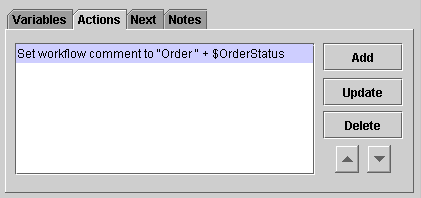
The copied node appears in the design area and in the folder tree. The properties dialog box for the action is displayed, with all settings copied from the source action.
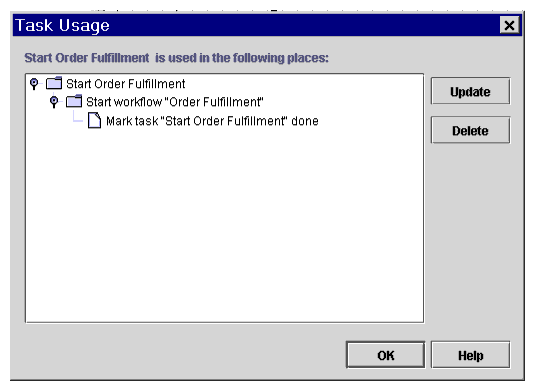
Viewing Task and Event Usage
You can view the different places where Event or Task nodes may be referenced, for example, by Task actions or the Cancel Workflow Event action. For more information, see Action Categories.
To see where a Task or Event node is used:
Figure 5-12 Task Usage Dialog Box
Working with Variables
Each workflow template definition can have a set of variables associated with it. Variables can hold values that are returned by business operations, that are extracted from XML documents, or that are set explicitly by workflow actions. Variables can also be used by the workflow for several other purposes, such as to evaluate a condition in a decision node, or to store the result of a response from the Worklist client application.
Not all workflow template definitions require variables. However, for those workflow template definitions containing processes that require variables, you can define these before you begin defining other workflow components such as node properties and actions, or add variables during the design process.
Workflow variables have a workflow-global scope. That is, a single variable is shared by all objects within a workflow template definition instance. Variables are, therefore, defined at the workflow template definition level in the folder tree and are referred to as workflow variables.
Variables can be of the following types:
Table 5-2 Workflow Variable Types and Initial Values
Note: If a plug-in is defined for variable types, additional variable types may be available.
Note: Initial values listed in the table above are determined by a setting in the server startup script. You can change initial values for all data types to be NULL by modifying this setting. For more information, see "Configuring BPM to Support Null Variables" in Customizing WebLogic Integration in Starting, Stopping, and Customizing BEA WebLogic Integration.
In addition, if the workflow is to be called by another workflow (for more information, see Defining Start Properties), you need to specify whether the variable is to serve as an input or output parameter. An input parameter indicates that the variable is to receive its value from the calling, or parent, workflow. An output parameter indicates that the variable contains a value that will be passed back to the calling workflow.
Additionally, for input parameters, you can specify whether or not they are mandatory. If the input parameter is mandatory, the workflow does not start until the value for the variable is received from the calling, or parent, workflow. If the value is not received, the workflow does not start, and an exception is thrown.
For details about passing parameters to called workflows, see Calling a Sub-Workflow.
To set the initial value of a variable, you must use the Set Workflow Variable action inside a node (for information, see Setting a Variable Value), or use the Variables tab of a Start or Event node, an Exception Handler, or the Send XML to Client action (for information, see Initializing Variables from Event Data).
When a variable is used in a workflow expression, the variable name is preceded by the dollar sign ($) or colon (:) or other characters. For more information on variable notation, see Using Variables.
Creating a Variable
To create a variable:
Figure 5-13 Variable Properties Dialog Box
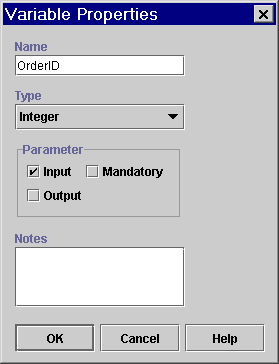
Note: Variable names cannot contain spaces.
Updating a Variable
To update an existing variable:
Viewing Variable Usage
To see where a variable is used within the workflow:
Figure 5-14 Variable Usage Dialog Box
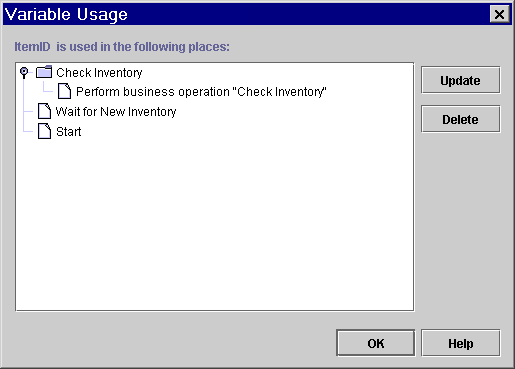
Deleting a Variable
You can only delete variables that have not yet been referenced in any workflow nodes, actions, or expressions. To view the places where a referenced variable is used, follow the procedure in Viewing Variable Usage.
To delete a variable:
Defining Node Properties
This section describes how to define node properties, according to each specific type of node:
Defining Start Properties
Every workflow has at least one start shape that indicates the beginning of the workflow. The first node after the start will be the first activated node of the workflow, which can be a Task, Decision, or Event node.
Note: If no Start node is specified, no node activation can occur in the workflow.
Start nodes can have four types of triggers:
Note: When you create a template definition, the default Start node is set to a manual start.
You can also specify more than one Start node, for various purposes, for example:
Note: To specify workflows that use sequential, rolling times, so that one flow expires and another one starts, you should define separate template definitions with the appropriate effective and expiry dates. For more information, see Working with Template Definitions.
Finally, you can use the Start node to initialize any variables created for the workflow. For example, you might have a counter in your workflow that you wish to take the value of 1 at the start of the workflow. You can assign this value to the counter variable upon activation of the start node. For more information, see Initializing Variables from Event Data.
To define a Start node:
Figure 5-15 Start Properties Dialog Box
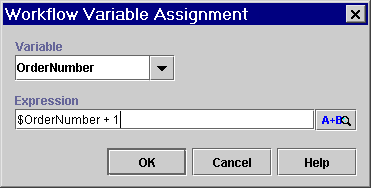
Figure 5-16 Workflow Variable Assignment Dialog Box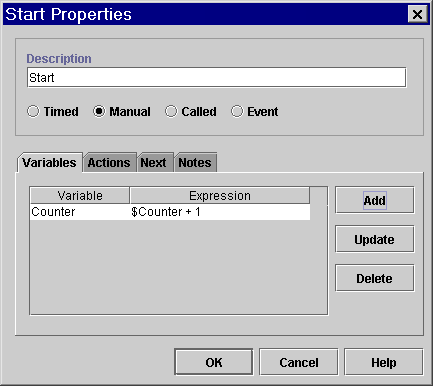
Defining a Timed Start Node
You can start a workflow at an exact time and date by specifying a start date expression. To start a workflow, you also need to specify the organization in which the workflow should be started.
You can also specify an interval at which the workflow will be restarted, such as every two days. In this case, an instance of the workflow will start every two days until the template expiry date. After the template expiry date, no additional workflows will be started.
Figure 5-17 Start Properties Dialog Box: Timed Option
Defining Event And Event-Triggered Start Properties
A workflow can be started, or nodes within a workflow triggered, by an event. An event is an asynchronous notification from another workflow or from an external source, such as another application. Start nodes can be defined as event-triggered, and Event nodes can only be triggered by an external event.
An event notification most typically takes the form of an XML document contained in a Java Message Service (JMS) message and received on a JMS queue, although it may also be plug-in defined, which means that the event notification can be a custom trigger rather than an XML document. (For more information, see Programming BPM Plug-Ins for WebLogic Integration).
The JNDI name of the default internal JMS queue for WebLogic Integration, from which messages are consumed by workflows, is com.bea.wlpiEventQueue. However, you can also set up alternate message queues; for more, information see "Configuring a Custom Java Message Service Queue" in Customizing WebLogic Integration in Starting, Stopping, and Customizing BEA WebLogic Integration.
In an XML event type, the actual trigger is either the document type declaration (DOCTYPE) specified in the prolog of the XML message, or it is the root element of the XML message. You specify the DOCTYPE or root element with which you want to trigger the event or start the workflow in a Start or Event node's properties dialog box. The event is not triggered unless the DOCTYPE or root element specified in the node's properties dialog box matches that in the incoming XML message.
In addition to using the DOCTYPE or root element, you can further qualify an event with an event key and an event condition. These are described below.
Understanding Event Keys
An event key allows you to specify the contents or JMS header or property values of incoming XML messages that will trigger a Start or Event node. That is, rather than allowing all incoming XML documents with a particular DOCTYPE or root element to trigger the node, you can filter the instances of incoming XML messages according to specific values contained in the XML body or JMS header fields, so that only a particular message, or messages, containing those values can trigger the node in the running workflow.
An event key consists of two parts:
You specify the key value expression in the Properties dialog box for Start or Event nodes. The key value expression is a workflow expression that is evaluated at run time to specify the exact data that the incoming message must contain for the node to be triggered. In a Start node, the expression typically contains a constant that refers to particular, recurring data contained in the incoming XML document or a JMS header. In an Event node, the expression typically contains variables or functions to obtain a unique value at run time. If you use event keys, each event node should specify a unique key.
Examples of key value expressions are given in the following sections, and steps for defining key value expressions are given in Defining Event-Triggered Start Properties and Defining Event Properties.
This is an expression that returns the key value from the header or body of the incoming message at run time and converts it to the data type required by the corresponding key value expression in a Start or Event node. You specify the event key expression in an event key expression dialog box that you access from the Configuration menu. The expression typically contains an XPath language expression to parse the XML document, or an EventAttribute() function expression to extract a value from a JMS message header. Once an event key expression is configured, it is available for all workflows in all organizations. Examples of event key expressions are given in the following sections, while procedures for configuring event key expressions are given in Configuring Event Keys.
Note: A detailed description of the workflow expression language is provided in Using Workflow Expressions. Specific information on XPath and EventAttribute() functions is provided in Extracting Run-Time Event Data.
Using XML Content as an Event Key
As a simple example, imagine that you have regularly incoming XML messages that, among other things, report customer account information from an accounts receivable application. These messages contain the following elements, among other data:
Listing 5-1 Example Incoming XML Document
<account>
	.
	.
	.
	<number>847365</number>
	<customer>John Doe</customer>
	<balance>
		<status>past due</status>
		<date_due>7-11-2001</date_due>
		<amount_due>5670.85</amount_due>
	</balance>
	<credit_limit>7500.00</credit_limit>
</account>
Let us say that you have a workflow that processes overdue accounts, so that only incoming documents with a balance status of "past due" (as opposed to "OK" or "pending", for example) should trigger the workflow. First, you specify that the root element of the incoming document must be <account> for the document to even be considered as a trigger for this workflow. Then, you create an event key to correspond to the value of past due. At run time, the event processor compares the value returned by the balance status element in the incoming XML document with the value specified in the Start node. If there is a match, the workflow is triggered.
Start nodes typically use a constant as an event key so that multiple instances of the workflow can be started by multiple instances of the incoming XML document. In contrast, an Event node inside of a workflow will typically need to be triggered only by a specific instance of an XML document that contains some specific data already captured elsewhere in the current workflow; for example, in a variable initialization in the Start node (see Initializing Variables from Event Data). Since this value can not be determined at design time, it must be expressed as a workflow variable or function that can return the desired value at run-time. For example, using the document in Listing 5-1, an event key could specify the value of the account number, for example, to ensure that the event instance is only triggered by the XML instance containing the correct account number, in this case, 847365. At run time, the event processor compares the value returned by the account number in the incoming XML document with the value returned by the expression specified in the Event node. If there is a match, the event is triggered.
Let us now look at how we would construct our key value and event key expressions in light of our example. For our Start node, our key value expression would consist of a constant (surrounded by quotation marks, as required by workflow expression syntax) as follows:
"past due"
The event key expression required to return this value from the XML document, that you specify in the event key configuration, is:
ToString(XPath("/account/balance/status/text()"))
For our Event node, our key value expression would consist of a variable (expressed by the dollar sign in workflow expression syntax) that we have created in the workflow, and whose value has presumably been set earlier by the running workflow instance:
$AccountNumber
Assuming that the account number is stored as a string in the workflow variable, the expression required in the event key configuration to return this value from the XML document is:
ToString(XPath("/account/number/text()"))
Note: An event key expression must evaluate to the same data type as that used by the key value expression in a Start or Event node. Since XPath expressions return a node list type, you will usually need to use a typecasting function provided in the workflow expression language to return the correct data type. For more information on these functions, see Converting Data Types. If the returned data type is a string, you can also use the XML dot notation. See XML Element Dot Notation for details.
The following figure summarizes the event key mechanism for XML content.
Figure 5-18 Event Key Mechanism
Using JMS Header or Property Data as an Event Key You can also use the EventAttribute() function to retrieve specific values from JMS headers or properties. The mechanism functions exactly the same way as for an XML document, but rather than parsing the XML document for the target value, the value can be extracted from a JMS property. For example, let us say the sending application uses a property field to indicate the country from which a message is originating, that we will call Country, and that you have different workflows that should be started according to the country of origin. Your event key expression would look like the following: ToString(EventAttribute("Country")) Note: An Event key configuration expression must evaluate to the same data type as that by the key value expression in a Start or Event node. Since EventAttribute() expressions return an object type, you will usually need to use a typecasting function provided in the workflow expression language to return the correct data type. For more information on these functions, see Converting Data Types. For a workflow that should only process information pertaining to Canada, the key value expression in your start node could be: "Canada" Now let us say that also contained in this message is a property called Province. Within your start node, you extract this information and store it in a variable for containing province names. Once the workflow is instantiated, you want to ensure that only messages coming in for that particular province are used to trigger another event instance in the workflow, say for example, to call a business operation that will calculate a sales tax value. In this case, you could create an event key for the province. The event key expression would be: ToString(EventAttribute("Province")) The key value expression would consist of the variable name: $ProvinceName Understanding Event Conditions To even further qualify the trigger of an Event or Start node, you can specify a condition that must be evaluated. In this way, even if the event processor has identified an event key match, the event will still not be triggered unless the condition is met. Note: Although you can use an event condition without an event key, this is not recommended. The event key mechanism provides significantly better performance than a simple event condition, as it stores the target value in memory and involves much less DOM parsing on the incoming XML document. You should only use an event condition as an additional filter, along with an event key, when you wish to further restrict the XML message instance that should trigger the event. Again using the example of the XML document listed in Listing 5-1, imagine there is an event within a workflow that issues a credit freeze on accounts that are past due and have balances over a certain amount, say 75 percent of the credit limit on the account. The workflow has previously extracted the values from the <amount_due> and <credit_limit> elements and stored them in two variables, Amount_Due and Credit_Limit, respectively. You could use the following expression as a condition to ensure that the event is only triggered (and the operations to perform the credit freeze) if the balance exceeds 75 percent of the credit limit: $Amount_Due > .75 * $Credit_Limit In the case of the example document instance in Listing 5-1, the condition would evaluate to true, and the event would be triggered. You can also use XPath() and EventAttribute() functions in event conditions to directly extract content from XML or JMS header or property data and compare it with other data, including constants, variables or even other functions. To continue the country example, you could have an event that should only be fired if the country of origin is one that you specify. Imagining that the country information were embedded in an XML element, such as <country>, your condition would look like this: ToString(XPath("/root_element/child_element/country/text()")) = "Canada" If the country value were embedded in a JMS property called Country, your condition would look like this: ToString(EventAttribute("Country")) = "Canada" Note: If you use conditions with functions such as XPath() or EventAttribute(), keep in mind that the expressions on both sides of the equation must evaluate to the same data type, or the server will not be able to process the condition. For more information on Studio typecasting functions, see Converting Data Types. You can also use XML dot notation for string values. See XML Element Dot Notation for details. Initializing Variables from Event Data The properties dialog boxes of Start and Event nodes contain a Variables tab that you can use to add, update, or delete variables whose values you want to set when a workflow is started or an event is triggered. (For information on variables, see Working with Variables.) Figure 5-19 Variables Tab of Start and Event Node Properties Dialog Boxes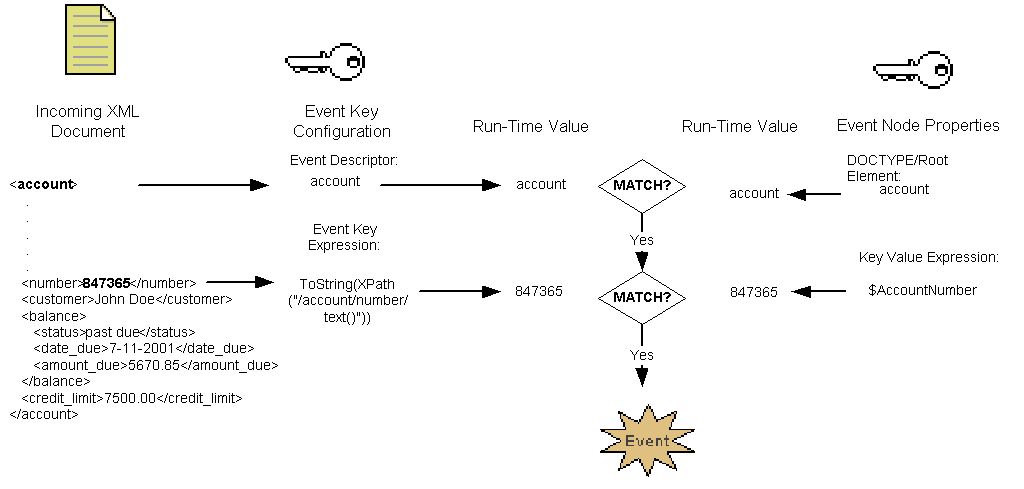
Clicking Add displays the Workflow Variable Assignment dialog box, which you can use to assign values to any variables already defined for the workflow. These are listed in the Variable drop-down list, from which you select the variable you want to initialize. Figure 5-20 Workflow Variable Assignment Dialog Box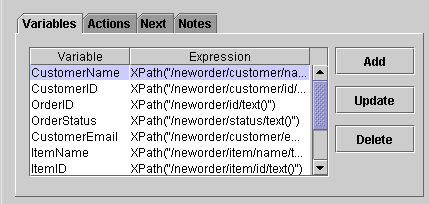
Note: You can also use the Set Workflow Variable action on the Actions tab to accomplish the same thing. In fact, for all nodes except Starts or Events, or if you want to assign an XML document to an XML variable, you must use this action. (For more information, see Setting a Variable Value.) Note, however, that in Start or Event nodes, when the workflow is executed, variables specified on the Variables tab are initialized before any actions are executed, in the sequence in which they are listed on the Actions tab. Although you can use this feature in a Start node to initialize variables to constant values when the workflow starts, it is probably most useful for capturing incoming event data that is to be used to set multiple variable values. For example, if the node is to be triggered by an incoming XML document in a JMS message, you can use multiple expressions to initialize variables with values contained in the document, or specified by JMS header or property fields. You can also use track attributes of other workflows such as instance IDs or template names that may be passed via XML documents or JMS properties to the current workflow. For example, you will need to extract these values and store them in variables if you want to use them later in addressed message replies to the workflows that initiated the conversation. You can also use the mechanism to gather together multiple workflow attributes that you can forward in a single JMS property header in a message delivered to an external application via a JMS topic or queue. (For more information about addressed messaging and inserting workflow attributes as JMS properties, see Posting an XML Message to a JMS Topic or Queue.) To update a variable value, you highlight the variable name in the list, and click Update to invoke the Workflow Variable Assignment dialog box. To delete a variable assignment, you select the variable name in the list, and click Delete. Defining Event-Triggered Start Properties When you define an event-triggered start, you need to specify the organization in which the workflow should be started. You can specify the organization at design time or use an expression that determines the organization at run time, for example, by extracting the data specified in the incoming event message. To define an event-triggered Start node: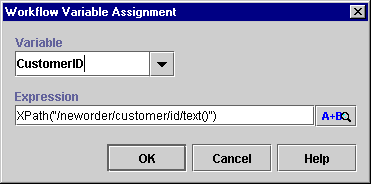
Figure 5-21 Start Properties Dialog Box: Event Option
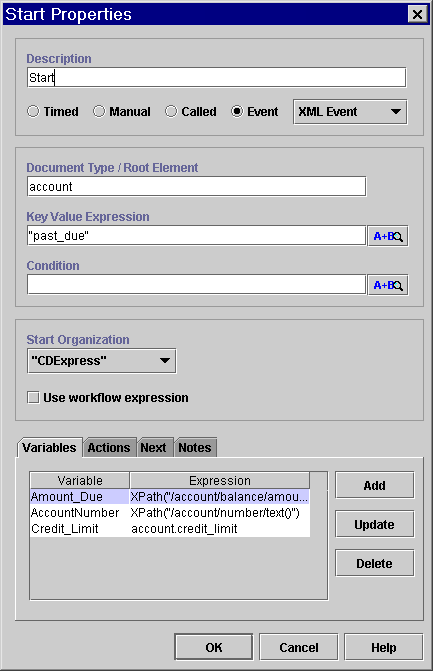
Note: You also need to define an event key configuration that locates the key value in the incoming XML message, so the process engine can compare it against the key value you specify in this field. For details, see Configuring Event Keys.
Figure 5-22 Workflow Variable Assignment Dialog Box
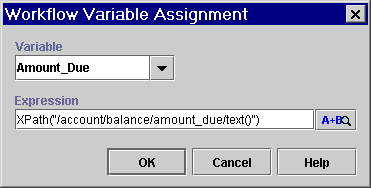
 to invoke the XPath Wizard, from which you can generate XPath expressions automatically from a sample incoming document. For information, see Creating XPath Expressions Using the XPath Wizard.
Defining Event Properties
To define an Event node:
Figure 5-23 Event Properties Dialog Box
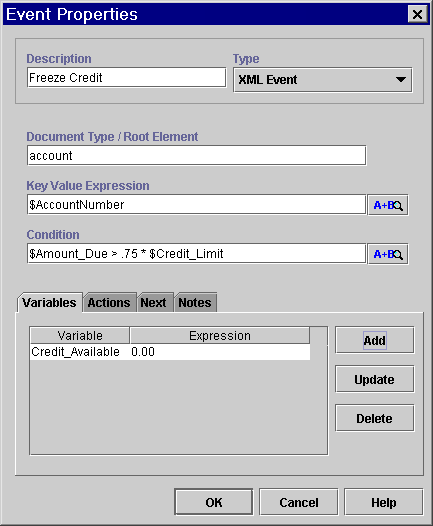
Note: You also need to define the expression that locates the key value in the incoming XML message, so the process engine can compare it against the key value you specify in this field. For details, see Configuring Event Keys.
Figure 5-24 Workflow Variable Assignment Dialog Box
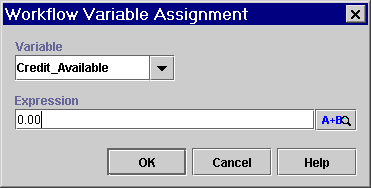
 to invoke the XPath Wizard, from which you can generate XPath expressions automatically from a sample incoming document. For information, see Creating XPath Expressions Using the XPath Wizard.
Defining Decision Properties
A workflow can use any number of decision. Each decision node contains a condition that is evaluated when a transition to that decision node occurs. The result is either True or False, with subsequent flow of control passed to different paths, according to the result.
Additionally, it is possible to specify actions to be executed on both a True and a False evaluation of the condition. Actions defined on the True and/or False tab are performed before nodes specified as targets of a true or false branch. They are also listed under True and False folders under Decision folders in the folder tree.
Figure 5-25 Decision Properties Dialog Box
For further details about actions, see Defining Actions.
Defining Task Properties
A task node represents the following:
Task nodes are the building blocks of a workflow and should ideally represent a single operation within the flow, although this may need to be implemented by multiple workflow actions.
In the workflow transaction model, workflow nodes enter states of activation and execution that determine how a transaction is processed, as described in Understanding the BPM Transaction Model in Programming BPM Client Applications. For all nodes other than tasks, these states are not explicitly represented in the Studio. For Task nodes, however, you must specify actions according to one of four task states, and it is important that you understand their meaning to be able to effectively manage control of your flow.
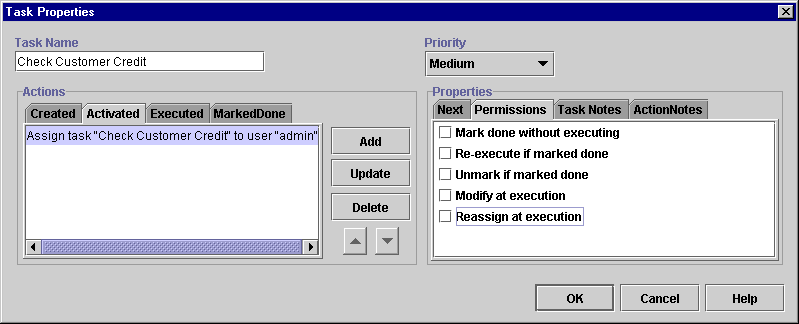
Figure 5-26 Task Properties Dialog Box
Understanding Task States Each task node progresses through four different states: Created, Activated, Executed, and Marked Done. For each state, you can specify a list of actions that are performed when the task reaches that state. The following table shows each task state, and when the actions specified in each state are executed:
All task nodes, unlike other nodes, must be marked done to signal the completion of the node, or the workflow will not proceed. For manually assigned tasks, you can set a permission (see below) that allows a user to mark the task done at run time. More typically, however, you explicitly mark a task done at design time by adding a Mark Task as Done action.
The tab on which the Mark Task as Done action should be placed depends on whether the task can be executed by any of the means listed in Table 5-3. If it is executed, you specify the Mark Task as Done action on the Executed tab; if it is not, you specify the Mark Task as Done action on the Activated tab. For more information, see Marking Tasks Done.
Actions defined in the Task properties dialog box are also displayed in the folder tree under Created, Activated, Executed, and Marked Done folders according to their placement.
About Task Permissions
You can assign permissions to a task, to control the types of operations that can be performed for a task at run time by a Worklist (or custom client) user or by an administrator monitoring instances in the Studio. For more information on performing operations on tasks at run time in the Studio, see Changing Task Permissions and Priority and Changing Task Status and Assignment. For more information on performing operations on tasks at run time in the Worklist, see Using the WebLogic Integration Worklist
.When you create a Task node, by default, no permissions are initially assigned, but you can enable any of the available task permissions as listed in the following table.
About Task Priority
For manually assigned tasks, you can assign a priority level. The priority has no effect on how the node or its actions are executed at run time, but is simply displayed to Worklist users, who can execute and sort their tasks accordingly.
Priority options are low, medium, and high. The default value is medium.
Defining the Task Node
To define a Task node:
Defining Join Properties
Join nodes are used to merge multiple paths of Task, Event, and Decision nodes into a single path. An AND join causes the workflow to wait until all preceding paths have finished executing before proceeding to the next node. An OR join causes the workflow to proceed to the next node after a single preceding path has finished executing, blocking any preceding unexecuted nodes from executing.
Once you have created a Join, you can change it from AND to OR and vice versa. The shape for the Join is automatically updated in the design area.
Figure 5-27 Join Properties Dialog Box
Defining Done Properties
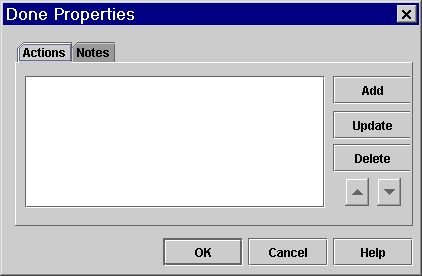
A Done node represents the point within the workflow where the process completes. Once a done node is reached in the workflow, the running instance of the workflow is marked done, regardless of whether all the done nodes have been reached or not.
You can specify any number of Done nodes in a workflow. If a workflow can exit from various points, you have the option of placing separate done nodes wherever needed.
Although you can add actions to a Done node, this is not recommended.
To define a Done node:
Figure 5-28 Done Properties Dialog Box
Working with Exception Handlers
Exception handlers function like sub-flows of actions within a main workflow, which are triggered by the occurrence of a server exception, or can be invoked with the Invoke Exception Handler action. Complete information on defining and invoking exception handlers is provided in Handling Workflow Exceptions.

|

|

|
|
|
|
Copyright © 2001 BEA Systems, Inc. All rights reserved.
|