
| Download Docs | Site Map | Glossary | |
|
|
|||
| bea.com | products | dev2dev | support | askBEA |
 |
 |
|
|||||||
| e-docs > WebLogic Platform > WebLogic Integration > B2B Topics > B2B Console Help > Getting Started with the WebLogic Integration B2B Console |
|
B2B Console Help
|
Getting Started with the WebLogic Integration B2B Console
The following sections explain how to log on to the WebLogic Integration B2B Console and start using it. They include:
What Is the B2B Console?
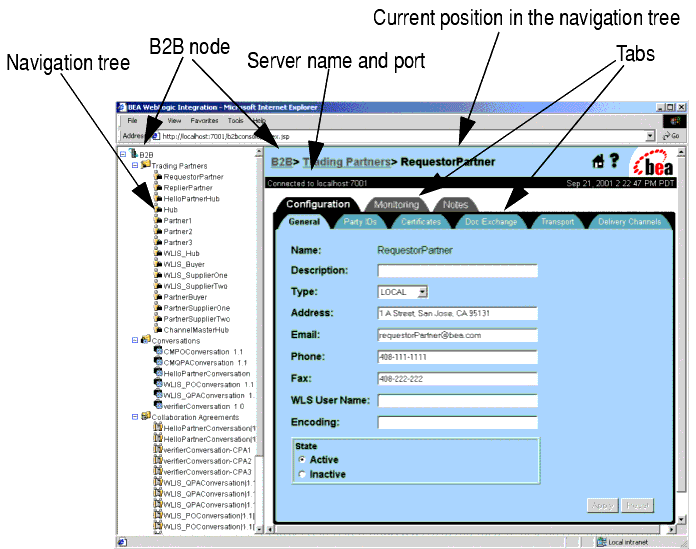
The WebLogic Integration B2B Console is a graphical, Web-based interface to the administrative functions required to maintain and run B2B integration. The home page for the WebLogic Integration B2B Console is similar to the home page for the WebLogic Server Administration Console: a window containing two vertical panes, as shown in the following figure.
Figure 1-1 B2B Integration Navigation Tree and Tabs
Note: For instructions on expanding and collapsing the navigation tree (so that items listed below nodes are displayed and hidden, respectively), see Displaying Entities in the Navigation Tree. The left pane contains a navigation tree: a hierarchically arranged set of nodes that represent the entities (such as trading partners) linked through B2B integration. The right pane contains interactive pages through which you manage the entities represented by the nodes in the navigation tree. These pages, which are depicted in the Console as file folders with tabs, are also known as tabs.
Starting the WebLogic Integration B2B Console
WebLogic Integration must be started before you can run the WebLogic Integration B2B Console. When you execute the startWeblogic.cmd (Windows) or startWeblogic (UNIX) command for a domain, WebLogic Server is started, and the WebLogic Integration applications and resources specified in the config.xml file for the domain are deployed on the server. For more information about starting WebLogic Integration, see "Starting WebLogic Integration" in Getting Started in Starting, Stopping, and Customizing BEA WebLogic Integration.
To start the WebLogic Integration B2B Console:
Using the Navigation Tree
Note: Because the display of many entities (such as trading partners) in the navigation tree may degrade B2B Console performance, the display of entities in the navigation tree is disabled by default.
To display a list of entities in the navigation tree:
To access the parameters controlling a particular entity, click the node for that entity in the navigation tree. The configuration page for the selected entity is displayed in the right pane of the console window.
Using the Pop-Up Context Menus
When you right-click a node in the navigation tree, the B2B Console displays a pop-up menu with the following commands.
Selecting and Ordering List Boxes Some dialog boxes enable you to transfer entities by moving them from one field to another:
Applying Changes and Removing Entities
Entities listed in the WebLogic Integration B2B Console can be changed or removed from lists.
When you modify the properties of an entity, click Set to modify properties for an attribute. When you finish modifying the properties, click Add/Apply to commit the changes.
To remove an entity from a list, select the entity in the appropriate list and click Remove. In some circumstances you can also disable an entity. For more information, see Shutting Down a Trading Partner Delivery Channel
Instructions for modifying entity properties and for removing and disabling entities are provided in the appropriate sections of this document.
Searching for Entities
You can search for the following entities by name in the WebLogic Integration B2B Console:
When querying the B2B Console about an entity, you can specify that entity by using any of the following pattern-matching methods:
For example, you can search for the name ABCD by using any of the following strings:
To search for an entity:
Using the Notes Tab
The WebLogic Integration B2B Console provides a Notes tab for each entity. From such a tab you can access dialog boxes through which you can provide a description of the relevant function. Each Notes tab is independent and stores information relative to its location. This information persists between login sessions.

|

|

|