
|
|
|
|
|
|
Using the Portal Management Administration Tool
The Portal Administration Tool contains a complete set of functions that enable portal administrators to easily create the components of a portal page and personalize the portal's content, layout, and appearance.
This topic includes the following sections:
Setting Up
To properly create and administer a portal using the Portal Administration Tool, you should know how to configure and run the WebLogic Server, and set up database connections.
To create and administer a portal, first you must install and set up the WebLogic Commerce Server and WebLogic Personalization Server software. Then, refer to the following sections in this document to complete these setup and initialization tasks:
Logging On to the Administration Tool
To log on to the Portal Administration Tool:
A dialog box appears and prompts you to enter a username and password.
Note: We recommend that after installation you immediately create a new password for the administrator.
Configuring the Flow Manager to Control Portal Access
The Flow Manager controls user access to your portal. The Flow Manager receives all incoming HTTP requests and dispatches each request to the appropriate destination URL. For more information about the Flow Manager, see the topic "Flow Manager" in the chapter "Foundation Classes and Utilities" in the Guide to Building Personalized Applications.
_DEFAULT_PORTAL_INIT property set
To configure the Flow Manager, create a portal property set based on a default APPLICATION_INIT property set.
To create a new property set:
Valid Flow Manager Parameters
To set parameters for your portal or application:
The table below lists valid parameters for the Flow Manager servlet.
Creating a Portal Web Site Directory
As a final step, create a Web site directory for your portal pages under the wlcsApp directory.
Create a new Web application directory named `myPortal' by copying and pasting the exampleportal directory and renaming it myPortal in the wlcsApp directory. For more information, refer to the section Deploying New Portals as Web Applications in this guide.
Table 3-2 shows the structure of the Acme Portal. The same structure can be used for any new portal.
.
Using the Portal Administration Tool
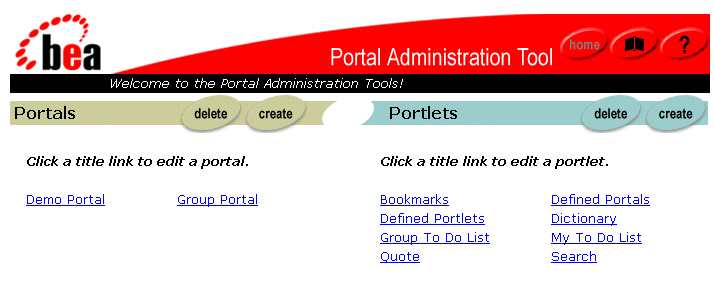
Figure 3-1 Administration Tool Home Page
Administering Portlets
To the portal framework, a portlet is a JSP page that knows how to retrieve specialized content and display it in the portal application. To users, a portlet is one of many content modules on a portal page that can be personalized to reflect appearance, content, and layout preferences. Once a portlet is created in the Portal Administration Tool, it can be associated with multiple portals.
You can create, edit, and delete portlets in the Portlets section of the Portal Administration Tool Home page. All screens in the administration tool related to portlet functions are color-coded with teal banners and command buttons. Screens related to portal functions display tan banners and command buttons.
A portlet includes two required components, a titlebar and content area, and several optional components including the banner, header, footer, edit URL, alternate header, alternate footer, maximized URL, and help URL as shown in the following graphic:
Figure 3-2 Portlet Application Decomposed by Components
You can define each portlet application to include any of the following attributes: 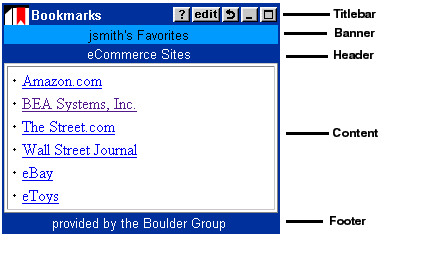
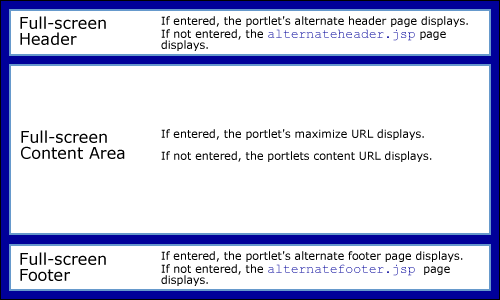
The full screen page uses:
Figure 3-3 Content Display Criteria
Creating Portlets
Before you use the Portal Administration Tool to create a portlet, place all your portlet application files in the following directory:
%WL_COMMERCE_HOME%/config/wlcsDomain/applications/wlcsApp/exampleportal/portals/repository/portlets
You create a portlet in the administration tool by creating a portlet definition entity (referred to in this document as a portlet) and associating portlet JSP URLs that have been created by a portlet developer with the portlet entity. When a portlet is created, it is not automatically associated with a portal. You need to add portlets to a portal later from the portal-view page.
To create a portlet:
<%@ page extends="com.beasys.portal.admin.PortalJspBase"%>
<%@ page import="com.beasys.portal.tags.PortalTagConstants"%>
<center>
<font size=-1>To Do's for
<%@ (String)getSessionValue(PortalTagConstants.PORTAL_GROUP,request)%></font>
</center>
If the portlet was successfully created, a confirmation message appears in red at the top of the screen. If not, an error message notifies you of the required changes.
Editing Portlets
After creating a portlet, you can redefine it at any time by adding or removing attributes.
To edit a portlet:
If the changes were successfully made, a confirmation message appears in red at the top of the screen. If not, an error message notifies you of the required changes.
Deleting Portlets
You can delete portlets that you no longer need. However, you must first remove (mark as unavailable) the portlet from any portals it is associated with.
To delete a portlet:
Administering Portals
You can create, edit, or delete portals from the Portals section of the Portal Administration Tool Home page. All screens in the administration tool related to portal functions are color-coded with tan banners and command buttons. Screens related to portlet functions display teal banners and command buttons.
Creating Portals
To create a new portal:
If the portal was successfully created, a confirmation message appears in red at the top of the screen. If not, an error message notifies you of the required changes.
Editing Portals
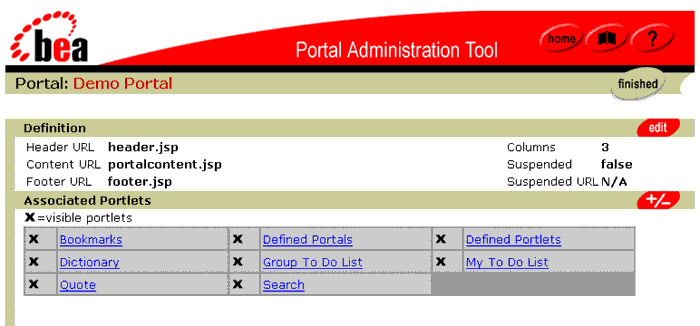
After creating a portal, you can edit it to associate portlets, groups, and users. You can also personalize the portal's layout and color scheme, and make changes to the definition.
To edit a portal:
Figure 3-4 Portal-View Page
Editing Portal Definitions
You can edit the portal definition you created to reflect any changes to the associated URLs or number of portal columns.
To edit a portal definition:
If the changes were successfully made, a confirmation message appears in red at the top of the screen. If not, an error message notifies you of the required changes.
Adding and Removing Portlets
You can choose which portlets are available to a portal by adding and removing them from the system's list of all established portlets. From the narrowed list of portlets you associate with a portal, group, and end users further define which portlets they want available and visible on their personalized portal page.
To associate portlets with a portal:
If the changes were successfully made, a confirmation message appears in red at the top of the screen. If not, an error message notifies you of the required changes.
Editing Portlet Display Attributes
Portlet titles, associated with a portal, display as hot links in the Associated Portlets section of the portal-view page. These links open a tool that enables you to further specify how the portlet displays in the portal, overriding the display attributes established when the portlet was created. Group Administrators can further personalize these attributes.
To edit an associated portlet's display attributes:
If the changes were successfully made, a confirmation message appears in red at the top of the screen. If not, an error message notifies you of the required changes.
Editing the Portal Layout
You can move a portal's associated portlets left and right between columns and up and down within columns depending on the column layout you selected when you created the portal. You can also change the percentage of the portal page that each column occupies. Group Administrators and end users can further personalize the portal layout.
To edit the layout of portlets in a portal:
To change the column spans of a portal layout:
If the changes were successfully made, a confirmation message appears in red at the top of the screen. If not, an error message notifies you of the required changes.
Editing the Portal Color Scheme
You can edit the overall appearance of a portal by changing its background color as well as the portlets' component colors, title colors, and border appearance.
To edit portal colors:
Associating Groups with a Portal
You can only associate portal groups from the portal-view page. For more information on associating users with a group and personalizing portal groups, see Administering Portal Groups.
To associate a group with a portal:
To disassociated with a group:
Deleting Portals
You can delete an existing portal from the Portal Administration Tool Home page. However, you must first disassociate all portal groups and users from that portal.
To delete a portal:
Administering Portal Groups
A portal group is a user group associated with a portal. The Portal Administration Tool enables you to personalize portal groups. You can personalize the layout, content, and color scheme.
Avoid creating portal groups for business-to-consumer portals with an unmanageable number of users.
You can edit portal groups from the portal-view page.
Editing Portal Groups
Editing portal groups allows you to associate portlets with each group. You can also personalize the group's portal layout and color scheme.
To edit a portal group:
Adding and Removing Portlets from a Portal Group
As the Group Administrator, you choose which portlets are available to a group by adding and removing them from the portal's list of all associated portlets. From the narrowed list of portlets you associate with a group, end users further define which portlets they want available and visible on their personalized portal page.
To associate portlets with a group:
If the changes were successfully made, a confirmation message appears in red at the top of the screen. If not, an error message notifies you of the required changes.
Editing the Portal Group Layout
You can move a group's associated portlets left and right between columns and up and down within columns. End users can further personalize the portal layout.
To edit the layout of portlets in a group:
If the changes were successfully made, a confirmation message appears in red at the top of the screen. If not, an error message notifies you of the required changes.
Editing the Portal Group Color Scheme
You can edit the overall appearance of a group by changing its portal background color as well as the portlets' component colors, title colors, and border appearance.
To edit group colors:
Where to Get More Information
This chapter presents the basics of portal development using the WebLogic Commerce Server and WebLogic Personalization Server Administration Tools. For an in-depth look at portals and portlets, see the following chapters later in this document:
You may need to consult the following documentation when using the WebLogic Commerce Server and WebLogic Personalization Server:

|

|

|
|
|
|
Copyright © 2001 BEA Systems, Inc. All rights reserved.
|