
|
|
|
|
|
|
Registered User Buys a Product
Because you were impressed by the large selection and low prices (not to mention the ease of use!) when you visited the e-commerce Web site, you decide to return and buy a drill for a friend who is starting a home improvement project. Your return trip to the Web site takes you along the following path:
Note: Consider opening the Registered User Roadmap link in a separate browser window; you may want to refer to it frequently during the tour.
Note: In this chapter, the product name is referred to as WebLogic Commerce Server. If you are licensed for BEA Campaign Manager for WebLogic, this product package includes WebLogic Commerce Server. For a licensing and packaging overview, see the section About the Product Licenses and This Tour.
Registered User Roadmap
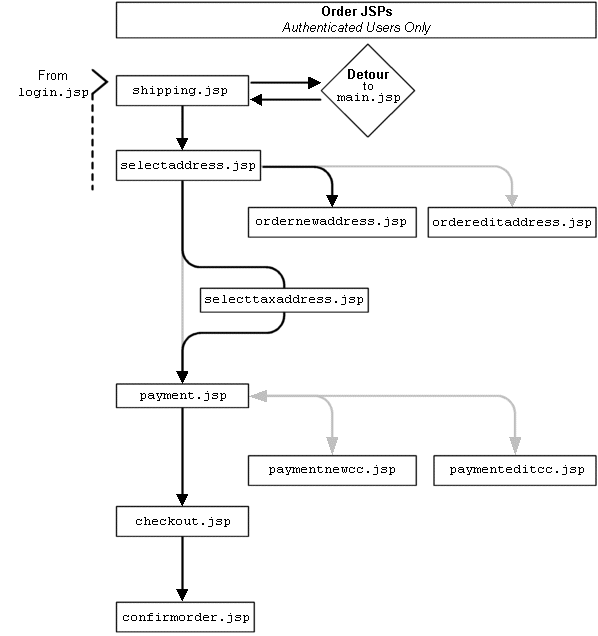
Before starting this section of the tour, review the following maps of the JSP templates (Figure 4-1, Figure 4-2, and Figure 4-3). The arrows in the maps represent navigation options that Webflow provides; the darker arrows show the path that this section of the tour describes.
Figure 4-1 JSPs for Browsing the Catalog
Figure 4-2 JSPs for the Shopping Cart and User Login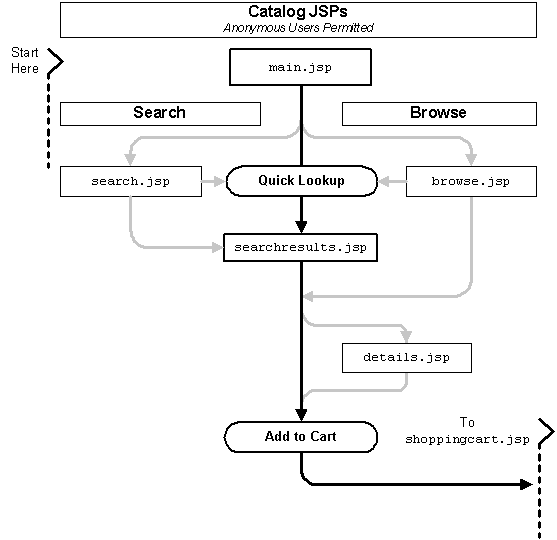
Figure 4-3 JSPs for Completing the Order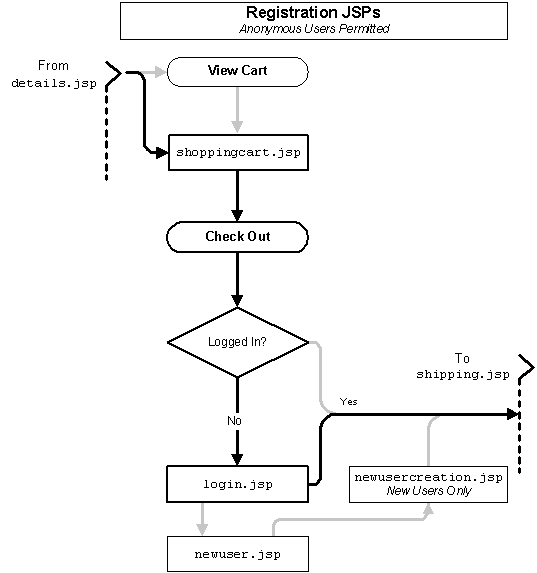
Step 1: Browse the Catalog and Select an Item
When you arrive at the Home page for your return shopping trip, you decide to browse for drills in the catalog.
Figure 4-4 Home Page: Top Level of the Catalog
Click Power Tools.
When you click Power Tools, WebLogic Commerce Server displays the contents of the Power Tools category in browse.jsp (see Figure 4-5).
Features of browse.jsp (Part 1 of 2)
Figure 4-5 Second Level of the Catalog
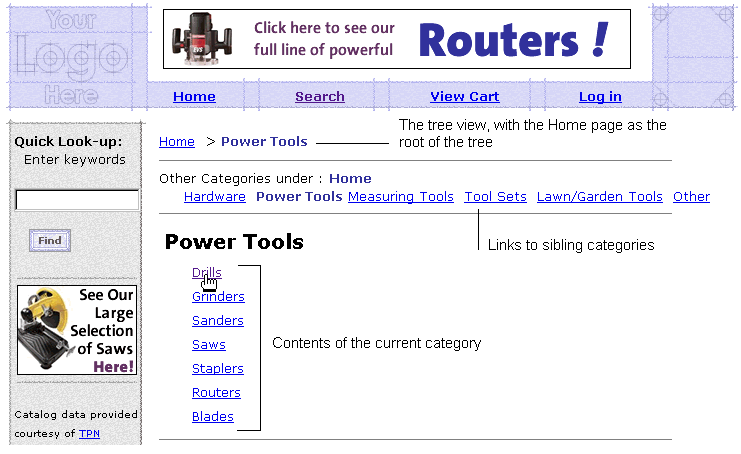
Notice the following features of browse.jsp:
WL_COMMERCE_HOME/config/wlcsDomain/applications/wlcsApp/wlcs/ commerce/catalog/browse.jsp (UNIX)
<jsp:include page="/commerce/catalog/includes/navigation.jsp" flush="true"/>
Listing 4-1 Catalog Tags to Display Current Category<%-- Get the summary JSP from the current category --%>
<catalog:getProperty object="<%= category %>"
propertyName="Jsp"
id="displayJsp"
returnType="com.beasys.commerce.ebusiness.catalog.JspInfo"/>
<%-- Include the category layout JSP for this category--%>
<jsp:include page="<%= displayJsp.getUrl() %>" flush="true"/>
Click Drills.
When you click Drills, WebLogic Commerce Server displays the contents of the Drills category in browse.jsp (see Figure 4-6).
More Features of browse.jsp (Part 2 of 2)
Figure 4-6 Third Level of the Catalog
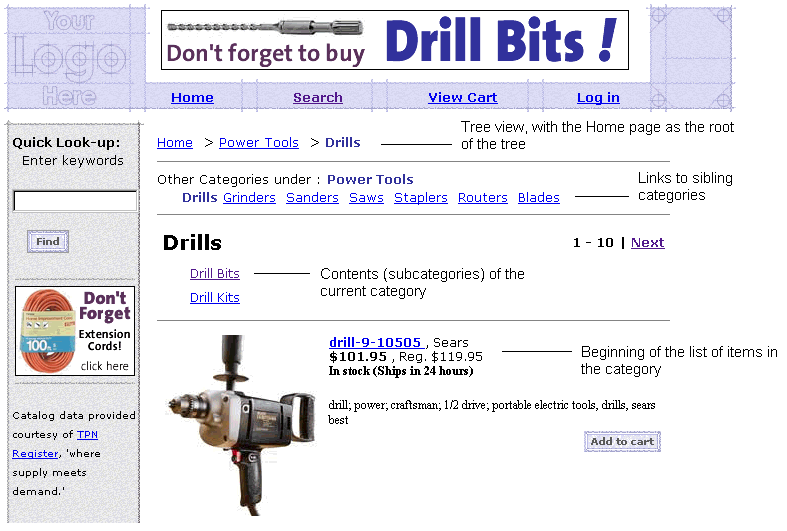
Notice the following additional features of browse.jsp:
Click the name of a drill.
When you click the name of a drill, WebLogic Commerce Server displays a product description in details.jsp (see Figure 4-7).
Features of details.jsp
Figure 4-7 Item Details
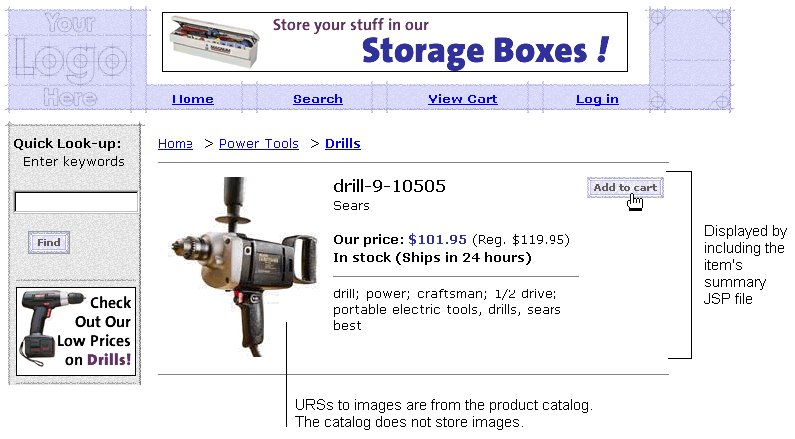
Notice the following features of details.jsp:
WL_COMMERCE_HOME/config/wlcsDomain/applications/wlcsApp/wlcs/ commerce/catalog/details.jsp (UNIX)
Click Add to Cart.
Step 2: Review the Shopping Cart and Check Out
When you click Add to Cart, WebLogic Commerce Server displays your selections in shoppingcart.jsp (see Figure 4-8).
Figure 4-8 Shopping Cart
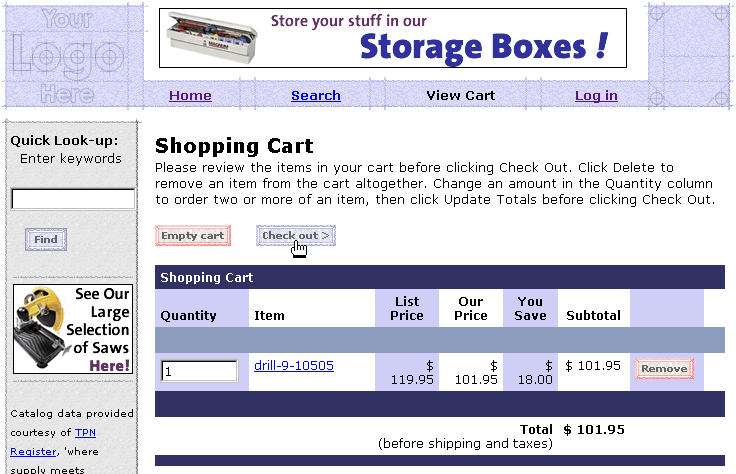
For a description of shoppingcart.jsp, see Features of shoppingcart.jsp.
To continue the tour...
Click Check Out.
When you click Check Out, WebLogic Commerce Server prompts you to log in (see Figure 4-9). Because you created a user profile in New User Buys a Product, you are now a registered user.
Figure 4-9 Log In
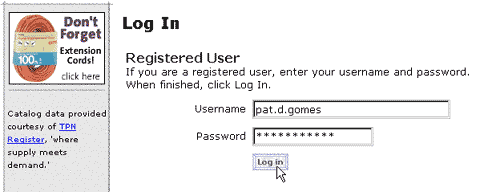
For a description of login.jsp, see Features of login.jsp.
Technical Note: The Security Model
How does WebLogic Commerce Server determine if users must log in when they click a link? Instead of using Webflow to implement security, WebLogic Commerce Server follows the J2EE specification for security. With this specification, the site administrator determines which set of files can be accessed only by authenticated users. By default, all JSP templates below the order and user directories can be accessed only by authenticated users.
When an anonymous user tries to access one of these files, WebLogic Commerce Server displays login.jsp, from which the user can either log in or create a new user account. After authentication, Webflow determines the remaining succession of pages.
To continue the tour...
Enter the username and password you set up in Step 4: Create a New User Profile. Then click Log In.
When you click Log In, WebLogic Commerce Server displays shipping options in shipping.jsp (see Figure 4-10).
Figure 4-10 Shipping Page Detour
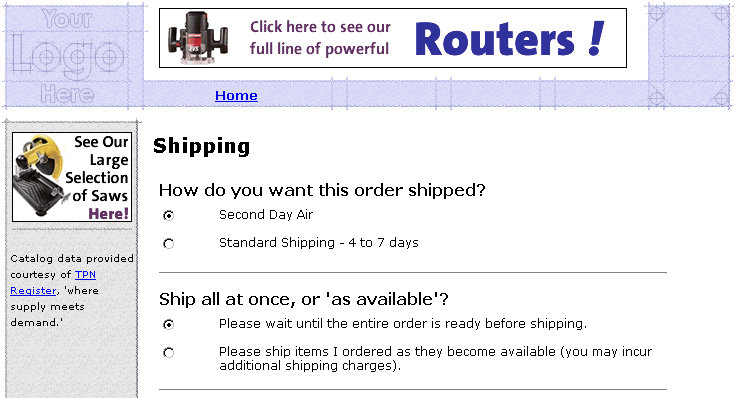
For a description of shipping.jsp, see Features of shipping.jsp.
Taking a detour...
Before continuing the tour, take a minute to review the Home page. Now that you have logged in (authenticated), the Home page shows options that are available only to authenticated users.
To take the detour, click Home (see Figure 4-10).
Detour: Review the Home Page for Authenticated Users
When you click Home, WebLogic Commerce Server displays main.jsp (see Figure 4-11).
Features of main.jsp for Authenticated Users
Figure 4-11 Home Page for Authenticated Users
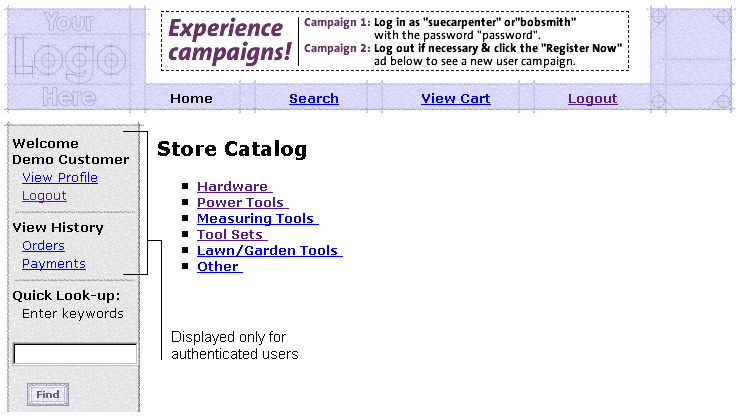
Notice the following features of main.jsp:
Listing 4-2 Conditional Display of InformationFrom the header.inc file
<%-- Get the username --%>
<pipeline:getPipelineProperty
propertyName="<%= PipelineSessionConstants.USER_NAME %>"
returnName="userName"
returnType="String" />
<%-- if the user is not null, get the customer's profile --%>
<% if(userName != null) { %><um:getProfile profileKey="<%=request.getRemoteUser()%>" profileType="WLCS_Customer" />
<% } %>
From the leftside.inc file
<%-- Get the username. The customer 's profile should have already been loaded --%>
<%-- obtained from the um:getProfile tag in the header.inc --%>
<pipeline:getPipelineProperty
propertyName="<%= PipelineSessionConstants.USER_NAME %>"
returnName="userName"
returnType="String" /><% if (userName != null && userName.length() != 0) { %><p><b>Welcome<br>
<um:getPropertyAsString
propertyName="firstName" />
<um:getPropertyAsString
propertyName="lastName" /></b></p><p> <a href="<%=
WebflowJSPHelper.createWebflowURL(pageContext, pageContext.getAttribute("AboutFileName") + ".jsp", "link(viewCustomerProfile)", true) %>">View Profile</a></p><p> <a href="<%= WebflowJSPHelper.createWebflowURL(pageContext, "main.jsp", "link(logout)", true) %>">Logout</a></p>
<div class="mid" align="center">
<img src="<%=WebflowJSPHelper.createGIFURL(request, response, "/commerce/images/left_rule.gif")%>" width="120" height="14" align="absmiddle"></div>
<p><b>View History</b></p>
<p> <a href="<%= WebflowJSPHelper.createWebflowURL(pageContext, "main.jsp", "link(viewOrderHistory)", true)%>">Orders</a></p>
<p> <a href="<%= WebflowJSPHelper.createWebflowURL(pageContext, "main.jsp", "link(viewPaymentHistory)", true) %>">Payments</a></p>
<div class="mid" align="center">
<img src="<%=WebflowJSPHelper.createGIFURL(request, response, "/commerce/images/left_rule.gif")%>" width="120" height="14" align="absmiddle"></div>
<% } %>
<%-- End of log-in conditional links. --%>
Step 3: Choose Shipping Options
When you click Check Out from shoppingcart.jsp, WebLogic Commerce Server displays shipping options in shipping.jsp (see Figure 4-10).
For a description of shipping.jsp, see Features of shipping.jsp.
To continue the tour...
From shipping.jsp, click Continue.
Step 4: Enter and Select a New Shipping Address
When you click Continue in shipping.jsp, WebLogic Commerce Server displays shipping addresses in selectaddress.jsp (see Figure 4-12).
To ship the item to someone other than yourself, you must enter a new address.
Figure 4-12 Select Add Address
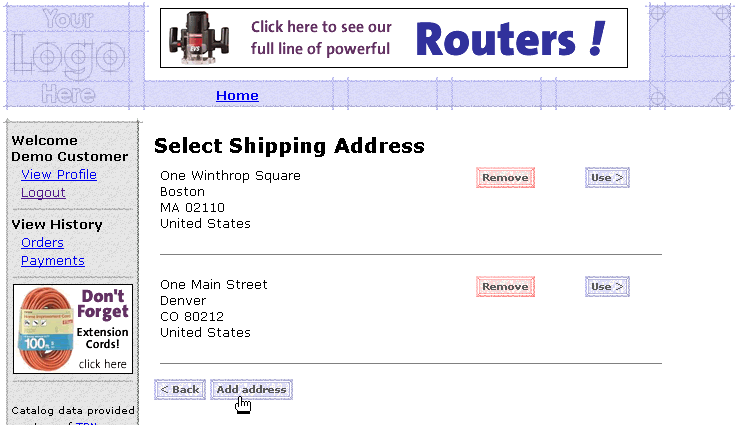
For a description of selectaddress.jsp, see Features of selectaddress.jsp.
To continue the tour...
Click Add Address.
When you click Add Address, WebLogic Commerce Server prompts you to enter a new shipping address in addaddress.jsp (see Figure 4-13).
Figure 4-13 Enter the New Address
Enter an address that contains the following information:
Then click Save.
This particular zip code spans multiple tax jurisdictions. Later in this step of the tour, you must select which tax jurisdiction applies.
When you click Save, WebLogic Commerce Server displays the addresses from your user profile in selectaddress.jsp (see Figure 4-14).
Figure 4-14 Select the New Address
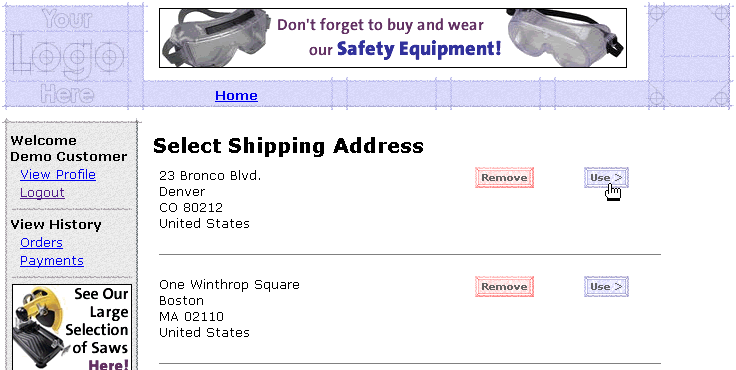
For a description of selectaddress.jsp, see Features of selectaddress.jsp.
To continue the tour...
Click Use next to the Denver, CO address that you created.
When you click Use, the Pipeline sends data to the Taxation Service, which uses TAXWARE to determine the tax jurisdiction and amount, based on the shipping address. Because the zip code 80212 covers different tax jurisdictions, WebLogic Commerce Server prompts you to choose a specific area within the zip code from selecttaxcaddress.jsp (see Figure 4-15).
Features of selecttaxaddress.jsp
Figure 4-15 Select Tax Jurisdiction
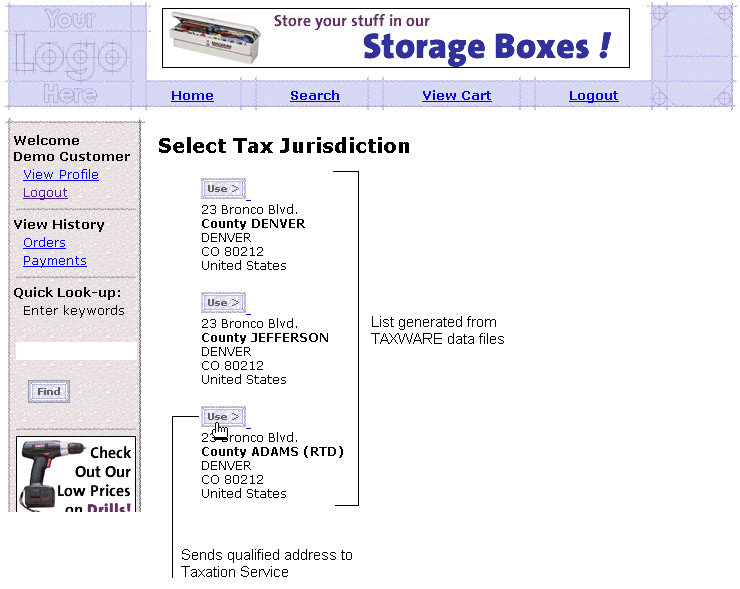
Note the following features of selecttaxaddress.jsp:
WL_COMMERCE_HOME/config/wlcsDomain/applications/wlcsApp/wlcs/ commerce/order/selecttaxaddress.jsp (UNIX)
Click Use next to an address.
Step 5: Select a Credit Card
When you click Use, WebLogic Commerce Server displays payment.jsp, which lists the credit cards in your user profile (see Figure 4-16).
Figure 4-16 Select a Credit Card
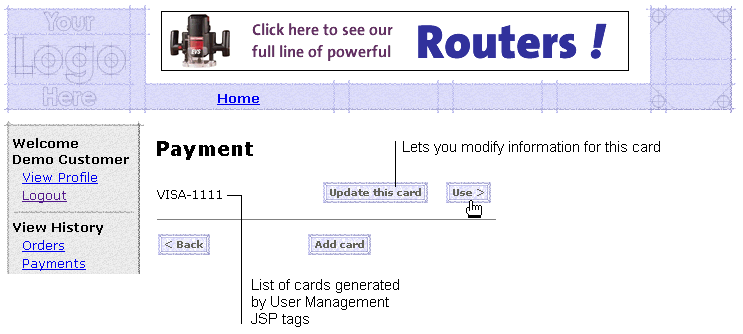
For a description of payment.jsp, see Features of payment.jsp.
To continue the tour...
Click Use.
Step 6: Purchase the Items
When you click Use in payment.jsp, WebLogic Commerce Server displays the final purchase information in checkout.jsp (see Figure 4-17).
Figure 4-17 Purchase the Items
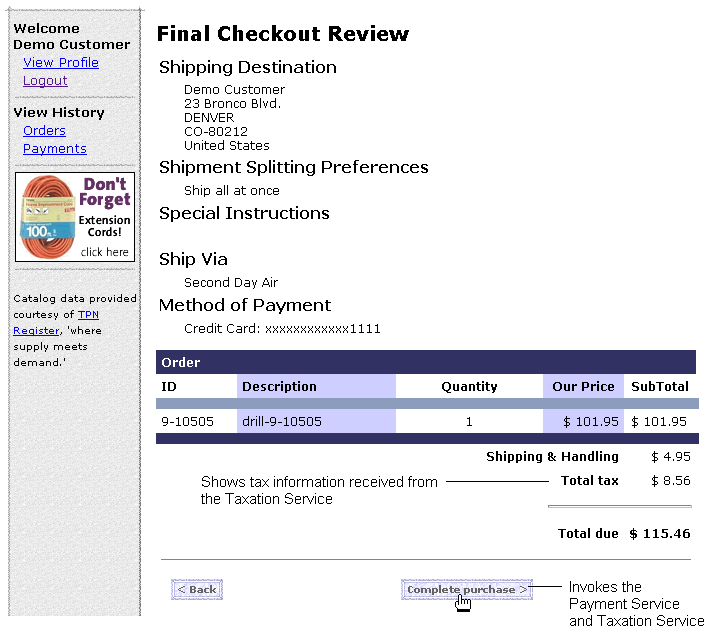
For a description of checkout.jsp, see Features of checkout.jsp.
To continue the tour...
Click Complete Purchase.
Step 7: Review Order Confirmation
When you click Complete Purchase, WebLogic Commerce Server completes the purchase and displays the confirmation number in confirmorder.jsp (see Figure 4-18).
Figure 4-18 Review the Order Confirmation
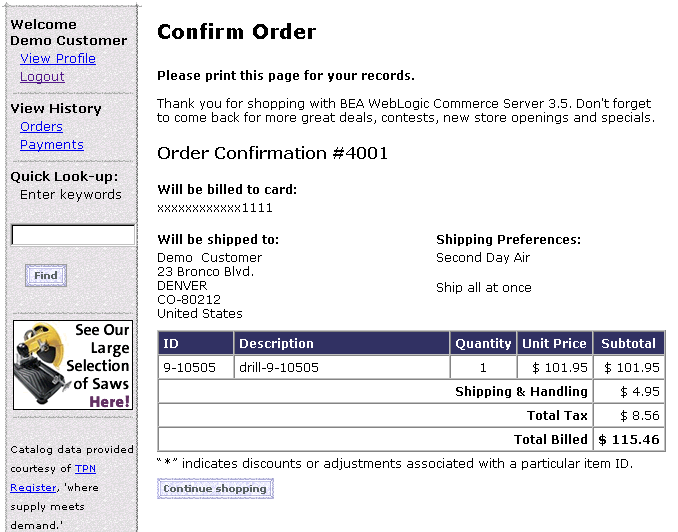
For a description of confirmorder.jsp, see Features of confirmorder.jsp.
To continue the tour...
This concludes the tour for a registered user buying a product.
To continue the tour of the JSP templates, click View Profile in the header and go to the next section, Registered User Adds a Credit Card.

|

|

|
|
|
|
Copyright © 2001 BEA Systems, Inc. All rights reserved.
|