


|

|
|
|
|
JoltBeans Class Library Walkthrough
This walkthrough describes how to build an applet that you use to:
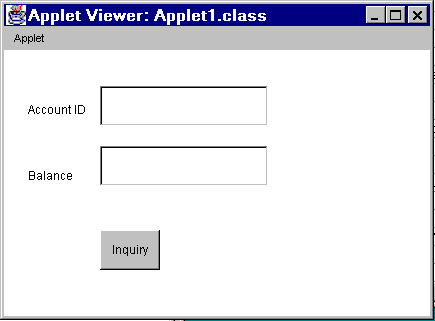
The following figure shows an example of a completed Java form containing JoltBeans. The applet implements the client functionality for the INQUIRY service of the BANKAPP sample that is included with BEA Tuxedo. To run this sample, the BEA Tuxedo server must be running.
Sample Inquiry Applet
Refer to the figure Visual Café 3.0 Form Designer for an example of each item required by the Java form. Each item in that figure is described in the following table Required Form Elements.
Building the Sample Form
The sample form is created using an integrated development environment (IDE), in this example, Visual Café 3.0. The example demonstrates how to build an applet that allows you to enter an account ID and use a BEA Tuxedo service to get and show the account balance.
Follow the basic steps below to create this sample.
These steps are described in detail in the following sections.
Note: The graphic interface of previous versions of Visual Café differ from the look of Visual Café 3.0. You can complete this sample applet in a previous version of Visual Café; however, the steps executed in the Interaction Wizard differ slightly from this example.
Placing JoltBeans onto the Form Designer
JoltBeans and the Form Designer in Visual Café
The following figure Visual Café 3.0 Form Designer illustrates how JoltBeans appear when they are placed on the palette of the Form Designer.
Visual Café 3.0 Form Designer
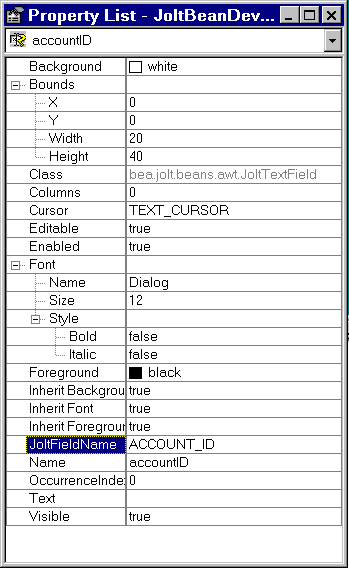
The following figure,Example of JoltTextField Property List and Custom Property Editor, shows how selecting the JoltFieldName of the button property list displays the Custom Property Editor.
Note: For complete information on setting and modifying the properties of the JoltBeans, refer to Using the Jolt Repository and Setting the Property Values.
The following table specifies the property values that should be set. Values specified in bold and italic text are required, and those in plain text are recommended.
Note: In this walkthrough, the default occurrenceIndex of 0 works for both JoltTextFields.
Refer to the following figure Example of JoltTextField Property List and Custom Property Editorand Using the Jolt Repository and Setting the Property Values for general guidelines about JoltBean properties.
Example of JoltTextField Property List and Custom Property Editor
The Custom Property Editor is displayed.
The change is reflected in the Property List shown in the following figure Revised JoltFieldName in the JoltTextField Property Listand on the text field shown on the figure Example of JoltBeans on the Form Designer with Property Changes.
Note: The properties that are visible in the Custom Property Editor are cached locally; therefore, if the source database is modified you must use the Refresh button to see the current, available properties.
Revised JoltFieldName in the JoltTextField Property List
The following figure Example of JoltBeans on the Form Designer with Property Changes illustrates how the text on the button and the textfield changes after the text is added to the property list fields for these beans. Example of JoltBeans on the Form Designer with Property Changes
Wiring the JoltBeans Together
After all the beans are positioned on your form and the properties are set, you must wire the beans and their events together. The following figure Sequence in Which JoltBeans Are Wired illustrates an example of the flow to help you determine the correct order in which to wire the beans.
Wiring the beans allows you to establish event source-listener relationships between various beans on the form. For example, the JoltServiceBean is a listener of ActionEvents from the button and invokes callService() when the event is received. Use the Visual Café Interaction Wizard to wire the beans together.
The following figure shows the sequence in which you will wire the beans together to create this sample applet. The numbers in this figure correspond to the numbered steps that follow.
Sequence in Which JoltBeans Are Wired
The steps below correspond to the callouts shown in the figure Sequence in Which JoltBeans Are Wired. Each of the steps below is detailed in the sections that follow. Step 2: Wire JoltSessionBean to JoltServiceBean Using PropertyChange Step 3: Wire the accountID JoltTextField as Input to the JoltServiceBean Using JoltInputEvent Step 5: Wire JoltServiceBean to the Balance JoltTextField Using JoltOutputEvent Step 7: Compile the Applet (not shown as a callout) Step 1: Wire the JoltSessionBean Logon 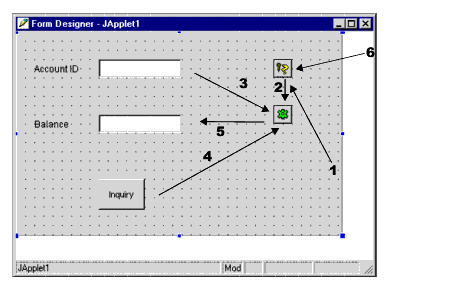
Wire the Applet to the Jolt Session Bean
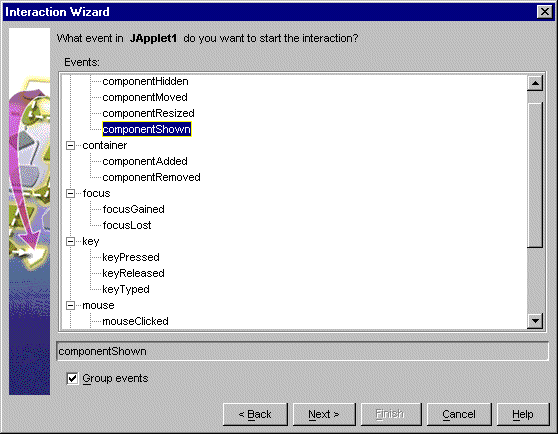
The Interaction Wizard window is displayed as shown in the figure Select ComponentShown Event, with the prompt:
What event in JApplet1 do you want to start the interaction?
Select ComponentShown Event
The Interaction Wizard window is displayed, as shown in the figure Select Logon to the Tuxedo System Action, with the prompt: What do you want to happen when Japplet1 fires componentShown event? Select Logon to the Tuxedo System Action
Completing "Step 1: Wire the JoltSessionBean Logon" enables the logon() method of the JoltSessionBean to be triggered by an applet (for example, ComponentShown) that is sent when the applet is opened for the first time.
Step 2: Wire JoltSessionBean to JoltServiceBean Using PropertyChange
Wire the JoltSessionBean to the JoltServiceBean
The Interaction Wizard window is displayed as shown in the figure Select propertyChange Event, with the prompt:
What event in joltSessionBean1 do you want to start the interaction?
Select propertyChange Event
The Interaction Wizard window is displayed as shown in the figure Select Handle a Jolt property change event..., with the prompt:
What do you want to happen when joltSessionBean1 fires propertyChange event?
Select Handle a Jolt property change event...
The Interaction Wizard window is displayed as shown in the figure Select joltSesssionBean, with the prompt: How do you want to supply the parameter to this method? and a list of available objects and actions from which to choose. Select joltSesssionBean1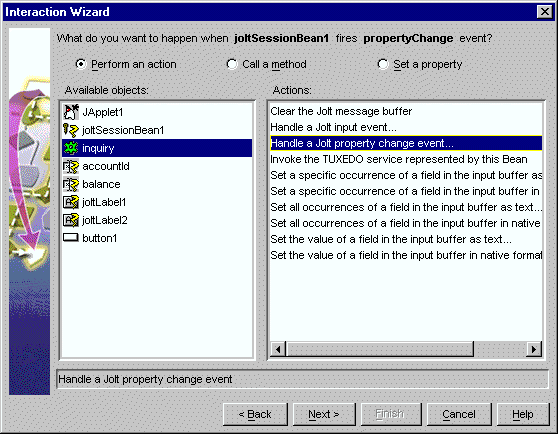
Completing "Step 2: Wire JoltSessionBean to JoltServiceBean Using PropertyChange"enables the JoltSessionBean to send a propertyChange event when logon() completes. The JoltServiceBean listens to this event and associates its service with this session.
Step 3: Wire the accountID JoltTextField as Input to the JoltServiceBean Using JoltInputEvent
The Interaction Wizard window is displayed, as shown in the following figure, with the prompt:
What event in accountId do you want to start the interaction?
Select dataChanged Event
The Interaction Wizard window is displayed as shown in the figure Select inquiry Object and Handle a Jolt input event Action, with the prompt: What do you want to happen when accountId fires dataChanged event? Select inquiry Object and Handle a Jolt input event Action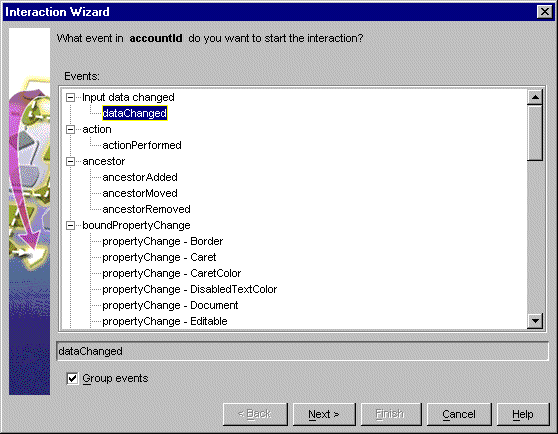
The Interaction Wizard window is displayed as shown in Select accountId Object and Get the current Jolt Input Event Action, with the prompt: How do you want to supply the parameter to this method? and a list of available objects and actions from which to choose. Select accountId Object and Get the current Jolt Input Event Action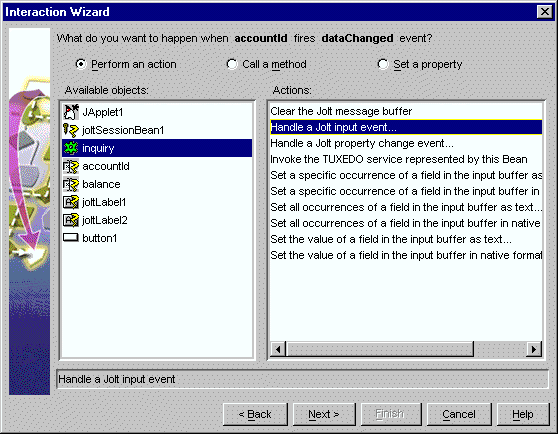
Completing "Step 3: Wire the accountID JoltTextField as Input to the JoltServiceBean Using JoltInputEvent" enables you to type the account number in the first text field. The JoltFieldName property of this JoltTextField is set to "ACCOUNT_ID". Whenever the text inside this text box changes, it sends a JoltInputEvent to the JoltServiceBean. (The JoltServiceBean listens to JoltInputEvents from this text box.) The JoltInputEvent object contains the name, value, and occurrence index of the field.
Step 4: Wire Button to JoltServiceBean Using JoltAction
The Interaction Wizard window is displayed as shown in the following figure, with the prompt:
What event in button1 do you want to start the interaction?
Select action Performed Event
The Interaction Wizard window is displayed, as shown in the figure Select inquiry Object and Invoke the TUXEDO Service... Action, with the prompt: What do you want to happen when button1 fires actionPerformed event? Select inquiry Object and Invoke the TUXEDO Service... Action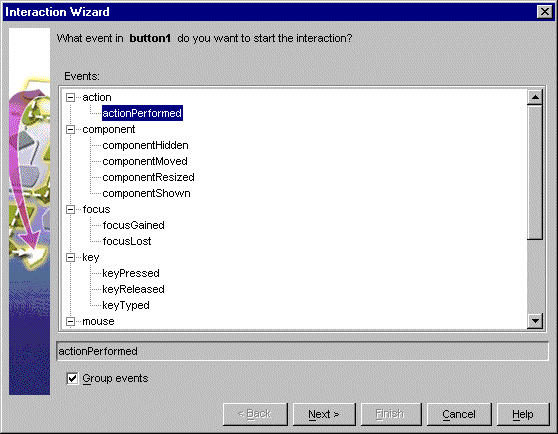
Completing "Step 4: Wire Button to JoltServiceBean Using JoltAction" enables the callService() method of the JoltServiceBean to be triggered by an ActionEvent from the Inquiry button.
Step 5: Wire JoltServiceBean to the Balance JoltTextField Using JoltOutputEvent
The Interaction Wizard is displayed, as shown in the following figure, with the prompt:
What event in inquiry do you want to start the interaction?
Select ServiceReturned Event
The Interaction Wizard window is displayed, as shown in the figure Select balance Object and Handle a service returned event Action, with the prompt: What do you want to happen when inquiry fires serviceReturned event? Select balance Object and Handle a service returned event Action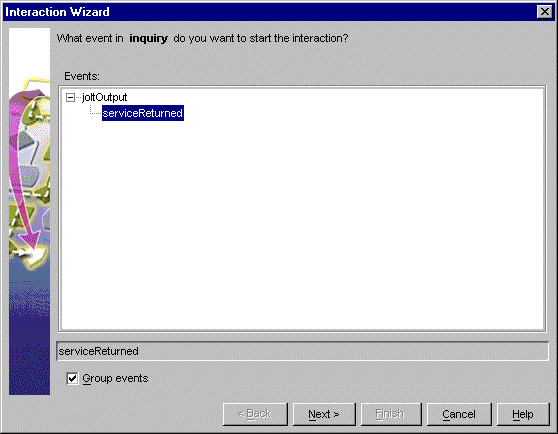
The Interaction Wizard window is displayed, as shown in the figure Select inquiry Object and Get the JoltOutputEvent object Action, with the prompt: How do you want to supply the parameter to this method? Select inquiry Object and Get the JoltOutputEvent object Action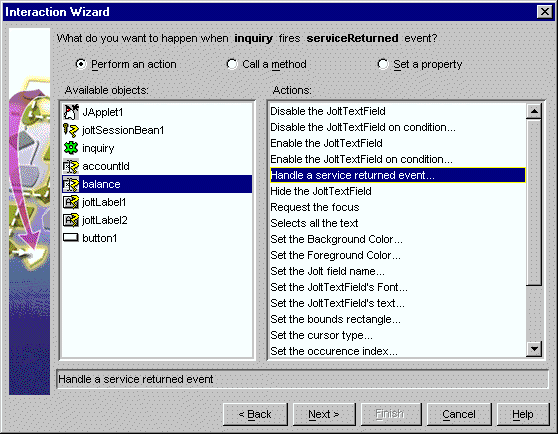
Completing "Step 5: Wire JoltServiceBean to the Balance JoltTextField Using JoltOutputEvent"allows the JoltServiceBean to send a JoltOutputEvent when it receives reply data from the remote service. The JoltOutputEvent object contains methods to access fields in the output buffer. The JoltTextField displays the result of the INQUIRY service.
Step 6: Wire the JoltSessionBean Logoff
The Interaction Wizard is displayed, as shown in the following figure, with the prompt:
What event in JApplet1 do you want to start the interaction?
Select componentHidden Event
The Interaction Wizard window is displayed, as shown in the figure Select joltSessionBean1 Object and Logoff from the Tuxedo System Action, with the prompt: What do you want to happen when JApplet1 fires componentHidden event? Select joltSessionBean1 Object and Logoff from the Tuxedo System Action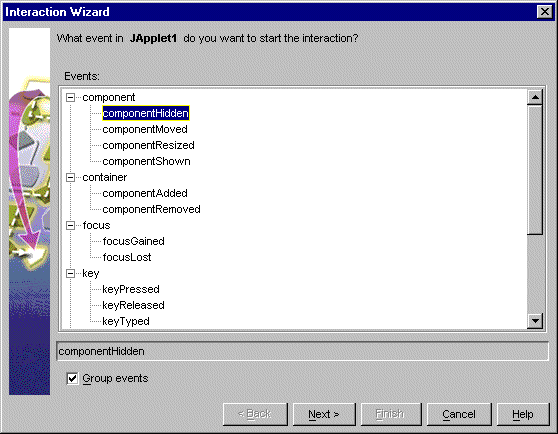
Completing "Step 6: Wire the JoltSessionBean Logoff" enables the logoff() method of the JoltSessionBean to be triggered by an applet (for example, componentHidden) that is sent when the applet gets hidden.
Step 7: Compile the Applet
After wiring the JoltBeans together, compile the applet. It is also recommended that you fill in the empty catch blocks for exceptions. Check the message window for any compilation errors and exceptions.
For additional information see the following section "Using the Jolt Repository and Setting the Property Values." Also refer to the table JoltBean Specific Properties and the figure JoltServiceBean Property Editor.
Running the Sample Application
To run the sample application, you must have the BEA Tuxedo server running. Then enter an account number in the Account ID textfield. You can use any of the account numbers included in the BANKAPP database. Following are two examples of account numbers you can use to test the sample application:

|

|

|
|
|
|
Copyright © 2001 BEA Systems, Inc. All rights reserved.
|